Case 1: Shell Basic Applications
1.1 Question
This case requires familiarity with the features of the Linux Shell environment and focuses on the following:
- Switch user's Shell environment
- Practice command history, command aliases
- Redirect Standard Input/Output/Error Output
- Pipeline Operation Practice
Step 1.2
The following steps are required to implement this case.
Step 1: Switch the user's Shell environment
What is a shell?
Shell is an interpreter program between the Linux kernel and users, usually referred to as bash, responsible for translating and communicating user/program instructions to the kernel, as shown in Figure 1.
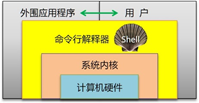
Figure-1
How shell s are used:
- Interactive execution instructions: manual intervention, low efficiency.
- Non-interactive execution of instructions: quiet execution in the background, efficient execution, easy scripting.
If you need to temporarily use another Shell environment, you can execute the corresponding Shell Interpreter Program directly, such as switching to the KSH command line environment as long as you execute ksh.
[root@svr5 ~]# Yum-y install ksh //Install the ksh package first if ksh is missing
.. ..
[root@svr5 ~]# cat /etc/shells
/bin/sh
/bin/bash
/sbin/nologin
/bin/tcsh
/bin/csh
/bin/ksh                                        //Verify that the current system recognizes ksh
[root@svr5 ~]# ksh //Enter ksh Environment
[root@svr5]~# exit //Return to bash environment before switching
If you want to modify a user's login Shell, the administrator can set it directly through the usermod (or useradd) command. For example, the following actions can change user zhangsan's login Shell to/bin/ksh:
[root@svr5 ~]# Usermod-s/bin/ksh Zhangsan //Perform modification
[root@svr5 ~]# grep 'zhangsan' /etc/passwd
zhangsan:x:516:516::/home/zhangsan:/bin/ksh              //Modified
Step 2: Shortcut keys are complemented with Tab keys. Common shortcuts are shown in Table-1
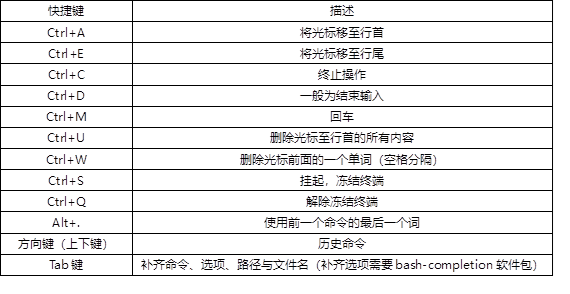
Table-1
Step 3: Practice command history
1) Check the capacity of historical commands.
1000 records by default, valid for all users through the global variable HISTSIZE settings:
[root@svr5 ~]# grep HISTSIZE /etc/profile
HISTSIZE=1000
View the number of historical commands that have been logged for the current user:
[root@svr5 ~]# history | wc -l
1000
2) View the list of historical commands.
List the 10 most recently executed historical commands:
[root@svr5 ~]# history | tail
 1028  grep 'zhangsan' /etc/passwd
 1029  cat /etc/redhat-release
 1030  usermod -s /bin/tcsh zhangsan
 1031  grep 'zhangsan' /etc/passwd
 1032  su - zhangsan
 1033  echo 1234567 | passwd --stdin zhangsan
 1034  su - zhangsan
 1035  grep HISTSIZE /etc/profile
 1036  history | wc -l
 1037  history | tail
3) Call the specified historical command.
Re-execute action 1028 in the list of historical commands:
[root@svr5 ~]# !1028
grep 'zhangsan' /etc/passwd
zhangsan:x:516:516::/home/zhangsan:/bin/bash
Re-execute the last historical command action that started with cat (changed as appropriate):
[root@svr5 ~]# !cat
cat /etc/redhat-release
Red Hat Enterprise Linux Server... ...
Step 4: Practice command aliases
1) View the list of command aliases that have been defined.
Current list of aliases:
[root@svr5 ~]# alias
alias cp='cp -i'
alias l.='ls -d .* --color=tty'
alias ll='ls -l --color=tty'
... ...
Step 4: Redirect Standard Input/Output/Error Output
1) Redirect standard output.
Use > to redirect the normal output of command execution to a file:
[root@svr5 ~]# Ls-ld/etc/ //should normally be output to screen
drwxr-xr-x. 140 root root 8192 8 February 04:45 /etc/
[root@svr5 ~]# Ls-ld/etc/ > stdout. Txt //redirect to file
[root@svr5 ~]# cat stdout.txt //Confirm Redirected Output Results
drwxr-xr-x. 140 root root 8192 8 February 04:45 /etc/
The operation overwrites the target file (empty, write):
[root@svr5 ~]# Echo "I am the king." > Stdout. Txt //Overwrite Target File
[root@svr5 ~]# cat stdout.txt //Confirm results
I am the king.
Use >> instead to achieve the append-oriented output:
[root@svr5 ~]# Ls-ld/etc/ > stdout. Txt //Append Output
[root@svr5 ~]# cat stdout.txt
I am the king.                                          //The original content remains
drwxr-xr-x. 140 root root 8192 8 February 04:45 /etc/
2) Redirection standard error.
For information on command execution errors, use > cannot be saved and will still be output to the screen. For example, you can use the ls command to view two objects simultaneously (where nb.txt does not exist), and redirect the output:
[root@svr5 ~]# ls -l nb.txt /etc/fstab > stderr.txt
 [root@svr5 ~]# cat stderr.txt //Normal information successfully redirected to target file
-rw-r--r--. 1 root root 541 1 May 5, 2017 /etc/fstab
Use 2>to redirect error information, for example, to execute an incorrect command:
[root@svr5 ~]# ls -l nb.txt /etc/fstab 2> stderr.txt
-rw-r--r--. 1 root root 541 1 May 5, 2017 /etc/fstab
//Correct information is output to screen by default, error information is redirected to target file
[root@svr5 ~]# cat stderr.txt //View error information from file
ls: nb.txt: No file or directory
Similarly, 2 >> achieves additional output:
[root@svr5 ~]# ls tmpfile 2>> stderr.txt
[root@svr5 ~]# cat stderr.txt
ls: nb.txt: No file or directory
ls: tmpfile: No file or directory
If you want to redirect normal and error output to the same file, use &>:
[root@svr5 ~]# ls -l nb.txt /etc/fstab &> stderr.txt
[root@svr5 ~]# cat stderr.txt
ls: nb.txt: No file or directory
-rw-r--r--. 1 root root 541 1 May 5, 2017 /etc/fstab
3) Redirect standard input.
[root@svr5 ~]# mail -s Error root < /etc/passwd
4) Cases
[root@svr5 ~]# cat  /root/test.sh
#!/bin/bash
for  i   in   {1..10}
do
            useradd  user$i  2>>/root/user.log
            echo  '123456' | passwd  --stdin  user$i  >/dev/null
done
Step 5: Pipeline Operation Practice
With the pipe character'|', the standard output of one command can be handled by another command, and multiple pipes can be used in turn from one command line.
1) Statistics/etc/quantities of data in the catalogue.
[root@svr5 ~]# ls -l /etc | wc -l
254
2) List packages with cluster in the name of the Yum library.
[root@svr5 ~]# yum list | grep cluster
cluster-cim.x86_64                 0.12.1-7.el5     RHEL5-Cluster
cluster-snmp.x86_64                 0.12.1-7.el5     RHEL5-Cluster
... ...
2. Design of simple Shell scripts
2.1 Question
This case requires three scripts to achieve the following goals:
- Output a text "Hello World" on the screen
- Ability to quickly match Yum warehouse for this machine
- Ability to quickly assemble vsftpd services for this machine
2.2 Program
A canonical Shell script consists of:
- Script declarations (required interpreters, author information, etc.)
- Note information (steps, ideas, uses, variable meanings, etc.)
- Executable statement (operation code)
2.3 Steps
The following steps are required to implement this case.
Step 1: Write the first Shell script to output "Hello World"
1) Write script files based on manual task operations
[root@svr5 ~]# vim  /root/first.sh
#!/bin/bash
echo  'Hello World'
exit
[root@svr5 ~]# Chmod +x/root/first. SH //Add Executable Rights
2) Execute scripts to test results
[root@svr5 ~]# /root/first.sh
Hello World
3) How the Shell script is executed:
Method 1, as a "command word": Specify the path to the script file, provided that you have x privileges
[root@svr5 ~]# . / first.sh //Specify relative path
[root@svr5 ~]# /root/first.sh //Specify absolute path
Method 2, as a parameter: use bash, sh, source to load the script file
[root@svr5 ~]# Bash first. SH //Open subprocess
[root@svr5 ~]# SH first. SH //Open subprocess
[root@svr5 ~]# source first.sh //Do not open subprocesses
Step 2: Write a Shell script to quickly allocate the Yum repository for your machine
1) The reference for the Yum warehouse configuration file is as follows:
[root@svr5 ~]# cat /etc/yum.repos.d/rhel.repo
[rhel]
name=redhat
baseurl=file:///misc/cd //yum source is different, can not copy directly!!!
enabled=1
gpgcheck=0
2) According to the contents of the reference file, write the following script:
[root@svr5 ~]# vim  /root/yum.sh
#!/bin/bash
rm  -rf  /etc/yum.repos.d/*.repo
echo  '[rhel]
name=redhat
baseurl=file:///misc/cd
gpgcheck=0
'  > /etc/yum.repos.d/rhel.repo
[root@svr5 ~]# Chmod +x/root/yum. SH //Add Executable Rights
3) Execute scripts and test results
Execute the script to configure the Yum repository:
[root@svr5 ~]# /root/yum.sh
Check configuration results:
[root@svr5 ~]# Ls/etc/yum. Repos. D/* //Warehouse configuration established
/etc/yum.repos.d/rhel.repo
[root@svr5 ~]# Yum repolist //Yum repository available
rhel-packages                              | 3.9 kB     00:00 ...
rhel-packages/primary_db                  | 3.1 MB     00:00 ...
repo id                repo name                       status
rhel                     redhat                         3,690
repolist: 3,690
Step 3: Write a Shell script to quickly assemble the vsftpd service
1) Write a reference script file as follows:
[root@svr5 ~]# vim  /root/ftpon.sh
#!/bin/bash
yum  -y  install  vsftpd  &> /dev/null
systemctl  start  vsftpd
systemctl  enable  vsftpd
cp /etc/hosts /var/ftp/pub
#Copy a file and place it in the FTP shared directory
[root@svr5 ~]# Chmod +x/root/ftpon. SH //Add Executable Rights
3) Execute scripts and test results
Execute a script to quickly assemble the vsftpd service:
[root@svr5 ~]# /root/ftpon.sh
Confirm script execution results:
[root@svr5 ~]# rpm -q vsftpd
vsftpd-3.0.2-10.el7.x86_64
[root@svr5 ~]# systemctl  status  vsftpd
3. Use Shell variables
3.1 Question
This case requires familiarity with the use of Shell variables, mainly by practicing or verifying the following:
- Define/assign/view variables
- Application of environment/predefined/location variables
In addition to learning to create and reference variables, you also need to know the environment variables PWD, USER, HOME, SHELL, as well as predefined variables $0, $$, $?, $#, $*. And the role of position variables $1, $2, $10,....
3.2 Steps
The following steps are required to implement this case.
Step 1: Definition/Assignment/View of Variables
1) New/Assignment Variables
Create a new variable test, assign "hello world", and check the variable settings with the set command:
[root@svr5 ~]# test=11
2) View variables
Variable values can be output by echo $variable name:
[root@svr5 ~]# echo $test
11
When viewing variables, if the variable name is concatenated with the string to be output later, the variable name should be enclosed in {} to distinguish:
[root@svr5 ~]# echo $testRMB //Unrecognized variable name test
[root@svr5 ~]# echo ${test}RMB // distinguishable
11RMB
3) Undo custom variables
To undo an existing variable, use the unset command:
[root@svr5 ~]# unset test //undo variable test
[root@svr5 ~]# echo $test // No results at view
Step 2: Using environment variables
1) View environment variable related files
The global file is/etc/profile, valid for all users; The user file is ~/. bash_profile, valid only for the specified user.
View/etc/profile file contents:
[root@svr5 ~]# cat /etc/profile
.. ..
HOSTNAME=`/bin/hostname`
HISTSIZE=1000
.. ..
export PATH USER LOGNAME MAIL HOSTNAME HISTSIZE INPUTRC
.. ..
2) Use environment variables
The current user's environment variable USER records the user name, HOME records the host directory, SHELL records the login shell, HOSTNAME records the host name, UID is the user's id number:
[root@svr5 ~]# echo $USER $HOME $SHELL $UID
root /root /bin/bash 0
[root@svr5 ~]# echo $HOSTNAME
svr5
The environment variable PS1 represents the first-level prompt for the Shell environment, that is, the command-line prompt (\u ser name, \h host name, \W working directory, $permission identifier):
[root@svr5 src]# echo $PS1 // View default Tips Level 1
[\u@\h \W]\$
[root@svr5 src]#PS1='hehe#'//Modify Level 1 Tips
hehe#                                      //Change results
hehe# PS1='[\u@\h \W]$'//Restore original settings
[root@svr5 src]#
The environment variable PS2 represents a secondary prompt, which occurs in forced line breaks, at task editing, and so on:
[root@svr5 ~]# echo $PS2 // View the default secondary prompt
>
[root@svr5 src]# cd \//Force line breaks to observe prompt effect
> /root/
[root@svr5 ~]# PS2='=>'//Manually modify secondary prompts
[root@svr5 ~]# cd \//Verify prompt effect again
=> ~
[root@svr5 ~]# PS2='>'//Restore original settings
3) View system variables
Use env to view all environment variables:
[root@svr5 src]# env
HOSTNAME=svr5.tarena.com
SHELL=/bin/bash
HISTSIZE=1000
SSH_CLIENT=192.168.4.110 59026 22
OLDPWD=/root
SSH_TTY=/dev/pts/0
USER=root
.. ..
Use set to view all variables (including environment variables that env can see):
[root@svr5 src]# set
BASH=/bin/bash
BASH_ARGC=()
BASH_ARGV=()
BASH_LINENO=()
.. ..
Step 3: Use positional and predefined variables
1) Create a test script to show.
[root@svr5 ~]# vim location.sh
#!/bin/bash
echo $0                                        //Name of the script
echo $1                                        //First parameter
echo $2                                        //Second parameter
echo $*                                        //All parameters
echo $#                                        //All Integration
echo $$                                        //Process number of current process
echo $?                                        //Return status code of previous program
[root@svr5 ~]# chmod +x location.sh //Add Executable Rights
2) Execute script location.sh, observe the results carefully (wise martial arts require careful insight).
[root@svr5 ~]# ./location.sh one 1 2 abc qq 8 7
Step 4: Create an account and change the password script
1) Write scripts.
[root@svr5 ~]# vim /root/user.sh
#!/bin/bash
useradd $1
echo "$2" |passwd --stdin $1
Execute script tests:
[root@svr5 ~]# ./user.sh jerry  123456
 Change User jerry Password.
passwd:  All authentication tokens have been successfully updated.
4. Extended application of variables
4.1 Question
This case requires further familiarity with the assignment control of Shell variables. Practice or verify the following:
- The Effect of Three Quotes on Assignment
- Use the read command to read variable values from the keyboard
- Publishing global variables using export
4.2 Steps
The following steps are required to implement this case.
Step 1: The effect of three quotation marks on variable assignment
1) Application of Double Quotes
Double quotation marks define a complete string.
[root@svr5 ~]# xx=Tarena IT Group
-bash: IT: command not found                      //Assignment failed when not defined
[root@svr5 ~]# xx="Tarena IT Group"//Defined Success
[root@svr5 ~]# touch aa bb //Two files were created
[root@svr5 ~]# touch "aa bb" //created a file
[root@svr5 ~]# ls //View results
2) Application of single quotation marks
Defines a complete string and masks special symbols.
[root@svr5 ~]# test=11
[root@svr5 ~]# echo "$test"
[root@svr5 ~]# echo '$test'
3) Application of apostrophe or $()
When using an apostrophe or $(), the standard output of command execution can be stored as a string and is therefore called command substitution.
[root@svr5 ~]# tar -czf log-`date +%Y%m%d`.tar.gz /var/log
Step 2: Use the read command to read variable values from the keyboard
1) read Basic Usage
After execution, it waits for and accepts user input (in the absence of any hints) and assigns it to the variable str:
[root@svr5 ~]# read str
What's happen ?                          //Enter some text and press Enter to submit
[root@svr5 ~]# echo $str //View assignment results
What's happen ?
To keep users from getting confused and confused, the recommended practice is to give a friendly hint with the -p option:
[root@svr5 ~]# Read-p "Please enter an integer:" i
 Please enter an integer: 240
[root@svr5 ~]# echo $i
240
2) stty terminal display control
Turn off echo (stty-echo),
The echo function will be restored (stty echo).
You can create a test script with the following actions:
[root@svr5 ~]# vim user.sh //Create a test script
#!/bin/bash
read -p "enter one user name:"  username              //Read User Name
stty -echo                                  //Turn off echo
read -p "Please input a password:"  passwd              //Read Password
stty echo                                  //Recovery Echo
echo ""                                      //Complete an empty line after echo recovery
useradd "$username"
echo "$passwd" | passwd --stdin "$username"
[root@svr5 ~]# chmod +x user.sh //Add Execution Rights
Execute the test script user.sh, verify the effect:
[root@svr5 ~]# ./user.sh
 enter one user name:  root                          //Enter root, return
 Please input a password:                                   //Enter 1234567 (not shown), Enter
Step 3: Publish global variables using export
By default, a custom variable is a local variable that is valid only in the current Shell environment and cannot be used directly in a child Shell environment. For example, a defined SCHOOL variable will be in an undefined state when it enters the sh or bash subshell:
[root@svr5 ~]# yy="Tarena IT Group"
[root@svr5 ~]# echo $yy
Tarena IT Group
[root@svr5 ~]# Bash //Open bash subprocess
[root@svr5 ~]# echo $yy //View SCHOOL variable value no result
[root@svr5 ~]# exit // Return to the original Shell environment
exit
[root@svr5 ~]# echo $yy
If you want the variable you define to be used by a child process, you can publish it as a global variable using the export command. When publishing with export, you only need to specify the variable name (which can be multiple), or you can set new global variables directly through the export command:
[root@svr5 ~]# export yy //Publish defined variables
[root@svr5 ~]# export XX="1234"//Publish a new variable
Verify the global variables just published:
[root@svr5 ~]# Bash //Enter bash child Shell environment
[root@svr5 ~]# echo $yy // View global variable values....
Tarena IT Group
[root@svr5 ~]# echo $XX
1234
5. Numeric operations in Shell
5.1 Question
This case requires familiarity with the features of the Linux Shell environment and focuses on the following:
- Use integer operation tools such as expr, $[], let: define the variable X=1234, and then calculate the four operations of X and 78 and the results of the modulus
- Use bc to perform decimal operations: interactively calculate the results of the four operations of 12.34 and 56.78, and then repeat the above calculations non-interactively, displaying up to four decimal places
5.2 Steps
The following steps are required to implement this case.
Step 1: Integer Operating Tool
1) Use expr command
Multiplication operations should be * escaped to avoid being used as Shell wildcards; The integer values involved in the operation need to be separated from the operator by a space, and variables must be referenced with a $sign.
First, the variable X=1234 is defined, and then the results of addition, subtraction, multiplication, division and modulus operations with 78 are calculated respectively:
[root@svr5 ~]# X=1234//Define variable X
[root@svr5 ~]# Expr $X + 78 //addition
1312
[root@svr5 ~]# Expr $X - 78 //subtraction
1156
[root@svr5 ~]# Expr $X \* 78 //multiplication, operator should add \escape
96252
[root@svr5 ~]# Expr $X / 78 // division, keeping only integer division results
15
[root@svr5 ~]# Expr $X% 78 // modulo
64
2) Use [ ] or [] or [] or (()) expression
Multiplication * There is no escape required and there can be no spaces on either side of the operator; Reference variables can omit the $symbol; The result of the calculation replaces the expression itself, which can be output in conjunction with the echo command.
Similarly, for variable X=1234, the addition, subtraction, multiplication, division and modulus of 78 are calculated:
[root@svr5 ~]# X=1234
[root@svr5 ~]# echo $[X+78]
1312
[root@svr5 ~]# echo $[X-78]
1156
[root@svr5 ~]# echo $[X*78]
96252
[root@svr5 ~]# echo $[X/78]
15
[root@svr5 ~]# echo $[X%78]
64
3) Use let command
expr or $[], $()) operations only do not change the value of the variable; The let command can operate directly on the value of a variable and save the new value. So the variable X=1234, the value changes after the let operation is performed; Also, let operations do not display results, but can be viewed in conjunction with echo commands:
[root@svr5 ~]# X=1234
[root@svr5 ~]# let y=X+22
[root@svr5 ~]# echo $y
1256
[root@svr5 ~]# let X++;  echo $X        # X++(X=X+1)
[root@svr5 ~]# let X--;  echo $X        # X--(X=X-1)
[root@svr5 ~]# let X+=78 ; echo $X        # X+=78(X=X+78)
[root@svr5 ~]# let X-=78 ; echo $X     # X-=78(X=X-78)
[root@svr5 ~]# let X*=78 ; echo $X     # X*=78(X=X*78)
[root@svr5 ~]# let X/=78 ; echo $X     # X/=78(X=X/78)
[root@svr5 ~]# let X%=78 ; echo $X     # X%=78(X=X%78)
Step 2: Decimal Operating Tool
1) bc Interactive Operation
Execute the bc command to enter the interactive environment, then enter the expression that needs to be evaluated. Taking four operations for calculating decimals 12.34 and 5.678 as examples, the relevant operations are as follows:
[root@svr5 ~]# bc
bc 1.06.95
Copyright 1991-1994, 1997, 1998, 2000, 2004, 2006 Free Software Foundation, Inc.
This is free software with ABSOLUTELY NO WARRANTY.
For details type `warranty'.
12.34+56.78                                        //addition
69.12
12.34-56.78                                        //subtraction
-44.44
12.34*56.78                                        //multiplication
700.66
12.34/56.78                                        //division
0
quit                                              //Exit Interactive Calculator
[root@svr5 ~]#
2) bc non-interactive operation
The expression to be evaluated is piped to the bc operation. Note that the length of decimal places can be limited by scale=N, which is also affected by the decimal places of the values participating in the operation. Taking four operations for calculating decimals 12.34 and 5.678 as examples, the relevant operations are as follows:
[root@svr5 ~]# echo 'scale=4;12.34+5.678' | bc
18.018
[root@svr5 ~]# echo 'scale=4;12.34*5.678' | bc
70.0665
[root@svr5 ~]# echo 'scale=4;12.34/5.678' | bc
2.1733
Exercise
1 How do I execute a Shell script that does not have x privileges set?
Choose one of the following three ways:
- sh script file path
- Sorce script file path
- . Script File Path
2 What are the rules for variable names when customizing Shell variables?
- Can include numbers, letters, underscores, not start with numbers
- Variable names are case sensitive
- Don't have spaces on either side of the equal sign when assigning values
- Try not to use keywords or special characters
- When multiple assignments are made to the same variable, the last one takes effect
3 Write a Shell script to report the current user's environment information.
Create a new script file report.sh, which can output the current host name, login user name, and folder path. The effect is as follows:
When user root executes: ```shell [ root@svr5 ~]#/opt/report. Sh
The current hostname is svr5.tarena.com logon user is: root is currently under / root folder
When the average user mike When executing:
shell [mike@svr5 ~]$ /opt/report.sh  The current hostname is: svr5.tarena.com
 Logged in user is: mike Currently in /home/mike Under Folder
[root@svr5 ~]# cat /opt/report.sh
#!/bin/bash
echo "The current hostname is: $HOSTNAME"
echo "Logged in user is: $LOGNAME"
echo "Currently in $PWD Under Folder"
[root@svr5 ~]# chmod +x /opt/report.sh
4 Briefly describe the predefined variables $, $?, $ 0, $#, $*, $! Role.
$$Save the (PID) number of the currently running process
$? Save command execution results (return status)
$0 to save the currently running (process name) or (script name)
$#Number of location variables to hold
$* Save (values) for all location variables
$! Save the PID number of the background (last process)
5 Write a Shell script to add user accounts quickly.
New script file quick_uad.sh, which specifies a new user name as a parameter when executed, can quickly add the corresponding user account and set the user's login password to 123 456. The effect is as follows:
[root@svr5 ~]# . / quick_uad.sh xixi //Add user xixi
 Change User xixi Password.
passwd:  All authentication tokens have been successfully updated.
[root@svr5 ~]# id xixi
uid=525(xixi) gid=525(xixi) group=525(xixi)
[root@svr5 ~]# . / quick_uad.sh haha //Add user haha
 Change User haha Password.
passwd:  All authentication tokens have been successfully updated.
[root@svr5 ~]# id haha
uid=526(haha) gid=526(haha) group=526(haha)
[root@svr5 ~]# vim quick_uad.sh
#!/bin/bash
useradd $1
echo 1234567 | passwd --stdin $1
[root@svr5 ~]# chmod +x quick_uad.sh
6. Briefly describe the characteristics of the three delimiters in variable assignment.
Double quotation mark '': allows expansion to reference other variables with $
Single quotation mark'': Disable extensions, even if $is considered a normal character
Apostrophe: The execution output of a command as a variable value
7 Calculate the disk usage for the root partition, with the percentage accurate to 2 decimal places.
Executing the df command lists the mounted file system usage:
[root@svr5 ~]# df
Filesystem                   1K-blocks    Used Available Use% Mounted on
/dev/mapper/VolGroup-lv_root  51606140 4292504  44692196   9% /
tmpfs                           502204     228    501976   1% /dev/shm
/dev/sda1                       495844   34880    435364   8% /boot
/dev/mapper/VolGroup-lv_home  28455944  586380  26424088   3% /home
.. ..
You can see that the root partition usage is 9%, and the percentage has no decimal places.
When calculating manually, you can get an accurate percentage by dividing the amount of Used columns by the total amount of 1K-block columns by 100. The result involves decimals, so you can use the bc tool.
[root@svr5 ~]# echo 'scale=2;4292504*100/51606140' | bc
8.31
That is, 8.31% of the current root zones are accurately used.
In case of infringement, please contact the author to delete