Mengxin entering the pit (please comment in the comment area if you have any suggestions)
This is the first article I published and the beginning of my entry into society. I firmly believe that as long as I work hard, I will become a big man in the future. (I will often publish some knowledge points and some small java projects in the future)
Online chat room (group chat + single chat)
Reprinted in calf snoring
Original link: https://blog.csdn.net/A__B__C__/article/details/87904470
Want to do the front end of the whole stack
Original link: https://blog.csdn.net/qq_42068550/article/details/92604316
Technology used:
springboot+websocket
The principle can be referred to:
http://www.cnblogs.com/fuqiang88/p/5956363.html
http://www.cnblogs.com/fuqiang88/p/5956363.html
Overall idea:
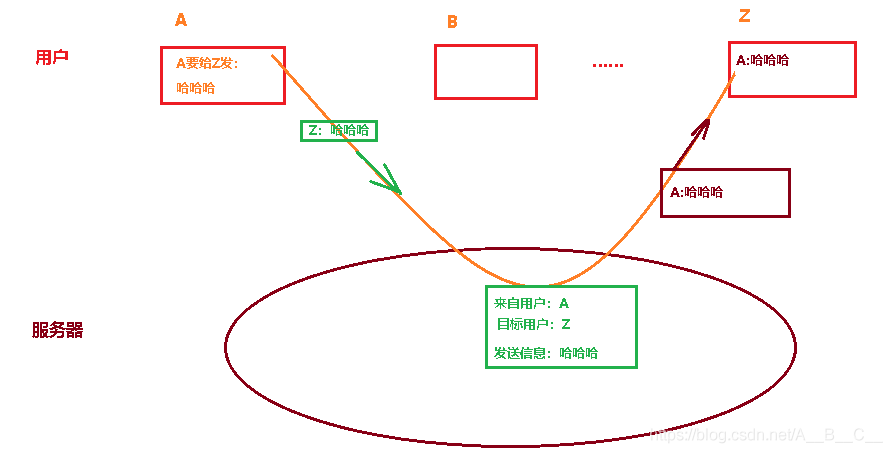
First of all, to realize the chat between two clients, one client does not send it directly to another client, but needs a server
For example, client A and client B are chatting. First, A will send the information to the server. The information is not only the chat information, but also the key information such as who to send to. For example, B:hi ~ this means that A wants to send information to B, and the content is hi ~;
Then, the server will sort out the information, separate the key information (such as the object to chat) from the information A originally sent to B (such as: hi ~) and forward it to the corresponding users, as shown in the following figure:
 Specific code implementation:
1. Import dependency:
// An highlighted block
<!--websocket rely on-->
<dependency>
   <groupId>org.springframework.boot</groupId>
   <artifactId>spring-boot-starter-websocket</artifactId>
</dependency>
2. Inject ServerEndpointExporter:
/**
 * @Auther: zj
 * @Date: 2018/8/16 17:21
 * @Description: Write a WebSocketConfig configuration class and inject the object ServerEndpointExporter,
 *      This bean will automatically register the Websocket endpoint declared with the @ ServerEndpoint annotation
 */
@Configuration
public class WebSocketConfig {
    @Bean
    public ServerEndpointExporter serverEndpointExporter() {
        return new ServerEndpointExporter();
    }
}
3. Specific implementation class of websocket
/**
 * @Auther: zj
 * @Date: 2018/8/16 17:55
 * @Description: websocket Concrete implementation class of
 * The only difference between using springboot and using the @ Component declaration is that the websocket is managed by the container itself,
 * But in spring boot, even containers are managed by spring.
    Although @ Component is in singleton mode by default, springboot will initialize a bean for each websocket connection,
    So you can save it with a static set.
 */
@ServerEndpoint(value = "/websocket")
@Component
public class MyWebSocket {
    //It is used to store the MyWebSocket object corresponding to each client.
    private static CopyOnWriteArraySet<MyWebSocket> webSocketSet = new CopyOnWriteArraySet<MyWebSocket>();
    //The connection session with a client needs to send data to the client through it
    private Session session;
    /**
     * Method successfully called after connection establishment
     */
    @OnOpen
    public void onOpen(Session session) {
        this.session = session;
        webSocketSet.add(this);     //Add to set
        System.out.println("There are new connections to join! The number of people currently online is" + webSocketSet.size());
        this.session.getAsyncRemote().sendText("Congratulations on your successful connection WebSocket-->The number of people currently online is:"+webSocketSet.size());
    }
    /**
     * Method called by connection closure
     */
    @OnClose
    public void onClose() {
        webSocketSet.remove(this);  //Delete from set
        System.out.println("One connection is closed! The number of people currently online is" + webSocketSet.size());
    }
    /**
     * Method of calling after receiving client message
     *
     * @param message Messages sent by clients*/
    @OnMessage
    public void onMessage(String message, Session session) {
        System.out.println("Messages from clients:" + message);
        //Mass messaging
        broadcast(message);
    }
    /**
     * Called when an error occurs
     *
     */
    @OnError
    public void onError(Session session, Throwable error) {
        System.out.println("An error occurred");
        error.printStackTrace();
    }
    /**
     * Mass customization message
     * */
    public  void broadcast(String message){
        for (MyWebSocket item : webSocketSet) {
            //Synchronous asynchronous description reference: http://blog.csdn.net/who_is_xiaoming/article/details/53287691
            //this.session.getBasicRemote().sendText(message);
            item.session.getAsyncRemote().sendText(message);//Send messages asynchronously
        }
    }
}
4. Write the client websockettest HTML (put it in the static directory)
<!DOCTYPE HTML>
<html>
<head>
    <meta charset="UTF-8">
    <title>My WebSocket</title>
    <style>
        #message{
            margin-top:40px;
            border:1px solid gray;
            padding:20px;
        }
    </style>
</head>
<body>
<button onclick="conectWebSocket()">connect WebSocket</button>
<button onclick="closeWebSocket()">Disconnect</button>
<hr />
<br />
Message:<input id="text" type="text" />
<button onclick="send()">send message</button>
<div id="message"></div>
</body>
<script type="text/javascript">
    var websocket = null;
    function conectWebSocket(){
        //Judge whether the current browser supports WebSocket
        if ('WebSocket'in window) {
            websocket = new WebSocket("ws://localhost:8080/websocket");
        } else {
            alert('Not support websocket')
        }
        //Callback method with connection error
        websocket.onerror = function() {
            setMessageInnerHTML("error");
        };
        //Callback method for successful connection establishment
        websocket.onopen = function(event) {
            setMessageInnerHTML("Loc MSG: The connection was established successfully");
        }
        //Callback method for receiving message
        websocket.onmessage = function(event) {
            setMessageInnerHTML(event.data);
        }
        //Callback method for connection closure
        websocket.onclose = function() {
            setMessageInnerHTML("Loc MSG:Close connection");
        }
        //Listen for window closing events. When the window is closed, take the initiative to close the websocket connection to prevent closing the window before the connection is disconnected, and the server side will throw exceptions.
        window.onbeforeunload = function() {
            websocket.close();
        }
    }
    //Display messages on Web pages
    function setMessageInnerHTML(innerHTML) {
        document.getElementById('message').innerHTML += innerHTML + '<br/>';
    }
    //Close connection
    function closeWebSocket() {
        websocket.close();
    }
    //send message
    function send() {
        var message = document.getElementById('text').value;
        websocket.send(message);
    }
</script>
</html>
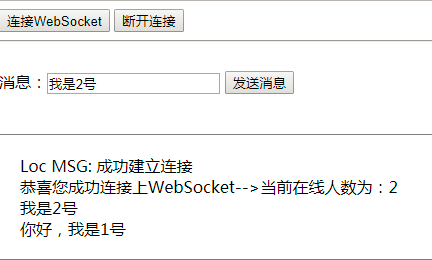
5. Testing
Click Connect to WebSocket, and then you can send a message.
(3) Open another browser or directly open a TAB to access the address:
http://127.0.0.1:8080/webSocketTest.html
(4) Click Connect to WebSocket, and then you can send a message.
(5) Observe the information printing on both sides to see if the message can be received.
reference resources: http://412887952-qq-com.iteye.com/blog/2404851
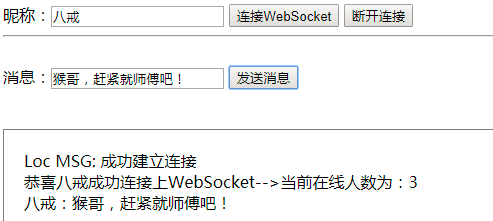
6.1 group chat + nickname
The group chat function is available in the previous part, but there is a problem, that is, it is unable to display who sent the message, which will make the message messy and unreadable. Let's solve this problem
6.2 effect display:
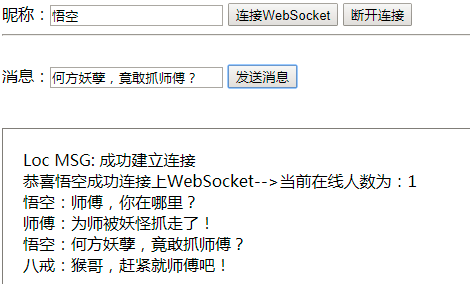
Master Long's message:
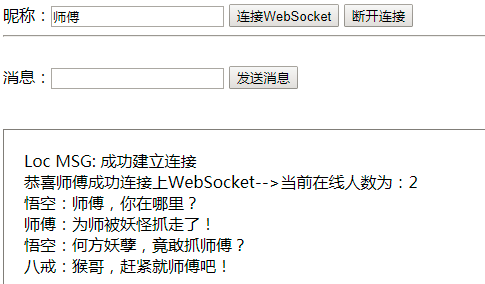
Long Bajie message:
Code modification
1. When connecting, let the user enter a nickname
Here are some inline snippets.
    input type="text" id="nickname"/>
    <button onclick="conectWebSocket()">connect WebSocket</button>
2. Verification before connection
    var nickname = document.getElementById("nickname").value;
    if(nickname===""){
        alert("Please enter a nickname");
        return;
    }
3. Nickname display method
First, modify the connection method of the client:
Js code
websocket = new WebSocket("ws://localhost:8080/websocket/"+nickname);
Java code
- @ServerEndpoint(value = "/websocket/{nickname}")
- @Component
- public class MyWebSocket {}
Get parameters from the server:
This can be obtained in each method. Use@PathParam("nickname") String nickname,For example, when connecting:
Modify MyWebSocket:
add to:
private String nickname;
/**
 * Method successfully called after connection establishment
 */
@OnOpen
public void onOpen(Session session,@PathParam("nickname") String nickname) {
    this.session = session;
    this.nickname=nickname;
    webSocketSet.add(this);     //Add to set
    System.out.println("New connection added:"+nickname+",The number of people currently online is" + webSocketSet.size());
    this.session.getAsyncRemote().sendText("Congratulations on your successful connection WebSocket-->The number of people currently online is:"+webSocketSet.size());
/**
 * Method of calling after receiving client message
 *
 * @param message Messages sent by clients*/
@OnMessage
public void onMessage(String message, Session session,@PathParam("nickname") String nickname) {
    System.out.println("Messages from clients-->"+nickname+": " + message);
    //Mass messaging
    broadcast(nickname+": "+message);
}
Test:
As shown in the effect drawing
reference resources: http://412887952-qq-com.iteye.com/blog/2404898
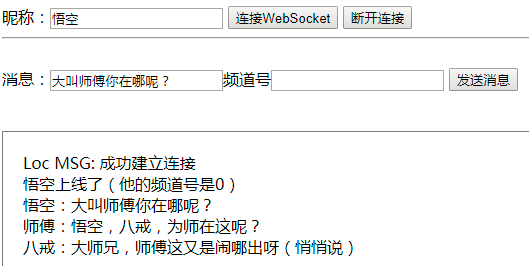
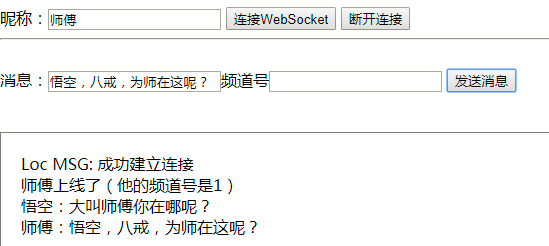
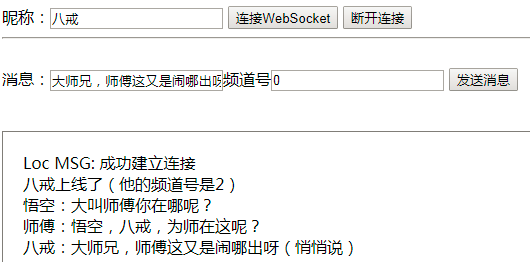
Single chat:
1. Create message object socketMsg
package jit.hf.agriculture.vo;
/**
 * @Auther: zj
 * @Date: 2018/8/16 23:29
- @Description: Here we can't use simple text messages to send messages. We use json to send messages.
- Therefore, you need to create a message object first, which contains the message sender, message receiver, message type (single chat or group chat), or message, as follows:
 public class SocketMsg {
    private int type;   //Chat type 0: group chat, 1: single chat
    private String fromUser;//Sender
    private String toUser;//Recipient
    private String msg;//news
    public int getType() {
        return type;
    }
    public void setType(int type) {
        this.type = type;
    }
    public String getFromUser() {
        return fromUser;
    }
    public void setFromUser(String fromUser) {
        this.fromUser = fromUser;
    }
    public String getToUser() {
        return toUser;
    }
    public void setToUser(String toUser) {
        this.toUser = toUser;
    }
    public String getMsg() {
        return msg;
    }
    public void setMsg(String msg) {
        this.msg = msg;
    }
}
2. Adjust the method of establishing connection (MyWebSocket)
Here, we mainly use a map object to save the relationship between the channel number and the previous session. Then we can obtain the session through the channel number, and then use the session to send messages.
    //It is used to record the sessionId and bind the session
    private static Map<String,Session> map = new HashMap<String, Session>();
3. Modify the connection method onOpen (MyWebSocket):
/**
 * Method successfully called after connection establishment
 */
@OnOpen
public void onOpen(Session session,@PathParam("nickname") String nickname) {
    this.session = session;
    this.nickname=nickname;

    map.put(session.getId(), session);

    webSocketSet.add(this);     //Add to set
    System.out.println("New connection added:"+nickname+",The number of people currently online is" + webSocketSet.size());
    this.session.getAsyncRemote().sendText("congratulations"+nickname+"Successfully connected WebSocket(Its channel number:"+session.getId()+")-->The number of people currently online is:"+webSocketSet.size());
}
4. Modify the message sending method onMessage (MyWebSocket):
/**
     * Method of calling after receiving client message
     *
     * @param message Messages sent by clients*/
    @OnMessage
    public void onMessage(String message, Session session,@PathParam("nickname") String nickname) {
        System.out.println("Messages from clients-->"+nickname+": " + message);

        //The data transmitted from the client is json data, so jackson is used to convert it into SocketMsg object,
        // Then judge whether it is a single chat or a group chat through the type of socketMsg, and carry out corresponding processing:
        ObjectMapper objectMapper = new ObjectMapper();
        SocketMsg socketMsg;

        try {
            socketMsg = objectMapper.readValue(message, SocketMsg.class);
            if(socketMsg.getType() == 1){
                //Just talk Need to find sender and receiver

                socketMsg.setFromUser(session.getId());//Sender
                Session fromSession = map.get(socketMsg.getFromUser());
                Session toSession = map.get(socketMsg.getToUser());
                //Send to recipient
                if(toSession != null){
                    //Send to sender
                    fromSession.getAsyncRemote().sendText(nickname+": "+socketMsg.getMsg());
                    toSession.getAsyncRemote().sendText(nickname+": "+socketMsg.getMsg());
                }else{
                    //Send to sender
                    fromSession.getAsyncRemote().sendText("System message: the other party is not online or the channel number you entered is incorrect");
                }
            }else{
                //Mass messaging
                broadcast(nickname+": "+socketMsg.getMsg);
            }

        } catch (JsonParseException e) {
            e.printStackTrace();
        } catch (JsonMappingException e) {
            e.printStackTrace();
        } catch (IOException e) {
            e.printStackTrace();
        }


//        //Mass messaging
//        broadcast(nickname+": "+message);
    }
5. Client adjustment
    Message:<input id="text" type="text" />
    Channel number:<input id="toUser" type="text" />
    <button onclick="send()">send message</button>
    //send message
function send() {
    //Get the input text information and send it
    var message = document.getElementById('text').value;
    var toUser = document.getElementById('toUser').value;
    var socketMsg = {msg:message,toUser:toUser};
    if(toUser == ''){
        //Group chat
        socketMsg.type = 0;
    }else{
        //Just talk
        socketMsg.type = 1;
    }
    websocket.send(JSON.stringify(socketMsg));
}
6. Testing
As expected
Long Wukong message:
Master Long's message:
Long Bajie message:
After reading this article, do you think websocket protocol is so troublesome? In fact, we can use its sub protocol STOMP to realize all the functions of this article. Because it has been encapsulated well, it is very simple to use. Of course, it is good for us to understand how to realize the underlying web socket
reference resources:
http://412887952-qq-com.iteye.com/blog/2405514
Slider verification (simple version)
Slider verification code is also common in life. This paper will introduce how to implement it and its principle. If you are interested in picture verification code, you can check this article: Implementation method of picture verification code

realization
The slider verification code mainly uses several attributes: clientx, screenx, pagex and offsetx. If you have doubts about this, you can check this article: the differences between clientx, screenx, pagex and offsetx
<!DOCTYPE html>
<html lang="en">
<head>
<meta charset="UTF-8">
<meta name="viewport" content="width=device-width, initial-scale=1.0">
<meta http-equiv="X-UA-Compatible" content="ie=edge">
<title>Slider verification code</title>
<style>
* {
margin: 0px;
padding: 0px;
font-family: "Microsoft YaHei ";
}
.drag {
width: 300px;
height: 40px;
line-height: 40px;
background-color: #e8e8e8;
position: relative;
margin: 0 auto;
}
.bg {
width: 40px;
height: 100%;
position: absolute;
background-color: #75CDF9;
}
.text {
position: absolute;
width: 100%;
height: 100%;
text-align: center;
user-select: none;
}
.btn {
width: 40px;
height: 38px;
position: absolute;
border: 1px solid #ccc;
cursor: move;
font-family: "Song style";
text-align: center;
background-color: #fff;
user-select: none;
color: #666;
}
</style>
</head>
<body>
<div class="drag">
<div class="bg"></div>
<div class="text" onselectstart="return false">Please drag the slider to unlock</div>
<div class="btn">>></div>
</div>
<script>
//1, Define a method to get DOM elements
var $ = function (selector) {
return document.querySelector(selector);
},
box = $(".drag"),//container
bg = $(".bg"),//background
text = $(".text"),//written words
btn = $(".btn"),//slider
success = false,//Whether it passes the verification
distance = box.offsetWidth - btn.offsetWidth;//Width (distance) of successful sliding
//2, Register mouse press events for sliders
btn.onmousedown = function (e) {
//1. The transition attribute set later must be cleared before pressing the mouse
btn.style.transition = "";
bg.style.transition = "";
//Note: the clientX event property will return the horizontal coordinates of the mouse pointer to the browser page (or client area) when the event is triggered.
//2. When the slider is in the initial position, get the horizontal position when the mouse is pressed
var e = e || window.event;
var downX = e.clientX;
//3, Register mouse movement events for documents
document.onmousemove = function (e) {
var e = e || window.event;//It is for better compatibility with IE browser and non IE browser. In IE browser, window Event is a global variable. In non ie, you need to pass in a parameter to get event, so there is var e = e|window event
//1. Obtain the horizontal position after the mouse is moved
var moveX = e.clientX;
//2. Get the offset of the horizontal position of the mouse (position when the mouse moves - position when the mouse is pressed)
var offsetX = moveX - downX;
//3. Judge here: the relationship between the horizontal moving distance of the mouse and the successful sliding distance
if (offsetX > distance) {
offsetX = distance;//If you slip past the end, stop it at the end
} else if (offsetX < 0) {
offsetX = 0;//If you slide to the left of the starting point, reset it to the starting point position
}
//4. Dynamically set the offset of the slider and the width of the background color according to the distance the mouse moves
btn.style.left = offsetX + "px";
bg.style.width = offsetX + "px";
//If the horizontal movement distance of the mouse = the width of successful sliding
if (offsetX == distance) {
//1. Set the style after successful sliding
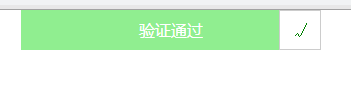
text.innerHTML = "Verification passed";
text.style.color = "#fff";
btn.innerHTML = "√";
btn.style.color = "green";
bg.style.backgroundColor = "lightgreen";
//2. Set the status after successful sliding
success = true;
//After success, clear the mouse press event and move event (because the move does not involve the mouse release event)
btn.onmousedown = null;
document.onmousemove = null;
//3. Callback function after successful unlocking
setTimeout(function () {
alert('Unlock succeeded!');
}, 100);
}
}
//4, Register the mouse release event for the document
document.onmouseup = function (e) {
//If the mouse is released and slides to the end point, the verification passes
if (success) {
return;
} else {
//Otherwise, reset the slider (set the attribute transition effect of 1s)
btn.style.left = 0;
bg.style.width = 0;
btn.style.transition = "left 1s ease";
bg.style.transition = "width 1s ease";
}
//As long as the mouse is released, it means that there is no need to drag the slider at this time, then the mouse movement and release events will be cleared.
document.onmousemove = null;
document.onmouseup = null;
}
}
</script>
</body>
</html>
design sketch:
Baidu online disk link:
https://pan.baidu.com/s/1RIxfb1YtZ8MBNKWpLx40fg
Extract password: asvg
There is a more complete slider verification in the online chat room, and there is a simple foreground slider verification separated.