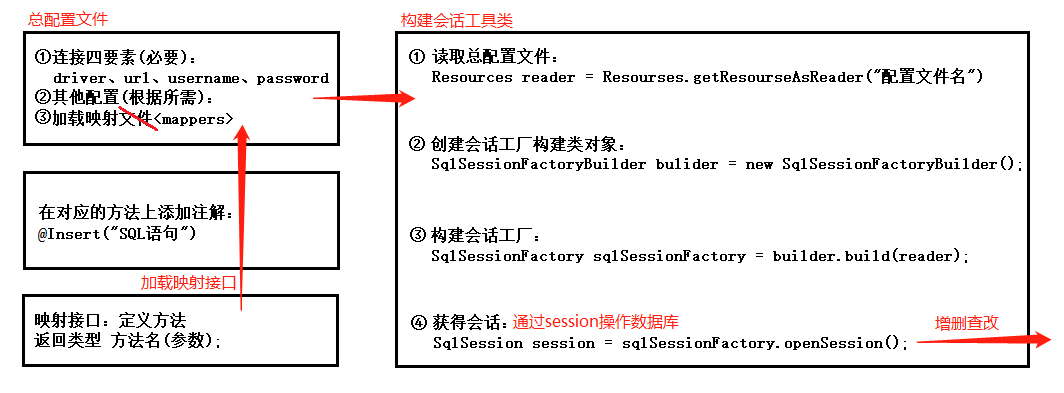
1. Configuration process
1. Process diagrams (implemented through XML mapping files):
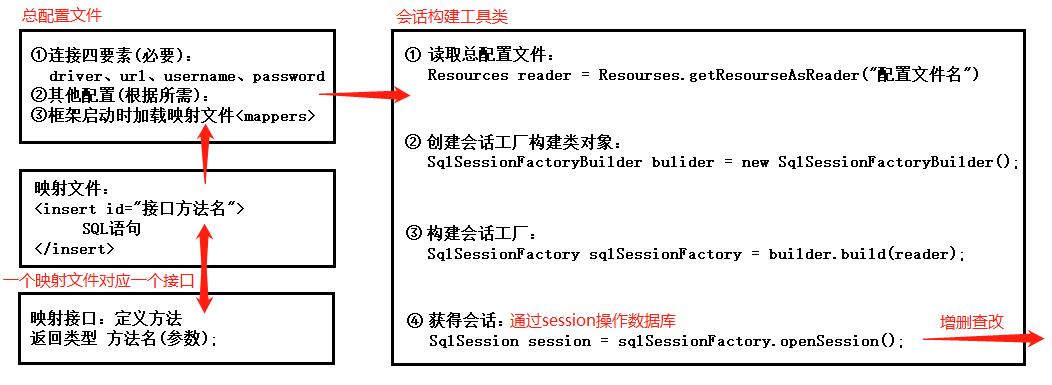
2. Process:
2.1 Import package:
2.1.1 Download Package
Database Driven Package (this article takes MySQL as an example): https://mvnrepository.com/artifact/mysql/mysql-connector-java
Mybatis Framework Package: https://mvnrepository.com/artifact/org.mybatis/mybatis

2.1.2 Importer
Put the jar package in a new folder created by the program

Select the jar package and right-click Build Path->Add to Build Path. As a result, the jar package is loaded in the process as shown in the figure

2.2 Add Rule File
Location of rule file: 1\mybatis-3.4.1\org\apache\ibatis\builder\xml
(2) Open the Mybatis Framework folder downloaded above and look for dtd

Key of the rule file: Ctrl+F finds public in the official document:


Select Window->Preferences
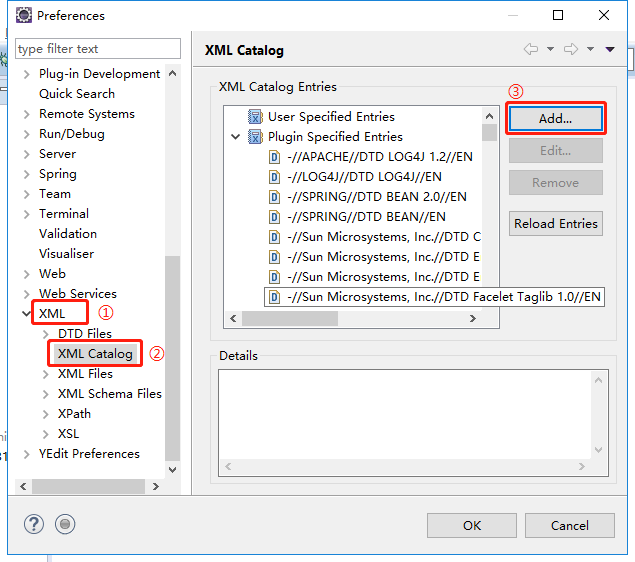
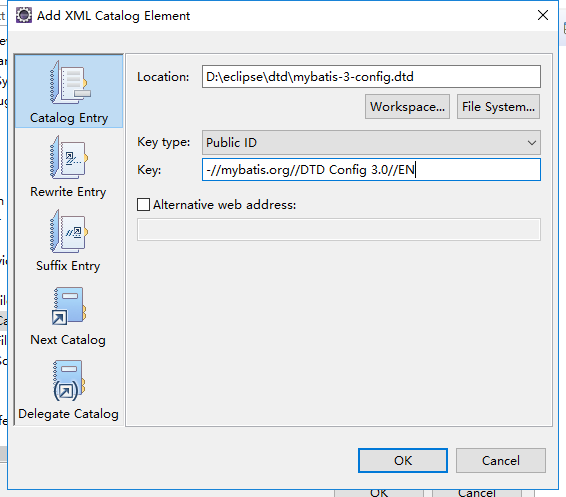
Click OK, repeat the above operation, and finish adding the Mapper rule file.
2.3. Write configuration files
2.3.1 Create an XML file
Create an XML file under the src file, fill in the file named MybatisConfig.xml, and Next:

Select the DTD file and Next,
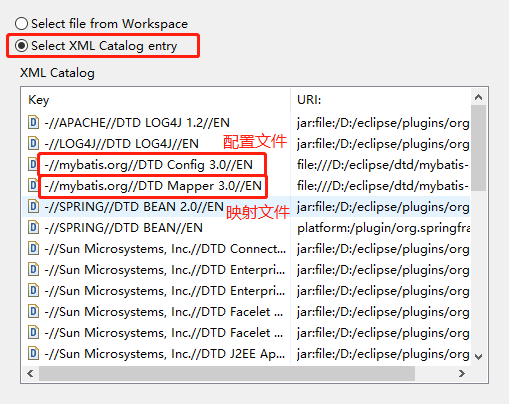
Select Create Profile and Next->FInish to create successfully.
2.3.2 Writing Files

 1 <?xml version="1.0" encoding="UTF-8"?>
 2 <!DOCTYPE configuration PUBLIC "-//mybatis.org//DTD Config 3.0//EN" "mybatis-3-config.dtd" >
 3 <configuration>
 4 <!--The environments tag is used to configure database connection information and can configure connection information for multiple databases
 5 default property: Multiple database connection environments can be configured in the environment set, but the default environment must be specified, which is the ID of the environment label
 6     -->
 7     <environments default="sms">
 8 <!-- Environment label, information for configuring a database connection-->
 9         <environment id="sms">
10 <!--Specify the type of transaction to use
11 JDBC: Transaction using JDBC
12 MANAGER: Transaction not required
13             -->
14             <transactionManager type="JDBC"></transactionManager>
15 <!--dataSource tag: Configure database connection information
16 type: Configure the type of data source
17 JNDI: Using a JNDI data source means configuring the data source on the web server so that the program can call it
18 POOLED: Use default built-in connection pool
19 UNPOOLED: No connection pooling is required using a direct connection database
20              -->
21             <dataSource type="POOLED">
22 <!--Connect the four elements-->
23                 <property name="driver" value="org.gjt.mm.mysql.Driver"/>
24                 <property name="url" value="jdbc:mysql://localhost:3306/sms"/>
25                 <property name="username" value="root"/>
26                 <property name="password" value="12345"/>
27             </dataSource>
28         </environment>
29     </environments>
30 <!--Configure the specified loaded mapping file-->
31     <mappers>
32         <mapper class="cn.zwj.mapper.StudentMapper"></mapper>
33     </mappers>
34 </configuration>
2.4 Mapping Files and Mapping Interfaces
Since the mapping file and the mapping interface have to correspond, their corresponding relationship is represented by the same name, and the corresponding interface can be found well in multiple mapping files.

Create a mapping file,
StudentMapper.xml
<?xml version="1.0" encoding="UTF-8"?>
<!DOCTYPE mapper PUBLIC "-//mybatis.org//DTD Mapper 3.0//EN" "mybatis-3-mapper.dtd" >
<mapper namespace="cn.zwj.mapper.StudentMapper">
    <!-- #{} Similar?(preprocessing block), corresponding to the variable name in POJO-->
    <insert id="insert">
        INSERT INTO tb_student (STUDENT_NAME, STUDENT_PWD, STUDENT_STATUS, CREATE_DATE, STUDENT_ACCOUNT) VALUES (#{studentName}, #{studentPwd}, #{studentStatus}, #{createDate}, #{studentAccount})
    </insert>
</mapper>

