
Author|Wang Xining Senior Technical Expert of Alibaba
Guidance: This paper is abstracted from the book "Istio Service Grid Technology Analysis and Practice" written by Wang Xining, a senior technical expert in Ali Cloud. It describes how to use Istio to manage multi-cluster deployment to illustrate the support capability of service grid for multi-cloud environment, multi-cluster or mixed deployment.
Previous details:
How to use Istio for multi-cluster deployment management: Single Control Plane *** Connect Topology
In a single control plane topology, multiple Kubernetes clusters work together to use a single Istio control plane running on one of the clusters.The control plane Pilot manages services on local and remote clusters and configures the Envoy Sidecar proxy for all clusters.
Cluster-aware service routing
Cluster-aware service routing capabilities were introduced in Istio 1.1, where Split-horizon EDS (Horizontal Split Endpoint Discovery Service) functionality of Istio can be used to route service requests to other clusters through its entry gateway in a single control plane topology configuration.Istio is able to route requests to different endpoints based on the location of the request source.
In this configuration, requests from a Sidecar proxy in one cluster to a service in the same cluster are still forwarded to the local service IP.If the target workload is running in another cluster, the gateway IP of the remote cluster is used to connect to the service.
(Cluster-aware service routing)
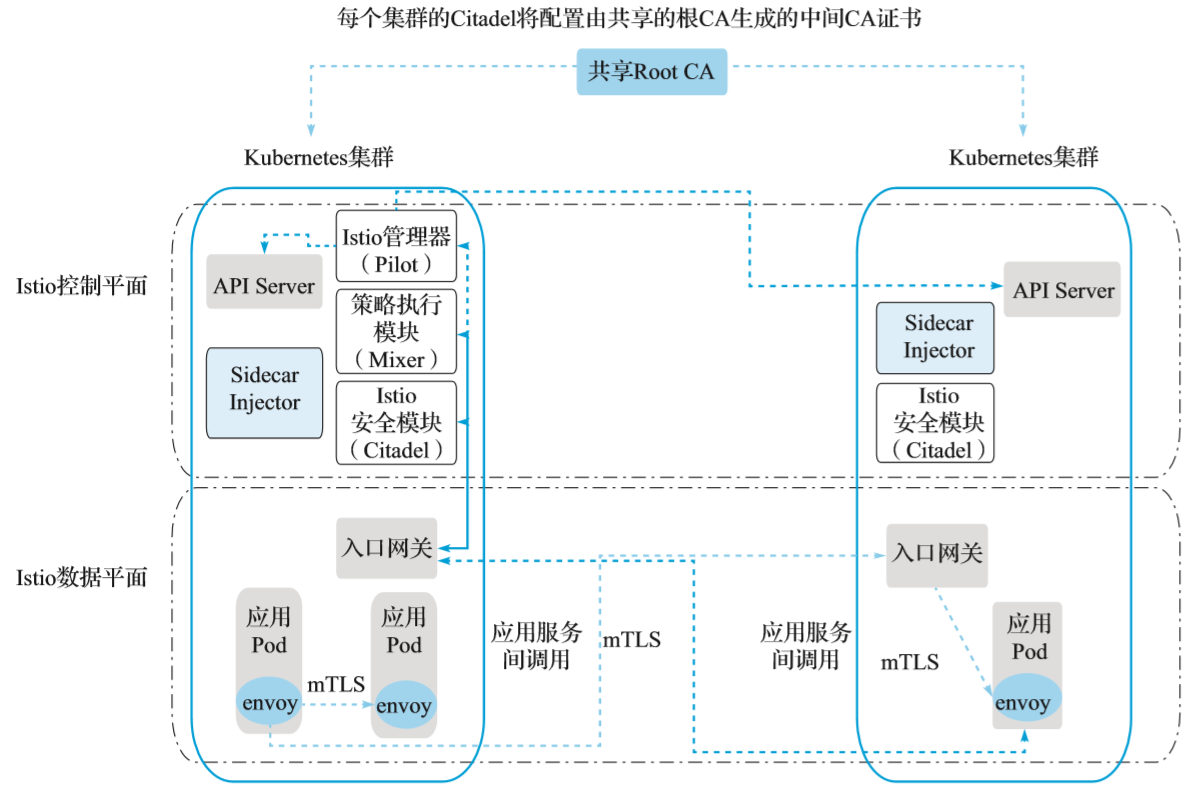
As shown, the primary cluster Cluster 1 runs a full set of Istio control plane components, while Cluster 2 runs only Istio Citadel, Sidecar Injector, and Ingress gateways.No *** connection is required and no direct network access is required between workloads in different clusters.
Generate intermediate CA certificates for each cluster's Citadel from the shared root CA, and the shared root CA enables bidirectional TLS communication across different clusters.For illustration purposes, we use the sample root CA certificate provided in the Istio installation in the samples/certs directory for both clusters.In a real deployment, you may use different CA certificates for each cluster, all of which are signed by a common root CA.
In each of the Kubernetes clusters (including the clusters cluster1 and cluster2 in the example), use the following command to create a Kubernetes key for the generated CA certificate:
kubectl
create namespace istio-system
kubectl
create secret generic cacerts -n istio-system \
  --from-file=samples/certs/ca-cert.pem \
  --from-file=samples/certs/ca-key.pem \
  --from-file=samples/certs/root-cert.pem \
  --from-file=samples/certs/cert-chain.pem
Istio Control Planar Component
In Cluster 1, which deploys a full set of Istio control plane components, follow these steps:
1. Install Istio's CRD s and wait a few seconds to submit them to the Kubernetes API server as follows:
for
i in install/kubernetes/helm/istio-init/files/crd*yaml; do kubectl apply -f $i;
done
2. Start deploying the Istio control plane in cluster 1.
If helm dependencies are missing or not up to date, you can update them with helm dep update.It is important to note that because istio-cni is not used, you can temporarily remove it from the dependency requirements.yaml before performing an update operation.The specific commands are as follows:
helm
template --name=istio --namespace=istio-system \
--set
global.mtls.enabled=true \
--set
security.selfSigned=false \
--set
global.controlPlaneSecurityEnabled=true \
--set
global.meshExpansion.enabled=true \
--set
global.meshNetworks.network2.endpoints[0].fromRegistry=n2-k8s-config \
--set
global.meshNetworks.network2.gateways[0].address=0.0.0.0 \
--set
global.meshNetworks.network2.gateways[0].port=15443 \
install/kubernetes/helm/istio
> ./istio-auth.yaml
Note that the gateway address is set to 0.0.0.0.This is a temporary placeholder value that will be updated to the public IP value of its gateway after cluster 2 is deployed.
Deploy Istio to cluster 1 as follows:
kubectl
apply -f ./istio-auth.yaml
Ensure that the above steps are successfully performed in the Kubernetes cluster.
3. Create a gateway to access remote services as follows:
kubectl
create -f - <<EOF
apiVersion:
networking.istio.io/v1alpha3
kind:
Gateway
metadata:
  name: cluster-aware-gateway
  namespace: istio-system
spec:
  selector:
    istio: ingressgateway
  servers:
  - port:
      number: 15443
      name: tls
      protocol: TLS
    tls:
      mode: AUTO_PASSTHROUGH
    hosts:
    - "*"
EOF
The above gateway is configured with a dedicated port 15443 to deliver incoming traffic to the target service specified in the requested SNI header, using a two-way TLS connection from the source service to the target service.
Note that although this gateway definition applies to cluster 1, since both clusters communicate with the same Pilot, this gateway instance also applies to cluster 2.
istio-remote component
Deploy the istio-remote component in another cluster, cluster 2, by following these steps:
1. Get the entrance gateway address of cluster 1 first, as follows:
export
LOCAL_GW_ADDR=$(kubectl get svc --selector=app=istio-ingressgateway \
  -n istio-system -o
jsonpath="{.items[0].status.loadBalancer.ingress[0].ip}")
Create an Istio remote deployment YAML file using Helm by executing the following command:
helm
template --name istio-remote --namespace=istio-system \
--values
install/kubernetes/helm/istio/values-istio-remote.yaml \
--set
global.mtls.enabled=true \
--set
gateways.enabled=true \
--set
security.selfSigned=false \
--set
global.controlPlaneSecurityEnabled=true \
--set
global.createRemoteSvcEndpoints=true \
--set
global.remotePilotCreateSvcEndpoint=true \
--set
global.remotePilotAddress=${LOCAL_GW_ADDR} \
--set
global.remotePolicyAddress=${LOCAL_GW_ADDR} \
--set
global.remoteTelemetryAddress=${LOCAL_GW_ADDR} \
--set
gateways.istio-ingressgateway.env.ISTIO_META_NETWORK="network2" \
--set
global.network="network2" \
install/kubernetes/helm/istio
> istio-remote-auth.yaml
2. Deploy the Istio remote component to cluster 2 as follows:
kubectl
apply -f ./istio-remote-auth.yaml
Ensure that the above steps are successfully performed in the Kubernetes cluster.
3. Update the configuration item istio for cluster 1 to get the gateway address for cluster 2 as follows:
export
REMOTE_GW_ADDR=$(kubectl get --context=$CTX_REMOTE svc --selector=app=
istio-ingressgateway
-n istio-system -o jsonpath="{.items[0].status.loadBalancer.ingress
[0].ip}")
Edit the configuration item istio under the namespace istio-system in cluster 1, replace the gateway address of network2, change from 0.0.0.0 to the gateway address of cluster 2 ${REMOTE_GW_ADDR}.After saving, Pilot automatically reads the updated network configuration.
4. Create Kubeconfig for Cluster 2.Create a Kubeconfig for the service account istio-multi on cluster 2 with the following command and save it as a file n2-k8s-config:
CLUSTER_NAME="cluster2"
SERVER=$(kubectl
config view --minify=true -o "jsonpath={.clusters[].cluster.server}")
SECRET_NAME=$(kubectl
get sa istio-multi -n istio-system -o jsonpath='{.secrets[].name}')
CA_DATA=$(kubectl
get secret ${SECRET_NAME} -n istio-system -o
"jsonpath={.data['ca\.crt']}")
TOKEN=$(kubectl
get secret ${SECRET_NAME} -n istio-system -o
"jsonpath={.data['token']}" | base64 --decode)
cat
<<EOF > n2-k8s-config
apiVersion:
v1
kind:
Config
clusters:
  - cluster:
      certificate-authority-data: ${CA_DATA}
      server: ${SERVER}
    name: ${CLUSTER_NAME}
contexts:
  - context:
      cluster: ${CLUSTER_NAME}
      user: ${CLUSTER_NAME}
    name: ${CLUSTER_NAME}
current-context:
${CLUSTER_NAME}
users:
  - name: ${CLUSTER_NAME}
    user:
      token: ${TOKEN}
EOF
5. Add Cluster 2 to the Istio control plane.
In Cluster Cluster, execute the following commands to add the above generated kubeconfig of Cluster 2 to the secret of Cluster 1. After these commands are executed, Istio Pilot in Cluster 1 will begin to listen for services and instances of Cluster 2, just as it does for services and instances in Cluster 1:
kubectl
create secret generic n2-k8s-secret --from-file n2-k8s-config -n istio-system
kubectl
label secret n2-k8s-secret istio/multiCluster=true -n istio-system
Deployment Sample Application
To demonstrate cross-cluster access, deploy the sleep application service in the first Kubernetes cluster 1 and the helloworld service in version v1, deploy the helloworld service in version v2 in the second cluster 2, and then verify that the sleep application can invoke the helloworld service in a local or remote cluster.
1. Deploy the helloworld service from sleep and version v1 to cluster 1 by executing the following commands:
kubectl
create namespace app1
kubectl
label namespace app1 istio-injection=enabled
kubectl
apply -n app1 -f samples/sleep/sleep.yaml
kubectl
apply -n app1 -f samples/helloworld/service.yaml
kubectl
apply -n app1 -f samples/helloworld/helloworld.yaml -l version=v1
export
SLEEP_POD=$(kubectl get -n app1 pod -l app=sleep -o
jsonpath={.items..metadata.name})
2. Deploy the helloworld service from version v2 to cluster 2 by executing the following commands:
kubectl
create namespace app1
kubectl
label namespace app1 istio-injection=enabled
kubectl
apply -n app1 -f samples/helloworld/service.yaml
kubectl
apply -n app1 -f samples/helloworld/helloworld.yaml -l version=v2
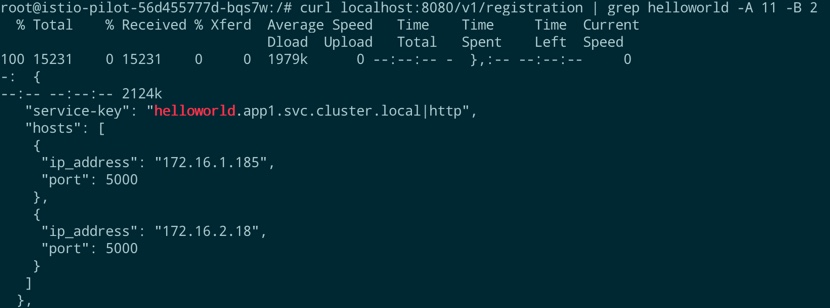
3. Log in to the istio-pilot container under the namespace istio-system and run the curl localhost:8080/v1/registration | grep helloworld-A 11-B 2 command. If you get similar results as the following, the HelloWorld services for versions V1 and v2 are already registered in the Istio control plane:
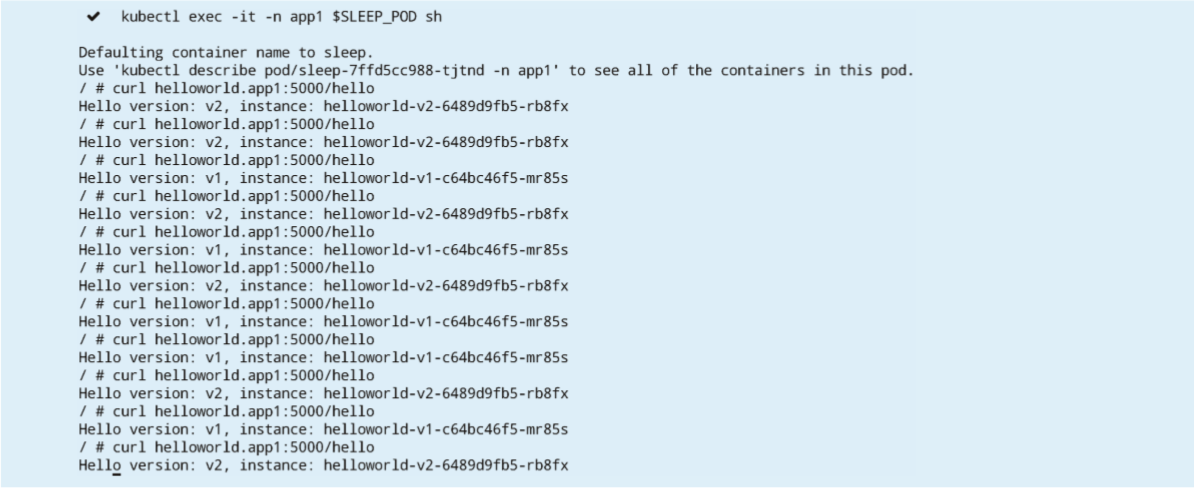
4. Verify that the sleep service in cluster 1 can properly invoke the helloworld service in a local or remote cluster by executing the following commands under cluster 1:
kubectl
exec -it -n app1 $SLEEP_POD sh

Log in to the container and run curl helloworld.app1:5000/hello.
If set correctly, you can see two versions of the helloworld service in the call results returned, and you can verify the IP address of the accessed endpoint by viewing the istio-proxy container log in the sleep container group. The result is as follows:
Readers of Istio Service Grid Technology Analysis and Practice can experience ASM products for free!Click to learn about Ali Cloud Service Grid product ASM: www.aliyun.com/product/servicemesh
Introduction to the Author
Wang Xining, Senior Technical Expert of Ali Cloud, Technical Leader of Ali Cloud Service Grid ASM and Istio on Kubernetes, specializes in Kubernetes, Cloud Native, Service Grid and other fields.I have worked in IBM China Development Center and chaired the Patent Technology Review and Adjudication Board. I have over 40 international technology patents in related fields.Written by Istio Service Grid Resolution and Practice, the book details the basic principles and development practices of Istio. It contains a large number of selected cases and reference codes that can be downloaded and quickly started with Istio development.Gartner believes that the service grid will become the standard technology for all leading container management systems by 2020.This book is suitable for all readers interested in micro-services and cloud native. It is recommended that you read this book in depth.
Course Recommendation
In order for more developers to enjoy the dividend of Serverless, this time, we have assembled 10 + Alibaba Serverless field technical experts to create a Serverless public course that is best suited for developers to get started, so that you can learn from it and embrace the new paradigm of cloud computing - Serverless.
Click to view the course for free: https://developer.aliyun.com/learning/roadmap/serverless
"Alibaba Cloud Native Focus on the technology areas such as micro services, Serverless, containers, Service Mesh, focus on cloud native popular technology trends, cloud native large-scale floor practices, and make a public number that best understands cloud native developers."