 Rimeng Society
AI AI:Keras PyTorch MXNet TensorFlow PaddlePaddle deep learning real combat (irregular update)
CNN: RCNN,SPPNet,Fast RCNN,Faster RCNN,YOLO V1 V2 V3,SSD,FCN,SegNet,U-Net,DeepLab V1 V2 V3,Mask RCNN
Single target tracking SiamMask: specific target vehicle tracking part1
Single target tracking SiamMask: specific target vehicle tracking part2
Single target tracking: tracking effect
Single target tracking: data set processing
Single target tracking: model building
Single target tracking: model training
Single target tracking: model testing
1.6 test
Learning objectives:
- Understand the process of network testing
- It can realize network training code writing
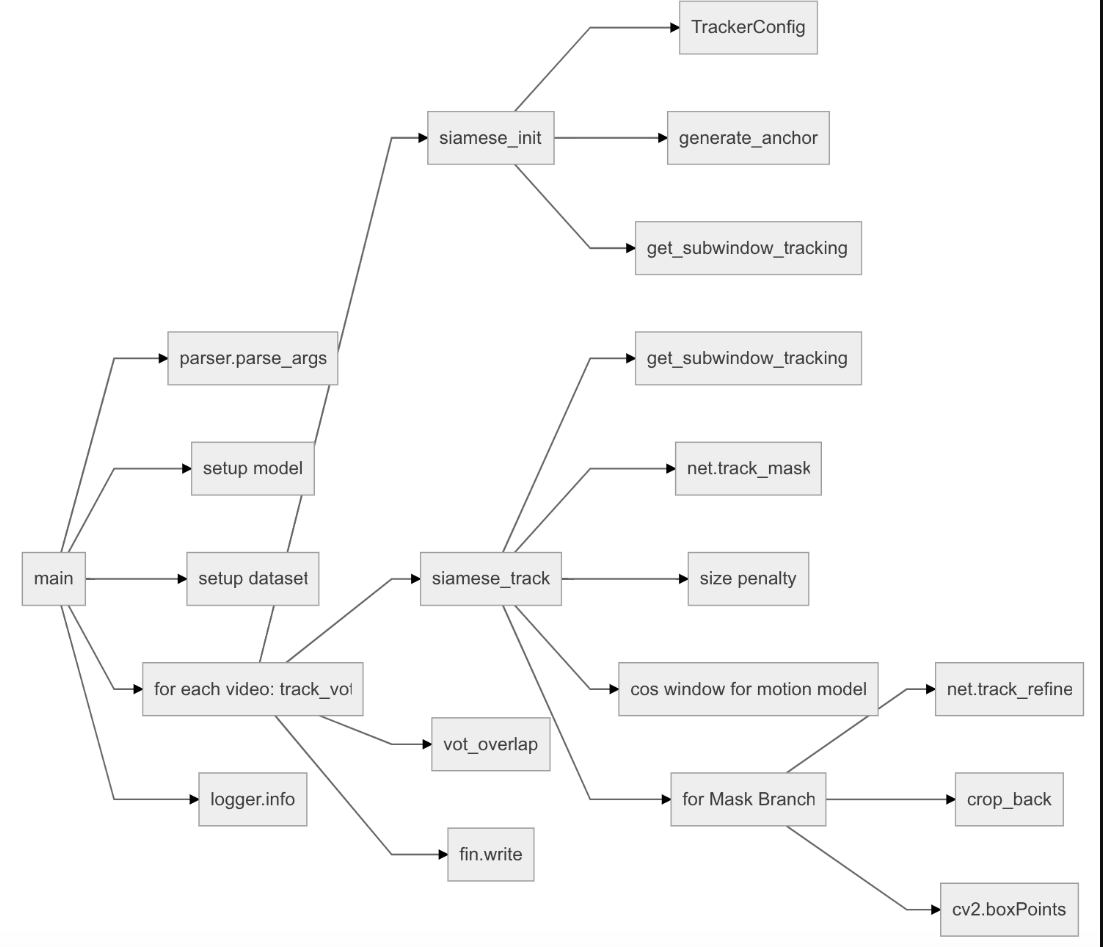
The network test is mainly in tools test Py. The contents contained in this file are shown in the following figure:

Next, we will introduce the above contents.
1.main
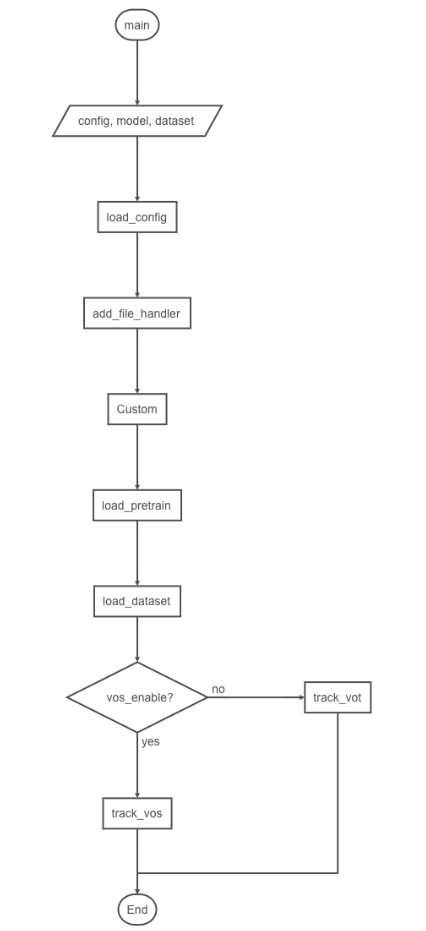
main function is the program entry for network training. Its execution process is to read configuration information - > set log output to log file - > load network model - > load weight file - > load data - > track. During tracking, it is also necessary to judge whether target segmentation is carried out, as shown in the following figure:

The implementation code is as follows:
def main():
    # Get command line parameter information
    global args, logger, v_id
    args = parser.parse_args()
    # Get the configuration information in the configuration file: mainly including network structure, super parameters, etc
    cfg = load_config(args)
    # Initialize the logxi information and input the log information into the disk file
    init_log('global', logging.INFO)
    if args.log != "":
        add_file_handler('global', args.log, logging.INFO)
    # Enter the relevant configuration information into the log file
    logger = logging.getLogger('global')
    logger.info(args)

    # setup model
    # Load network model schema
    if args.arch == 'Custom':
        from custom import Custom
        model = Custom(anchors=cfg['anchors'])
    else:
        parser.error('invalid architecture: {}'.format(args.arch))
    # Load network model parameters
    if args.resume:
        assert isfile(args.resume), '{} is not a valid file'.format(args.resume)
        model = load_pretrain(model, args.resume)
    # Use evaluation mode to activate drop, etc
    model.eval()
    # Hardware information
    device = torch.device('cuda' if (torch.cuda.is_available() and not args.cpu) else 'cpu')
    model = model.to(device)
    # Load dataset setup dataset
    dataset = load_dataset(args.dataset)

    # These three data support mask VOS or VOT?
    if args.dataset in ['DAVIS2016', 'DAVIS2017', 'ytb_vos'] and args.mask:
        vos_enable = True  # enable Mask output
    else:
        vos_enable = False

    total_lost = 0  # VOT
    iou_lists = []  # VOS
    speed_list = []
    # Process data
    for v_id, video in enumerate(dataset.keys(), start=1):
        if args.video != '' and video != args.video:
            continue
        # Call track with true_ vos
        if vos_enable:
            # If the test data is ['davis2017 ','ytb_vos'], multi-target tracking will be enabled
            iou_list, speed = track_vos(model, dataset[video], cfg['hp'] if 'hp' in cfg.keys() else None,
                                 args.mask, args.refine, args.dataset in ['DAVIS2017', 'ytb_vos'], device=device)
            iou_lists.append(iou_list)
        # False call track_vot
        else:
            lost, speed = track_vot(model, dataset[video], cfg['hp'] if 'hp' in cfg.keys() else None,
                             args.mask, args.refine, device=device)
            total_lost += lost
        speed_list.append(speed)

    # report final result
    if vos_enable:
        for thr, iou in zip(thrs, np.mean(np.concatenate(iou_lists), axis=0)):
            logger.info('Segmentation Threshold {:.2f} mIoU: {:.3f}'.format(thr, iou))
    else:
        logger.info('Total Lost: {:d}'.format(total_lost))

    logger.info('Mean Speed: {:.2f} FPS'.format(np.mean(speed_list)))
3.get_subwindow_tracking
This function obtains the image window of the tracking target and adjusts the target frame. If the target frame is outside the image, expand the image and modify the coordinates of the target frame. The code is as follows:
def get_subwindow_tracking(im, pos, model_sz, original_sz, avg_chans, out_mode='torch'):
    """
    Get tracking target information(Image window)
    :param im:Tracked template image
    :param pos:Target location
    :param model_sz:Target dimensions required by the model
    :param original_sz: Expanded target size
    :param avg_chans:Average of images
    :param out_mode: Output mode
    :return:
    """
    if isinstance(pos, float):
        # Target center point coordinates
        pos = [pos, pos]
    # Target size
    sz = original_sz
    # Image size
    im_sz = im.shape
    # Distance from boundary to center after expanding background
    c = (original_sz + 1) / 2
    # Judge whether the target exceeds the image boundary. If it exceeds the boundary, fill the image
    context_xmin = round(pos[0] - c)
    context_xmax = context_xmin + sz - 1
    context_ymin = round(pos[1] - c)
    context_ymax = context_ymin + sz - 1
    left_pad = int(max(0., -context_xmin))
    top_pad = int(max(0., -context_ymin))
    right_pad = int(max(0., context_xmax - im_sz[1] + 1))
    bottom_pad = int(max(0., context_ymax - im_sz[0] + 1))
    # Image filling changes the origin of the image and calculates the coordinates of the filled image block
    context_xmin = context_xmin + left_pad
    context_xmax = context_xmax + left_pad
    context_ymin = context_ymin + top_pad
    context_ymax = context_ymax + top_pad

    # zzp: a more easy speed version
    r, c, k = im.shape
    # In case of filling, the target position needs to be re assigned
    if any([top_pad, bottom_pad, left_pad, right_pad]):
        # Generate an all zero array of the same size as the filled image
        te_im = np.zeros((r + top_pad + bottom_pad, c + left_pad + right_pad, k), np.uint8)
        # Assign a value to the original image area
        te_im[top_pad:top_pad + r, left_pad:left_pad + c, :] = im
        # Assign the filled area to the mean value of the image
        if top_pad:
            te_im[0:top_pad, left_pad:left_pad + c, :] = avg_chans
        if bottom_pad:
            te_im[r + top_pad:, left_pad:left_pad + c, :] = avg_chans
        if left_pad:
            te_im[:, 0:left_pad, :] = avg_chans
        if right_pad:
            te_im[:, c + left_pad:, :] = avg_chans
        # Modify the location of the target based on the fill results
        im_patch_original = te_im[int(context_ymin):int(context_ymax + 1), int(context_xmin):int(context_xmax + 1), :]
    else:
        im_patch_original = im[int(context_ymin):int(context_ymax + 1), int(context_xmin):int(context_xmax + 1), :]
    # If the size of the tracking target block is different from the model input size, the image size is modified by opencv
    if not np.array_equal(model_sz, original_sz):
        im_patch = cv2.resize(im_patch_original, (model_sz, model_sz))
    else:
        im_patch = im_patch_original
    # cv2.imshow('crop', im_patch)
    # cv2.waitKey(0)
    # If the output mode is Torch, switch its channels; otherwise, output im directly_ patch
    return im_to_torch(im_patch) if out_mode in 'torch' else im_patch
4.generate_anchor
This method generates the anchor of the target, uses the anchor to track the target, and modifies the coordinates of the anchor.

The code is as follows:
def generate_anchor(cfg, score_size):
    """
    Generate anchor: anchor
    :param cfg: anchor Configuration information for
    :param score_size:Scoring results of classification
    :return:Generated anchor
    """
    # Initialize anchor
    anchors = Anchors(cfg)
    # Get generated anchors
    anchor = anchors.anchors
    # Get the upper left and lower right coordinates of each anchor
    x1, y1, x2, y2 = anchor[:, 0], anchor[:, 1], anchor[:, 2], anchor[:, 3]
    # Convert anchor to the form of center point coordinates and width and height
    anchor = np.stack([(x1+x2)*0.5, (y1+y2)*0.5, x2-x1, y2-y1], 1)
    # Gets the scope of the generated anchor
    total_stride = anchors.stride
    # Get the number of anchors
    anchor_num = anchor.shape[0]
    # The anchor group is broadcast and its coordinates are set.
    anchor = np.tile(anchor, score_size * score_size).reshape((-1, 4))
    # After adding ori offset, xx and yy take the image center as the origin
    ori = - (score_size // 2) * total_stride
    xx, yy = np.meshgrid([ori + total_stride * dx for dx in range(score_size)],
                         [ori + total_stride * dy for dy in range(score_size)])
    xx, yy = np.tile(xx.flatten(), (anchor_num, 1)).flatten(), \
             np.tile(yy.flatten(), (anchor_num, 1)).flatten()
    # Get anchor
    anchor[:, 0], anchor[:, 1] = xx.astype(np.float32), yy.astype(np.float32)
    return anchor
5.siamese_init
Siamese_ Create the target dictionary state in init. The contents of state are shown in the following figure:

TrackerConfig is the configuration information, net is the network model, window is the penalty window, and also includes a series of information of the tracking target.
The code implementation is as follows:
def siamese_init(im, target_pos, target_sz, model, hp=None, device='cpu'):
    """
    Initialize the tracker and build it according to the information of the target state Dictionaries
    :param im: Currently processed image
    :param target_pos: Target location
    :param target_sz: Target size
    :param model: Trained network model
    :param hp: Super parameter
    :param device: Hardware information
    :return: Tracker state Dictionary data
    """

    # Initialize state dictionary
    state = dict()
    # Sets the width and height of the image
    state['im_h'] = im.shape[0]
    state['im_w'] = im.shape[1]
    # Configure the relevant parameters of the tracker
    p = TrackerConfig()
    # Update parameters
    p.update(hp, model.anchors)
    # Update parameters
    p.renew()
    # Get network model
    net = model
    # Update the parameters of the tracker according to the network parameters, mainly anchors
    p.scales = model.anchors['scales']
    p.ratios = model.anchors['ratios']
    p.anchor_num = model.anchor_num
    # Generate anchor
    p.anchor = generate_anchor(model.anchors, p.score_size)
    # Average of images
    avg_chans = np.mean(im, axis=(0, 1))
    # Enter the width, height and size of z according to the set context scale
    wc_z = target_sz[0] + p.context_amount * sum(target_sz)
    hc_z = target_sz[1] + p.context_amount * sum(target_sz)
    s_z = round(np.sqrt(wc_z * hc_z))
    # initialize the exemplar
    z_crop = get_subwindow_tracking(im, target_pos, p.exemplar_size, s_z, avg_chans)
    # Converting it to a Variable allows back propagation in Python
    z = Variable(z_crop.unsqueeze(0))
    # Special handling template
    net.template(z.to(device))
    # Set penalty window used
    if p.windowing == 'cosine':
        # Using the outer product of hanning window to generate cosine window
        window = np.outer(np.hanning(p.score_size), np.hanning(p.score_size))
    elif p.windowing == 'uniform':
        window = np.ones((p.score_size, p.score_size))
    # Each anchor has a corresponding penalty window
    window = np.tile(window.flatten(), p.anchor_num)
    # Update information to state dictionary
    state['p'] = p
    state['net'] = net
    state['avg_chans'] = avg_chans
    state['window'] = window
    state['target_pos'] = target_pos
    state['target_sz'] = target_sz
    return state
6.siamese_track
The method tracks the target according to siamese_init gets the target tracking box and then calls track_. Mask (if segmented) or track (not segmented) for target tracking.

1. Function prototype
def siamese_track(state, im, mask_enable=False, refine_enable=False, device='cpu', debug=False):
    """
    Track the target
    :param state:Target status
    :param im:Tracked image frames
    :param mask_enable:Mask or not
    :param refine_enable:Is feature fusion performed
    :param device:Hardware information
    :param debug: Whether to proceed debug
    :return:Track the status of the target state Dictionaries
    """
2. Current status of target
Get the current state of the target. If you debug, you can draw the state of the target on the image.
  # Get target status
    p = state['p']
    net = state['net']
    avg_chans = state['avg_chans']
    window = state['window']
    target_pos = state['target_pos']
    target_sz = state['target_sz']
    # The width, height and size of the tracking frame containing surrounding information
    wc_x = target_sz[1] + p.context_amount * sum(target_sz)
    hc_x = target_sz[0] + p.context_amount * sum(target_sz)
    s_x = np.sqrt(wc_x * hc_x)
    # Scale of input box size of template model to tracking box
    scale_x = p.exemplar_size / s_x
    # The detection area is obtained using the same proportion as the template branch
    d_search = (p.instance_size - p.exemplar_size) / 2
    pad = d_search / scale_x
    s_x = s_x + 2 * pad
    # Expand the detection box to include surrounding information
    crop_box = [target_pos[0] - round(s_x) / 2, target_pos[1] - round(s_x) / 2, round(s_x), round(s_x)]
    # If debug
    if debug:
        # Copy picture
        im_debug = im.copy()
        # Generate crop_box
        crop_box_int = np.int0(crop_box)
        # Draw it on the picture
        cv2.rectangle(im_debug, (crop_box_int[0], crop_box_int[1]),
                      (crop_box_int[0] + crop_box_int[2], crop_box_int[1] + crop_box_int[3]), (255, 0, 0), 2)
        # Picture display
        cv2.imshow('search area', im_debug)
        cv2.waitKey(0)
3. Target tracking
Call track according to whether to segment the target_ Mask or track for target tracking.
# Convert the target position proportionally to the target to be tracked
    x_crop = Variable(get_subwindow_tracking(im, target_pos, p.instance_size, round(s_x), avg_chans).unsqueeze(0))
    #Call network for target tracking
    if mask_enable:
        # Target segmentation
        score, delta, mask = net.track_mask(x_crop.to(device))
    else:
        # Only target tracking, no segmentation
        score, delta = net.track(x_crop.to(device))
4. Classification and regression
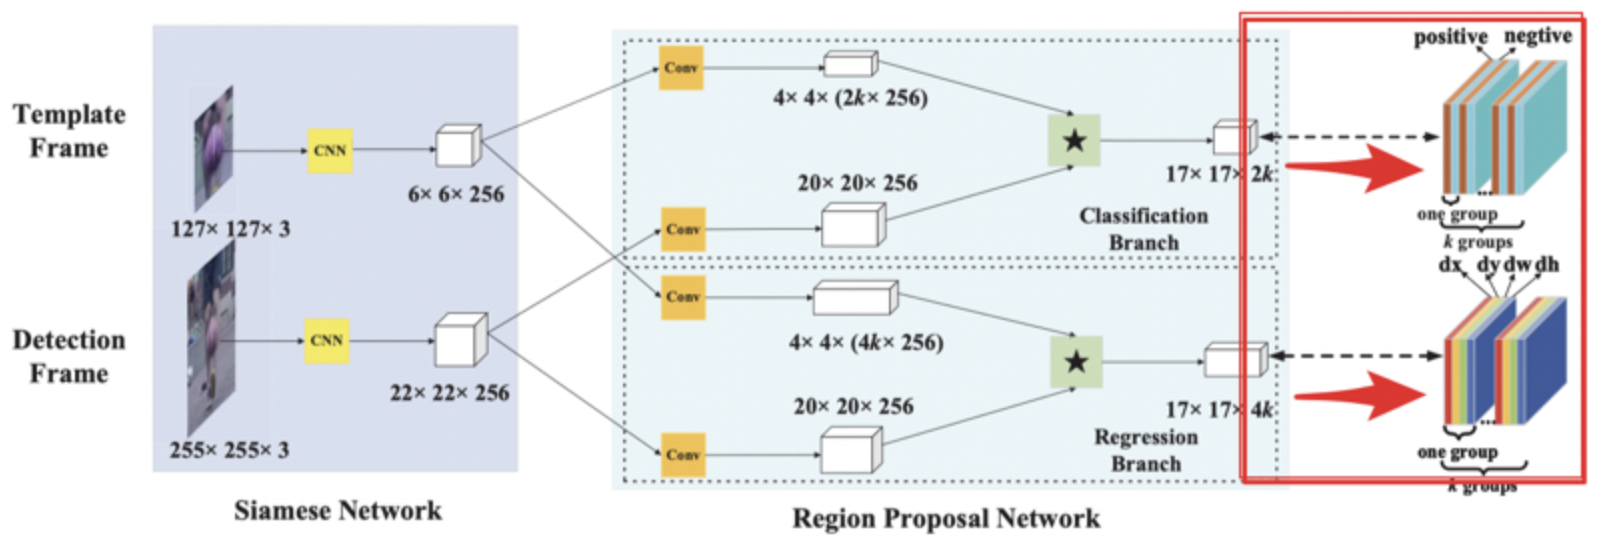
The results of target regression and classification are achieved through RPN network, as shown in the figure below:

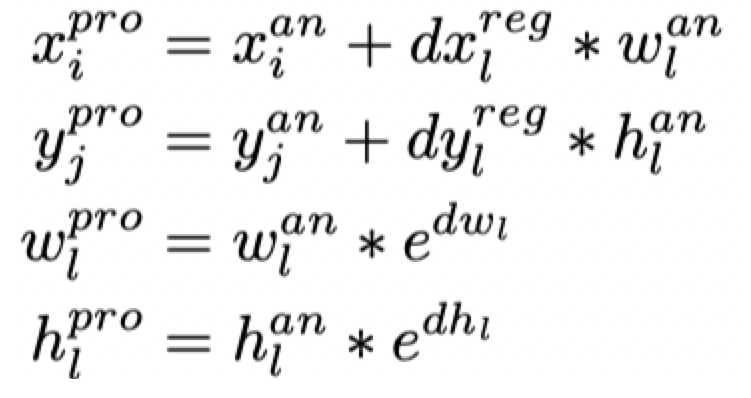
The results returned by the rpn network are not the width, height and position of the real detection frame, but:

Where: delta[0],delta[1],delta[2,],delta[3] is the result returned by the network model. In the following code, it refers to delta[0],delta[1],delta[2,],delta[3] on the right side of the equation. Here, we require the predicted position of the target box, that is, TX, ty, TW, th (Delta [0], Delta [1], Delta [2], Delta [3] on the left of the equation in the following code), ax, ay, aw and ah represent the center point, width and height of the anchor
The following code refers to p.anchor. Convert to the following formula in the forecast:

The code is as follows:
# Target box regression result (convert it to the style of 4 *...)
    delta = delta.permute(1, 2, 3, 0).contiguous().view(4, -1).data.cpu().numpy()
    # Target classification result (convert it to the style of 2 *...)
    score = F.softmax(score.permute(1, 2, 3, 0).contiguous().view(2, -1).permute(1, 0), dim=1).data[:,
            1].cpu().numpy()
    # Calculate the center point coordinates of the target frame, delta[0],delta[1], and width delta[2] and height delta[3].
    delta[0, :] = delta[0, :] * p.anchor[:, 2] + p.anchor[:, 0]
    delta[1, :] = delta[1, :] * p.anchor[:, 3] + p.anchor[:, 1]
    delta[2, :] = np.exp(delta[2, :]) * p.anchor[:, 2]
    delta[3, :] = np.exp(delta[3, :]) * p.anchor[:, 3]
5. Standard punishment
The next step is to select the optimal target using cosine window and scale penalty. Firstly, scale suppression is carried out. k is a super parameter, r is the aspect ratio, and s is the equivalent side length:

    def sz(w, h):
        """
        Calculate equivalent side length
        :param w: wide
        :param h: high
        :return: Equivalent side length
        """
        pad = (w + h) * 0.5
        sz2 = (w + pad) * (h + pad)
        return np.sqrt(sz2)

    def sz_wh(wh):
        """
        Calculate equivalent side length
        :param wh: Array of width and height
        :return: Equivalent side length
        """
        pad = (wh[0] + wh[1]) * 0.5
        sz2 = (wh[0] + pad) * (wh[1] + pad)
        return np.sqrt(sz2)
Next, the penalty is performed, and the non maximum suppression is used to obtain the final target tracking frame.
# Non maximum suppression
def change(r):
    """
        take r And 1/r Bit by bit comparison takes the maximum value
        :param r:
        :return:
        """
    return np.maximum(r, 1. / r)

# size penalty
    target_sz_in_crop = target_sz*scale_x
    s_c = change(sz(delta[2, :], delta[3, :]) / (sz_wh(target_sz_in_crop)))  # scale penalty
    r_c = change((target_sz_in_crop[0] / target_sz_in_crop[1]) / (delta[2, :] / delta[3, :]))  # ratio penalty
    # p.penalty_k-hyperparameter
    penalty = np.exp(-(r_c * s_c - 1) * p.penalty_k)
    # Punish the classification results
    pscore = penalty * score

    # cos window (motion model)
    # Window penalty: superimpose a window distribution value according to a certain weight
    pscore = pscore * (1 - p.window_influence) + window * p.window_influence
    # Index to obtain the optimal weight
    best_pscore_id = np.argmax(pscore)
    # Map the optimal prediction results back to the original graph
    pred_in_crop = delta[:, best_pscore_id] / scale_x
    # Calculate lr
    lr = penalty[best_pscore_id] * score[best_pscore_id] * p.lr  # lr for OTB
    # Calculate the position and size of the target: obtain the position and size of the target according to the predicted offset
    res_x = pred_in_crop[0] + target_pos[0]
    res_y = pred_in_crop[1] + target_pos[1]

    res_w = target_sz[0] * (1 - lr) + pred_in_crop[2] * lr
    res_h = target_sz[1] * (1 - lr) + pred_in_crop[3] * lr
    # Location and size of target
    target_pos = np.array([res_x, res_y])
    target_sz = np.array([res_w, res_h])
6. Segmentation
In this part, the target is segmented, mainly according to whether the refine module is used to segment the image of the module.
# If split
    if mask_enable:
        # Location index for obtaining optimal prediction results: NP unravel_ Index: converts a plane index or a plane index array to a tuple of a coordinate array
        best_pscore_id_mask = np.unravel_index(best_pscore_id, (5, p.score_size, p.score_size))
        delta_x, delta_y = best_pscore_id_mask[2], best_pscore_id_mask[1]
        # Whether to perform feature fusion
        if refine_enable:
            # Call track_refine, run the refine module, as shown in Figure 1 × one × The target mask is obtained from the feature vector of 256 and the feature map before detection down sampling
            mask = net.track_refine((delta_y, delta_x)).to(device).sigmoid().squeeze().view(
                p.out_size, p.out_size).cpu().data.numpy()
        else:
            # Mask data is generated directly without fusion
            mask = mask[0, :, delta_y, delta_x].sigmoid(). \
                squeeze().view(p.out_size, p.out_size).cpu().data.numpy()
According to the segmentation results, the location and size of target tracking are further obtained.
First, affine transform the image:
        def crop_back(image, bbox, out_sz, padding=-1):
            """
            Affine transformation of image
            :param image: image
            :param bbox:
            :param out_sz: Output size
            :param padding: Expand
            :return: Results after affine transformation
            """
            # Construct transformation matrix
            # Scale coefficient
            a = (out_sz[0] - 1) / bbox[2]
            b = (out_sz[1] - 1) / bbox[3]
            # Translation
            c = -a * bbox[0]
            d = -b * bbox[1]
            mapping = np.array([[a, 0, c],
                                [0, b, d]]).astype(np.float)
            # Affine transformation
            crop = cv2.warpAffine(image, mapping, (out_sz[0], out_sz[1]),
                                  flags=cv2.INTER_LINEAR,
                                  borderMode=cv2.BORDER_CONSTANT,
                                  borderValue=padding)
            return crop
Then, after affine transformation of the segmentation result, the minimum circumscribed rectangle of its contour is calculated to obtain the position of the target, so that the target frame we get will change adaptively with the movement of the target.
# Ratio of the length of the detection area box to the size of the input model: scaling factor
        s = crop_box[2] / p.instance_size
        # Predicted template area box
        sub_box = [crop_box[0] + (delta_x - p.base_size / 2) * p.total_stride * s,
                   crop_box[1] + (delta_y - p.base_size / 2) * p.total_stride * s,
                   s * p.exemplar_size, s * p.exemplar_size]
        # Scaling factor
        s = p.out_size / sub_box[2]
        # Background box
        back_box = [-sub_box[0] * s, -sub_box[1] * s, state['im_w'] * s, state['im_h'] * s]
        # affine transformation
        mask_in_img = crop_back(mask, back_box, (state['im_w'], state['im_h']))
        # Mask results are obtained
        target_mask = (mask_in_img > p.seg_thr).astype(np.uint8)
        # Find profile based on cv2 version
        if cv2.__version__[-5] == '4':
            # There are only two parameters returned in opencv4 and four in other versions
            contours, _ = cv2.findContours(target_mask, cv2.RETR_EXTERNAL, cv2.CHAIN_APPROX_NONE)
        else:
            _, contours, _ = cv2.findContours(target_mask, cv2.RETR_EXTERNAL, cv2.CHAIN_APPROX_NONE)
        # Gets the area of the profile
        cnt_area = [cv2.contourArea(cnt) for cnt in contours]
        if len(contours) != 0 and np.max(cnt_area) > 100:
            # Gets the contour with the largest area
            contour = contours[np.argmax(cnt_area)]  # use max area polygon
            # Convert to* Form of 2
            polygon = contour.reshape(-1, 2)
            # pbox = cv2.boundingRect(polygon)  # Min Max Rectangle
            # After getting the smallest circumscribed rectangle, find the four vertices of the rectangle
            prbox = cv2.boxPoints(cv2.minAreaRect(polygon))  # Rotated Rectangle

            # box_in_img = pbox
            # Get tracking box
            rbox_in_img = prbox
        else:  # empty mask
            # The location is obtained according to the predicted target position and size
            location = cxy_wh_2_rect(target_pos, target_sz)
            # Get the four vertices of the tracking box
            rbox_in_img = np.array([[location[0], location[1]],
                                    [location[0] + location[2], location[1]],
                                    [location[0] + location[2], location[1] + location[3]],
                                    [location[0], location[1] + location[3]]])
7. Tracking results
Get the location and size of the target, and update the information into the state object.
# Get the position and size of the target
    target_pos[0] = max(0, min(state['im_w'], target_pos[0]))
    target_pos[1] = max(0, min(state['im_h'], target_pos[1]))
    target_sz[0] = max(10, min(state['im_w'], target_sz[0]))
    target_sz[1] = max(10, min(state['im_h'], target_sz[1]))
    # Update state object
    state['target_pos'] = target_pos
    state['target_sz'] = target_sz
    state['score'] = score[best_pscore_id]
    state['mask'] = mask_in_img if mask_enable else []
    state['ploygon'] = rbox_in_img if mask_enable else []
    return state
6. Network test
During network test, execute the following at the terminal:
cd $SiamMask/experiments/siammask_sharp
bash test_mask_refine.sh config_vot.json SiamMask_VOT.pth VOT2016 0
test_ mask_ refine. The contents in SH are as follows:
# Judge whether it is an empty string. If it is empty, you need to enter parameters,
if [ -z "$4" ]
  then
      # echo command is used to display string, and it will be displayed on the terminal
    echo "Need input parameter!"
    echo "Usage: bash `basename "$0"` \$CONFIG \$MODEL \$DATASET \$GPUID"
    exit
# fi is the end of the if statement, equivalent to end if
fi
# Indicates the location of the project, which is the top position
ROOT=/Users/yaoxiaoying/Documents/01-work/03.computer vision /03.Intelligent transportation/04.Single target tracking/SiamMask-master
# Setting environment variables
export PYTHONPATH=$ROOT:$PYTHONPATH
# Create log path
mkdir -p logs
# Set parameters
config=$1
model=$2
dataset=$3
gpu=$4
# Run test Py, the input parameters are: (1) config file: config_vot.json; (2)mode: SiamMask_VOT.pth; (3)dataset:VOT2016; (4)gpu:0
CUDA_VISIBLE_DEVICES=$gpu python -u $ROOT/tools/test.py \
    --config $config \
    --resume $model \
    --mask --refine \
    --dataset $dataset 2>&1 | tee logs/test_$dataset.log

# 2> & 1: direct errors to standard output
# tee logs/test_$dataset.log: add the contents of the standard output to the log file
Test results:
[2020-02-10 21:02:20,709-rk0-test.py#856] Total Lost: 44
[2020-02-10 21:02:20,710-rk0-test.py#858] Mean Speed: 5.85 FPS
Summary:
- Network testing uses data to test the performance of the network. The process is to load data, model and track the targets in the data
- The network test code mainly includes
- siammese_init: trace initialization
- siamese_trask: track the target