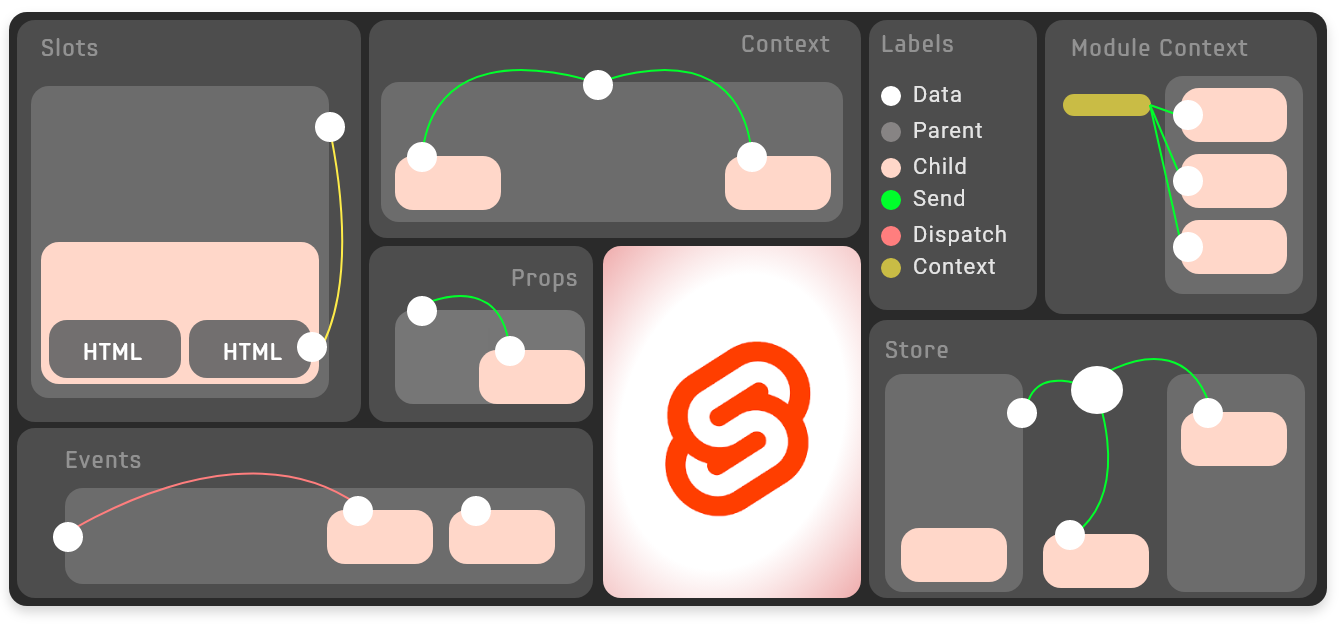
The main challenge of designing user interfaces using components is to manage the application state on different components. Svelte provides a powerful ability to transfer data in components.
"Great communication begins with connection."
— Oprah Winfrey
Oprah Gail Winfrey (English: Oprah Gail Winfrey, January 29, 1954 -), born in Mississippi, is an American TV talk show host, producer, investor, philanthropist and actor. She is one of the most influential African American celebrities in the United States and one of the top 100 figures of the time.
She is the most frequently selected one of the top 100 figures of the times, a total of 9 times. In 2005, AOL held a voting activity - "the greatest American". She was selected as the ninth greatest person in the United States.
Next, let's learn about six methods to realize the communication between Svelte components. They are:
- Send data to subcomponent: Props
- Rendering HTML: Slots within a component
- The child component notifies the parent component of the data through Events: Events
- Passing data through Context API: Context API
- Share data between instances of all components: Module Context
- Share data between any components: Store
In this article, we write some simple examples that apply different Svelte component communication technologies. This code will not contain all the bits and pieces, just to let you understand the essence of these technologies.
1. Props
In real applications, it is often necessary to transfer data from one component to other sub components. The most basic method is to use component properties. In Svelte, you can use the export keyword to define component properties.
Note the export keyword in the highlighted part of the following code:
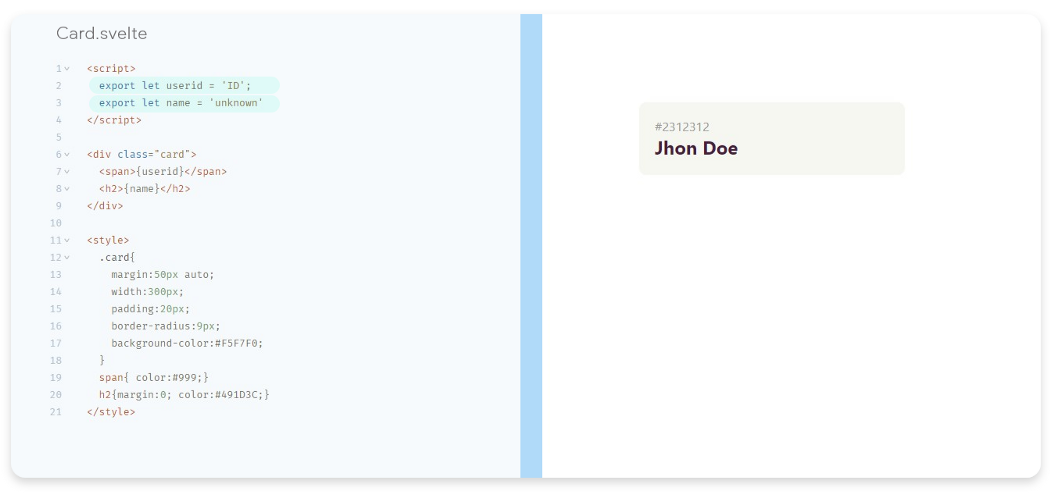
Card.svelte with props
Simply introduce the Card component and pass the data to the Card through attributes.
<script> import Card from './Card.svelte'; </script> <Card userid="#2312312" name="Jhon Doe"/>
Tip: using Typescript in Svelte can solve the problem of property type checking in components.
2. Slots
Slots - subcomponents can use slots to pass content to be rendered, which is a recommendation based on Web component slots.
<div class="card">
  <slot/>
</div>
The default way to define a slot is to use the < slot > HTML tag in the subcomponent.
Slots help to design components as a template, and you can also inject HTML content based on naming. The following chestnut shows how to name the slot:
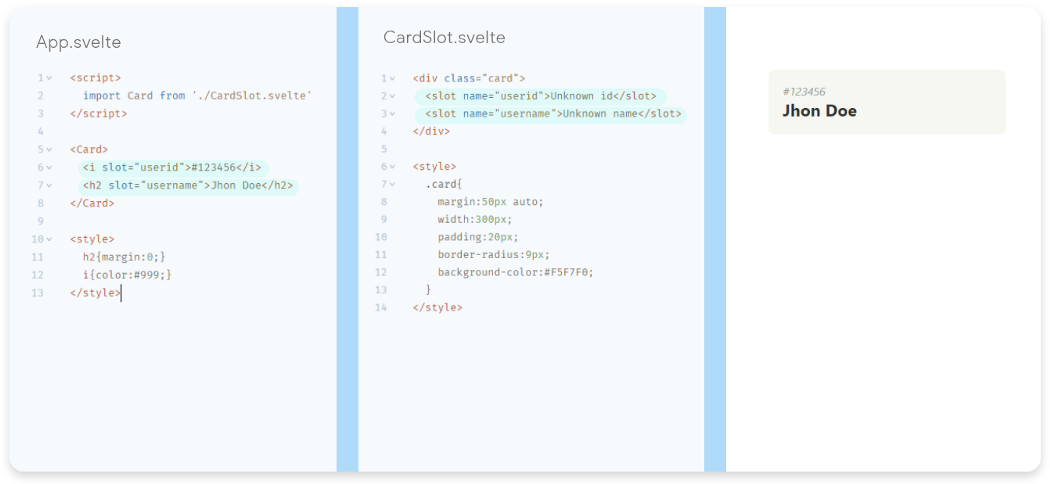
Card component with slots
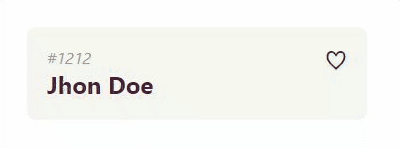
3. Events
When designing components, it is interesting to capture events from sub components. Continue to update the above code. When we click the heart icon, we will switch between like and dislike. As shown in the figure:
<script>
	import { createEventDispatcher } from 'svelte';

	//Declare the dispatch
	const dispatch = createEventDispatcher();

	export let id = 'ID';
	export let name = 'unknown'
	export let favor = false;

	let hearts = ['♡','♥'];
	let heartIcon = hearts[0];

	//if you wonder $: its svelte way make reactive statement
	$: heartIcon = favor ? hearts[1] : hearts[0];

	const favorite = (id) => {
		favor = !favor;

		//Dispatch the favorite event with object data
		dispatch('favorite', {id, favor});
	}
</script>

<div class="card">
	<i>{id}</i>
	<h2>{name}</h2>
	<span class="btnHeart" on:click={() => favorite(id)}>{heartIcon}</span>
</div>

<style>
	.card{position:relative;margin:50px auto;width:300px;padding:20px;border-radius:9px;background-color:#F5F7F0;	}
	i{ color:#999;}
	h2{margin:0; color:#491D3C;}
	.btnHeart{position:absolute;right:20px;	top:10px;font-size:32px;cursor:pointer;	}
</style>
CardEvent.svelte files distribute events based on clicks.
Here, we get three values, namely ID, name and favor, and distribute them to the parent component through dispatch:
<script>
 import Card from './CardEvent.svelte'

 let user ={
  id : '#1212',
  name: 'Jhon Doe',
  favor : false
 }

 const whenFavored = (event) => user.favor = event.detail.favor;

</script>

<Card {...user} on:favorite={whenFavored}/>
App.svelte using CardEvent.svelte
{...} is used here Operator to set the attribute of the {user} object as a child component and listen for the} favorite} click event. When there is a click, trigger the} whenFavored() function to execute and set the value to the parent object.
Black Technology
- In multi-level nested components, you can use < card on: favorite / > to forward events, which passes events to the parent component. This mechanism is also applicable to DOM events.
- Child components can be passed to the parent component as a reference, and all subcomponents output methods are invoked in the parent component. For example, you can use < Card bind: This = {userCard} / > to reference the {Card} component as a {userCard} object.
4. Context API
Context API. Now let's go to the advanced part of Svelte communication technology, which is very useful. Context API provides a powerful mechanism to realize the dialogue between components.
"Communication is only effective when we communicate in a way that is meaningful to the recipient, not ourselves."
"Communication is effective only when we communicate in a way that makes sense to the recipient rather than ourselves“
- rich Simmonds (co-founder and CEO of LinkedIn)
First, the top-level components need to set data using getContext(), and then other components get data through getContext(). Isn't it quite simple?
//App.svelte

<script>

import Card from './CardContext.svelte'
import {setContext} from 'svelte';

let user ={
  id:123456,
  name:'Jhon Doe',
  favor : true
}

setContext('user', user);

</script>

<Card/>
We pass the user object to all sub components through the context API:
<script>
	import {getContext} from 'svelte';

	//Get the Ancestor user object
        const user = getContext('user');

	let hearts = ['♡','♥'];
	let heartIcon = hearts[0];

	//Apply the favor value to reactive heartIcon
        $: heartIcon = user.favor ? hearts[1] : hearts[0];
</script>

<div class="card">
	<i>{user.id}</i>
	<h2>{user.name}</h2>
	<span class="btnHeart">{heartIcon}</span>
</div>

<style>
	.card{	position:relative; margin:50px auto; width:300px; padding:20px; border-radius:9px;background-color:#F5F7F0;}
	i{ color:#999;}
	h2{margin:0; color:#491D3C;}
	.btnHeart{ position:absolute; right:20px; top:10px; font-size:32px; cursor:pointer; }
</style>
CardContext.svelte
Note that the state in the context is only valid for child components, which is very useful if you want to use multiple instances of a component without making the state of one component interfere with the state of other components.
5. Module Context
In Svelte, it is very simple for multiple instances of the same component to share the same data. You only need to define these variables between < script context ='module '> < / script >.
Let's take an example. When you click the label noun, other component instances will show the same effect accordingly.
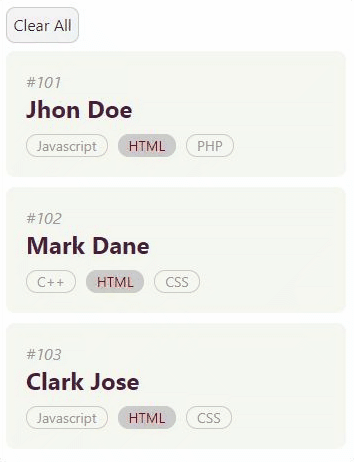
First in app Svelte uses the users object to create a Card instance and uses properties to pass the user object.
<script>
 import Card,{ clearAll } from './CardWithModuleContext.svelte'
 let users=[
  {id:101, name:'Jhon Doe', tags:['Javascript','HTML','PHP']},
  {id:102, name:'Mark Dane', tags:['C++','HTML','CSS']},
  {id:103, name:'Clark Jose', tags:['Javascript','HTML','CSS']},
 ];
</script>
<button on:click={clearAll}
    style="border-radius:9px;"
    >Clear All
</button>
{#each users as user}
  <Card {user}/>
{/each}
App.svelte
At the same time, add a module method {clearAll} to clear all highlighted labels:
<script context="module">
       //data shared accross each instance of this componenet
	let tagSelected;
	export function clearAll() { tagSelected = "" }
</script>

<script>
	import { onMount, onDestroy } from "svelte";
	export let user;
	let choosed;
	let interval;

	const selectIt = (tag) => {
		tagSelected = tag;
		choosed = tagSelected
	}

  	//read the data on interval
	onMount(() => {
	    interval = setInterval(()=> choosed = tagSelected, 100);
	  });

	//destroy the timer
  	onDestroy(() => clearInterval(interval));
</script>

<div class="card">
	<i>#{user.id}</i>
	<h2>{user.name}</h2>
	<dl>
		{#each user.tags as tag}
		<dd on:click={()=>selectIt(tag)} class:apply={choosed == tag}>{tag}</dd>
		{/each}
	</dl>
</div>

<style>
	.card{width:300px;padding:20px;border-radius:9px;background-color:#F5F7F0;margin-bottom:10px;}
	i{ color:#999;}
	h2{margin:0; color:#491D3C;}
	dl{margin:0; padding:0; margin-top:10px;}
	dd{display:inline-block;margin:0; margin-right:10px;
		color:#999; padding:1px 10px; border:1px solid #ccc;
		border-radius:15px; font-size:14px;cursor:pointer;
	}
	.apply{color:#900; background:#ccc;}

</style>
CardWithModuleContext.svelte
The variable "tagSelected" will be shared among different instances of the component. It is very interesting to understand. Here, a 100 millisecond timer is added to update the highlight of the tag. As you can see, all the logic in the subcomponent is used to communicate with other instances.
6. Store
With more and more complex applications, more and more features and more components, the complexity increases day by day. At this time, we need to save some application states outside the component hierarchy. The Svelte built-in store can achieve this.
In svelte storage, you can save a single object, array, etc. Svelte provides a variety of storage, including writable, readable, derived, or custom
Next, take a simple example to implement the book list:
BookStore.js
import { writable } from 'svelte/store'
export let bookStore = writable([
 {name:"Hamlet",author:"William Shakespeare"},
 {name:"The Great Gatsby",author:"F. Scott Fitzgerald"}
]);
BookList.svelte
<script>
 import { bookStore } from './BookStore.js'
</script>
<ul>
 {#each $bookStore as book}
  <li>{book.name} - {book.author}</li>
 {/each}
</ul>
BookForm.svelte
<script>
 import { bookStore } from './BookStore.js'
 let bookName;
 let author;
 const addNew = ()=>{
  $bookStore = [{name:bookName, author:author},...$bookStore,];
 }
</script>
<input type="text" bind:value={bookName} placeholder="Book Name"/>
<input type="text" bind:value={author} placeholder="Author Name"/>
<button on:click={addNew}>+ Add Book</button>
App.svelte
<script>
 import BookList from './BookList.svelte'
 import BookForm from './BookForm.svelte'
</script>
<BookForm/>
<BookList/>
Here, a # bookStore is created as a writable array. The syntax sugar $is referenced in the form and list components to access data.
Context vs Store
Context and Store are similar. The difference is that Store can be accessed in any component of the application, while context can only be used for sub components.
Sample code
Learn about all the examples described in this article, which are available in Svelte REPL. To test, update the app by importing different card components Svelte file to check the results. ( demo)
conclusion
Building communication between components is the most important part of application design. In Svelte, we have built-in functions for state management, which can give us great flexibility to design better applications.
This article is translated from https://betterprogramming.pub/6-ways-to-do-component-communications-in-svelte-b3f2a483913c