Thanks for bigAken's contribution
Every repository that uses git for version management has a directory git/hooks, including scripts of Hooks in each stage of commit. These Hooks can perform pre or post operations when git operates commit, push, merge, etc. for example, pre commit can perform code verification before git commit. ESLint is used to verify the code, and prettier is used for formatting. The common Hooks supported by git are shown in the following table. For more information, please check the official website Hooks:
Git Hook | Call timing | Call timing |
|---|---|---|
pre-commit | Before git commit execution | You can bypass it with git commit -- no verify |
commit-msg | Before git commit execution | You can bypass it with git commit -- no verify |
pre-merge-commit | Before git merge execution | You can bypass it with git merge -- no verify |
pre-push | Before git push execution |
This article first practices how to write the git hooks of pre commit, and then introduces the use of husky, lint staged and commitlint
In the GIT project There are many hooks examples under git/hooks, as follows
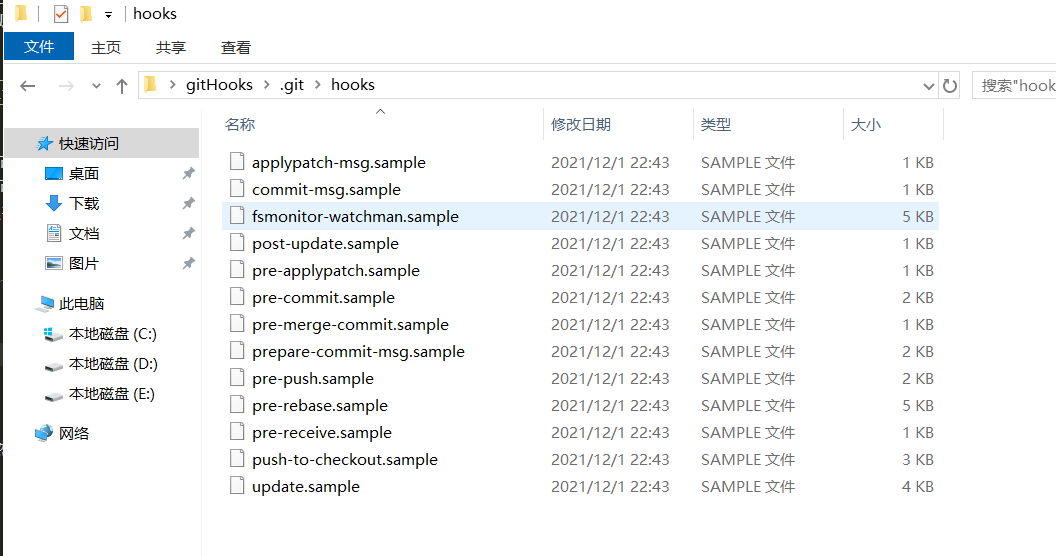
These git hooks are At the end of sample, if you want to enable a hooks, you can remove it End of sample
practice
npm init -y initializes a project, then git init, and then NPM install eslint -- save dev
newly build. gitignore file
node_modules

# local env files
.env.local
.env.*.local

# Log files
npm-debug.log*
yarn-debug.log*
yarn-error.log*

*-lock.json
*.lock
newly build. eslintrc, configure eslint
{
 "rules": {
  // Semicolons are required
  "semi": ["error", "always"],
  // Force consistent backticks, double quotes, or single quotes
  "quotes": ["error", "double"]
 }
}
Create a new src directory, and then create an index JS, do not use shortcut keys to format
console.log('object')
Create a new folder from the root directory customGitHooks then git config 'core hooksPath' . customGitHooks is mainly used to set the storage directory of gitHooks, because the default storage directory of gitHooks is git/hooks, create a new pre commit, and write as follows
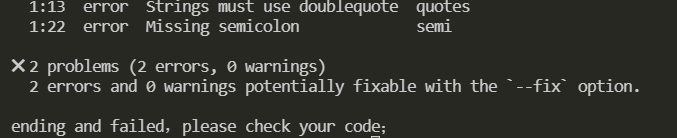
#!/bin/sh

echo 'start check your code,please wait...'
# git diff gets the changed content. You can configure the condition through the parameter -- diff filter
npx eslint $(git diff --cached --name-only --diff-filter=ACM -- '*.js')
# Variable $? --- > Execution status result of the previous command
if [ $? != '0' ];then
  echo "ending and failed,please check your code;"
 exit 1
else
  echo "check pass"
fi
At this time, execute git add, git commit -m 'test' will find no successful commit and report an error, as shown in the following figure
If you put index JS code is modified as follows:
console.log('object')
Execute git add, git commit -m 'test' will find that the eslint code has passed the check and can be submitted normally. The above practice can well explain how to check the code before commit, but there is a disadvantage that others pull your code to execute git config 'core hooksPath' . Customgithooks works; The following describes the use of husky, lint staged, and committed lint
. git folders are not tracked and uploaded to the remote warehouse
Husky
github in order to solve the problem git configuration cannot submit to the remote warehouse. Husky comes out. After you install npm i, husky only needs to automatically execute husky install
Install npm install husky -D
npm install husky -D
use
Edit Package JSON adds the value of prepare in the script as husky install
  "scripts": {
    "prepare":"husky install"
  },
Then execute npm run prepare. What did you do
Source code index TS, we see that executing husky install is actually creating Husky directory, copy/ husky.sh file to this directory, and one is configured gitignore, set the core Hookspath (set the. Husky directory to git hooks directory)
Add a hook
Yes Create pre commit under husky directory
#!/bin/sh

echo 'start check your code,please wait...'
# git diff gets the changed content. You can configure the condition through the parameter -- diff filter
npx eslint $(git diff --cached --name-only --diff-filter=ACM -- '*.js')
# Variable $? --- > Execution status result of the previous command
if [ $? != '0' ];then
  echo "ending and failed,please check your code;"
 exit 1
else
  echo "check pass"
fi
index.js file contents are as follows
console.log('object')
Then execute git add, git commit -m 'test' found that the code has been intercepted and not submitted because of index JS code does not conform to the specification
The remaining problem is what to do if git hooks can't be written. Here's lint staged
lint-staged
Function of configuration example: bash command operation on Git temporary storage code file, etc
npm i lint-staged -D
Create a new directory under the root directory lintstagedrc file
{
  "*.js": "eslint"
}
Modify the pre commit under husky directory as follows
. "$(dirname "$0")/_/husky.sh"
npm run lint
package.json add script
"scripts": {
  "lint": "lint-staged"
}
index.js is as follows
console.log('object')
console.log('object')
Execute git add, git commit -m 'test', it can be found that eslint is called to check the code. If the check fails, exit the commit

To sum up, the code detection specification has been, and now the submission specification also needs to be standardized;
commitlint
github
Verify the information submitted by commit
npm install --save-dev @commitlint/config-conventional @commitlint/cli
Use new commitlint config. js
module.exports = {
 extends: ['@commitlint/config-conventional'],
 rules: {
  'type-enum': [2, 'always', ['build', 'ci', 'docs', 'feat', 'fix', 'perf', 'refactor', 'style', 'test', 'revert', 'chore']],
  'type-case': [0],
  'type-empty': [0],
  'scope-empty': [0],
  'scope-case': [0],
  'subject-full-stop': [0, 'never'],
  'subject-case': [0, 'never'],
  'header-max-length': [0, 'always', 72]
 }
}
Configure git hooks and execute the following command
npx husky add .husky/commit-msg 'npx --no -- commitlint --edit $1'
The commit message is generally divided into three parts: Header, Body and Footer
header
<type>(<scope>): <subject>
// One blank line
<body>
// One blank line
<footer>
Among them, Header Is required, Body and Footer Can be omitted
The next commit must conform to the following format
Notice the space after the colon
git commit -m <type>[optional scope]: <description>
Common type categories
- build: the main purpose is to modify the submission of the project construction system (such as glup, webpack, rollup configuration, etc.)
- ci: the main purpose is to modify the submission of project continuous integration process (such as Travis, Jenkins, gitlab, ci, Circle, etc.)
- docs: document update
- feat: what's new
- Fix: bug fix
- perf: Performance Optimization
- Refactor: refactor code (no new features, no bug fixes)
- style: code modification that does not affect program logic (modify white space characters, complete missing semicolons, etc.)
- Test: add test cases or update existing tests
- revert: rolls back an earlier commit
- chore: other types (daily affairs) that do not belong to the above types
optional scope: an optional modification scope. It is used to identify which module in the code is mainly involved in this submission.
description: describe the main contents of this submission in one sentence, so as to be concise and comprehensive.
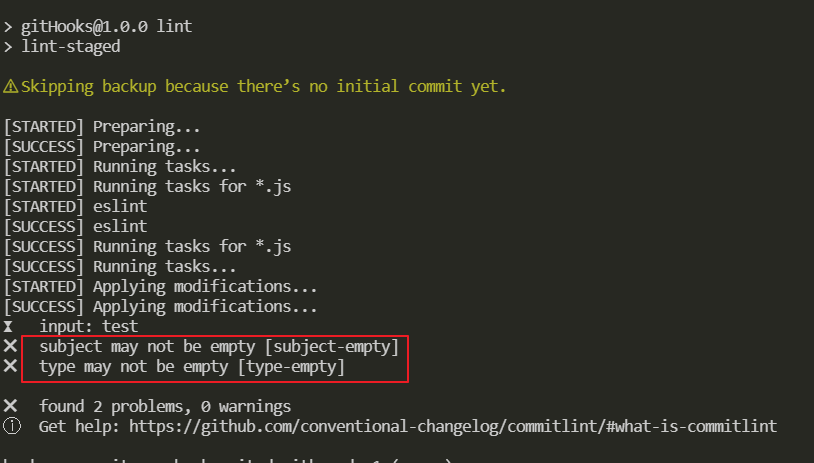
At this point, perform a test
git add .
git commit -m 'test'
Because the commit submitted is nonstandard, the failure during submission is shown in the following figure
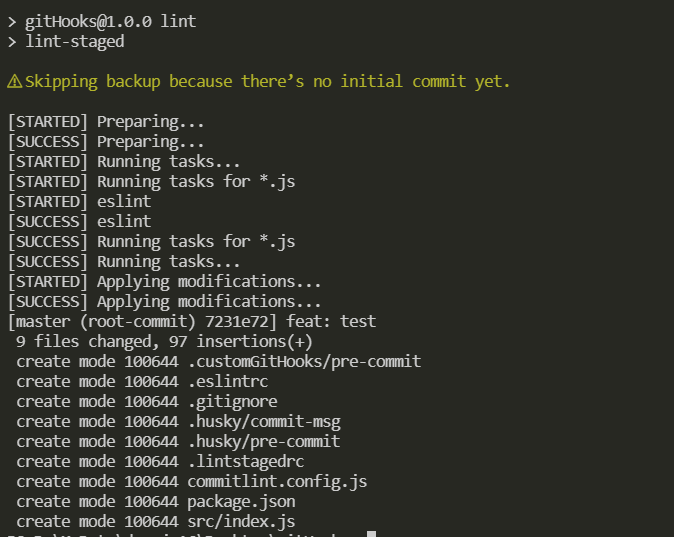
If you modify the commit, it will be submitted successfully because it complies with the commit specification
git add .
git commit -m 'feat: test'
But the problem comes again. You have to enter it every time you commit, which is a little inconvenient; And it may be wrong. Let's introduce commitizen
commitizen
cz-commitlint
Generate a qualified commit message
There is no global installation for the local installation. Of course, you can use the global installation. For the global installation, you can use git, CZ, CZ commitlint to get through the commitizen and commitlint configurations
npm install --save-dev @commitlint/cz-commitlint commitizen
then
npx commitizen init cz-conventional-changelog --save-dev --save-exact
package.json add script
{
 "scripts": {
  "commit": "git-cz"
 },
 "config": {
  "commitizen": {
   "path": "@commitlint/cz-commitlint"
  }
 }
}
Create a new commitlint config. js
module.exports = {
 extends: ['@commitlint/config-conventional']
}
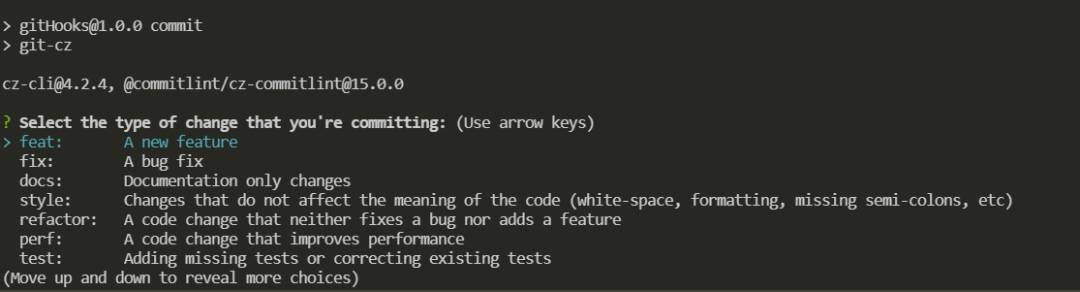
Then execute
git add .
npm run commit
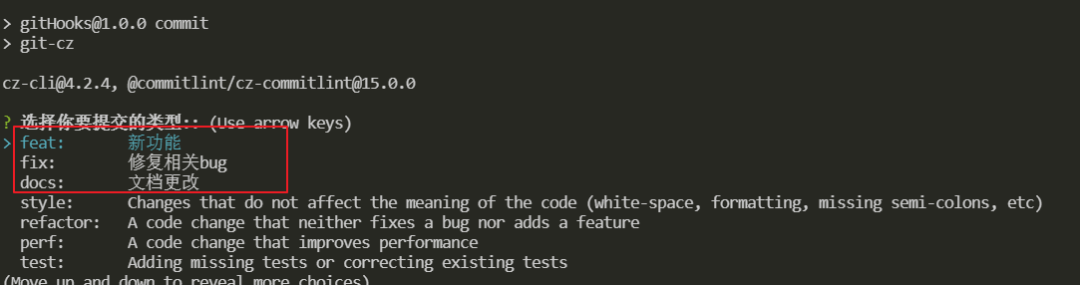
If it is found in Chinese, the prompt is shown in the figure below
Modify commitlint. Again config. js
module.exports = {
 extends: ['@commitlint/config-conventional'],
 prompt: {
  questions: {
   type: {
    description: 'Select the type you want to submit:',
    enum: {
     feat: {
      description: 'new function',
      title: 'Features',
      emoji: '✨'
     },
     fix: {
      description: 'Repair related bug',
      title: 'Bug Fixes',
      emoji: '🐛'
     },
     docs: {
      description: 'Document changes',
      title: 'Documentation',
      emoji: '📚'
     }
    }
   }
  }
 }
}
Then execute
git add .
npm run commit
You can see that it has become Chinese. Please refer to the official website for details
Next, submit the information and execute npm run commit to submit according to the specification; If you do not use commit lint, you can also customize many configurations by using CZ customizable in commit