First of all, the components of the applet are divided into two categories, which will also be introduced one by one in the following contents:
- Built in components
- Custom components
Built in components
Built in components refer to pre-defined components inside the applet. Developers can use them directly in the code without special references. Take the following code as an example:
<view>
	<text>This is a button</text>
	<button bintap='foo'>Button</button>
</view>
< View >, < text >, < button > are built-in components. For more usage methods of built-in components, please refer to Wechat applet development document.
Custom components
With the development of our small program, more and more code is written, and the code at the page level will become more and more bloated. At this time, we need to split the code into smaller granularity units, which can make the code easier to maintain and reuse. This smaller granularity unit, that is, custom components.
There is such a scenario: we fill in several mobile phone numbers on one page, click "save" and save the numbers in a list of storage. The page code is as follows:
// wxml
<view>index page</view>
<view class="wrapper">
  <input class="weui-input" bindinput="bindKeyInput"  placeholder="Please enter the correct mobile phone number" />
  <button type='primary' class="weui-btn" bindtap="updateTel" size="small">preservation</button>
</view>
<view class="wrapper">
  <input class="weui-input" bindinput="bindKeyInput"  placeholder="Please enter the correct mobile phone number" />
  <button type='primary' class="weui-btn" bindtap="updateTel" size="small">preservation</button>
</view>
<view class="wrapper">
  <input class="weui-input" bindinput="bindKeyInput"  placeholder="Please enter the correct mobile phone number" />
  <button type='primary' class="weui-btn" bindtap="updateTel" size="small">preservation</button>
</view>

// js
Page({
  data: {
    tel: ''
  },
  bindKeyInput(e) {
    this.setData({
      tel: e.detail.value
    })
  },
  getTelList() {
    return wx.getStorageSync('tel')
  },
  updateTel() {
    let telList = this.getTelList() || []
    if(this.data.tel.length !== 11) {
      wx.showToast({
        title: 'Please enter the correct mobile phone number',
      })
      return
    }
    telList.push(this.data.tel)
    wx.setStorage({
      key: 'tel',
      data: telList,
      success(res) {
        wx.showToast({
          title: 'Number saved successfully',
        })
      },
      fail(res) {

      }
    })
  }
})
```
You can see that there are a lot of duplicate template code here, which looks very bloated. Then we can extract the repeated code into a custom component, and then call it repeatedly where we need to use it.
For example, we can do this:
First step
Let's create a new folder of components in the root directory, and then select new component
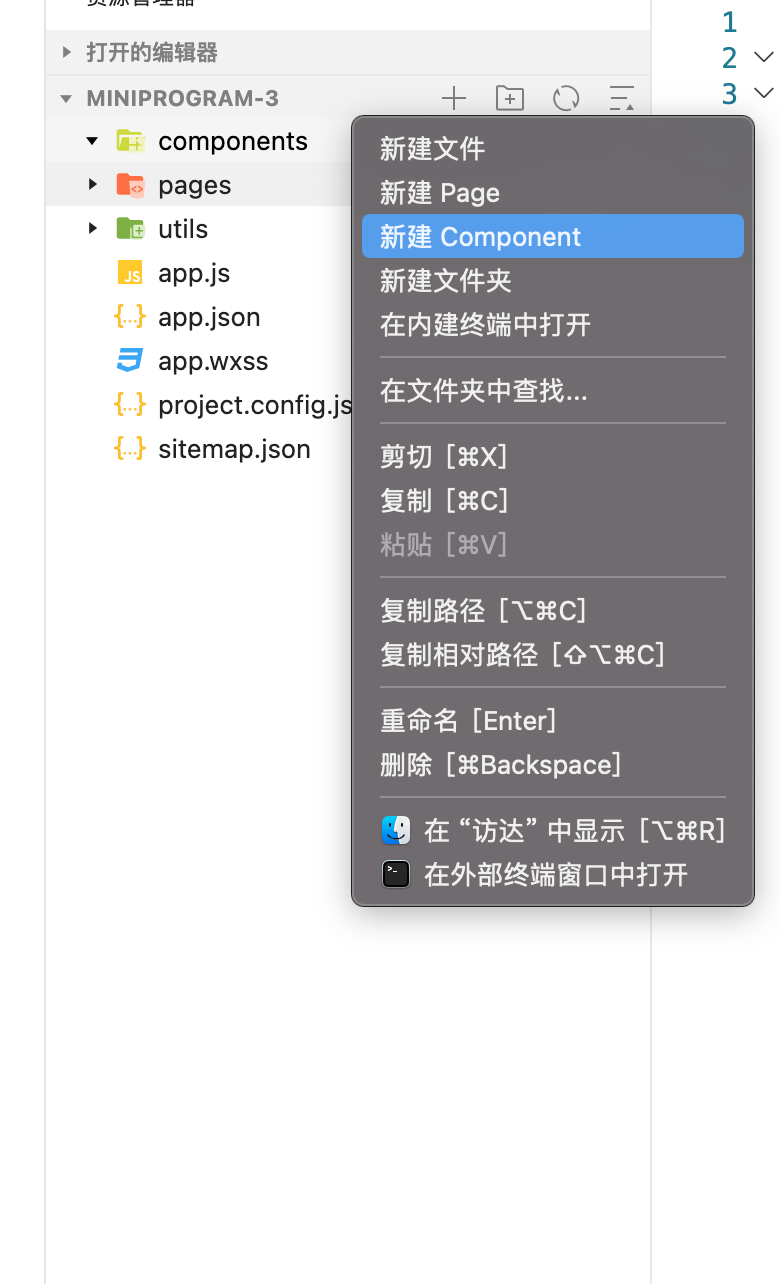
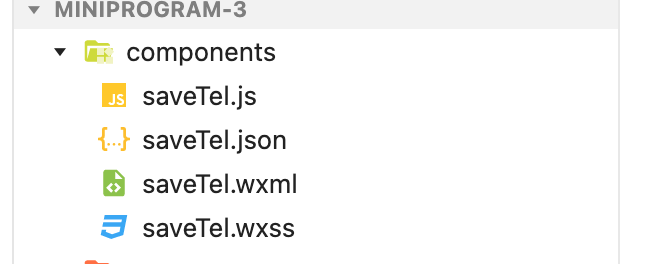
Step 2
Naming a 'saveTel' file will generate component related files and basic configuration
Step 3
We migrate the code originally written in the page to the component
// Move this part to savetel In wxml
<view class="wrapper">
  <input class="weui-input" bindinput="bindKeyInput"  placeholder="Please enter the correct mobile phone number" />
  <button type='primary' class="weui-btn" bindtap="updateTel" size="small">preservation</button>
</view>
// Index JS to savetel JS, as follows:
// Here are some points to note:
// 1. The js of the Component is wrapped by the Component constructor
// 2. The component method is not directly placed in the constructor configuration object like Page, but in a deeper layer of methods
Component({
  /**
   * List of properties for the component
   */
  properties: {

  },

  /**
   * Initial data of components
   */
  data: {
    tel: ''
  },

  /**
   * Component method list
   */
  methods: {
    bindKeyInput(e) {
      this.setData({
        tel: e.detail.value
      })
    },
    getTelList() {
      return wx.getStorageSync('tel')
    },
    updateTel() {
      let telList = this.getTelList() || []
      if(this.data.tel.length !== 11) {
        wx.showToast({
          title: 'Please enter the correct mobile phone number',
        })
        return
      }
      telList.push(this.data.tel)
      wx.setStorage({
        key: 'tel',
        data: telList,
        success(res) {
          wx.showToast({
            title: 'Number saved successfully',
          })
        },
        fail(res) {

        }
      })
    }
  }
})
```
Step 4
After the above steps, we have separated the logic / template / style of "input and save mobile phone number" from the page. Next, we need to introduce and use this component in the page, that is, "add the processed component to the page".
First, we need to know where and what the name of the component we want to reference. We can go to the corresponding page for these two information json to configure.
{
  "usingComponents": {
    "save-tel" : "/components/saveTel"
  }
}
// Save Tel is the name we give to the component. The name here can be used freely, but it is recommended to express the meaning
// /components/saveTel is the path where we refer to the component
After configuration, it also means that we have configured the components. Next, we need to import the components from the corresponding page template:
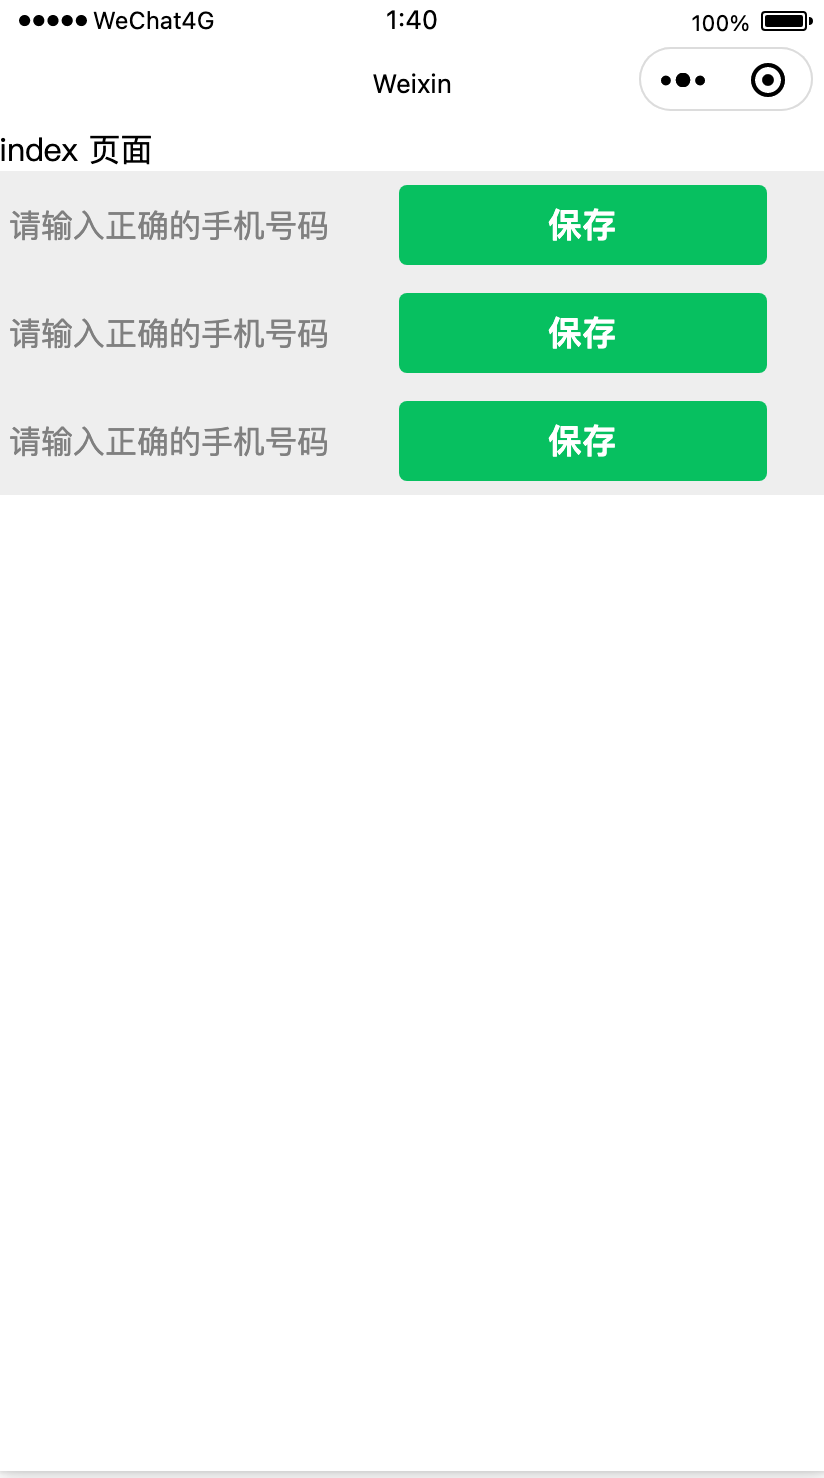
// wxml
<view>index page</view>
<save-tel></save-tel>
<save-tel></save-tel>
<save-tel></save-tel>
The effect is as follows. Test it to ensure that the functions such as input and save should be normal.
So far, we have completed the operation of extracting common logic from a page to the use of a component / component.
summary
We can realize the basic functions of our applet through built-in components, and then abstract public modules through custom components to increase the reusability of applet and make it have a more elegant code organization.
Of course, custom components also have various high-level functions, which you can read Wechat applet development document Deepen understanding.
This article belongs to FinClip One of the applet teaching series, more content can be accessed FinClip blog.