In order to study whether sql automatic inspection and analysis tools are easy to use, I install and use soar and soar web locally.
The preliminary experimental results are summarized as follows:
1. The installation is relatively cumbersome, especially the installation of dependency package of soar web, which involves the download and installation of related components of python pip.
2. When starting soar web, you will encounter some strange problems. The prompt "ImportError: No module named xxx" is not installed, but it is successfully installed through python -m pip list check.
3. The start script run.sh of soar web cannot be started normally, but it can be started normally by using python. / soar web.py install.
4. Database type. Only MySQL is supported
Follow-up:
Finally, the comprehensive feeling, the function of soar web, is far away from automatic SQL check and optimization, there is still a lot of space. Next, I will continue to investigate and compare the remaining two tools: see and year
1.see tools
https://github.com/myide/see
2. Year tool
https://github.com/cookieY/Yearning
1, The main steps of soar are as follows:
step 1: download the installation package
# prepare dir and install
mkdir -p /opt/soft/soar && mkdir -p /opt/install/soar/{log,conf}
wget -O /opt/soft/soar/soar  -c https://github.com/XiaoMi/soar/releases/download/0.11.0/soar.linux-amd64
step 2: copying and installing files
# install server
mv /opt/soft/soar/soar /opt/install/soar

# Table of contents:
# The configuration file is in yaml format. Generally, only a few parameters such as online DSN, test DSN, log output need to be configured. Even if you don't create a profile SOAR, you'll still have basic heuristics.
# The default files are loaded in the order of / etc / solar.yaml,. / etc / solar.yaml,. / solar.yaml,
# After finding the first one, do not continue to load the later configuration file. You can specify other configuration files through the - config parameter.
# The online DSN requires the SELECT permission of the corresponding database table, and the test DSN requires the highest root permission.

# Modify the default configuration parameters as follows
# Reference resources
# # 1. Modify the basic parameters of solar.conf
root >> cat > /opt/install/soar/conf/soar.yaml << EOF
# Online environment configuration
online-dsn:
  addr: CNT7XMYSQLD01:13306
  schema: sakila
  user: root
  password: 1t'sB1g3rt
  disable: false
# Test environment configuration
test-dsn:
  addr: CNT7XMYSQLD01:13307
  schema: test
  user: root
  password: 1t'sB1g3rt
  disable: false
# Whether to allow the same configuration of test environment and online environment
allow-online-as-test: true
# Whether to clean up the temporary files generated during the test
drop-test-temporary: true
# Grammar check widget
only-syntax-check: false
sampling-statistic-target: 100
sampling: false
# Log level, [0:Emergency, 1:Alert, 2:Critical, 3:Error, 4:Warning, 5:Notice, 6:Informational, 7:Debug]
log-level: 7
log-output: ${SOAR_LOG_DIR}/soar.log
# Optimize recommended output format
report-type: markdown
ignore-rules:
- ""
# The SQL in the blacklist will not give comments. One line of SQL can be regular or fingerprint. When filling in the fingerprint, note that the question mark needs to be escaped with a backslash.
blacklist: ${SOAR_CONF_DIR}/soar.blacklist
# Heuristic algorithm related configuration
max-join-table-count: 5
max-group-by-cols-count: 5
max-distinct-count: 5
max-index-cols-count: 5
max-total-rows: 9999999
spaghetti-query-length: 2048
allow-drop-index: false
# Display related configuration
explain-sql-report-type: pretty
explain-type: extended
explain-format: traditional
explain-warn-select-type:
- ""
explain-warn-access-type:
- ALL
explain-max-keys: 3
explain-min-keys: 0
explain-max-rows: 10000
explain-warn-extra:
- ""
explain-max-filtered: 100
explain-warn-scalability:
- O(n)
query: ""
list-heuristic-rules: false
list-test-sqls: false
verbose: true
root >> EOF
step 3: prepare environment variable
# env parameter and path
echo '' >> /etc/profile && \
echo 'SOAR_HOME=/opt/install/soar' >> /etc/profile && \
echo 'SOAR_CONF_DIR=$SOAR_HOME/conf' >> /etc/profile && \
echo 'SOAR_LOG_DIR=$SOAR_HOME/log' >> /etc/profile && \
echo 'PATH=$PATH:$SOAR_HOME' >> /etc/profile && \
source /etc/profile
step 4: File authorization
chmod -R 777 $SOAR_HOME/soar
step 5: check that the solar global configuration is effective
# View version
soar -version

# Print all heuristic rules
soar -list-heuristic-rules

# Print supported report formats
soar -list-report-types
2, The main steps of soar web are as follows:
step 1: install the dependency package of soar Web
step 1: install soar-web Dependency package
# 1.1 install python3, python3 PIP and gcc (gcc is required when installing Python components such as pycryptodome in source code)
yum install -y python36 python36-pip gcc

# Check Python 3 installation results
python -V
# Check the python components that pip has installed
python3 -m pip list
# Uninstall pip components
# python3 -m pip uninstall "packagename"

# 1.2 flash (python3 must be installed first)
# Installation tutorial: https://www.cnblogs.com/wobeinianqing/p/7650498.html
# yum install -y flask
python3 -m pip install flask


# 1.3 install pymysql (python3 must be installed first)
# Installation tutorial: https://blog.csdn.net/qq_37788558/article/details/73716002
# Installation tutorial: https://github.com/PyMySQL/PyMySQL
python3 -m pip install PyMySQL


# 1.4 install pycryptodome (python3 must be installed first)
python3 -m pip install pycryptodome
# If the pip download speed is slow, you can use the following command
#### Or installation mode 2, as follows
python3 -m pip install /opt/soft/soar/pycryptodome-3.9.6.tar.gz
#### Or installation mode 3, as follows
# Format = python3 -m pip install https://pypi.tuna.tsinghua.edu.cn/simple/simple / {package name}
# Format = python3 - M PIP install https://pypi.doublio.com/simple / {package name}
python3 -m pip install https://pypi.tuna.tsinghua.edu.cn/simple/pycryptodome-3.9.6.tar.gz
step 2: install soar Web
# 2.1 download the source code of solar Web
wget -O /opt/soft/soar/soar-web-master.zip  -c https://codeload.github.com/xiyangxixian/soar-web/zip/master
yum install -y unzip
unzip /opt/soft/soar/soar-web-master.zip -d /opt/soft/soar/

# 2.2 installing soar Web
mkdir -p /opt/install/soar-web && \
mv /opt/soft/soar/soar-web-master/*  /opt/install/soar-web
# Running soar Web
chmod -R 777 /opt/install/soar-web/run.sh
bash /opt/install/soar-web/run.sh

# 2.3 or start soar web as follows
cd /opt/install/soar-web/
python3 ./soar-web.py install
step 3: check the port as follows
netstat -nltp | grep 5077

step 4: client, access URL, as follows:

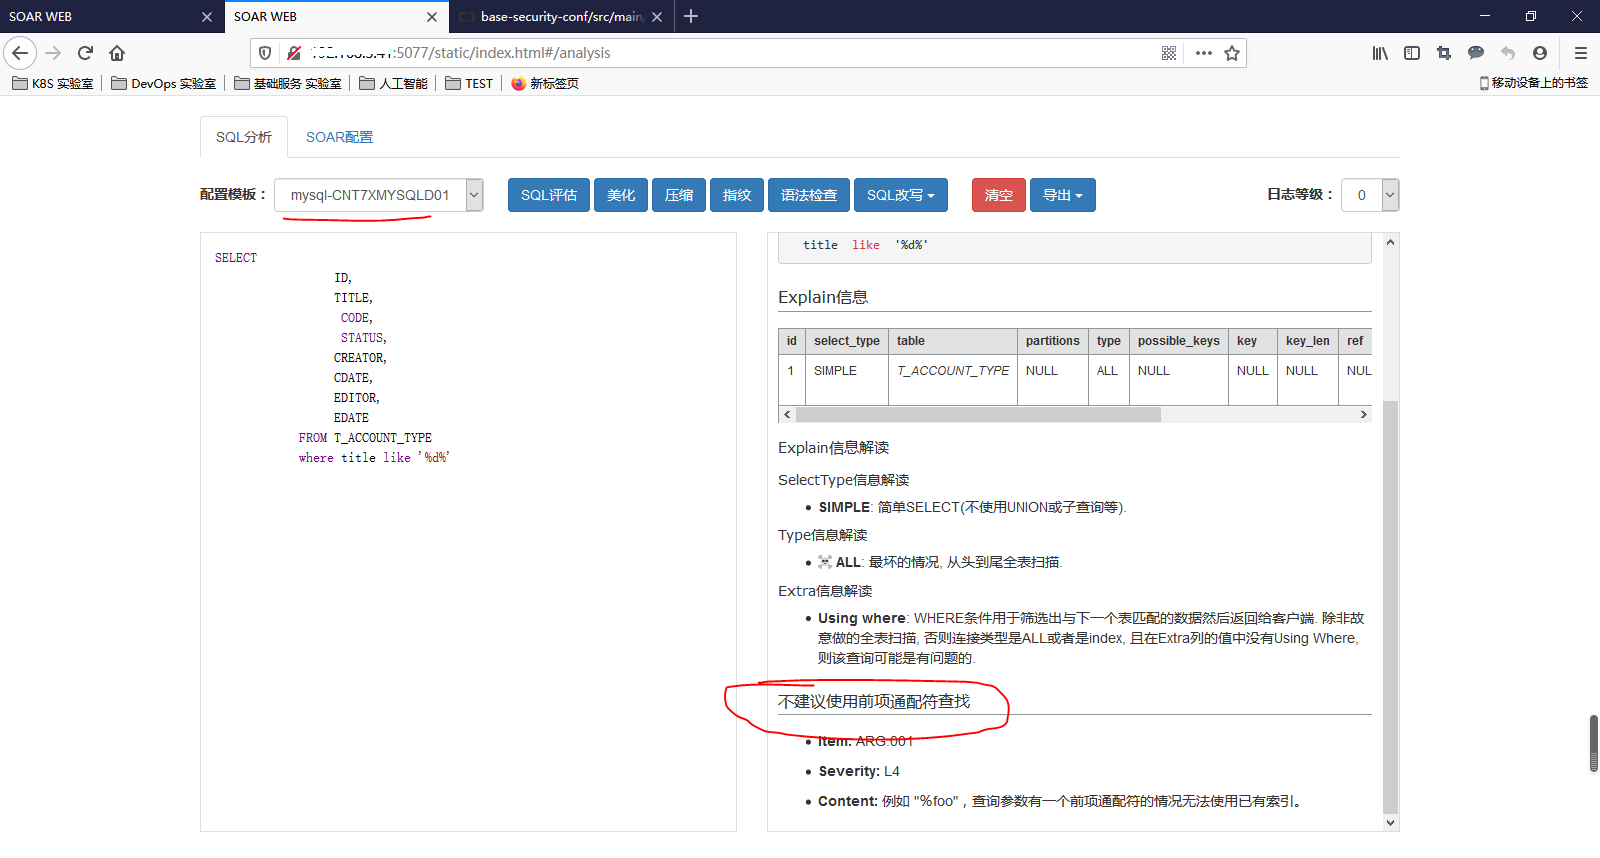
step 6: Test and use SQL check