Recently, in learning Baidu's open source upload component WebUploader, the last article learned how to upload batch files. Today, learn how to upload batch pictures. Actually, it is very similar to file upload, but it adds image display function, which has been provided in the WebUploader component.
First: The following is a batch file solution that uses WebUploader components to allow customers to select multiple files at a time, and then upload the selected files to the server.
Let's take a look at the client's interface first. (multiple file selection, batch upload, upload progress display)
1) Display interface:

Figure 1
2) Multi-document selection:

Figure 2
Note: Keep up with the previous article Solution of Web Uploader by Selecting Multiple Files at a Time in WEB Edition As can be seen from the comparison, this time only pictures are displayed, but no compressed files and executable files are displayed.
3) Upload progress display

Figure 3

Figure 4
Note: See the WebUploader image above. By default, three threads upload files concurrently. If you need to increase the number of concurrencies, or reduce the number of concurrencies. You can modify the threads attribute, which is the maximum number of concurrent uploads allowed.
3) Upload Successful Display
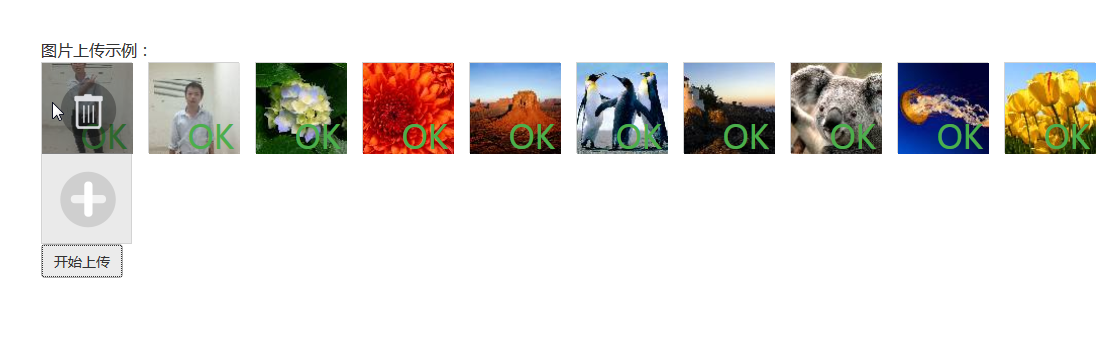
Figure 5
Second: Specific code and operation steps:
The first step is to prepare the WebUploader component for the following process.
1) WebUploader: You can visit the official website of WebUploader: http://fex.baidu.com/webuploader/download.html, where you can download components and demo.
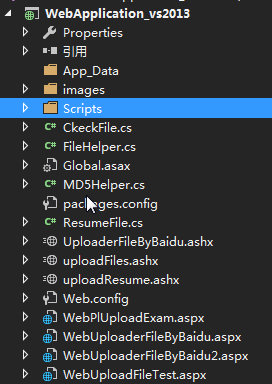
The second step is to create the directory structure of the application. The directory structure of my example is as follows:
1. Main Directory Structure
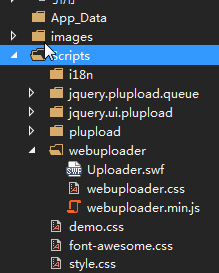
2. js script files and css files used for file upload.
The third step is to prepare the WEB interface for customer operations in the front desk as follows [WebUploader FileByBaidu.aspx, Uploader FileByBaidu.ashx]
1) Front-end client code, where the WebUploader FileByBaidu. ASPX code is as follows, WebUploader FileByBaidu. aspx. CS file only uses the default code, without adding any code.
WebUploaderFileByBaidu.aspx
Html code
<%@ Page Language="C#" AutoEventWireup="true" CodeBehind="WebUploaderFileByBaidu.aspx.cs" Inherits="WebApplication1.WebUploaderFileByBaidu" %>


<!DOCTYPE html>

<html xmlns="http://www.w3.org/1999/xhtml">
<head runat="server">

<meta http-equiv="Content-Type" content="text/html; charset=utf-8"/>

    <title></title>

    <script type="text/javascript" src="http://ajax.aspnetcdn.com/ajax/jQuery/jquery-1.8.2.min.js"></script>

      <link href="Scripts/webuploader/webuploader.css" rel="stylesheet" />
    <script type="text/javascript" src="Scripts/webuploader/webuploader.min.js"></script>
    <link href="https://cdn.bootcss.com/bootstrap/3.0.3/css/bootstrap.min.css" rel="stylesheet"/>
    <link href="Scripts/style.css" rel="stylesheet" />
    <link href="Scripts/demo.css" rel="stylesheet" />
    <link href="Scripts/font-awesome.css" rel="stylesheet" />


     <script type="text/javascript">
         var applicationPath = window.applicationPath === "" ? "" : window.applicationPath || "../../";

         $(function () {

             var $ = jQuery,
             $list = $('#fileList'),
             // optimization retina, stay retina The next value is 2.
             ratio = window.devicePixelRatio || 1,

             // thumbnail size

             thumbnailWidth = 90 * ratio,
             thumbnailHeight = 90 * ratio,

             // Web Uploader Example
             uploader;

             uploader = WebUploader.create({
                 // Whether to upload files automatically after selecting them.

                 auto: false,
                 disableGlobalDnd: true,
                 // swf File path
                 swf: applicationPath + 'Script/webuploader/Uploader.swf',

                 // File receiving server.

                 server: 'UploaderFileByBaidu.ashx',

                 // Select the button for the file. Optional.
                 // Internal based on current operation is created, possibly input Elements, or possibly flash.
                 pick: '#filePicker',

                 //Only picture selection is allowed
                 accept: {
                     title: 'Images',
                     extensions: 'gif,jpg,jpeg,bmp,png',
                     mimeTypes: 'image/*'

                 }

             });

             // When files are added

             uploader.on('fileQueued', function (file) {
                 var $li = $(

                         '<div id="' + file.id + '" class="cp_img">' +
                             '<img>' +
                         '<div class="cp_img_jian"></div></div>'

                         ),

                     $img = $li.find('img');
                 // $list For container jQuery instance
                 $list.append($li);
                 // Create Thumbnail
                 // If it's a non-picture file, you don't need to call this method.

                 // thumbnailWidth x thumbnailHeight For 90x 90
                 uploader.makeThumb(file, function (error, src) {
                     if (error) {
                         $img.replaceWith('<span>Unable to preview</span>');
                         return;
                     }

                     $img.attr('src', src);
                 }, thumbnailWidth, thumbnailHeight);

             });

             // Create progress bar to display in real time during file upload.
             uploader.on('uploadProgress', function (file, percentage) {

                 var $li = $('#' + file.id),
                     $percent = $li.find('.progress span');
                 // Avoid duplicate creation. If you don't want to show a progress bar like Figure 4, you can use the following code to comment out what you are using now.
               /*  if (!$percent.length) {
                     $percent = $('<p class="progress"><span></span></p>')
                             .appendTo($li)
                             .find('span');

                 }*/

                 if (!$percent.length) {
                     $percent = $('<div class="progress progress-striped active">' +
                       '<div class="progress-bar" role="progressbar" style="width: 0%">' +
                       '</div>' +
                     '</div>').appendTo($li).find('.progress-bar');

                 }
                 $percent.css('width', percentage * 100 + '%');

             });

             // The file was uploaded successfully. item Add success class, Upload success with style tags.
             uploader.on('uploadSuccess', function (file, response) {
                 $('#' + file.id).addClass('upload-state-done');

             });

             // File upload failed, showing upload error.
             uploader.on('uploadError', function (file) {
                 var $li = $('#' + file.id),
                     $error = $li.find('div.error');

                 // Avoid duplicate creation
                 if (!$error.length) {
                     $error = $('<div class="error"></div>').appendTo($li);

                 }
                 $error.text('Upload failure');

             });

             // Finish uploading, success or failure, delete progress bar first.
             uploader.on('uploadComplete', function (file) {
                 $('#' + file.id).find('.progress').remove();

             });

             //All files uploaded
             uploader.on("uploadFinished", function () {
                 //Submit Form

             });

             //Start uploading

             $("#ctlBtn").click(function () {
                 uploader.upload();

             });

             //Display Delete Button
             $(".cp_img").live("mouseover", function () {
                 $(this).children(".cp_img_jian").css('display', 'block');

             });

             //Hide Delete Button
             $(".cp_img").live("mouseout", function () {
                 $(this).children(".cp_img_jian").css('display', 'none');

             });

             //Execute the deletion method, just delete from the client
             $list.on("click", ".cp_img_jian", function () {
                 var Id = $(this).parent().attr("id");
                 uploader.removeFile(uploader.getFile(Id, true));
                 $(this).parent().remove();

             });

         });

    </script>

</head>

<body>

    <div class="container">

        <div class="row">Picture upload example:</div>

         <div class="row">

        <div id="file">

                 <!--Used to store file information-->

                <div id="fileList">

                </div>
        </div>

             </div>
          <div class="row">
     <div class="cp_img_jia" id="filePicker"></div>

    </div>
        <div class="row">  <button id="ctlBtn" class="btn btn-default">Start uploading</button></div>

    </div>
    <div>
    </div>
</body>
</html>
The final display of the above code is as follows:

Figure 8.
2) Background server-side code( Solution of Web Uploader by Selecting Multiple Files at a Time in WEB Edition ) The code of the UploaderFileByBaidu.ashx.cs file is the same.
Step 4: File Auxiliary Class( Solution of Web Uploader by Selecting Multiple Files at a Time in WEB Edition ) The code is the same in Chinese.
Fifth, after uploading, the files are saved in the corresponding date directory. The following diagram.

Figure 9