preface:
- This article is my first-order notes on learning the spring 5 framework from Shang Silicon Valley
- After learning, improve and understand yourself through later changes. Personally, I think this article can more clearly and easily understand the relevant knowledge of getting started with spring 5.
- The code part of the article intercepts the detailed and less redundant steps when I practice the Spring framework
Introduction to spring 5
1.Spring has two cores:
- IOC: control inversion, leaving the process of creating objects to Spring for management
- AOP: aspect oriented, without modifying the source code for function enhancement
2.Spring features:
(1) Convenient decoupling and simplified development
(2) Aop programming support
(3) Convenient program testing
(4) Facilitate integration with other frameworks
(5) Facilitate transaction operations
(6) Reduce the difficulty of API development
3. Introductory cases
- Get the object of the class through the Spring configuration file
<!--xml Medium configuration User Class to create an object-->
    <bean id="user" class="user.User"></bean>
       /*Load Spring configuration file*/
        ApplicationContext context = new ClassPathXmlApplicationContext("bean.xml"); //xml under src
        /*Get the object through the Spring configuration file*/
        User user = context.getBean("user",User.class); //id:user
IOC
1.IOC introduction
1. What is IOC
(1) Control inversion, and leave the object creation and calling process between objects to Spring for management
(2) Purpose of using IOC: to reduce coupling
(3) An introductory case is IOC implementation
2.IOC underlying principle
(1) xml parsing, factory schema, reflection
3. Draw and understand the underlying principle of IOC
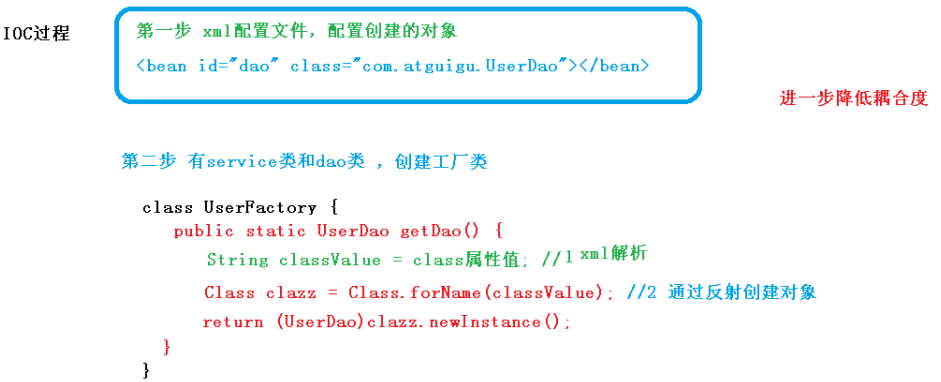
- IOC(BeanFactory interface)
1. The IOC idea is based on the IOC container, and the bottom layer of the IOC container is the object factory
2. Spring provides two ways to implement IOC container: (two interfaces)
(1) BeanFactory: the basic implementation of IOC container. It is the internal use interface of Spring and is not available for developers to use
- The object will not be created when the configuration file is loaded. The object is created only after the object is obtained (used)
(2) ApplicationContext: the sub interface of BeanFactory interface, which provides more and more powerful functions and is generally used by developers
- When the configuration file is loaded, the configuration file object will be created
2.Bean management XML
(1) What is Bean management
1. Bean management refers to two operations
(1) Spring create object
(2) Spirng injection properties
2. There are two ways to manage Bean operations
(1) Implementation of configuration file based on xml
(2) Annotation based implementation
(2) Attribute injection
- set method injection attribute
First create a class and its set method in the Bean
Manual assembly:
<bean id="book" class="test.Book">
        <!--name: Attribute name   value: Attribute value-->
        <property name="name" value="Java Programming thought"></property>
        <property name="price" value="98"></property>
    </bean>
p namespace injection, add attributes in the tag, and add p. attribute name in the tag
<beans xmlns:p="http://www.springframework.org/schema/p">
<bean id="book" class="test.Book" p:name="Java Programming idea 2" p:price="108"></bean>
Inject null value:
<property name="name">
            <null/>
</property>
Special symbols:
<property name="name">
            <value><![CDATA[<<"Java Programming thought">>]]></value>
</property>
- Using parametric construction to inject attributes
A parameterized constructor that writes a class in a Bean
<!--Parameterized constructor injection attribute-->
    <bean id="order" class="test.Order">
        <constructor-arg name="name" value="Java core technology "></constructor-arg>
        <constructor-arg name="price" value="144"></constructor-arg>
    </bean>
(3) Object injection
External Bean:
private UserDao userDao;

    public void setUserDao(UserDao userDao) {
        this.userDao = userDao;
    }

    public void serviceMethod(){
        System.out.println("UserService is realize");
        userDao.method();
    }
<!--external bean-->
    <!--establish UserService object-->
    <bean id="userService" class="test.Service.UserService">
        <!--injection userDao object
        name:UserService Property name in
        ref: userDao Configuration file id value
        -->
        <property name="userDao" ref="userDao"></property>
    </bean>
    <!--establish userDao object-->
    <bean id="userDao" class="test.Dao.UserDaoImpl"></bean>
Internal Bean:
public class Employee {
    private String name;
    private int age;

    private Department department;

    public void setDepartment(Department department) {
        this.department = department;
    }

    public void setName(String name) {
        this.name = name;
    }

    public void setAge(int age) {
        this.age = age;
    }
}
<!--inside bean-->
    <!--establish Employee object-->
    <bean name="employee" class="test.bean.Employee">
        <!--Set basic properties-->
        <property name="name" value="cxk"></property>
        <property name="age" value="20"></property>

        <!--injection Department object-->
        <property name="department">
            <!--establish Department object-->
            <bean name="department" class="test.bean.Department">
                <property name="deptName" value="Production department"></property>
                <property name="deptId" value="1"></property>
            </bean>
        </property>

    </bean>
(4) Array and collection injection
public class Into {
    private String[] arr;
    private List<String> list;
    private Map<String,Person> personMap;

    private Set<Person> personSet;

    public String[] getArr() {
        return arr;
    }
}
<bean name="into" class="collectionType.Into">
        <!--Array attribute injection-->
        <property name="arr">
            <array>
                <value>Cai Xukun</value>
                <value>Lu Benwei</value>
            </array>
        </property>

        <!--list Collection attribute injection-->
        <property name="list">
            <list>
                <value>cxk</value>
                <value>lbw</value>
            </list>
        </property>

        <!--Map Collection attribute injection-->
        <property name="personMap">
            <map>
                <entry key="cxk" value-ref="person1"></entry>
                <entry key="lbw" value-ref="person2"></entry>
            </map>
        </property>

        <!--set Collection attribute injection-->
        <property name="personSet">
            <set>
                <ref bean="person1"></ref>
                <ref bean="person2"></ref>
            </set>
        </property>
    </bean>

    <!--establish Person Class object-->
    <bean name="person1" class="collectionType.Person">
        <property name="name" value="MapCxk"></property>
        <property name="age" value="10"></property>
    </bean>
    <bean name="person2" class="collectionType.Person">
        <property name="name" value="MapLBW"></property>
        <property name="age" value="20"></property>
    </bean>
- Extract the set part and assign values
public class Book {
    private List<String> books;

    public void setBooks(List<String> books) {
        this.books = books;
    }
}
- Introducing namespaces in configuration files
<!--increase util-->
<beans xmlns="http://www.springframework.org/schema/beans"
       xmlns:xsi="http://www.w3.org/2001/XMLSchema-instance"
       xmlns:util="http://www.springframework.org/schema/util"
       xsi:schemaLocation="http://www.springframework.org/schema/beans http://www.springframework.org/schema/beans/spring-beans.xsd
                          http://www.springframework.org/schema/util http://www.springframework.org/schema/util/spring-util.xsd">
    <!--establish Book Object, direct use bookList Assign values-->
    <bean name="book" class="collectionType.Book">
        <property name="books" ref="bookList"></property>
    </bean>
    <!--extract list Attribute injection for collection type-->
    <util:list id="bookList">
        <value>Java Programming thought</value>
        <value>Java core technology </value>
        <value>Effective Java</value>
    </util:list>

</beans>
(5)FactoryBean
1. Spring has two types of beans, a normal bean and a factory bean
2. Ordinary bean: the bean type defined in the configuration file is the return type
3. Factory bean: the bean type defined in the configuration file can be different from the return type
-
The first step is to create a class that acts as a factory bean and implements the interface FactoryBean
-
The second step is to implement the method in the interface and define the returned bean type in the implemented method
public class MyBean implements FactoryBean<Person> {
    @Override
    public Person getObject() throws Exception {
        Person person = new Person();
        person.setName("kobe");
        person.setAge(10);
        return person;
    }
}
<bean name="myBean" class="factoryBean.MyBean"></bean>
@Test
    public void MyBeanTest(){
        ApplicationContext context = new ClassPathXmlApplicationContext("bean3.xml");
        Person myBean = context.getBean("myBean", Person.class);
        System.out.println(myBean);
    }
The obtained object is the Person object
scope attribute in label:
- singleton: single instance object (default)
- prototype: multi instance object
(6) Bean life cycle
(1) Create bean instance through constructor (no parameter construction)
(2) Set values for bean properties and references to other beans (call the set method)
(3) Pass the bean instance to the bean post processor's method postProcessBeforeInitialization
(4) Call the initialization method of the bean (the method that needs configuration initialization)
(5) Pass the bean instance to the bean post processor method postProcessAfterInitialization
(6) The bean is ready to use (the object is obtained)
(7) When the container is closed, call the bean destruction method (the method that needs to be configured for destruction)
- xml configuration file:
<!--Configure the object of the class-->
    <bean name="lifeCycleTest" class="lifeCycle.LifeCycleTest" init-method="initMethod" destroy-method="destroyMethod">
        <property name="name" value="Cai Xukun"></property>
    </bean>
    <!--Configure post processor-->
    <bean name="postProcessors" class="lifeCycle.PostProcessors"></bean>
- Note: when configuring a postprocessor, a postprocessor will be added for all of the current xml configuration file
(7) Automatic assembly
<!--to configure person Objects, auto assemble-->
    <bean name="person" class="auto.Person" autowire="byName"></bean>
    <!--to configure dept object-->
    <bean name="dept" class="auto.Dept"></bean>
(8) Import external properties file
- properties configuration file
prop.url=jdbc:mysql://localhost:3306/test
prop.username=root
prop.password=502502
prop.driverClassName=com.mysql.cj.jdbc.Driver
- You need to add the context attribute in the xml configuration file
<beans xmlns="http://www.springframework.org/schema/beans"
       xmlns:xsi="http://www.w3.org/2001/XMLSchema-instance"
       xmlns:context="http://www.springframework.org/schema/context"
       xsi:schemaLocation="http://www.springframework.org/schema/beans http://www.springframework.org/schema/beans/spring-beans.xsd
                           http://www.springframework.org/schema/context http://www.springframework.org/schema/context/spring-context.xsd">

<!--Import external properties file-->
    <context:property-placeholder location="classpath*:jdbc.properties"/>
    <!--Configure connection pool-->
        <bean name="dataSource" class="com.alibaba.druid.pool.DruidDataSource">
            <property name="url" value="${prop.url}" />
            <property name="username" value="${prop.username}" />
            <property name="password" value="${prop.password}" />
            <property name="driverClassName" value="${prop.driverClassName}" />
        </bean>
3.Bean management notes
(1) Creating objects with annotations
1. What is annotation
(1) Annotation is a code special tag, format: @ annotation name (attribute name = attribute value, attribute name = attribute value...)
(2) Using annotations, annotations act on classes, methods and properties
(3) Purpose of using annotations: to simplify xml configuration
2. Spring provides annotations for creating objects in Bean management
(1)@Component
(2)@Service
(3)@Controller
(4)@Repository
- The above four annotation functions are the same and can be used to create bean instances
Step 1: enable component scanning in xml configuration file
- Join context
<beans xmlns="http://www.springframework.org/schema/beans"
       xmlns:xsi="http://www.w3.org/2001/XMLSchema-instance"
       xmlns:context="http://www.springframework.org/schema/context"
       xsi:schemaLocation="http://www.springframework.org/schema/beans http://www.springframework.org/schema/beans/spring-beans.xsd
                           http://www.springframework.org/schema/context http://www.springframework.org/schema/context/spring-context.xsd">
    <!--Turn on component scanning-->
    <context:component-scan base-package="bean1"></context:component-scan>
- Base package represents the scanned package name, and multiple packages can be written
The second part is to create an entity class and add annotations
/*If you do not write value, the id defaults to the name of the class, starting with lowercase*/
@Component(value = "bean1Test") //Equivalent to < bean id = "bean1test" class = "" > < / bean >
public class Bean1Test {
    public void say(){
        System.out.println("name is Jack");
    }
}
- Details of component scanning
<!--Example 1
 use-default-filters="false" Indicates that the default is not used now filter,Self configuration filter
 context:include-filter ,Set what to scan
-->
<context:component-scan base-package="com.atguigu" use-defaultfilters="false">
 <context:include-filter type="annotation"

expression="org.springframework.stereotype.Controller"/>
</context:component-scan>
<!--Example 2
 Next, configure all contents of the scanning package
 context:exclude-filter:  Set what is not scanned
-->
<context:component-scan base-package="com.atguigu">
 <context:exclude-filter type="annotation"

expression="org.springframework.stereotype.Controller"/>
</context:component-scan>
(2) Injecting attributes & objects with annotations
- @Autowired: inject according to attribute type
/*Create UserService object*/
@Service
public class UserService {

    /*Injection properties: injecting UserDaoImpl objects*/
    @Autowired //Injection according to attribute type
    private UserDao userDao;
}
/*Create UserDaoImpl object*/
@Component
public class UserDaoImpl implements UserDao{
}
- @Qualifier: inject by name
Must be used with @ Autowired
/*Create UserService object*/
@Service
public class UserService {

    /*Injection properties: injecting UserDao objects*/
    @Autowired //Injection according to attribute type
    @Qualifier(value = "userDaoImpl") //Inject by attribute name
    private UserDao userDao;
}
/*Create UserDaoImpl object*/
@Component(value = "userDaoImpl")
public class UserDaoImpl implements UserDao{
}
- **@Resource: * * can be injected according to type or name (spring is not recommended in javax package)
/*Injection according to type*/
@Resource
    private UserDao userDao;
/*Injection by name*/
@Resource(name = "userDaoImpl")
    private UserDao userDao;
- **@Value: * * injection of basic type attribute value
 /*Injection of basic type attributes*/
    @Value(value = "cxk")
    private String name;
(3) Fully annotated development
Replace the xml configuration file with a configuration class
- Configuration: indicates that this class is a configuration class, which can replace xml
- ComponentScan(basePackages = {package path "," package path "})
@Configuration //Indicates that this class is a configuration class instead of an xml configuration file
@ComponentScan(basePackages = {"dao","service"}) //Component scanning, set the package to be scanned
public class SpringConfig {
}
Test method:
@Test
public void springConfigTest(){
    ApplicationContext context = new AnnotationConfigApplicationContext(SpringConfig.class); //Configuration class class
    UserService userService = context.getBean("userService", UserService.class);
    userService.serviceMethod();
}
AOP
1.AOP introduction
(1) What is AOP
(1) Aspect oriented programming (aspect oriented), AOP can isolate each part of business logic, reduce the coupling between each part of business logic, improve the reusability of program, and improve the efficiency of development.
(2) Popular Description: add new functions to the main functions without modifying the source code.
2.AOP underlying principle
- Interface: create a proxy object for the interface implementation class
- No interface: creates a proxy object for the current subclass
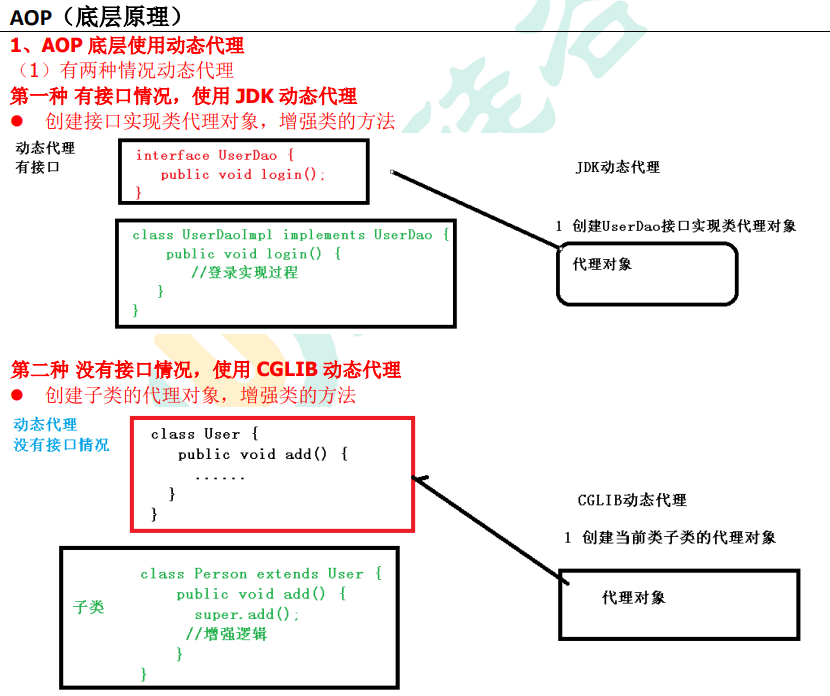
(2) Write JDK dynamic agent code
(1) Call the newProxyInstance method
Method has three parameters:
-
First parameter, class loader
-
The second parameter is the class where the enhancement method is located. The interface implemented by this class supports multiple interfaces
-
The third parameter is to implement this interface InvocationHandler, create a proxy object and write the enhanced part
public static void main(String[] args) {
        Class[] interfaces={UserDao.class};
        TheProxy theProxy = new TheProxy(new UserDaoImpl());
    /*Call the newProxyInstance method to call the proxy class and proxy class methods*/
        UserDao dao = (UserDao) Proxy.newProxyInstance(UserDaoProxy.class.getClassLoader(), interfaces, theProxy);
        System.out.println(dao.method1("cxk", 20));
        System.out.println(dao.method2("hello world"));
    }
(2) Create interface and implementation class
public interface UserDao {
    public String method1(String name, int age);
    public String method2(String str);
}

public class UserDaoImpl implements UserDao{
    @Override
    public String method1(String name, int age) {
        System.out.println("method1 Yes");
        return "name: "+name+" age: "+age;
    }

    @Override
    public String method2(String str) {
        System.out.println("method2 Yes");
        return "The string is:"+str;
    }
}
(3) Create proxy class
- method.getName(): the method name of the called proxied class
- Object proxy: the object passed into the proxy class
- Method method: pass in the proxy method
- Object[] args: pass in method parameters
- method.invoke (obj,args): run the proxied method obj: the passed in proxied class object
/*Create proxy class*/
class TheProxy implements InvocationHandler {

    /*The object passed into the proxied class*/
    private Object obj;
    /*The object of the proxy class is passed in through the parameterized construction method*/
    public TheProxy(Object obj){
        this.obj=obj;
    }

    /*Agent logic*/
    @Override           //The object of the proxy class is the parameter passed in by the proxy method
    public Object invoke(Object proxy, Method method, Object[] args) throws Throwable {
        /*Before proxy method*/
        System.out.println("Execute before proxy method:"+method.getName()+"Parameters passed in:"+ Arrays.toString(args)); //method.getName(): method name

        /*Proxy method execution*/
        Object invoke = method.invoke(obj, args);

        /*Execute after proxy method*/
        System.out.println("Execute after proxy method:"+method.getName()+"The parameters passed in are:"+Arrays.toString(args));

        return invoke;
    }
}
(3) AOP operational terminology
1. Connection point
The methods that can be enhanced in a class are called join points
2. Entry point
The methods that are actually enhanced in the class are called pointcuts
3. Notification (enhanced)
(1) The part that is actually enhanced is called notification (enhancement).
(2) There are types of notifications
- Pre notification: part before the enhanced method
- Post notification: part after the enhanced method
- Surround notification: before and after the enhanced method
- Exception notification: the part of the enhanced method that executes when an exception occurs
- Final notification: the final execution part of the enhanced method (equivalent to fianally)
4. Section
Is the process of applying notifications to pointcuts (actions)
2.AOP operation
(1) Operation description
1. Spring frameworks generally implement AOP operations based on AspectJ
AspectJ is not a part of Spring. It is an independent AOP framework. Generally, AspectJ and Spirng framework are used together for AOP operation
2. Implementation of AOP operation based on AspectJ
(1) Implementation of configuration file based on xml
(2) Annotation based implementation (use)
3. Pointcut expression
(1) Pointcut expression function: know which method in which class to enhance
(2) Syntax structure:
execution([permission modifier] [return type] [full path of class] Method name )
-
Example 1: com atguigu. dao. add in bookdao class is enhanced for execution(* com.atguigu.dao.BookDao.add(...))
-
Example 2: com atguigu. dao. All methods in the bookdao class are enhanced execution(* com.atguigu.dao.BookDao. * (...))
-
Example 3: com atguigu. All classes in the Dao package and all methods in the class are enhanced execution(* com.atguigu.dao.. (...))
(2) Configure different types of notifications (enhanced)
-
Component create object
-
@Aspect declares this class as an enhanced class and generates proxy annotations
-
@Before advance notice
-
@AfterReturning post notification
-
@Surround notification
-
@AfterThrowing exception notification
-
@After final notification
1. Create enhanced class
/*Enhanced class*/
@Component //Create the object of the enhanced class
public class UserDao {
    public void add(){
        System.out.println("add Method execution");
    }
}
2. Create profile
<!--add to context and aop-->
<beans xmlns="http://www.springframework.org/schema/beans"
       xmlns:xsi="http://www.w3.org/2001/XMLSchema-instance"
       xmlns:context="http://www.springframework.org/schema/context"
       xmlns:aop="http://www.springframework.org/schema/aop"
       xsi:schemaLocation="http://www.springframework.org/schema/beans http://www.springframework.org/schema/beans/spring-beans.xsd
                           http://www.springframework.org/schema/context http://www.springframework.org/schema/context/spring-context.xsd
                           http://www.springframework.org/schema/aop http://www.springframework.org/schema/aop/spring-aop.xsd">

    <!--Add annotation scan-->
    <context:component-scan base-package="aopTest"/>

    <!--open Aspect Generate proxy object: find whether there is a proxy object in the class@Aspect Object, if any, is an enhanced class-->
    <aop:aspectj-autoproxy></aop:aspectj-autoproxy>
3. Create enhancement class
/*Enhancement class*/
@Component //Create objects for enhanced classes
@Aspect //Declare this class as an enhanced class and generate proxy annotations
public class UserDaoProxy {

    /*Pre enhancement method (pre notification)*/
    /*Write a pointcut expression to indicate which method to enhance @ Before: indicates to execute Before the pointcut*/
    @Before(value = "execution(* aopTest.UserDao.add(..))")
    public void before(){
        System.out.println("before Method execution");
    }

    /*Post notification*/
    @AfterReturning(value = "execution(* aopTest.UserDao.add(..))")
    public void AfterReturning(){
        System.out.println("afterReturning Method execution");
    }

    /*Exception notification*/
    @AfterThrowing(value = "execution(* aopTest.UserDao.add(..))")
    public void afterThrowing(){
        System.out.println("afterThrowing Method execution");
    }

    /*Around Advice */
    @Around(value = "execution(* aopTest.UserDao.add(..))")
    public void around(ProceedingJoinPoint proceedingJoinPoint) throws Throwable {
        System.out.println("Front surround notification");
        proceedingJoinPoint.proceed(); //Execution entry point
        System.out.println("Rear surround notification");
    }


    /*Final notice*/
    @After(value = "execution(* aopTest.UserDao.add(..))")
    public void After(){
        System.out.println("after Method execution");
    }
}
(3) Extract pointcuts & set priorities
- Pointcut extracts pointcuts
- Order sets the priority of the enhancement class
1. @ Pointcut(value = "pointcut expression")
/*Extract the same pointcut and enhance the call in the method.*/
    @Pointcut(value = "execution(* aopTest.UserDao.add(..))")
    public void pointcut(){}

    @Before(value = "pointcut()") //Call the pointcut method to specify the pointcut
    public void before(){}
2. @ order (number): the smaller the number, the higher the priority
/*Set priority of enhancement class*/
@Order(1)
public class UserDaoProxy {}

@Order(2)
public class UseDaoProxy2 {}
(4) AspectJ XML configuration file operation
- Turn on component scanning
- Configuration enhancement
<!-- Add a component scan to obtain the objects in the specified package-->
    <context:component-scan base-package="aopxml"/>

    <!--to configure aop enhance-->
    <aop:config>
        <!--Configure pointcuts-->
        <aop:pointcut id="p1" expression="execution(* aopxml.Book.book(..))"/>

        <!--Configure section-->
        <aop:aspect ref="bookProxy"> <!--Fill in the object of the enhancement class-->
            <aop:before method="before" pointcut-ref="p1"/> <!--Set the enhancement type and name the pointcut-->
        </aop:aspect>
    </aop:config>
JdbcTemplate
1. Overview and preparation of jbctemplate
- What is a JdbcTemplate
The Spring framework encapsulates JDBC and uses JdbcTemplate to facilitate database operation
- Preparing the Jdbc configuration file
prop.url=jdbc:mysql://localhost:3306/test
prop.username=root
prop.password=502502
prop.driverClassName=com.mysql.cj.jdbc.Driver
- Configure the database connection pool in the spring configuration file
<!--Import external properties file-->
    <context:property-placeholder location="classpath*:jdbc.properties"/>
    <!--Configure connection pool-->
    <bean name="dataSource" class="com.alibaba.druid.pool.DruidDataSource">
        <property name="url" value="${prop.url}" />
        <property name="username" value="${prop.username}" />
        <property name="password" value="${prop.password}" />
        <property name="driverClassName" value="${prop.driverClassName}" />
    </bean>

    <!--establish JdbcTemplate object-->
    <bean name="jdbcTemplate" class="org.springframework.jdbc.core.JdbcTemplate">
        <!--injection dataSource-->
        <property name="dataSource" ref="dataSource"/>
    </bean>
- Turn on component scanning, get the comments containing the created object in the specified package, and create an object for it
<context:component-scan base-package="project1"/> <!--scanning project1 All content in-->
2. Use of jdbctemplate
(1) Basic writing level
- Create database, data table
- Create bean class
@Component
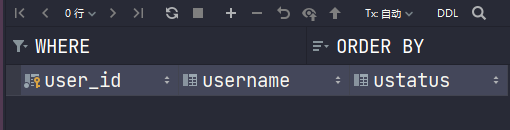
public class Book {
private String userId;
private String username;
private String ustatus;
/*get,set,toString,Constructor method*/
}
- Create a service layer (set the method of saving information)
@Component  //create object
public class BookService {

    /*Inject BookDaoImpl object*/
    @Autowired
    private BookDao bookDao;

    /*Add books*/
    public void addBook(Book book){
        bookDao.add(book);
}
- Create dao layer
Obtain the JdbcTemplate object with the @ Autowired annotation
Using the update method of the JdbcTemplate class, you can add, delete and modify by passing in sql statements and parameters
public interface BookDao {
    void add(Book book);
}

@Component  //create object
public class BookDaoImpl implements BookDao{

    /*Inject the JdbcTemplate object*/
    @Autowired
    private JdbcTemplate jdbcTemplate;

    @Override
    public void add(Book book) {
        String sql="insert into spring5.t_book values (?,?,?)";
        Object[] args={book.getUserId(), book.getUsername(), book.getUstatus()};
        /*update:jdbcTemplate Addition, deletion and modification of*/
        int update = jdbcTemplate.update(sql,args);
        System.out.println(update); //Number of rows affected
    }
}
- test
Since the add method of the BookService class is called, the test needs to get the object of the BookService class
After running, the book object information can be saved in the database
@Test
    public void BookTest1(){
        ClassPathXmlApplicationContext context = new ClassPathXmlApplicationContext("bean1.xml");
        BookService bookService = context.getBean("bookService", BookService.class);
        Book book = new Book();
        book.setUserId("1");
        book.setUsername("cxk");
        book.setUstatus("kobe");
        bookService.addBook(book);
}
(2) The JdbcTemplate method uses
-
Add, delete, modify:
update is the number of rows affected by the operation
int update = jdbcTemplate.update(sql, args); //sql statement, pass in parameters
- Total records queried
public int selectCount() {
        String sql="select count(*) from spring5.t_book";
        return jdbcTemplate.queryForObject(sql,Integer.class); //class of return value type
}
- Query and return objects according to a field
Beanpropertyrowmapper < return type > (return type. class)
public Book findBook(String user_id) {
        String sql="select * from spring5.t_book where user_id=?";
        Book book = jdbcTemplate.queryForObject(sql, new BeanPropertyRowMapper<Book>(Book.class), user_id);
        return book;
}
- Query returns multiple records (list collection object)
Beanpropertyrowmapper < return type > (return type. class)
public List<Book> findAll() {
        String sql="select * from spring5.t_book";
        List<Book> books = jdbcTemplate.query(sql, new BeanPropertyRowMapper<Book>(Book.class));
        return books;
}
- Batch add operation
The elements of the Object[] args array are the fields of each object
int[] update array is the number of rows affected by each data in the collection
public void batchAdd(List<Object[]> args) {
        String sql="insert into spring5.t_book values(?,?,?)";
        int[] update = jdbcTemplate.batchUpdate(sql, args);
}
- Multiline modification
public void batchUpdate(List<Object[]> args) {
    String sql="update spring5.t_book set username=?,ustatus=? where user_id=?";
    int[] ints = jdbcTemplate.batchUpdate(sql, args);
}
- Multiline deletion
public void batchDelete(List<Object[]> args) {
    String sql="delete from spring5.t_book where user_id=?";
    int[] ints = jdbcTemplate.batchUpdate(sql, args);
}
Thing operation
1. Concept of things
(1) What is a transaction
(1) Transaction is the most basic unit of database operation. Logically, a group of operations either succeed. If one fails, all operations fail
(2) Typical scenario: bank transfer * lucy transfers 100 yuan to mary * lucy is 100 less and mary is 100 more
2. Four characteristics of transaction (ACID)
(1) Atomicity
(2) Consistency
(3) Isolation
(4) Persistence
(2) Introduction to Spring transaction management
1. Generally, things are added to the service (business logic layer)
2. Transaction management operations in Spring
(1) There are two ways: programmed transaction management and declarative transaction management
- Programming (not commonly used)
public void accountMoney(){
/*marry Transfer to lucy*/

/*Open things*/
try {
    /*lucy More money*/
    accountDao.addMoney();

    /*marry Less money*/
    accountDao.reduceMoney();

    /*If there is no exception, submit the transaction*/
    System.out.println("No exception, submit things");
} catch (Exception e) {
    /*If an exception occurs, roll back the transaction*/
    System.out.println("If an exception occurs, roll back the transaction");
}
}
3. Declarative transaction management
(1) Annotation based approach (use)
(2) xml based configuration file mode
4. For declarative transaction management in Spring, the underlying layer uses AOP principle
2. Operation
(1) Declarative thing operations (annotation based)
- Add transaction configuration in spring's xml configuration file
Introducing namespace tx
<xmlns:tx="http://www.springframework.org/schema/tx"
http://www.springframework.org/schema/tx http://www.springframework.org/schema/tx/spring-tx.xsd>
Create the event manager, open the event annotation, and introduce the event manager
<!--Create transaction manager-->
<bean name="transactionManager" class="org.springframework.jdbc.datasource.DataSourceTransactionManager">
    <!--injection dataSource-->
    <property name="dataSource" ref="dataSource"/>
</bean>

<!--Open the event annotation and introduce the event manager-->
<tx:annotation-driven transaction-manager="transactionManager"></tx:annotation-driven>
- Add notes to things
(1) @ Transactional, this annotation can be added to classes or methods
(2) If you add this annotation to the class, all the methods in the class will add transactions
(3) If you add this annotation to the method, add transactions for the method
@Transactional //Open things (adding to a class indicates that all methods in the class have added things)
public class AccountServiceImpl {}
(2) Transaction management parameter configuration
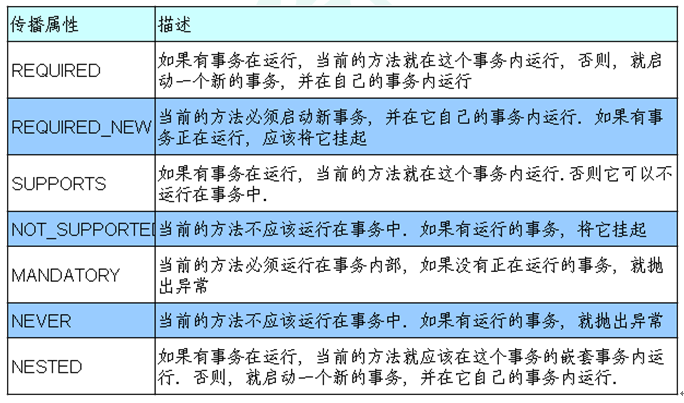
**1.propagation: * * transaction propagation behavior
Multiple transaction methods are called directly. How are transactions managed in this process
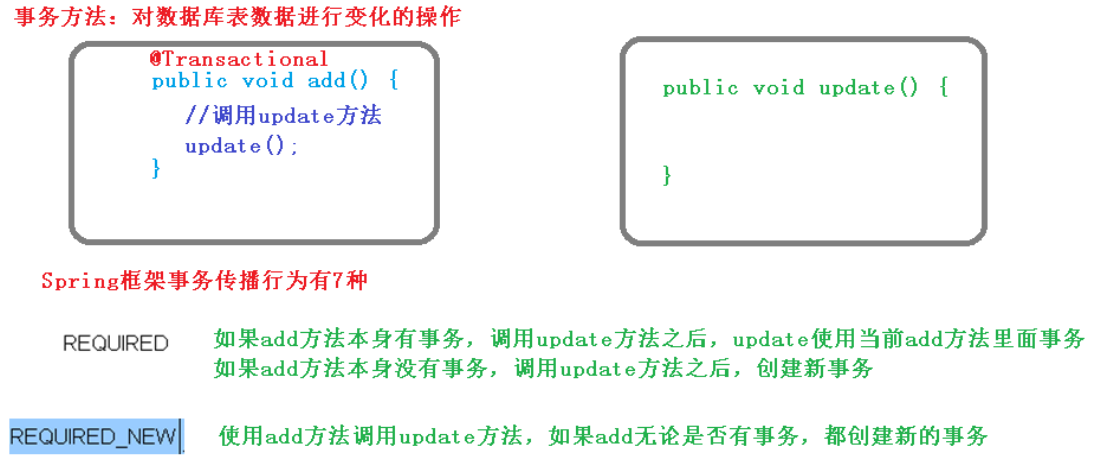
(7 propagation behaviors defined by Spring)
2.isolation: isolation level
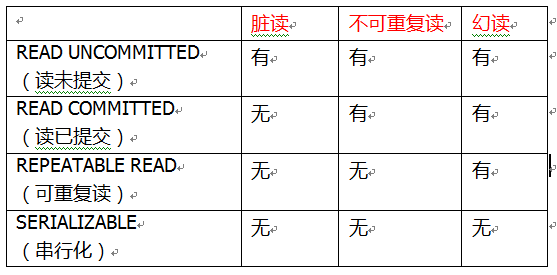
(1) Transactions are characterized by isolation, which will not affect multi transaction operations. Ignoring isolation will cause many problems
(2) There are three reading problems: dirty reading, unrepeatable reading and virtual (illusory) reading
- Dirty read: data read from one uncommitted transaction to another uncommitted transaction
- Non repeatable reading: one uncommitted transaction reads the modified data of another committed transaction
- Phantom read: an uncommitted transaction reads data added to another committed transaction
(3) Solution: solve the read problem by setting the transaction isolation level
3.timeout: timeout
(1) The transaction needs to be committed within a certain period of time. If it is not committed, it will be rolled back
(2) The default value is - 1, and the set time is calculated in seconds
4.readOnly: read only
(1) Read: query, write: add, modify, delete
(2) The default value of readOnly is false, which means that you can query, add, modify and delete operations
(3) Set the readOnly value to true. After it is set to true, you can only query
5. Rollback for: rollback
Set which exceptions occur for transaction rollback
6.noRollbackFor: no rollback
Set which exceptions occur without transaction rollback
(3) XML file configuration
Configure in the spring configuration file
-
Step 1: configure the transaction manager
-
Step 2 configure notifications
-
Step 3 configure pointcuts and facets
<!--Create transaction manager-->
<bean name="transactionManager" class="org.springframework.jdbc.datasource.DataSourceTransactionManager">
    <!--injection dataSource-->
    <property name="dataSource" ref="dataSource"/>
</bean>

<!--Configure notifications-->
<tx:advice id="txadvice">
    <!--Configure transaction parameters-->
    <tx:attributes>
        <!--Specify which method to add things to,And set things parameters-->
        <tx:method name="accountMoney"/>
    </tx:attributes>
</tx:advice>

<!--Configure pointcuts and facets-->
<aop:config>
    <!--Configure pointcuts-->
    <aop:pointcut id="pt" expression="(execution(* project.service.*(..)))"/>
    <!--Configure section-->
    <aop:advisor advice-ref="txadvice" pointcut-ref="pt"/>
</aop:config>
(4) Fully annotated statement management
- Create a configuration class instead of an xml configuration file
/*Replace the spring XML configuration file with a configuration class*/
@Configuration //Set as configuration class
@ComponentScan(basePackages = "project") //Set component scan
@EnableTransactionManagement //Open things
public class TxConfig {

    /*Create database connection pool*/
    @Bean
    public DruidDataSource getDruidDataSource(){
        DruidDataSource dataSource = new DruidDataSource();
        dataSource.setUrl("jdbc:mysql://localhost:3306/test");
        dataSource.setUsername("root");
        dataSource.setPassword("502502");
        dataSource.setDriverClassName("com.mysql.cj.jdbc.Driver");
        return dataSource;
    }

    /*Create an object for the JdbcTemplate*/
    @Bean
    public JdbcTemplate getJdbcTemplate(DataSource dataSource){ //The dataSource object was found by name in the ioc container
        JdbcTemplate jdbcTemplate = new JdbcTemplate();
        /*Inject dataSource*/
        jdbcTemplate.setDataSource(dataSource);
        return jdbcTemplate;
    }

    /*Create transaction manager object*/
    @Bean
    public DataSourceTransactionManager getDataSourceTransactionManager(DataSource dataSource){
        DataSourceTransactionManager dataSourceTransactionManager = new DataSourceTransactionManager();
        dataSourceTransactionManager.setDataSource(dataSource);
        return dataSourceTransactionManager;
    }
}
- test
@Test
public void txConfigTest(){
    AnnotationConfigApplicationContext context = new AnnotationConfigApplicationContext(TxConfig.class); //Configuration class class
    AccountServiceImpl accountServiceImpl = context.getBean("accountServiceImpl", AccountServiceImpl.class);
    accountServiceImpl.accountMoney();
}
What's new in spring 5
1. Log encapsulation
1. Spring 5.0 framework comes with a general log encapsulation
(1) Log4jConfigListener has been removed from spring 5, and Log4j2 is officially recommended
(2) Spring 5 framework integration Log4j2
2. Create log4j2 XML configuration file
<?xml version="1.0" encoding="UTF-8"?>
    <!--Log level and prioritization: OFF > FATAL > ERROR > WARN > INFO > DEBUG > TRACE >
    ALL -->
    <!--Configuration hinder status Used to set log4j2 The internal information output can not be set,
    When set to trace When, you can see log4j2 Various internal detailed outputs-->
    <configuration status="INFO">
    <!--Define all first appender-->
    <appenders>
        <!--Output log information to console-->
        <console name="Console" target="SYSTEM_OUT">
            <!--Controls the format of log output-->
            <PatternLayout pattern="%d{yyyy-MM-dd HH:mm:ss.SSS} [%t] %-
5level %logger{36} - %msg%n"/>
        </console>
    </appenders>
    <!--Then define logger,Only definition logger And introduced appender,appender Will take effect-->
    <!--root: Used to specify the root log of the project, if not specified separately Logger,Will be used root As
   Default log output-->
    <loggers>
    <root level="info">
    <appender-ref ref="Console"/>
    </root>
    </loggers>
    </configuration>
2. Spring 5 core container supports functional style
- @Nullable annotation
(1) The @ Nullable annotation can be used on methods, properties and parameters, indicating that the method return can be null, the property value can be null and the parameter value can be null
(2) The annotation is used on the method, and the return value of the method can be null
- Create objects in a functional style and hand them over to Spring for management
@Test
public void testGenericApplicationContext() {
    //1 create GenericApplicationContext object
    GenericApplicationContext context = new GenericApplicationContext();
    //2. Call the method object registration of context
    context.refresh();
    context.registerBean("user1",User.class,() -> new User());
    //3 get the object registered in spring
    // User user = (User)context.getBean("com.atguigu.spring5.test.User");
    User user = (User)context.getBean("user1");
    System.out.println(user);
}
3.Spring integrates JUnit
(1) Integrate JUnit 4
import org.junit.Test;
import org.junit.runner.RunWith;
import org.springframework.beans.factory.annotation.Autowired;
import org.springframework.test.context.ContextConfiguration;
import org.springframework.test.context.junit4.SpringJUnit4ClassRunner;
import project.junitTest.JunitClass;

@RunWith(SpringJUnit4ClassRunner.class) //Unit test class framework
@ContextConfiguration("classpath:bean.xml") //Load profile
public class Junit4Test {
    /*Inject the object of the class under test*/
    @Autowired
    private JunitClass junitClass;
    /*Create unit test*/
    @Test
    public void Test1(){
        junitClass.method();
    }
}
(2) Integrate Junit5
import org.junit.jupiter.api.Test;
import org.junit.jupiter.api.extension.ExtendWith;
import org.springframework.beans.factory.annotation.Autowired;
import org.springframework.test.context.ContextConfiguration;
import org.springframework.test.context.junit.jupiter.SpringExtension;
import project.junitTest.JunitClass;

@ExtendWith(SpringExtension.class)
@ContextConfiguration("classpath:bean.xml")
public class Junit5Test {

    @Autowired
    private JunitClass junitClass;

    @Test
    public void Test1(){
        junitClass.method();
    }
}
(3) Composite annotation integration JUnit 5
import org.junit.jupiter.api.Test;
import org.springframework.beans.factory.annotation.Autowired;
import org.springframework.test.context.junit.jupiter.SpringJUnitConfig;
import project.junitTest.JunitClass;

@SpringJUnitConfig(locations="classpath:bean.xml") //Merge test class annotations
public class JunitConfigTest {

    @Autowired
    private JunitClass junitClass;

    @Test
    public void Test(){
        junitClass.method();
    }
}
4.Webflux introduction
-
Spring Webflux is a new module added by spring 5 for web development. Its function is similar to spring MVC. Webflux uses a popular framework of responsive programming.
-
Using traditional web frameworks, such as spring MVC, which are based on Servlet containers, Webflux is an asynchronous non blocking framework. The asynchronous non blocking framework is in Servlet 3 1 later. The core is implemented based on the relevant API of Reactor.
-
Explain what asynchronous non blocking is
Asynchronous and synchronous
Non blocking and blocking
The above is for different objects
-
Asynchronous and synchronous are for the caller. If the caller sends a request and waits for the other party's response before doing other things, it is synchronous. If the caller does other things without waiting for the other party's response after sending a request, it is asynchronous
-
Blocking and non blocking are aimed at the callee. After receiving the request, the callee gives feedback only after completing the request task, which is blocking. After receiving the request, the callee gives feedback immediately and then does something is non blocking
-
Webflux features:
First, non blocking: under limited resources, improve system throughput and scalability, and realize responsive programming based on Reactor
Second, functional programming: the spring 5 framework is based on Java 8, and Webflux uses Java 8 functional programming to route requests
- Compare spring MVC
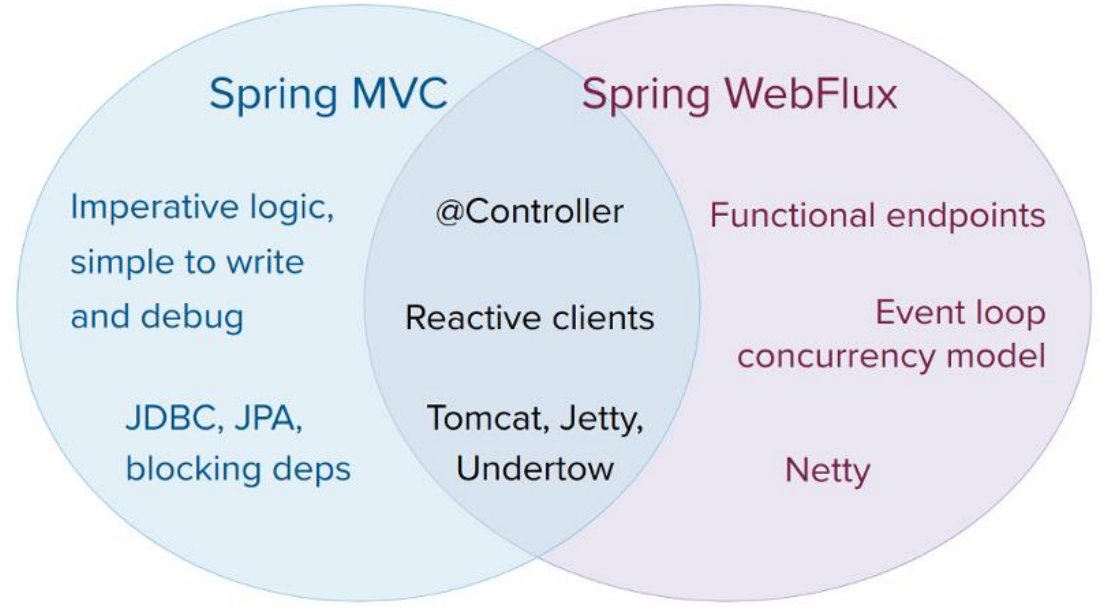
The first two frameworks can be annotated and run in containers such as Tomet
Second, spring MVC adopts imperative programming and Webflux adopts asynchronous response programming
- Webflux, as a new feature of spring 5, is not well understood. After learning the spring family framework, I will go back to the Webflux stage.
- That's all for my work on the spring 5 framework. Thank you for watching.