1. Spring5 transactions
What is a transaction?
Transaction is the most basic unit of database operation. Logically, it is a set of operations. Either all succeed. If one fails, all fail.
Four characteristics of transactions:
Atomicity, consistency, isolation, persistence.
A case we often encounter is the problem of bank transfer.
Just like the following transfer, it should be an increase and a decrease. But if something goes wrong in the middle! Then use the transaction to do a rollback operation!
The cases are as follows:
First create a database to test the use of:

After that, in POM In XML, import the response package:
<?xml version="1.0" encoding="UTF-8"?>
<project xmlns="http://maven.apache.org/POM/4.0.0"
         xmlns:xsi="http://www.w3.org/2001/XMLSchema-instance"
         xsi:schemaLocation="http://maven.apache.org/POM/4.0.0 http://maven.apache.org/xsd/maven-4.0.0.xsd">
    <modelVersion>4.0.0</modelVersion>

    <groupId>org.example</groupId>
    <artifactId>spring5_atguigu_transaction</artifactId>
    <version>1.0-SNAPSHOT</version>

    <properties>
        <maven.compiler.source>8</maven.compiler.source>
        <maven.compiler.target>8</maven.compiler.target>
    </properties>

    <dependencies>
        <!-- https://mvnrepository.com/artifact/org.springframework/spring-webmvc -->
        <dependency>
            <groupId>org.springframework</groupId>
            <artifactId>spring-webmvc</artifactId>
            <version>5.3.14</version>
        </dependency>
        <!-- https://mvnrepository.com/artifact/mysql/mysql-connector-java -->
        <dependency>
            <groupId>mysql</groupId>
            <artifactId>mysql-connector-java</artifactId>
            <version>8.0.22</version>
        </dependency>
        <!-- https://mvnrepository.com/artifact/com.alibaba/druid -->
        <dependency>
            <groupId>com.alibaba</groupId>
            <artifactId>druid</artifactId>
            <version>1.2.6</version>
        </dependency>

        <!-- https://mvnrepository.com/artifact/org.springframework/spring-jdbc -->
        <dependency>
            <groupId>org.springframework</groupId>
            <artifactId>spring-jdbc</artifactId>
            <version>5.3.13</version>
        </dependency>

        <!--spring tx I don't know what to do.-->
        <dependency>
            <groupId>org.springframework</groupId>
            <artifactId>spring-tx</artifactId>
            <version>5.2.6.RELEASE</version>
        </dependency>
        <!--spring orm I don't know what to do-->
        <dependency>
            <groupId>org.springframework</groupId>
            <artifactId>spring-orm</artifactId>
            <version>5.2.6.RELEASE</version>
        </dependency>
        <!-- https://mvnrepository.com/artifact/org.aspectj/aspectjweaver -->
        <dependency>
            <groupId>org.aspectj</groupId>
            <artifactId>aspectjweaver</artifactId>
            <version>1.9.6</version>
        </dependency>


    </dependencies>

</project>
Configure beans XML file. Note that beans.xml in idea When naming XML, no error will be reported if there is a space in front of it! Be careful not to have spaces.
<?xml version="1.0" encoding="UTF-8"?>
<beans xmlns="http://www.springframework.org/schema/beans"
       xmlns:context="http://www.springframework.org/schema/context"
       xmlns:aop="http://www.springframework.org/schema/aop"
       xmlns:xsi="http://www.w3.org/2001/XMLSchema-instance"
       xsi:schemaLocation="
       http://www.springframework.org/schema/beans
       http://www.springframework.org/schema/beans/spring-beans.xsd
       http://www.springframework.org/schema/context
       http://www.springframework.org/schema/context/spring-context.xsd
       http://www.springframework.org/schema/aop
       http://www.springframework.org/schema/aop/spring-aop.xsd">

    <context:component-scan base-package="com.itholmes"/>

    <bean id="dataSource" class="com.alibaba.druid.pool.DruidDataSource" destroy-method="close">
        <property name="url" value="jdbc:mysql://localhost:3306/user_db?ServerTimezone=Aisa/shanghai"/>
        <property name="username" value="root"/>
        <property name="password" value="0818"/>
        <property name="driverClassName" value="com.mysql.cj.jdbc.Driver"/>
    </bean>

    <bean id="jdbcTemplate" class="org.springframework.jdbc.core.JdbcTemplate">
        <property name="dataSource" ref="dataSource"/>
    </bean>

</beans>
Create an interface and an implementation class of dao layer to operate the contents in the database:
package com.itholmes.dao;

public interface UserDao {

    public void addMoney();
    public void reduceMoney();

}
package com.itholmes.dao;

import org.springframework.beans.factory.annotation.Autowired;
import org.springframework.jdbc.core.JdbcTemplate;
import org.springframework.stereotype.Repository;

@Repository
public class UserDaoImpl implements UserDao{

    @Autowired
    private JdbcTemplate jdbcTemplate;

    //Less money (lucy transfer 100)
    @Override
    public void reduceMoney() {
        String sql = "update t_account set money=money-? where username=?";
        jdbcTemplate.update(sql, 100, "lucy");

    }

    //More money (mery receives 100)
    @Override
    public void addMoney() {
        String sql = "update t_account set money=money+? where username=?";
        jdbcTemplate.update(sql, 100, "mery");

    }

}
Then create the UserService class in the service layer. In order to facilitate the implementation without setting an interface, it is the same:
package com.itholmes.service;

import com.itholmes.dao.UserDao;
import org.springframework.beans.factory.annotation.Autowired;
import org.springframework.stereotype.Service;

@Service
public class UserService {

    //Injection dao
    @Autowired
    private UserDao userDao;

    //Calling transfer method in service business logic layer
    public void accountMoney() {


        //lucy transfer 100
        userDao.reduceMoney();

        //Simulation exceptions, such as power failure, network failure, etc.
        int i = 1 / 0;

        //mery collection 100
        userDao.addMoney();


    }

}
Test class to test:
import com.itholmes.service.UserService;
import org.springframework.context.ApplicationContext;
import org.springframework.context.support.ClassPathXmlApplicationContext;

public class Test {
    public static void main(String[] args) {

        ApplicationContext context = new ClassPathXmlApplicationContext("beans.xml");
        UserService bean = context.getBean("userService", UserService.class);
        bean.accountMoney();

    }
}
Just like the above effect, you need to use transactions in the service at this time!!! Transactions can be at any layer, but we'd better use them at the business logic service layer.
2. Spring 5 transaction operation
We usually add transactions to the Service layer (business logic layer).
There are two ways to perform transaction management operations in Spring:
- Programming transaction management
- Declarative transaction management (most used)
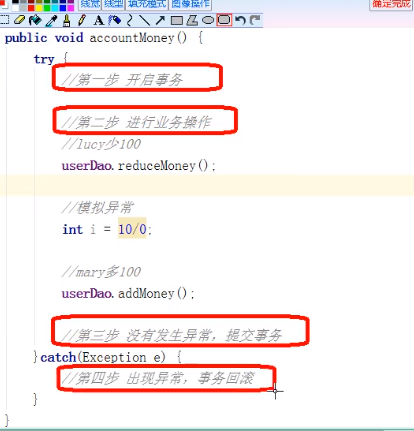
Programming transaction management is to use code to operate transactions step by step. This method is very troublesome! And the code is very redundant.
Just like the try catch method, handle the following situations:
Declarative transaction management is divided into annotation based (the most commonly used) and xml based configuration file.
For declarative transaction management in Spring, the underlying principle of AOP is used, which is very reasonable! AOP is aspect oriented programming, which can enhance the code functions without changing the source code. If you ask about the underlying principles of using AOP in Spring, you can go back to Spring's declarative transaction management.
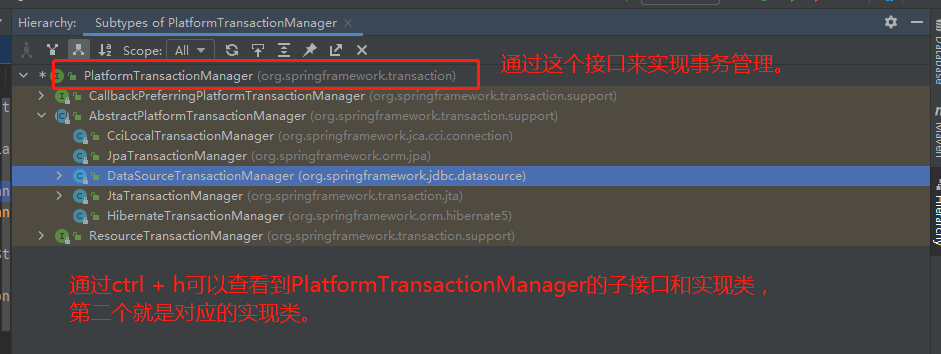
Spring Transaction Management API:
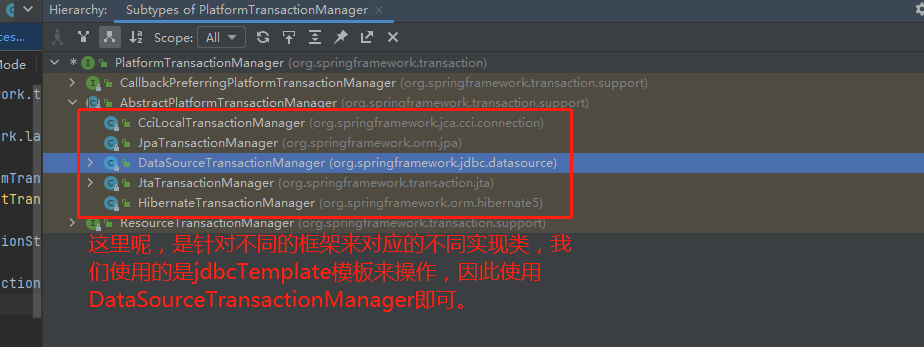
- A PlatformTransactionManager interface is provided to represent the transaction manager. This interface provides different implementation classes for different frameworks.
Understand the hierarchy of the PlatformTransactionManager interface:
We can use ctrl + H to view the hierarchy of structure classes.
3. Spring 5 declarative transaction management (annotation method)
Step 1: configure the transaction manager in the Spring configuration file.
As mentioned above, different frameworks implement different implementation classes of PlatformTransactionManager.
The transaction manager here sounds very tall, but it is actually in beans Create the corresponding implementation class in the XML file, just like the bean tag with id transaction manager below.
<?xml version="1.0" encoding="UTF-8"?>
<beans xmlns="http://www.springframework.org/schema/beans"
       xmlns:context="http://www.springframework.org/schema/context"
       xmlns:aop="http://www.springframework.org/schema/aop"
       xmlns:xsi="http://www.w3.org/2001/XMLSchema-instance"
       xsi:schemaLocation="
       http://www.springframework.org/schema/beans
       http://www.springframework.org/schema/beans/spring-beans.xsd
       http://www.springframework.org/schema/context
       http://www.springframework.org/schema/context/spring-context.xsd
       http://www.springframework.org/schema/aop
       http://www.springframework.org/schema/aop/spring-aop.xsd">

    <context:component-scan base-package="com.itholmes"/>

    <bean id="dataSource" class="com.alibaba.druid.pool.DruidDataSource" destroy-method="close">
        <property name="url" value="jdbc:mysql://localhost:3306/user_db?ServerTimezone=Aisa/shanghai"/>
        <property name="username" value="root"/>
        <property name="password" value="0818"/>
        <property name="driverClassName" value="com.mysql.cj.jdbc.Driver"/>
    </bean>

    <bean id="jdbcTemplate" class="org.springframework.jdbc.core.JdbcTemplate">
        <property name="dataSource" ref="dataSource"/>
    </bean>


    <!--Create a transaction manager because we are using jdbcTemplate,So we want to create DataSourceTransactionManager Transaction manager.-->
    <bean id="transactionManager" class="org.springframework.jdbc.datasource.DataSourceTransactionManager">

        <!--By viewing DataSourceTransactionManager Source code is not difficult to see, there is a setDataSource Method, so inject the data source dataSource!-->
        <!--
            Injection data source datasource .
                It's confusing here, name of dataSource It points to the inside of the source code setDataSource method(injection),
                ref of dataSource Point to the Druid above druid of dataSource!
        -->
        <property name="dataSource" ref="dataSource"></property>

    </bean>


</beans>
Step 2: open the transaction annotation in the Spring configuration file.
- 1. In the spring configuration file beans Introduce namespace tx into XML.
(tx here is the spring tx package we imported earlier. The spring tx module is responsible for implementing the transaction management function in the spring framework. It injects transactions into business code in an aop perspective and implements different types of transaction managers.)
xmlns:tx="http://www.springframework.org/schema/tx"
xsi:schemaLocation="
	http://www.springframework.org/schema/tx
	http://www.springframework.org/schema/tx/spring-tx.xsd"
- 2. Open the annotation of the transaction in the configuration file beans Open transaction annotations in XML.
<!--Open transaction annotation-->
<!--transaction-manager To specify which transaction manager.-->
<tx:annotation-driven transaction-manager="transactionManager"></tx:annotation-driven>
Full beans The XML effect is as follows:
<?xml version="1.0" encoding="UTF-8"?>
<beans xmlns="http://www.springframework.org/schema/beans"
       xmlns:context="http://www.springframework.org/schema/context"
       xmlns:aop="http://www.springframework.org/schema/aop"
       xmlns:tx="http://www.springframework.org/schema/tx"
       xmlns:xsi="http://www.w3.org/2001/XMLSchema-instance"
       xsi:schemaLocation="
       http://www.springframework.org/schema/beans
       http://www.springframework.org/schema/beans/spring-beans.xsd
       http://www.springframework.org/schema/context
       http://www.springframework.org/schema/context/spring-context.xsd
       http://www.springframework.org/schema/aop
       http://www.springframework.org/schema/aop/spring-aop.xsd
       http://www.springframework.org/schema/tx
       http://www.springframework.org/schema/tx/spring-tx.xsd">

    <context:component-scan base-package="com.itholmes"/>

    <bean id="dataSource" class="com.alibaba.druid.pool.DruidDataSource" destroy-method="close">
        <property name="url" value="jdbc:mysql://localhost:3306/user_db?ServerTimezone=Aisa/shanghai"/>
        <property name="username" value="root"/>
        <property name="password" value="0818"/>
        <property name="driverClassName" value="com.mysql.cj.jdbc.Driver"/>
    </bean>

    <bean id="jdbcTemplate" class="org.springframework.jdbc.core.JdbcTemplate">
        <property name="dataSource" ref="dataSource"/>
    </bean>


    <!--Create a transaction manager because we are using jdbcTemplate,So we want to create DataSourceTransactionManager Transaction manager.-->
    <bean id="transactionManager" class="org.springframework.jdbc.datasource.DataSourceTransactionManager">

        <!--By viewing DataSourceTransactionManager Source code is not difficult to see, there is a setDataSource Method, so inject the data source dataSource!-->
        <!--
            Injection data source datasource .
                It's confusing here, name of dataSource It points to the inside of the source code setDataSource method(injection),
                ref of dataSource Point to the Druid above druid of dataSource!
        -->
        <property name="dataSource" ref="dataSource"></property>

    </bean>

    <!--Open transaction annotation-->
    <!--transaction-manager To specify which transaction manager.-->
    <tx:annotation-driven transaction-manager="transactionManager"></tx:annotation-driven>

</beans>
Step 3: add transaction annotations on the service class (or on the methods in the service class).
- @Transactional annotations can be added to both classes and methods.
- Add to the class, then all the methods in the class add transactions to them.
- Add to the method, then just add transactions to the method.
package com.itholmes.service;

import com.itholmes.dao.UserDao;
import org.springframework.beans.factory.annotation.Autowired;
import org.springframework.stereotype.Service;
import org.springframework.transaction.annotation.Transactional;

@Service
@Transactional
public class UserService {

    //Injection dao
    @Autowired
    private UserDao userDao;

    //Calling transfer method in service business logic layer
    public void accountMoney() {

		//Once the @ Transactional annotation is set, the following steps will be performed automatically because it is the principle of AOP aspect programming.
        //Step 1: start the transaction
        //Part II: business operation

        //lucy transfer 100
        userDao.reduceMoney();

        //Simulation exceptions, such as power failure, network failure, etc.
        int i = 1 / 0;

        //mery collection 100
        userDao.addMoney();

        //If there are no exceptions in the above steps, we will commit the transaction.
        //Part III: submission of services

        //If an error occurs, an exception occurs.
        //Part IV: transaction rollback
    }

}
In this way, we can test whether the transaction rollback effect can be achieved through the test class.
4. Spring 5 declarative transaction management parameter configuration
4.1 introduction to parameter configuration
@Transactional. Transaction related parameters can be configured in this annotation.
In idea, you can use ctrl + p to view parameters.
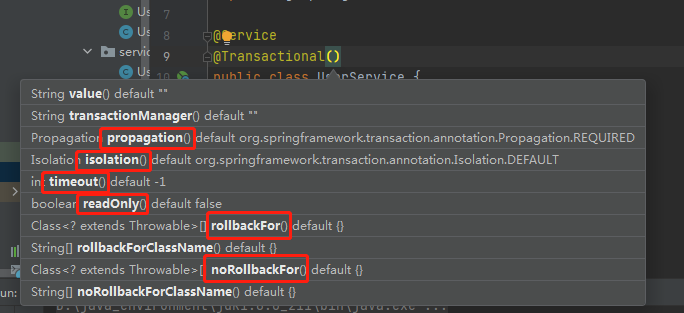
Transaction parameters are commonly used as follows:
- Parameter propagation: transaction propagation behavior.
- Parameter ioslation: transaction isolation level.
- Parameter timeout: timeout.
- Parameter readOnly: whether to read only.
- Parameter rollbackFor: rollback.
- Parameter noRollbackFor: no rollback.
4.2 parameter propagation transaction propagation behavior
Parameter propagation: transaction propagation behavior.
- Multiple transaction methods are called directly. How are transactions managed in this process.
The above terms need to be understood:
What is a transaction method?
The operation of changing database table data is called transaction method, that is, the related operation of query is not transaction operation!
What is transaction propagation behavior?
Transaction propagation behavior can be divided into the following situations: a method with transaction calls a method without transaction; A method without transaction calls a method with transaction; A method with a transaction calls a method with a transaction. This process is called transaction propagation behavior.
There are seven kinds of transaction propagation behaviors, as shown below:
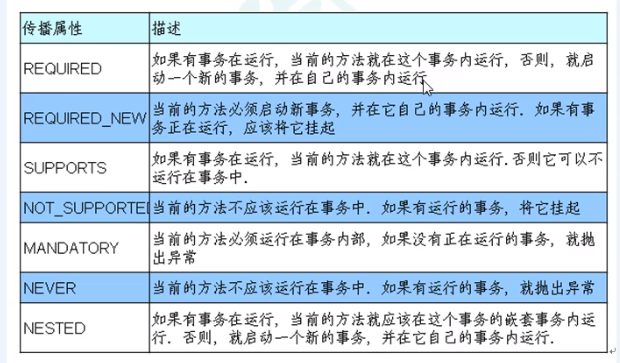
There are seven kinds of transaction propagation behaviors, but the most commonly used are the following two (important, remember!):
(the picture is compared with the first one)
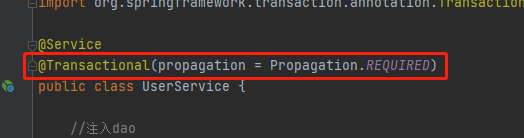
-
REQUIRED(required, also the default):

-
REQUIRED_NEW(required_new):

The parameter effect is shown in the figure below:
4.3 parameter ioslation transaction isolation level
For the isolation level of transactions, first understand the word isolation. In fact, the so-called isolation means that multiple things will not have an impact!
One of the characteristics of transactions is isolation, which will not affect multi transaction operations.
If the transaction does not consider isolation, many problems will arise! For example: dirty reading, non repeatable reading, virtual reading (phantom reading).
-
Dirty read: data read from one uncommitted transaction to another uncommitted transaction.

(dirty reading is a fatal problem that has affected the results we expect) -
Non repeatable reading: an uncommitted transaction reads the data modified by another committed transaction.
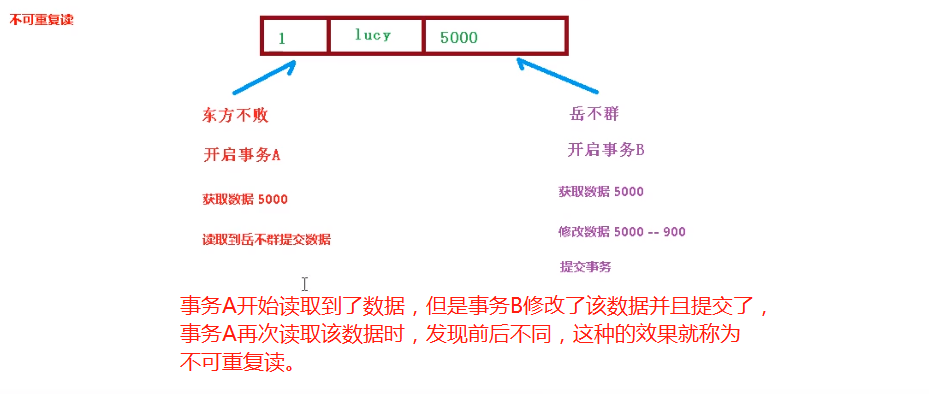
(non repeatability is a phenomenon that is allowed to occur, but it needs to do some unified operations, etc. it itself can not be regarded as a problem.) -
Virtual read (phantom read): an uncommitted transaction reads the data added by another committed transaction.
(it's similar to non repeatability, but not much. Here is the added data.)
Therefore, in Spring, we set transaction isolation ioslation to solve the above problems:
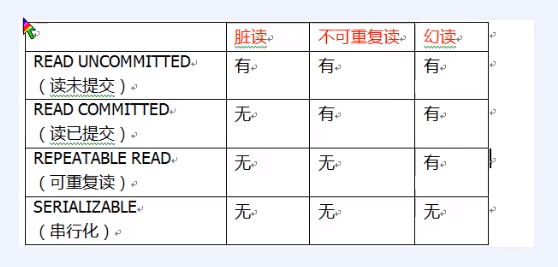
In mysql, if we do not set the isolation level, the third level is REPEATABLE READ by default.
The parameter effect is shown in the figure below:

4.4 other parameters
Parameter timeout: timeout.
This is easy to understand. After the transaction is started, the transaction needs to be committed within a certain time, otherwise it will be rolled back, which means timeout!
The default value of the timeout parameter in spring is - 1, which means no timeout.
Set the time in seconds.

Parameter readOnly: whether to read only.
- Read: query operation.
- Write: add, delete, modify.
Read here means query operation.
The default value of parameter readOnly is generally false. False indicates that operations such as query, modification and deletion can be performed.
If set to true, you can only perform read operations, that is, query operations.

Parameter rollbackFor: rollback.
- Set which exceptions occur for transaction rollback.
Parameter noRollbackFor: no rollback.
- Set which events occur without transaction rollback.
This is a good understanding of the effects of which exceptions need to be rolled back and which exceptions do not need to be rolled back.
5. Spring 5 declarative transaction management (xml mode)
For declarative transaction management, the steps of xml are as follows:
- Step 1: configure the transaction manager.
- Step 2: configure notifications.
- Step 3: configure pointcuts and facets.
<?xml version="1.0" encoding="UTF-8"?>
<beans xmlns="http://www.springframework.org/schema/beans"
       xmlns:context="http://www.springframework.org/schema/context"
       xmlns:aop="http://www.springframework.org/schema/aop"
       xmlns:tx="http://www.springframework.org/schema/tx"
       xmlns:xsi="http://www.w3.org/2001/XMLSchema-instance"
       xsi:schemaLocation="
       http://www.springframework.org/schema/beans
       http://www.springframework.org/schema/beans/spring-beans.xsd
       http://www.springframework.org/schema/context
       http://www.springframework.org/schema/context/spring-context.xsd
       http://www.springframework.org/schema/aop
       http://www.springframework.org/schema/aop/spring-aop.xsd
       http://www.springframework.org/schema/tx
       http://www.springframework.org/schema/tx/spring-tx.xsd
        ">

    <context:component-scan base-package="com.itholmes"/>

    <bean id="dataSource" class="com.alibaba.druid.pool.DruidDataSource" destroy-method="close">
        <property name="url" value="jdbc:mysql://localhost:3306/user_db?ServerTimezone=Aisa/shanghai"/>
        <property name="username" value="root"/>
        <property name="password" value="0818"/>
        <property name="driverClassName" value="com.mysql.cj.jdbc.Driver"/>
    </bean>

    <bean id="jdbcTemplate" class="org.springframework.jdbc.core.JdbcTemplate">
        <property name="dataSource" ref="dataSource"/>
    </bean>


    <!--The first step is to configure the transaction manager.-->
    <!--Create a transaction manager because we are using jdbcTemplate,So we want to create DataSourceTransactionManager Transaction manager.-->
    <bean id="transactionManager" class="org.springframework.jdbc.datasource.DataSourceTransactionManager">

        <!--By viewing DataSourceTransactionManager Source code is not difficult to see, there is a setDataSource Method, so inject the data source dataSource!-->
        <!--
            Injection data source datasource .
                It's confusing here, name of dataSource It points to the inside of the source code setDataSource method(injection),
                ref of dataSource Point to the Druid above druid of dataSource!
        -->
        <property name="dataSource" ref="dataSource"></property>

    </bean>

    <!--Step 2: configure notifications-->
    <tx:advice id="txadvice">
        <!--Configure transaction parameters-->
        <tx:attributes>
            <!--Specify the method of that rule and add a transaction above it-->
            <!--there accountMoney It's us UserService Method in which you want to add a transaction accountMoney. -->
            <tx:method name="accountMoney" propagation="REQUIRED"/><!--You can also specify the parameter attribute value and so on.-->
            <!--
                The above can also be written as the following effect:
                <tx:method name="account*"/>
            -->
        </tx:attributes>
    </tx:advice>

    <!--Step 3: configure pointcuts and facets.-->
    <aop:config>

        <!--Configure pointcuts-->
        <aop:pointcut id="pointcut" expression="execution(* com.itholmes.service.UserService.*(..))"/>
        <!--Configure section-->
        <aop:advisor advice-ref="txadvice" pointcut-ref="pointcut"/>

    </aop:config>


</beans>
6. Spring 5 declarative transaction management (full annotation)
Step 1: create the TxConfig class, and make the TxConfig class completely replace the xml configuration file by using annotations:
package com.itholmes.config;

import com.alibaba.druid.pool.DruidDataSource;
import org.springframework.context.annotation.Bean;
import org.springframework.context.annotation.ComponentScan;
import org.springframework.context.annotation.Configuration;
import org.springframework.jdbc.core.JdbcTemplate;
import org.springframework.jdbc.datasource.DataSourceTransactionManager;
import org.springframework.transaction.annotation.EnableTransactionManagement;
import javax.sql.DataSource;


//@Configuration annotation: indicates that this class is a configuration class
//@ComponentScan annotation: equivalent to < context: component scan base package = "com. Itholmes" / > in xml file.
//@Enable transaction management annotation: this annotation is used to start a transaction
@Configuration
@ComponentScan(basePackages = "com.itholmes")
@EnableTransactionManagement
public class TxConfig {

    //The connection pool that creates the database corresponds to the content in the xml configuration file one by one
    //@Bean annotations are used to tell methods to generate a bean object, which is then handed over to Spring for management. (the function of the bean tag in the xml configuration is the same)
    @Bean
    public DruidDataSource getDruidDataSource(){

        DruidDataSource dataSource = new DruidDataSource();

        //The xml configuration file method is also the set injection method, so the use of set here is also in the corresponding configuration file.
        dataSource.setDriverClassName("com.mysql.cj.jdbc.Driver");
        dataSource.setUrl("jdbc:mysql://localhost:3306/user_db?ServerTimezone=Aisa/shanghai");
        dataSource.setUsername("root");
        dataSource.setPassword("0818");

        return dataSource;
    }

    //Create a JdbcTemplate object
    @Bean
    public JdbcTemplate getJdbcTemplate(DataSource dataSource){

        //The dataSource parameter above is to find the dataSource of the above Druid database connection pool in the ioc container according to the type

        JdbcTemplate jdbcTemplate = new JdbcTemplate();

        jdbcTemplate.setDataSource(dataSource);

        return jdbcTemplate;
    }

    //Create transaction manager
    @Bean
    public DataSourceTransactionManager getDataSourceTransactionManager(DataSource dataSource){
        DataSourceTransactionManager transactionManager = new DataSourceTransactionManager();
        transactionManager.setDataSource(dataSource);
        return transactionManager;
    }

}
Step 2: add @ Transactional annotation and add transaction to the class of database interaction in the service layer.
UserService class:
package com.itholmes.service;

import com.itholmes.dao.UserDao;
import org.springframework.beans.factory.annotation.Autowired;
import org.springframework.stereotype.Service;
import org.springframework.transaction.annotation.Isolation;
import org.springframework.transaction.annotation.Propagation;
import org.springframework.transaction.annotation.Transactional;

@Service
@Transactional(readOnly = false,timeout = 10,propagation = Propagation.REQUIRED,isolation = Isolation.SERIALIZABLE)
public class UserService {

    //Injection dao
    @Autowired
    private UserDao userDao;

    //Calling transfer method in service business logic layer
    public void accountMoney() {

        //Step 1: start the transaction

        //Part II: business operation

        //lucy transfer 100
        userDao.reduceMoney();

        //Simulation exceptions, such as power failure, network failure, etc.
        int i = 1 / 0;

        //mery collection 100
        userDao.addMoney();

        //If there are no exceptions in the above steps, we will commit the transaction.
        //Part III: submission of services

        //If an error occurs, an exception occurs.
        //Part IV: transaction rollback

    }

}
Step 3: write test class and Test3 class to test whether the transaction is rolled back:
Note that instead of using xml configuration file, we use class and annotation, so we need to use AnnotationConfigApplicationContext(TxConfig.class); To get the container of context.
import com.itholmes.config.TxConfig;
import com.itholmes.service.UserService;
import org.springframework.context.ApplicationContext;
import org.springframework.context.annotation.AnnotationConfigApplicationContext;

public class Test3 {
    public static void main(String[] args) {

        //Here you need to use the AnnotationConfigApplicationContext object
        ApplicationContext context = new AnnotationConfigApplicationContext(TxConfig.class);

        //Note that the userservice here cannot be written as userservice, and an error will be reported!
        UserService service = context.getBean("userService", UserService.class);

        service.accountMoney();

    }
}