applicationContext basic configuration
IOC configuration
1. Basic configuration
<?xml version="1.0" encoding="UTF-8"?>
<beans
	xmlns="http://www.springframework.org/schema/beans"
	xmlns:xsi="http://www.w3.org/2001/XMLSchema-instance"
	xsi:schemaLocation="http://www.springframework.org/schema/beans
	http://www.springframework.org/schema/beans/spring-beans-4.3.xsd">
</beans>
2. Alias bean s
<!-- name Property is used to give bean Name, original name and name The values in can be used, and can be used"," ";" " "division -->
<bean id="helloT" class="com.tcc.entity.HelloT" name="hello2,h1;h2 h3">
    <!-- <constructor-arg name="stringT" value="3.1415926" /> -->
    <property name="stringT" value="stringT"/>
</bean>
<alias name="" alias=""/>
3. Import other xml files
<!-- When developing by multiple people, it is used to introduce information written by others xml configuration file -->
<import resource="beans.xml"/>Put class into bean in
4. Put the class into the bean
<bean id="..." class="com.xxx.xxx"></bean>
5. Properties in bean Tags
-
Autowire auto injection: autowire = "byName|byType|no"
pattern explain no Automatic assembly is not used. The dependency must be specified through the ref element, which is the default setting. This setting is recommended for larger deployment configurations because explicitly specifying collaborators can make the configuration more flexible and clear. byName Automatically assemble according to the attribute name. This option checks the container and looks for bean s that exactly match the properties by name, and automatically assembles them with the properties byType If a bean of the same type as the specified property exists in the container, it will be automatically assembled with the property. If there are multiple beans of this type, an exception will be thrown and it will be pointed out that byType cannot be used for automatic assembly. If no matching bean is found, the property will not be set. -
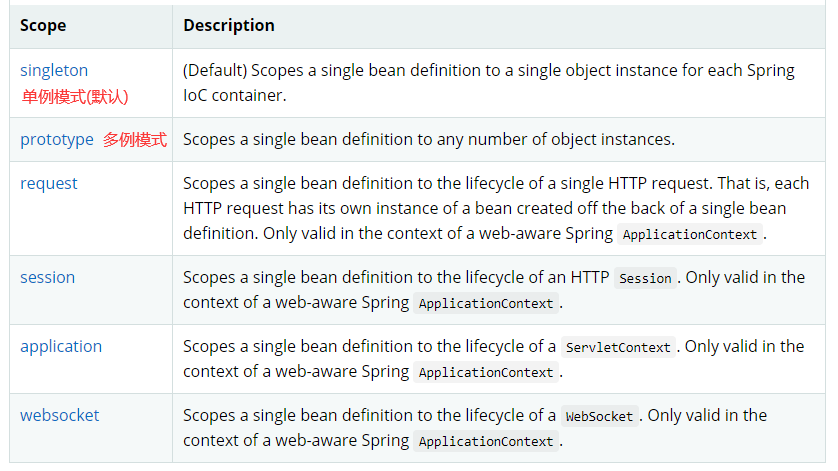
scope Bean scope: scope = "singleton|prototype|request|session|application|websocket"
-
Name: name = "H1, H2; H3, H4"
- The name attribute is used to name the bean. Both the original name and the value in name can be used, and can be separated by "or; or space"
<bean id="hello" class="com.tcc.entity.Hello" name="h1,h2;h3 h4"/>
6. Entity class injection value (set injection, constructor injection)
6.1. Set injection value (there should be set method in entity class)
- For set injection:
<property name="string1" value="String1"/>
6.2. Three methods of constructor injection value (there should be parameter construction method in entity class)
-
Inject by subscript:
<!-- Assignment by subscript -->
<constructor-arg index="0" value="123456" />
-
Injection by type: if the attribute types are the same, it cannot be used. It is not recommended
<!-- Through type assignment, if the attribute types are the same, it cannot be used. It is not recommended -->
<constructor-arg type="java.lang.String" value="123456" />
-
Inject by variable name:
<!-- Most commonly used variable name -->
<constructor-arg name="string1" value="3.1415" />
7. Special type injection value
-
Reference type injection:
<bean id="dog" class="com.tcc.entity.Dog"/>
<bean id="cat" class="com.tcc.entity.Cat"/>

<bean id="people" class="com.tcc.entity.People">
  <property name="dog" ref="dog"/>
  <property name="cat" ref="cat"/>
</bean>
-
Array:
<property name="shuZu1"> <list> <value>1</value> <value>2</value> <value>3</value> </list> </property> -
Set:
<property name="list1"> <array> <value>2</value> <value>3</value> <value>4</value> </array> </property> -
Map:
<property name="map1"> <map> <entry key="full name" value="Xiao Hei"/> <entry key="hobby" value="female"/> </map> </property> -
Set:
<property name="set1">
	<set>
		<value>set1</value>
	</set>
</property>
-
Null:
<property name="stringNull">
  <null/>
</property>
-
Properties:
<property name="properties1">
  <props>
    <prop key="driver">com.mysql.jdbc.Driver</prop>
    <prop key="url">123123</prop>
    <prop key="username">root</prop>
    <prop key="password">admin</prop>
  </props>
</property>
8. P namespace
-
P namespace (set injection): add p:string1 = "string1" to the bean tag
-
Add configuration in xml: xmlns:p=“ http://www.springframework.org/schema/p ”
<bean id="address" class="com.tcc.entity.Address" p:address="address1"/>
9. C namespace
-
C namespace (constructor injection): add c:string1 = "string1" to the bean tag
-
be careful!: C is injected through the constructor, so all the attributes of the object must be named and assigned with C at one time before the construction can succeed. Otherwise, the construction with parameters will lack other parameters and report errors!
-
Add configuration in xml: xmlns:c=“ http://www.springframework.org/schema/c ”
<bean id="address" class="com.tcc.entity.Address" c:address="address1"/>
annotation
-
Environment configuration
-
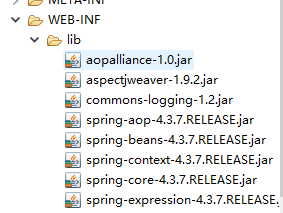
First import spring-aop-4.3.7 RELEASE. Jar package
<beans xmlns="http://www.springframework.org/schema/beans"
    xmlns:xsi="http://www.w3.org/2001/XMLSchema-instance"
    xmlns:context="http://www.springframework.org/schema/context"
    xsi:schemaLocation="http://www.springframework.org/schema/beans
        https://www.springframework.org/schema/beans/spring-beans.xsd
        http://www.springframework.org/schema/context
        https://www.springframework.org/schema/context/spring-context.xsd">

        <!-- The following is to scan all the comments in this package -->
        <context:component-scan base-package="com.tcc.entity"/>
         <context:annotation-config/>

</beans>
-
Common notes
1. @ Autowired: used for automatic injection of attributes.
-
It is a combination of [autowire = "byName"] and [autowire = "byType"]
-
He will first query according to "byType". If there is no match, he will query through "byName".
-
@Autowired can be placed either in front of the field or in front of the setter method
private String name;
	@Autowired
	private Dog dog;
@Autowired
	private Cat cat;
-
2. @ Qualifier(value = "dog1"): used with @ Autowired.
-
If byName and byType do not match, the value of value is used to find the value with matching id.
private String name;
  	@Autowired
  	@Qualifier("dog1")
  	private Dog dog;
  	@Autowired
  	private Cat cat;
Summary: use @Autowired The process of annotation automatic assembly dependency is as follows: 1.First, according to the type of attribute (or the type of method and constructor parameter), the Spring Find matching types in the application container bean 2.If there is no matching type bean,Throw BeanCreationException;If there is only one, inject dependency and complete automatic loading Match; If there is more than one, continue with step 3; 3.If passed @Qualifier Specified bean Name, from all matching types bean Returns the specified bean,Complete automatic loading Match; If not @Qualifier formulate bean Name, the name of the current attribute is obtained through reflection technology bean name Returns the specified bean,Complete automatic assembly.
3. @ Resource: @ Resource is provided by J2EE and is equivalent to @ Autowired.
-
@Press @ byName to inject automatically, and press @ byName to inject automatically.
-
@Resource has two important attributes: name and type
-
@The Resource can be placed either in front of the field or in front of the setter method
private String name;
	/*@Autowired
	@Qualifier("dog1")*/
	@Resource(name="dog")
	private Dog dog;
	/*@Autowired*/
	@Resource(type=Cat.class)
	private Cat cat;
4. @ Component: put class into bean
-
The bean name defaults to the class name that converts the first letter to lowercase.
-
The bean name defaults to the class name that converts the first letter to lowercase.
-
@The only optional parameter of the Component annotation is value, which is used to specify the name of the bean (i.e. id value, so it must be unique)
 @Component(value="computer")
 public class Computer { ... }

 //The value attribute in the annotation can be omitted and can be abbreviated as:
 @Component("computer")
 public class Computer { ... }
Spring More detailed definitions are also provided bean Annotation form: 1.@Repository,@Service,@Controller, 2.They correspond to the data access layer respectively bean,Business layer bean,View layer bean. 3.In the current version, these annotations are related to@Component The semantics are the same, completely universal, in Spring They may be tracked in later versions Add more semantics. 4.Therefore, we recommend using@Repository,@Service,@Controller To replace@Component.
5. @ Scope: @ Scope is used to define the Scope of the bean.
-
Singleton means that in each Spring IoC container, a bean definition corresponds to an object instance, that is, Spring uses singleton mode to obtain instances by default.
-
prototype means that a bean definition corresponds to multiple object instances, that is, non singleton mode, which is often referred to as multiple instances.
-
By default, the scope of spring beans is singleton.
@Component
@Scope("prototype")
public class Computer { ... }
-
Use configuration Java to act as an xml file
-
@Configuration: indicates that this class is a configuration class
-
@Bean: put the following class into the bean
@org.springframework.context.annotation.Configuration
public class Configuration {

	@Bean
	public Cat cat(){
		return new Cat();
	}
	@Bean
	public Dog dog(){
		return new Dog();
	}
	@Bean
	public People people(){
		return new People();
	}
-
Test: AnnotationConfigApplicationContext(Configuration.class);
public class MyTest {
	public static void main(String[] args){
		ApplicationContext context=new AnnotationConfigApplicationContext(Configuration.class);
		People p = context.getBean(People.class);
		p.getDog().jiao();
		p.getCat().jiao();
	}

}
Dynamic agent (understand)
Create interface and impl
package com.tcc.servlet;

public interface UserServlet {
	public void add();
	public void delete();
	public void update();
	public void selete();

}
package com.tcc.servlet;

public class UserServletImpl implements UserServlet{

	@Override
	public void add() {
		// TODO Auto-generated method stub
		System.out.println("Add method");

	}

	@Override
	public void delete() {
		// TODO Auto-generated method stub
		System.out.println("Method of deletion");

	}

	@Override
	public void update() {
		// TODO Auto-generated method stub
		System.out.println("Update method");

	}

	@Override
	public void selete() {
		// TODO Auto-generated method stub
		System.out.println("Query method");

	}

}
Method for creating proxy class and implementing dynamic proxy (tool class)
package com.tcc.proxy;

import java.lang.reflect.InvocationHandler;
import java.lang.reflect.Method;
import java.lang.reflect.Proxy;

import com.tcc.entity.User;
import com.tcc.servlet.UserServlet;


//Use this class to automatically generate proxy classes
public class ProxyInvocationHandler implements InvocationHandler{
	private Object target;


	//Call the set method to set the object to proxy
	public void setTarget(Object target) {
		this.target = target;
	}

	//Generated proxy class
	public Object getProxy(){
		return Proxy.newProxyInstance(this.getClass().getClassLoader(),
				target.getClass().getInterfaces(), this);

	}


	//Process the proxy instance and return the result
	@Override
	public Object invoke(Object proxy, Method method, Object[] args) throws Throwable {
		// TODO Auto-generated method stub
		Object result = method.invoke(target, args);
		logger(method.getName());
		return result;
	}

	public void logger(String msg){
		System.out.println("Yes"+msg+"method");
	}

}
Test:
package com.tcc.test;

import com.tcc.proxy.ProxyInvocationHandler;
import com.tcc.servlet.UserServlet;
import com.tcc.servlet.UserServletImpl;

public class MyTest {

	public static void main(String[] args) {
		// TODO Auto-generated method stub
		//Real role
		UserServlet userServlet = new UserServletImpl();
		//Proxy role, does not exist
		ProxyInvocationHandler pih = new ProxyInvocationHandler();

		//Sets the object to proxy
		pih.setTarget(userServlet);

		//Dynamically generate proxy classes
		UserServlet proxy = (UserServlet) pih.getProxy();

		proxy.delete();

	}

}
AOP
AOP is the abbreviation of Aspect Oriented Programming, which means that Aspect Oriented Programming is a technology to realize the unified maintenance of program functions through precompiled mode and runtime dynamic agent. AOP is the continuation of OOP, a hot spot in software development, an important content of Spring framework and a derivative paradigm of functional programming. AOP can isolate all parts of business logic, so as to reduce the coupling between all parts of business logic, improve the reusability of programs, and improve the efficiency of development.
AOP It contains many new concepts and terms, which are described as follows:
1) section (Aspect): Aspect is a functional module abstracted from the system.
2) Connection point (Joinpoint): A specific point in the process of program execution, such as when calling a method or handling exceptions. stay SpringAOP In, join points always represent the execution of a method.
3) notice (Advice): Notification is the concrete implementation of aspect and the class where "aspect code" is placed.
4) breakthrough point (Pointcut): Multiple join points form a pointcut, which can be represented by a pointcut expression.
5) Target object (Target Object): An object that contains a connection point, that is, the intercepted object.
6) AOP agent (AOP Proxy): AOP The object generated by the framework is a combination of notification and target object.
7) Weave in (Weaving): The process of combining pointcuts and notifications is called weaving.
Import jar package
Method 1: use the API interface of spring
1. Create interfaces and methods
2. Create a log package, and implement the BeforeLog class (MethodBeforeAdvice class) and the AfterLog class (AfterReturningAdvice class).
package com.tcc.log;

import java.lang.reflect.Method;

import org.springframework.aop.MethodBeforeAdvice;

public class BeforeLog implements MethodBeforeAdvice{

	@Override
	//method(arg0): 	 Method to execute the target
	//args(arg1): 	 parameter
	//target(arg2): 	 Target object
	public void before(Method method, Object[] args, Object target) throws Throwable {
		// TODO Auto-generated method stub
		System.out.println(target.getClass().getName()+"of"+method.getName()+"Method ready for execution");
	}


}
package com.tcc.log;

import java.lang.reflect.Method;

import org.springframework.aop.AfterReturningAdvice;

public class AfterLog implements AfterReturningAdvice{

	@Override
	//resultValue(arg0): 	 Return value of method
	//method(arg1): 	 Method to execute the target
	//args(arg2): 	 parameter
	//target(arg3): 	 Target object
	public void afterReturning(Object resultValue, Method method, Object[] args, Object target) throws Throwable {
		// TODO Auto-generated method stub
		System.out.println(target.getClass().getName()+"of"+method.getName()+"After the method is executed, the return value is:"+resultValue);
	}

}
Add the interface and two classes in log to beans
Add aop constraints to the configuration file
<?xml version="1.0" encoding="UTF-8"?>
<beans
	xmlns="http://www.springframework.org/schema/beans"
	xmlns:xsi="http://www.w3.org/2001/XMLSchema-instance"
	xmlns:aop="http://www.springframework.org/schema/aop"
	xsi:schemaLocation="http://www.springframework.org/schema/beans
	http://www.springframework.org/schema/beans/spring-beans-4.3.xsd
	http://www.springframework.org/schema/aop
	http://www.springframework.org/schema/aop/spring-aop-4.3.xsd">


</beans>
Add Bean
<bean id="userServce" class="com.tcc.servlet.UserServiceImpl"/>
<bean id="beforeLog" class="com.tcc.log.BeforeLog"/>
<bean id="afterLog" class="com.tcc.log.AfterLog"/>
Add section (method 1)
<!-- Method 1: use native spring API Interface -->
<!-- to configure aop Import required aop Constraints of -->
<aop:config>
  <!-- Entry point:	execution(<Modifier mode>? <Return type mode> <Method name pattern>(<Parameter mode>) <Abnormal mode>?) -->
  <aop:pointcut expression="execution(* com.tcc.servlet.UserServiceImpl.*(..))" id="pointcut"/>

  <!-- Execute surround increase -->
  <aop:advisor advice-ref="beforeLog" pointcut-ref="pointcut"/>
  <aop:advisor advice-ref="afterLog" pointcut-ref="pointcut"/>


</aop:config>
Test:
package com.tcc.test;

import org.springframework.context.ApplicationContext;
import org.springframework.context.support.ClassPathXmlApplicationContext;

import com.tcc.servlet.UserService;

public class MyTest {

	public static void main(String[] args) {
		// TODO Auto-generated method stub
		@SuppressWarnings("resource")
		ApplicationContext context = new ClassPathXmlApplicationContext("applicationContext.xml");
		//Dynamic proxy is the interface
		UserService userService = context.getBean(UserService.class);
		userService.add();

	}

}
Method 2: custom implementation of AOP
Create com tcc. Diylog package, create Diy
package com.tcc.diyLog;

public class DiyPointCut {
	public void before(){
		System.out.println("===============Before method execution=================");
	}

	public void after(){
		System.out.println("================After method execution================");
	}

}
In ApplicationContext Write aop in XML
<!-- Method 2: custom implementation AOP -->
<bean id="diy" class="com.tcc.diyLog.DiyPointCut"/>
<bean id="userServce" class="com.tcc.servlet.UserServiceImpl"/>
<bean id="beforeLog" class="com.tcc.log.BeforeLog"/>
<bean id="afterLog" class="com.tcc.log.AfterLog"/>

<aop:config>
  <!-- Custom cut: ref Class to reference -->
  <aop:aspect ref="diy">
    <!-- breakthrough point -->
    <aop:pointcut expression="execution(* com.tcc.servlet.UserServiceImpl.*(..))" id="pointcut"/>

    <!-- notice method:Method name-->
    <aop:before method="before" pointcut-ref="pointcut"/>
    <aop:after method="after" pointcut-ref="pointcut"/>

  </aop:aspect>

</aop:config>
Method 3: implement AOP with annotation
Create AnnocationPointCut class
1. @ Aspect: define the current class as Aspect
2. @ Before("execution(* com.tcc.servlet.UserService. * (...))"): execute the following methods before the execution of this class method
3. @ After("execution(* com.tcc.servlet.UserService. * (...))"): execute the following methods after this class method is executed
package com.tcc.diyLog;

import org.aspectj.lang.annotation.After;
import org.aspectj.lang.annotation.Aspect;
import org.aspectj.lang.annotation.Before;

//Use annotations to define facets
@Aspect
public class AnnocationPointCut {

	@Before("execution(* com.tcc.servlet.UserService.*(..))")
	public void before(){
		System.out.println("===============Before method execution=================");
	}

	@After("execution(* com.tcc.servlet.UserService.*(..))")
	public void after(){
		System.out.println("================After method execution================");
	}
}
Optimization:
@Pointcut("execution(* com.tcc.servlet.UserService.*(..))")
public void p1(){};
package com.tcc.diyLog;

import org.aspectj.lang.ProceedingJoinPoint;
import org.aspectj.lang.Signature;
import org.aspectj.lang.annotation.After;
import org.aspectj.lang.annotation.Around;
import org.aspectj.lang.annotation.Aspect;
import org.aspectj.lang.annotation.Before;
import org.aspectj.lang.annotation.Pointcut;
import org.springframework.stereotype.Component;

//Use annotations to define facets
@Aspect
@Component
public class AnnocationPointCut {

	@Pointcut("execution(* com.tcc.servlet.UserService.*(..))")
	public void p1(){};

	@Before("p1()")
	public void before(){
		System.out.println("===============Before method execution=================");
	}

	@After("p1()")
	public void after(){
		System.out.println("================After method execution================");
	}

	//In surround enhancement, we can give a parameter to represent the point where we want to get the processing entry:
	@Around("p1()")
	public void around(ProceedingJoinPoint pj) throws Throwable{
		System.out.println("Surround front");

		//The execution method is pre positioned above the method and post positioned below the method
		Object proceed = pj.proceed();
		//Get signature
		Signature signature = pj.getSignature();
		System.out.println(signature);

		System.out.println("After surround");
	}
}
Or: (not commonly used)
//In surround enhancement, we can give a parameter to represent the point where we want to obtain the processing entry:
@Around("execution(* com.tcc.servlet.UserService.*(..))")
public void around(ProceedingJoinPoint pj) throws Throwable{
  System.out.println("Surround front");

  //Execution method
  Object proceed = pj.proceed();
  //Get signature
  Signature signature = pj.getSignature();
  System.out.println(signature);

  System.out.println("After surround");
}
result:
Surround front
===============Before method execution=================
Queried users
void com.tcc.servlet.UserService.selete()
After surround
================After method execution================
applicationContext.xml configuration
<!-- Method 3: use annotation -->
<bean id="annocationPointCut" class="com.tcc.diyLog.AnnocationPointCut"/>
<!-- Enable annotation support 	jdk(default): proxy-target-class="false"
cglib: proxy-target-class="true"-->
<aop:aspectj-autoproxy proxy-target-class="true"/>
execution
When configuring AOP with spring framework, pointcut "pointcut" needs to be defined whether through XML configuration file or annotation
For example, define the pointcut expression execution (* com.sample.service.impl... (...))
execution() is the most commonly used pointcut function. Its syntax is as follows:
The whole expression can be divided into five parts:
1. execution(): expression body.
2. The first asterisk: indicates the return type, and the * sign indicates all types.
3. Package name: indicates the name of the package to be intercepted. The following two periods represent the current package and all sub packages of the current package. Com sample. service. All methods under the package and impl class.
4. The second asterisk: indicates the class name, and the * sign indicates all classes.
5. * (...): the last asterisk indicates the method name, the * sign indicates all methods, the following parentheses indicate the parameters of the method, and the two periods indicate any parameters.
**Execution (< modifier mode >? < return type mode > < method name mode > (< parameter mode >) < exception mode >?) Except for return type mode, method name mode and parameter mode, other items are optional** Instead of explaining the rules of this method directly, it is better to understand it through specific examples