catalogue
1. The notes of JUnit 5 and JUnit 4 are changed
3.@BeforeEach,@AfterEach,@BeforeAll,@AfterAll
1, JUnit 5 changes
1. Introduction
Spring boot version 2.2.0 began to introduce JUnit 5 as the default library for unit testing
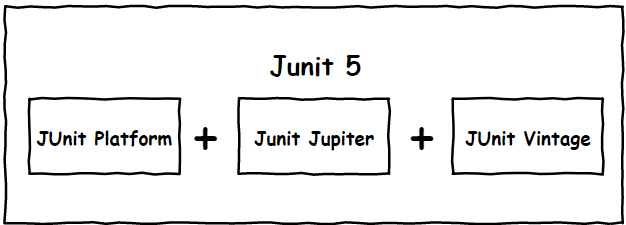
As the latest version of JUnit framework, JUnit 5 is very different from the previous version of JUnit framework. It consists of several different modules of three different subprojects.
JUnit 5 = JUnit Platform + JUnit Jupiter + JUnit Vintage
JUnit Platform: Junit Platform is the basis for starting the test framework on the JVM. It supports not only Junit's self-made test engine, but also other test engines.
JUnit Jupiter: JUnit Jupiter provides a new programming model of JUnit 5 and is the core of JUnit 5's new features. A test engine is included internally to run on the Junit Platform.
JUnit Vintage: since JUint has developed for many years, in order to take care of old projects, JUnit Vintage provides JUnit 4.0 compatible services x,Junit3. X test engine.
be careful:
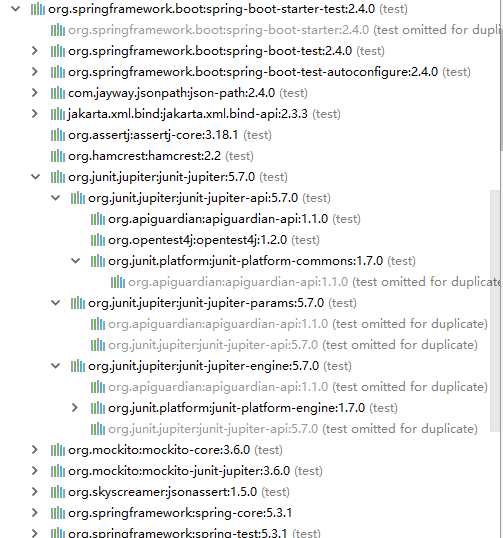
Springboot versions above 2.4 remove the default dependency on Vintage. If you need to be compatible with junit4, you need to introduce it yourself (you can't use the function @ Test of junit4)
JUnit 5's vintage engine removed from spring boot starter test. If you need to continue to be compatible with junit4, you need to introduce vintage by yourself
<dependency>
    <groupId>org.junit.vintage</groupId>
    <artifactId>junit-vintage-engine</artifactId>
    <scope>test</scope>
    <exclusions>
        <exclusion>
            <groupId>org.hamcrest</groupId>
            <artifactId>hamcrest-core</artifactId>
        </exclusion>
    </exclusions>
</dependency>
2. Use
(1) Introduce dependency
<dependency>
  <groupId>org.springframework.boot</groupId>
  <artifactId>spring-boot-starter-test</artifactId>
  <scope>test</scope>
</dependency>
(2) Use
Junit class has the function of Spring, @ Autowired, such as @ Transactional, annotates the test method, and automatically rolls back after the test is completed
@SpringBootTest
class Boot05WebAdminApplicationTests {

    @Test // @Test annotation (note that you need to use JUnit 5 annotation)
    void contextLoads() {

    }
}
2, JUnit 5 common annotations
1. The notes of JUnit 5 and JUnit 4 are changed
*@ Test: indicates that the method is a Test method. However, unlike JUnit4's @ Test, it has a very single responsibility and cannot declare any attributes. Jupiter will provide additional tests for expanded tests
*@ parametrizedtest: the expression method is parametric test, which will be described in detail below
*@ RepeatedTest: indicates that the method can be executed repeatedly, which will be described in detail below
*@ DisplayName: set the display name for the test class or test method
*@ BeforeEach: indicates to execute before each unit test
*@ AfterEach: means to execute after each unit test
*@ BeforeAll: indicates to execute before all unit tests
*@ AfterAll: indicates to execute after all unit tests
*@ Tag: indicates the unit test category, similar to @ Categories in JUnit4
*@ Disabled: indicates that the test class or test method is not executed, similar to @ Ignore in JUnit4
*@ Timeout: indicates that the test method will return an error if it exceeds the specified time
*@ ExtendWith: provide extension class references for test classes or test methods
2.@DisplayName
@DisplayName("junit5 Functional test class")
public class Junit5Test {

    @DisplayName("test displayname annotation")
    @Test
    void testDisplayName() {
        System.out.println(1);
    }
}
3.@BeforeEach,@AfterEach,@BeforeAll,@AfterAll
@BeforeEach
void testBeforeEach() {
    System.out.println("The test is about to begin...");
}

@AfterEach
void testAfterEach() {
    System.out.println("The test is over...");
}

@BeforeAll // Must be a static method
static void testBeforeAll() {
    System.out.println("All tests are about to begin...");
}

@AfterAll // Must be a static method
static void testAfterAll() {
    System.out.println("All tests are over...");
}
4.@Disabled
Executing the test class will execute all test methods, but the test method marked @ Disabled will not execute.
@Disabled
@DisplayName("Test method 2")
@Test
void test2() {
    System.out.println(2);
}
5.@Timeout
/**
* Specify method timeout. Out of time test exception
*
* @throws InterruptedException
*/
@Timeout(value = 500, unit = TimeUnit.MILLISECONDS)
@Test
void testTimeout() throws InterruptedException {
    Thread.sleep(600);
}
6.@SpringBootTest
On the annotation class, you can use the container and other functions of springboot.
7.@RepeatedTest
@RepeatedTest(5)
@Test
void test3() {
    System.out.println(5);
}
3, Assert
1. Introduction
Assertions are the core part of the test method, which is used to verify the conditions that the test needs to meet. These assertion methods are org junit. jupiter. api. Static method for assertions. The built-in assertions in JUnit 5 can be divided into the following categories:
Check whether the data returned by the business logic is reasonable.
After all test runs are completed, there will be a detailed test report.
2. Simple assertion
Used for simple validation of a single value. For example:
| method | explain |
| assertEquals | Determines whether two objects or two primitive types are equal |
| assertNotEquals | Determines whether two objects or two primitive types are not equal |
| assertSame | Judge whether two object references point to the same object |
| assertNotSame | Judge whether two object references point to different objects |
| assertTrue | Determines whether the given Boolean value is true |
| assertFalse | Determines whether the given Boolean value is false |
| assertNull | Determines whether the given object reference is null |
| assertNotNull | Determines whether the given object reference is not null |
/**
* Assertion: if the previous assertion fails, the following code will not be executed
*/
@DisplayName("Test simple assertions")
@Test
void testSimpleAssertions() {
    int cal = cal(3, 2);
    //equal
    assertEquals(6, cal, "Business logic calculation failed");
    Object obj1 = new Object();
    Object obj2 = new Object();
    assertSame(obj1, obj2, "The two objects are different");
}

int cal(int i, int j) {
    return i + j;
}

// Operation results
org.opentest4j.AssertionFailedError: Business logic calculation failed ==>
Expected :6
Actual   :5
<Click to see difference>

    at org.junit.jupiter.api.AssertionUtils.fail(AssertionUtils.java:55)
    at org.junit.jupiter.api.AssertionUtils.failNotEqual(AssertionUtils.java:62)
    at org.junit.jupiter.api.AssertEquals.assertEquals(AssertEquals.java:150)
    at org.junit.jupiter.api.Assertions.assertEquals(Assertions.java:542)
    ......
3. Array assertion
Use the assertArrayEquals method to determine whether two objects or arrays of the original type are equal
@Test
@DisplayName("array assertion")
void array() {
    assertArrayEquals(new int[]{1, 2}, new int[]{1, 2}, "Array contents are not equal");
}
4. Combination assertion
The assertAll method accepts multiple org junit. jupiter. api. As the assertions to be verified, the instance of the executable functional interface can easily provide these assertions through lambda expressions
@Test
@DisplayName("Composite assertion")
void all() {
    /**
     * All assertions need to succeed
     */
    assertAll("test",
            () -> assertTrue(true && true, "The result is not true"),
            () -> assertEquals(1, 2, "The result is not 1"));

    System.out.println("=====");
}
5. Exception assertion
In JUnit 4, when you want to test the exception of a method, the ExpectedException variable annotated with @ Rule is still troublesome. JUnit 5 provides a new assertion method, assertions Assertthrows() can be used in conjunction with functional programming.
@DisplayName("Exception assertion")
@Test
void testException() {

    //Conclude that the business logic must be abnormal
    assertThrows(ArithmeticException.class, () -> {
        int i = 10 / 2;
    }, "Is the business logic working normally?");
}
6. Timeout assertion
Junit5 also provides assertions Asserttimeout() sets a timeout for the test method
@Test
@DisplayName("Timeout tests ")
public void timeoutTest() {
    //If the test method takes more than 1s, it will be abnormal
    Assertions.assertTimeout(Duration.ofMillis(1000), () -> Thread.sleep(500));
}
7. Quick failure
Make the test fail directly through the fail method
@DisplayName("Rapid failure")
@Test
void testFail(){
    //xxxxx
    if(2 == 2){
        fail("Test failed");
    }
}
4, Preconditions
Preconditions in JUnit 5 are similar to assertions. The difference is that unsatisfied assertions will fail the test method, while unsatisfied preconditions will only terminate the execution of the test method. Preconditions can be regarded as the premise of test method execution. When the premise is not met, there is no need to continue execution.
assumeTrue and assumFalse ensure that the given condition is true or false. If the condition is not met, the test execution will be terminated. The parameter assemingthat is the Boolean value representing the condition and the implementation object of the corresponding Executable interface. The Executable object will be executed only when the conditions are met; When the conditions are not met, the test execution does not terminate.
/**
* Test preconditions
*/
@DisplayName("Test preconditions")
@Test
void testassumptions(){
    Assumptions.assumeTrue(false,"The result is not true");
    System.out.println("111111");
}
@DisplayName("Preconditions")
public class AssumptionsTest {
private final String environment = "DEV";
@Test
@DisplayName("simple")
public void simpleAssume() {
assumeTrue(Objects.equals(this.environment, "DEV"));
assumeFalse(() -> Objects.equals(this.environment, "PROD"));
}
@Test
@DisplayName("assume then do")
public void assumeThenDo() {
assumingThat(
Objects.equals(this.environment, "DEV"),
() -> System.out.println("In DEV")
);
}
}5, Nested test
JUnit 5 can implement Nested tests through internal classes and @ Nested annotations in Java, so as to better organize relevant test methods together. You can use @ BeforeEach and @ AfterEach annotations in internal classes, and there is no limit to the nesting level.
@DisplayName("A stack")
class TestingAStackDemo {

    Stack<Object> stack;

    @Test
    @DisplayName("is instantiated with new Stack()")
    void isInstantiatedWithNew() {
        new Stack<>();
        //In the case of nested tests, the Test of the outer layer cannot drive the methods such as Before(After)Each/All of the inner layer to run in advance / after
        assertNull(stack);
    }

    @Nested // Represents nested tests
    @DisplayName("when new")
    class WhenNew {

        @BeforeEach // All tests are executed before and will not be executed outside the nested class
        void createNewStack() {
            stack = new Stack<>();
        }

        @Test
        @DisplayName("is empty")
        void isEmpty() {
            assertTrue(stack.isEmpty());
        }

        @Test
        @DisplayName("throws EmptyStackException when popped")
        void throwsExceptionWhenPopped() {
            assertThrows(EmptyStackException.class, stack::pop);
        }

        @Test
        @DisplayName("throws EmptyStackException when peeked")
        void throwsExceptionWhenPeeked() {
            assertThrows(EmptyStackException.class, stack::peek);
        }

        @Nested
        @DisplayName("after pushing an element")
        class AfterPushing {

            String anElement = "an element";

            @BeforeEach
            void pushAnElement() {
                stack.push(anElement);
            }

            /**
            * The Test of the inner layer can drive the methods such as Before(After)Each/All of the outer layer to run in advance / later
            */
            @Test
            @DisplayName("it is no longer empty")
            void isNotEmpty() {
                assertFalse(stack.isEmpty());
            }

            @Test
            @DisplayName("returns the element when popped and is empty")
            void returnElementWhenPopped() {
                assertEquals(anElement, stack.pop());
                assertTrue(stack.isEmpty());
            }

            @Test
            @DisplayName("returns the element when peeked but remains not empty")
            void returnElementWhenPeeked() {
                assertEquals(anElement, stack.peek());
                assertFalse(stack.isEmpty());
            }
        }
    }
}
6, Parametric test
Parametric testing is a very important new feature of JUnit 5. It makes it possible to run tests multiple times with different parameters, and also brings a lot of convenience to our unit testing.
Using @ ValueSource and other annotations to specify input parameters, we can use different parameters for multiple unit tests without adding a unit test every time a parameter is added, saving a lot of redundant code.
@ValueSource: Specifies the input parameter source for parametric testing. It supports eight basic classes, String type and Class type
@NullSource: indicates that a null input parameter is provided for the parameterized test
@EnumSource: indicates that an enumeration input parameter is provided for the parameterized test
@CsvFileSource: read the contents of the specified CSV file as the parametric test input parameter
@MethodSource: means to read the return value of the specified method as the parameterized test input parameter (note that the method return needs to be a stream)
Of course, if the parametric test can only specify ordinary input parameters, it can not reach the point that makes me feel amazing. What makes me really feel his strength is that he can support all kinds of external participation. For example, CSV,YML,JSON files and even the return value of methods can also be used as input parameters. You only need to implement the ArgumentsProvider interface, and any external file can be used as its input parameter.
@ParameterizedTest
@DisplayName("Parametric test")
@ValueSource(ints = {1,2,3,4,5})
void testParameterized(int i){
    System.out.println(i);
}

@ParameterizedTest
@DisplayName("Parametric test")
@MethodSource("stringProvider")
void testParameterized2(String i){
    System.out.println(i);
}

static Stream<String> stringProvider() {
    return Stream.of("apple", "banana","atguigu");
}
7, Migration guide
The following changes should be noted during migration:
*Annotations at org junit. jupiter. In the API package, the assertions are in org junit. jupiter. api. In the assertions class, the preconditions are in org junit. jupiter. api. In the assumptions class.
*Replace @ Before and @ After with @ BeforeEach and @ AfterEach.
*Replace @ BeforeClass and @ AfterClass with @ BeforeAll and @ AfterAll.
*Replace @ Ignore with @ Disabled.
*Replace @ Category with @ Tag.
*Replace @ RunWith, @ Rule and @ ClassRule with @ ExtendWith.