It mainly includes the steps and principles of using the external servlet container, and the introduction and core concepts of docker.
1. Use an external Servlet container
Embedded Servlet Containers: Applications typed into executable jar s
Advantages: Simple and portable;
Disadvantages: By default, JSP is not supported, and optimizing customization is more complex (using customizer [Server Properties, custom Embedded Servlet Container Customizer] to write the creation factory of embedded Servlet container by oneself [Embedded Servlet Container Factory]);
External Servlet container: Tomcat is installed outside - packaged in the way of war package;
step
1. A war project must be created; (idea is used to create directory structure)
2. Specify embedded Tomcat as provided.
<dependency>
   <groupId>org.springframework.boot</groupId>
   <artifactId>spring-boot-starter-tomcat</artifactId>
   <scope>provided</scope>
</dependency>
3. You must write a subclass of SpringBootServletInitializer and call the configure method
public class ServletInitializer extends SpringBootServletInitializer {

   @Override
   protected SpringApplicationBuilder configure(SpringApplicationBuilder application) {
       //Main program imported into SpringBoot application
      return application.sources(SpringBoot04WebJspApplication.class);
   }

}
4. Start the server and use it.
principle
The jar package: Execute the main method of the SpringBook main class, start the ioc container, and create the embedded Servlet container.
war package: Start the server, start the SpringBoot application [SpringBoot Servlet Initializer], start the ioc container;
Serlet 3.0 (Spring Annotation Version):
8.2.4 Shared libraries / runtimes pluggability:
Rules:
1. Server startup (web application startup) creates a Servlet Container Initializer instance in each jar package of the current web application:
2. The implementation of Servlet Container Initializer is placed in the META-INF/services folder of the jar package. There is a file named javax. servlet. Servlet Container Initializer, which contains the full class name of the implementation class of Servlet Container Initializer.
3. You can also use @HandlesTypes to load the classes we are interested in when the application starts.
Technological process:
1. Start Tomcat
2,org\springframework\spring-web\4.3.14.RELEASE\spring-web-4.3.14.RELEASE.jar!\META-INF\services\javax.servlet.ServletContainerInitializer:
Spring's web module contains this file: org. spring framework. web. Spring Servlet Container Initializer
3. Spring Servlet Container Initializer passes all classes of this type labeled by @HandlesTypes (Web Application Initializer. class) into the Set < Class <?> of the onStartup method; creates instances for these classes of Web Application Initializer type;
4. Each Web Application Initializer calls its own onStartup.
5. The class equivalent to our SpringBootServletInitializer is created and the onStartup method is executed
6. The SpringBootServletInitializer instance creates RootApplication Context when it executes onStartup; creates a container
protected WebApplicationContext createRootApplicationContext(
      ServletContext servletContext) {
    //1. Create Spring Application Builder
   SpringApplicationBuilder builder = createSpringApplicationBuilder();
   StandardServletEnvironment environment = new StandardServletEnvironment();
   environment.initPropertySources(servletContext, null);
   builder.environment(environment);
   builder.main(getClass());
   ApplicationContext parent = getExistingRootWebApplicationContext(servletContext);
   if (parent != null) {
      this.logger.info("Root context already created (using as parent).");
      servletContext.setAttribute(
            WebApplicationContext.ROOT_WEB_APPLICATION_CONTEXT_ATTRIBUTE, null);
      builder.initializers(new ParentContextApplicationContextInitializer(parent));
   }
   builder.initializers(
         new ServletContextApplicationContextInitializer(servletContext));
   builder.contextClass(AnnotationConfigEmbeddedWebApplicationContext.class);

    //Calling the configure method, subclasses override the method, passing in SpringBook's main program class
   builder = configure(builder);

    //Create a Spring application using builder
   SpringApplication application = builder.build();
   if (application.getSources().isEmpty() && AnnotationUtils
         .findAnnotation(getClass(), Configuration.class) != null) {
      application.getSources().add(getClass());
   }
   Assert.state(!application.getSources().isEmpty(),
         "No SpringApplication sources have been defined. Either override the "
               + "configure method or add an @Configuration annotation");
   // Ensure error pages are registered
   if (this.registerErrorPageFilter) {
      application.getSources().add(ErrorPageFilterConfiguration.class);
   }
    //Start Spring applications
   return run(application);
}
7. Spring applications start and create IOC containers
public ConfigurableApplicationContext run(String... args) {
   StopWatch stopWatch = new StopWatch();
   stopWatch.start();
   ConfigurableApplicationContext context = null;
   FailureAnalyzers analyzers = null;
   configureHeadlessProperty();
   SpringApplicationRunListeners listeners = getRunListeners(args);
   listeners.starting();
   try {
      ApplicationArguments applicationArguments = new DefaultApplicationArguments(
            args);
      ConfigurableEnvironment environment = prepareEnvironment(listeners,
            applicationArguments);
      Banner printedBanner = printBanner(environment);
      context = createApplicationContext();
      analyzers = new FailureAnalyzers(context);
      prepareContext(context, environment, listeners, applicationArguments,
            printedBanner);

       //Refresh IOC container
      refreshContext(context);
      afterRefresh(context, applicationArguments);
      listeners.finished(context, null);
      stopWatch.stop();
      if (this.logStartupInfo) {
         new StartupInfoLogger(this.mainApplicationClass)
               .logStarted(getApplicationLog(), stopWatch);
      }
      return context;
   }
   catch (Throwable ex) {
      handleRunFailure(context, listeners, analyzers, ex);
      throw new IllegalStateException(ex);
   }
}
Start the Servlet container, and then start the SpringBook application
2,Docker
1, introduction
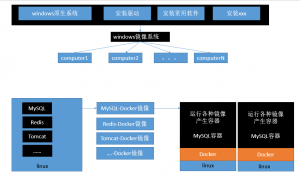
Docker is an open source application container engine; is a lightweight container technology; implements resource isolation in virtual machines
Docker supports compiling software into a mirror, configuring various software in the mirror and publishing the image, which other users can use directly.
This image in operation is called a container, which starts very quickly.
2. Core concepts
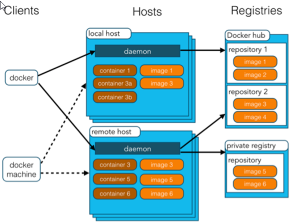
Docker Host: Machine with Docker program installed (Docker installed directly on the operating system);
Docker client: connect to docker host for operation;
docker Warehouse (Registry): Used to store various packaged software images;
Docker image: software packaged image; in docker repository;
docker container: An instance of a mirror startup is called a container; a container is an application or set of applications that run independently.
Steps to use Docker:
1) Installation of Docker
2) Go to Docker Warehouse and find the corresponding image of the software.
3) Running the image with Docker generates a Docker container.
4) Start and stop the container is start and stop the software;
Docker
1. Installing Docker
1) Install linux virtual machine
1), VMWare, VirtualBox (Installation);
2) Import the virtual machine file centos7-atguigu.ova;
3) Double-click to start the linux virtual machine; login with root/123456
4) Use client to connect linux server for command operation;
5) Setting up virtual machine network;
Bridging network = choosing network card = access network line;
6) Restart the virtual machine network with commands after setting up the network
service network restart
7) View the ip address of linux
ip addr
8) using client to connect linux;
2) Install docker on linux virtual machine
Steps:
1,Check the kernel version, must be 3.10 And above
uname -r
2,install docker
yum install docker
3,input y Confirm installation
4,start-up docker
[root@localhost ~]# systemctl start docker
[root@localhost ~]# docker -v
Docker version 1.12.6, build 3e8e77d/1.12.6
5,Boot up docker
[root@localhost ~]# systemctl enable docker
Created symlink from /etc/systemd/system/multi-user.target.wants/docker.service to /usr/lib/systemd/system/docker.service.
6,Stop it docker
systemctl stop docker
2. Common Docker Commands & Operations
1) Mirror operation
| operation | command | Explain |
|---|---|---|
| retrieval | Docker search keyword eg: docker search redis | We often go to docker hub to retrieve the details of the mirror, such as the TAG of the mirror. |
| Pull out | docker pull mirror name: tag | Tag is optional, tag means tag, mostly software version, default is latest |
| list | docker images | View all local mirrors |
| delete | docker rmi image-id | Delete the specified local image |
https://hub.docker.com/
2) Container operation
Software Mirror (QQ Installer) - - Running Mirror - - generates a container (running software, running QQ);
Steps:
1. Search Mirror
[root@localhost ~]# docker search tomcat
 2. Pull out the mirror
[root@localhost ~]# docker pull tomcat
 3. Start the container according to the mirror
docker run --name mytomcat -d tomcat:latest
4,docker ps
View containers in operation
 5. Containers in Stop Operation
 id of docker stop container
 6. View all containers
docker ps -a
 7. Start Container
 docker start container id
 8. Delete a container
 docker rm container id
 9. Start a tomcat with port mapping
[root@localhost ~]# docker run -d -p 8888:8080 tomcat
 - d: Background operation
 - p: Mapping the port of the host to one port of the container: the port inside the container

10. Simply shut down the linux Firewall for demonstration
 service firewalld status; view firewall status
 service firewalld stop: Close the firewall
 11. View container logs
docker logs container-name/container-id

See more commands
https://docs.docker.com/engine/reference/commandline/docker/
You can refer to the documentation for each mirror.
3) Install MySQL sample
docker pull mysql
Error startup
[root@localhost ~]# docker run --name mysql01 -d mysql
42f09819908bb72dd99ae19e792e0a5d03c48638421fa64cce5f8ba0f40f5846

mysql Quit
[root@localhost ~]# docker ps -a
CONTAINER ID        IMAGE               COMMAND                  CREATED             STATUS                           PORTS               NAMES
42f09819908b        mysql               "docker-entrypoint.sh"   34 seconds ago      Exited (1) 33 seconds ago                            mysql01
538bde63e500        tomcat              "catalina.sh run"        About an hour ago   Exited (143) About an hour ago                       compassionate_
goldstine
c4f1ac60b3fc        tomcat              "catalina.sh run"        About an hour ago   Exited (143) About an hour ago                       lonely_fermi
81ec743a5271        tomcat              "catalina.sh run"        About an hour ago   Exited (143) About an hour ago                       sick_ramanujan


//Error log
[root@localhost ~]# docker logs 42f09819908b
error: database is uninitialized and password option is not specified
  You need to specify one of MYSQL_ROOT_PASSWORD, MYSQL_ALLOW_EMPTY_PASSWORD and MYSQL_RANDOM_ROOT_PASSWORD;The three parameters must specify one
Correct startup
[root@localhost ~]# docker run --name mysql01 -e MYSQL_ROOT_PASSWORD=123456 -d mysql
b874c56bec49fb43024b3805ab51e9097da779f2f572c22c695305dedd684c5f
[root@localhost ~]# docker ps
CONTAINER ID        IMAGE               COMMAND                  CREATED             STATUS              PORTS               NAMES
b874c56bec49        mysql               "docker-entrypoint.sh"   4 seconds ago       Up 3 seconds        3306/tcp            mysql01
Port mapping
[root@localhost ~]# docker run -p 3306:3306 --name mysql02 -e MYSQL_ROOT_PASSWORD=123456 -d mysql
ad10e4bc5c6a0f61cbad43898de71d366117d120e39db651844c0e73863b9434
[root@localhost ~]# docker ps
CONTAINER ID        IMAGE               COMMAND                  CREATED             STATUS              PORTS                    NAMES
ad10e4bc5c6a        mysql               "docker-entrypoint.sh"   4 seconds ago       Up 2 seconds        0.0.0.0:3306->3306/tcp   mysql02
Several other advanced operations
docker run --name mysql03 -v /conf/mysql:/etc/mysql/conf.d -e MYSQL_ROOT_PASSWORD=my-secret-pw -d mysql:tag
 Mount the host's / conf/mysql folder into the / etc/mysql/conf.d folder of the mysqldocker container
 To change the MySQL configuration file, you just need to place the MySQL configuration file in a custom folder (/ conf/mysql)

docker run --name some-mysql -e MYSQL_ROOT_PASSWORD=my-secret-pw -d mysql:tag --character-set-server=utf8mb4 --collation-server=utf8mb4_unicode_ci
 Specify some configuration parameters for mysql