Spring Boot -- Integrated Shiro framework
1. Introduction to Shiro
1.1. What is Shiro
Apache Shiro is a powerful and easy-to-use Java security framework that performs authentication, authorization, password and session management, Web integration, caching, etc. At present, more and more people use Apache Shiro because it is quite simple. Compared with Spring Security, it may not be as powerful as Spring Security, but it may not need so complex things in actual work, so using a small and simple Shiro is enough. There is no need to tangle about which of them is better. It's better to solve the project problems more simply.
1.2 functions of shiro
Shiro's API is also very simple; Its basic function points are shown in the figure below:
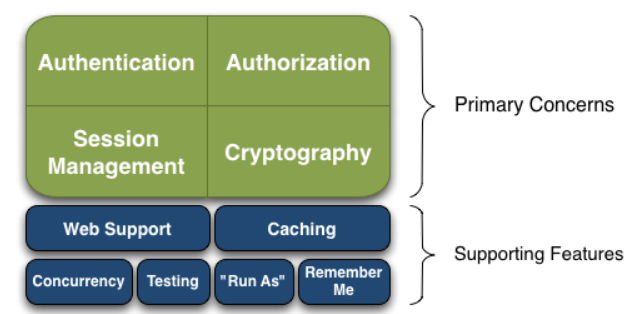
- Authentication: identity authentication / login to verify whether the user has the corresponding identity;
- Authorization: authorization, i.e. permission verification, which verifies whether an authenticated user has a certain permission; That is to judge whether a user can do something. Common examples are: verifying whether a user has a role. Or fine-grained verification of whether a user has certain permissions on a resource;
- Session Management: Session Management, that is, after a user logs in, it is a session. Before exiting, all its information is in the session; The session can be in ordinary JavaSE environment or in Web environment;
- Cryptography: encryption to protect the security of data. For example, the password is encrypted and stored in the database instead of plaintext;
- Web Support: Web Support, which can be easily integrated into the web environment;
- Caching: caching. For example, after a user logs in, it is not necessary to check his / her user information and roles / permissions every time, which can improve efficiency;
- Concurrency: shiro supports concurrent verification of multithreaded applications, that is, if you start another thread in one thread, you can automatically propagate permissions in the past;
- Testing: provide test support;
- Run As: allow one user to pretend to be the identity of another user (if they allow it);
- Remember Me: Remember Me, this is a very common function, that is, after logging in once, you don't need to log in next time.
Note: Shiro will not maintain users and permissions; These need to be designed / provided by ourselves; Then inject it into Shiro through the corresponding interface.
1.3 Shiro external frame
Shiro external framework has a very simple and easy-to-use API, and the API contract is clear. The following figure shows how Shiro works from an application perspective:
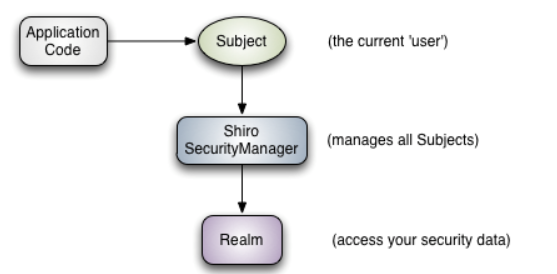
It can be seen that the object of direct interaction between application codes is Subject, that is, the core of Shiro's external API is Subject; The meaning of each API:
-
Subject: subject, which represents the current "user". This user is not necessarily a specific person. Anything interacting with the current application is a subject, such as web crawler, robot, etc; An abstract concept; All subjects are bound to SecurityManager, and all interactions with subjects will be delegated to SecurityManager; You can think of subject as a facade; The SecurityManager is the actual executor;
-
SecurityManager: Security Manager; That is, all security related operations will interact with SecurityManager; And it manages all subjects; It can be seen that = = SecurityManager is the core of Shiro = =, which is responsible for interacting with other components introduced later. If you have studied spring MVC, you can regard it as the front-end controller of dispatcher servlet;
-
Realm: domain. Shiro obtains security data (such as users, roles and permissions) from realm, which means that if SecurityManager wants to verify user identity, it needs to obtain corresponding users from realm for comparison to determine whether the user identity is legal; You also need to get the corresponding role / authority of the user from realm to verify whether the user can operate; You can think of realm as a DataSource, that is, a secure data source.
-
In other words, for us, the simplest Shiro application:
-
The application code is authenticated and authorized through the Subject, which is entrusted to the SecurityManager;
-
We need to inject real into Shiro's SecurityManager so that the SecurityManager can obtain legal users and their permissions for judgment.
-
It can also be seen from the above that Shiro does not provide maintenance users / permissions, but allows developers to inject by themselves through Realm.
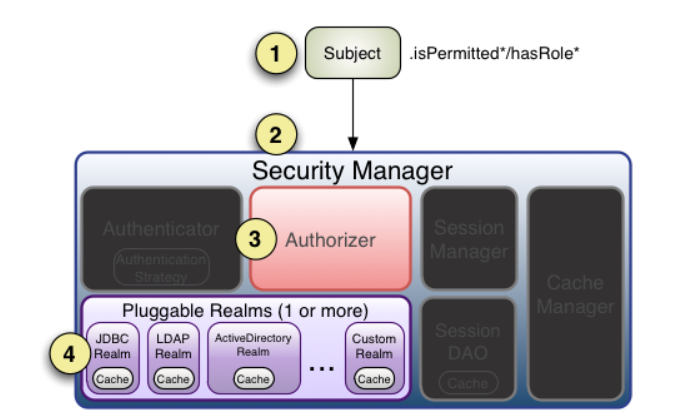
1.4 internal framework of Shiro
Shiro internal framework is an extensible architecture, that is, it is very easy to insert user-defined implementation, because no framework can meet all requirements.
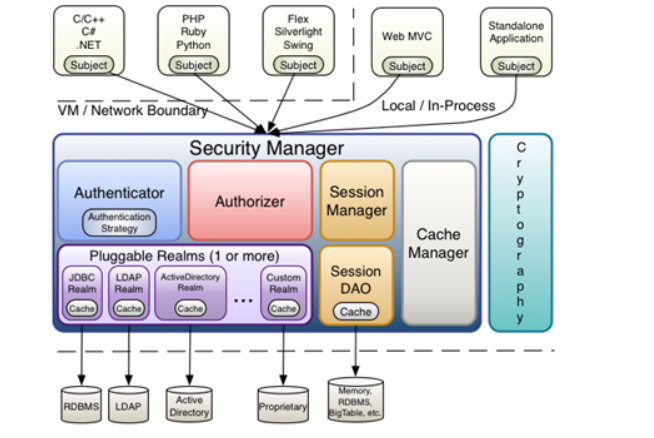
- Subject: subject. It can be seen that the subject can be any "user" who can interact with the application;
- SecurityManager: equivalent to dispatcher servlet in spring MVC or FilterDispatcher in struts 2; It's Shiro's heart; All specific interactions are controlled through the SecurityManager; It manages all subjects and is responsible for authentication and authorization, session and cache management.
- Authenticator: authenticator, which is responsible for principal authentication. This is an extension point. If users think Shiro's default is not good, they can customize the implementation; It needs Authentication Strategy, that is, when the user authentication is passed;
- Authorizer: authorizer or access controller, which is used to determine whether the subject has permission to perform corresponding operations; That is, it controls which functions users can access in the application;
- Realm: there can be one or more realms, which can be considered as the data source of security entity, that is, the data source used to obtain security entity; It can be implemented by JDBC, LDAP or memory; Provided by the user; Note: Shiro doesn't know where your users / permissions are stored and in what format; Therefore, we generally need to implement our own realm in applications;
- SessionManager: if you have written servlets, you should know the concept of session. Session needs someone to manage its life cycle. This component is SessionManager; Shiro can be used not only in the Web environment, but also in ordinary JavaSE environment, EJB and other environments; Therefore, Shiro abstracts a session of its own to manage the data interaction between the subject and the application; In this case, for example, when we used it in the Web environment, it was a Web server at the beginning; Then I went to an EJB server; At this time, if you want to put the session data of the two servers in one place, you can realize your own distributed session (such as putting the data on the Memcached server);
- SessionDAO: DAO has been used by everyone. Data access objects and CRUD for sessions. For example, if we want to save sessions to the database, we can implement our own SessionDAO and write to the database through JDBC; For example, if you want to put a Session into Memcached, you can implement your own Memcached SessionDAO; In addition, in SessionDAO, Cache can be used for caching to improve performance;
- CacheManager: cache controller to manage the cache of users, roles, permissions, etc; Because these data are rarely changed, putting them in the cache can improve the performance of access
- Cryptography: password module. Shiro provides some common encryption components, such as password encryption / decryption.
2. Shiro's quick start
2.1 environment construction
Create a maven project and import dependencies:
<dependencies>
    <dependency>
        <groupId>org.apache.shiro</groupId>
        <artifactId>shiro-core</artifactId>
        <version>1.7.1</version>
    </dependency>

    <!-- configure logging -->
    <dependency>
        <groupId>org.slf4j</groupId>
        <artifactId>jcl-over-slf4j</artifactId>
        <version>1.7.26</version>

    </dependency>
    <dependency>
        <groupId>org.slf4j</groupId>
        <artifactId>slf4j-log4j12</artifactId>
        <version>1.7.26</version>

    </dependency>
    <dependency>
        <groupId>log4j</groupId>
        <artifactId>log4j</artifactId>
        <version>1.2.12</version>
    </dependency>
</dependencies>
log4j.properties:
log4j.rootLogger=INFO, stdout

log4j.appender.stdout=org.apache.log4j.ConsoleAppender
log4j.appender.stdout.layout=org.apache.log4j.PatternLayout
log4j.appender.stdout.layout.ConversionPattern=%d %p [%c] - %m %n

# General Apache libraries
log4j.logger.org.apache=WARN

# Spring
log4j.logger.org.springframework=WARN

# Default Shiro logging
log4j.logger.org.apache.shiro=INFO

# Disable verbose logging
log4j.logger.org.apache.shiro.util.ThreadContext=WARN
log4j.logger.org.apache.shiro.cache.ehcache.EhCache=WARN
Shiro configuration file Shiro ini:
[users]
# user 'root' with password 'secret' and the 'admin' role
root = secret, admin
# user 'guest' with the password 'guest' and the 'guest' role
guest = guest, guest
# user 'presidentskroob' with password '12345' ("That's the same combination on
# my luggage!!!" ;)), and role 'president'
presidentskroob = 12345, president
# user 'darkhelmet' with password 'ludicrousspeed' and roles 'darklord' and 'schwartz'
darkhelmet = ludicrousspeed, darklord, schwartz
# user 'lonestarr' with password 'vespa' and roles 'goodguy' and 'schwartz'
lonestarr = vespa, goodguy, schwartz

# -----------------------------------------------------------------------------
# Roles with assigned permissions
#
# Each line conforms to the format defined in the
# org.apache.shiro.realm.text.TextConfigurationRealm#setRoleDefinitions JavaDoc
# -----------------------------------------------------------------------------
[roles]
# 'admin' role has all permissions, indicated by the wildcard '*'
admin = *
# The 'schwartz' role can do anything (*) with any lightsaber:
schwartz = lightsaber:*
# The 'goodguy' role is allowed to 'drive' (action) the winnebago (type) with
# license plate 'eagle5' (instance specific id)
goodguy = winnebago:drive:eagle5
2.2 testing
Some API methods are tested in the test class, mainly the use of Subject.
import com.sun.org.omg.CORBA.InitializerSeqHelper;
import org.apache.shiro.SecurityUtils;
import org.apache.shiro.authc.*;
import org.apache.shiro.config.IniSecurityManagerFactory;
import org.apache.shiro.mgt.SecurityManager;
import org.apache.shiro.session.Session;
import org.apache.shiro.subject.Subject;
import org.apache.shiro.util.Factory;
import org.slf4j.Logger;
import org.slf4j.LoggerFactory;


public class Quickstart {

    private static final transient Logger log = LoggerFactory.getLogger(Quickstart.class);

    public static void main(String[] args) {


        /*  Setting environment:
        * The easiest way to create Shiro SecurityManager using configuration:
        * Load the domain, user, role, and permission configuration through the ini file (shiro.ini)
        * IniSecurityManagerFactory By reading ini configuration file, return
        */
        // Factory<SecurityManager> factory = new IniSecurityManagerFactory("classpath:shiro.ini");
        // SecurityManager securityManager = factory.getInstance();
        SecurityManager securityManager = new IniSecurityManagerFactory("classpath:shiro.ini").getInstance();

        // For this simple example quick start, make the SecurityManager accessible as a JVM singleton.
        // Most applications do not do this, but rely on their container configuration or web webapps for XML.
        // This is beyond the scope of this simple quick start, so we will only do the minimum things so that you can continue to feel things.
        SecurityUtils.setSecurityManager(securityManager);


        // Now that we have set up a simple Shiro environment, let's see what we can do:
        // Get the currently executing user Subject:
        Subject currentUser = SecurityUtils.getSubject();

        // Get the session through the current user (session in shiro)
        Session session = currentUser.getSession();
        // session stored value and value
        session.setAttribute("someKey", "Wan Li Gu Yicheng");
        String value = (String) session.getAttribute("someKey");
        if (value.equals("Wan Li Gu Yicheng")) {
            log.info("Subject-->session [" + value + "]");//Subject -- "session"
        }

        // Judge whether the current user is authenticated
        if (!currentUser.isAuthenticated()) {

            //Verify the user's user name and password (compared with the user information in the. ini configuration file). If the authentication is successful, a token will be generated for the user
            UsernamePasswordToken token = new UsernamePasswordToken("root", "secret");
            token.setRememberMe(true);//Turn on the remember me function

            try {
                currentUser.login(token);//Perform login operation
            } catch (UnknownAccountException uae) {
                log.info("There is no user with username of " + token.getPrincipal());
            } catch (IncorrectCredentialsException ice) {
                log.info("Password for account " + token.getPrincipal() + " was incorrect!");
            } catch (LockedAccountException lae) {
                log.info("The account for username " + token.getPrincipal() + " is locked.  " +
                        "Please contact your administrator to unlock it.");
            }
            // General anomaly
            catch (AuthenticationException ae) {
            }
        }
        // Print current user name
        log.info("User [" + currentUser.getPrincipal() + "] logged in successfully.");

        //  Test user's role
        if (currentUser.hasRole("admin")) {//If the current user has the role of admin
            log.info("May the admin be with you!");
        } else {
            log.info("Hello, mere mortal.");
        }

        // Test role permissions (non instance level), coarse grained
        if (currentUser.isPermitted("lightsaber:wield")) {
            log.info("You may use a lightsaber ring.  Use it wisely.");
        } else {
            log.info("Sorry, lightsaber rings are for schwartz masters only.");
        }

        // A (very powerful) instance level permission, fine-grained
        if (currentUser.isPermitted("winnebago:drive:eagle5")) {
            log.info("You are permitted to 'drive' the winnebago with license plate (id) 'eagle5'.  " +
                    "Here are the keys - have fun!");
        } else {
            log.info("Sorry, you aren't allowed to drive the 'eagle5' winnebago!");
        }

        // cancellation
        currentUser.logout();

        // end
        System.exit(0);
    }
}
Start the test class test and view the log output:

The above is just a simple test of console output. Next, we use Springboot to integrate shiro.
3. Springboot integrated Shiro
3.1. Construction environment
Create a new springboot project and import dependencies:
<dependencies>

<dependency>
            <groupId>org.springframework.boot</groupId>
            <artifactId>spring-boot-starter-web</artifactId>
        </dependency>

        <dependency>
            <groupId>org.springframework.boot</groupId>
            <artifactId>spring-boot-devtools</artifactId>
            <scope>runtime</scope>
            <optional>true</optional>
        </dependency>
        <dependency>
            <groupId>org.projectlombok</groupId>
            <artifactId>lombok</artifactId>
            <optional>true</optional>
        </dependency>
        <dependency>
            <groupId>org.springframework.boot</groupId>
            <artifactId>spring-boot-starter-test</artifactId>
            <scope>test</scope>
        </dependency>

        <!--Import tomcat analysis jsp Dependence of-->
        <dependency>
            <groupId>org.apache.tomcat.embed</groupId>
            <artifactId>tomcat-embed-jasper</artifactId>
        </dependency>

        <dependency>
            <groupId>jstl</groupId>
            <artifactId>jstl</artifactId>
            <version>1.2</version>
        </dependency>

        <dependency>
            <groupId>org.apache.shiro</groupId>
            <artifactId>shiro-spring-boot-starter</artifactId>
            <version>1.7.1</version>
        </dependency>
</dependencies>
Custom Realm
package com.cheng.shiro.realm;

import jdk.nashorn.internal.ir.CallNode;
import org.apache.shiro.authc.AuthenticationException;
import org.apache.shiro.authc.AuthenticationInfo;
import org.apache.shiro.authc.AuthenticationToken;
import org.apache.shiro.authc.SimpleAuthenticationInfo;
import org.apache.shiro.authz.AuthorizationInfo;
import org.apache.shiro.realm.AuthorizingRealm;
import org.apache.shiro.subject.PrincipalCollection;

public class CustomerRealm extends AuthorizingRealm {

    //to grant authorization
    @Override
    protected AuthorizationInfo doGetAuthorizationInfo(PrincipalCollection principals) {
        return null;
    }

    //authentication
    @Override
    protected AuthenticationInfo doGetAuthenticationInfo(AuthenticationToken token) throws AuthenticationException {
        return null;
    }
}
Write Shiro configuration class
package com.cheng.config;

import com.cheng.shiro.realm.CustomerRealm;
import org.apache.shiro.realm.Realm;
import org.apache.shiro.spring.web.ShiroFilterFactoryBean;
import org.apache.shiro.web.mgt.DefaultWebSecurityManager;
import org.springframework.beans.factory.annotation.Qualifier;
import org.springframework.context.annotation.Bean;
import org.springframework.context.annotation.Configuration;

import java.util.HashMap;


@Configuration
public class ShiroConfig {

    //1. Create ShiroFilter to intercept all requests
    @Bean
    public ShiroFilterFactoryBean getShiroFilterFactoryBean(DefaultWebSecurityManager securityManager){
        ShiroFilterFactoryBean bean = new ShiroFilterFactoryBean();

        return bean;
    }

    //2. Create SecurityManager
    @Bean
    public DefaultWebSecurityManager getDefaultWebSecurityManager(Realm realm){
        DefaultWebSecurityManager securityManager = new DefaultWebSecurityManager();

        securityManager.setRealm(realm);

        return securityManager;
    }
    //3. Create a custom Realm
    @Bean(name = "realm")
    public Realm getRealm(){
        CustomerRealm customerRealm = new CustomerRealm();
        return customerRealm;
    }
}
3.2. Realize login interception
Login page
<%@page contentType="text/html; UTF-8" pageEncoding="UTF-8" isELIgnored="false" %>
<!doctype html>
<html lang="en">
<head>
    <meta charset="UTF-8">
    <meta name="viewport"
          content="width=device-width, user-scalable=no, initial-scale=1.0, maximum-scale=1.0, minimum-scale=1.0">
    <meta http-equiv="X-UA-Compatible" content="ie=edge">
    <title>Document</title>
</head>
<body>

<h1>Login page</h1>
<form action="" method="post">
    user name<input type="text" name="username"><br>
    password<input type="text" name="password"><br>
    <input type="submit" value="Sign in">

</form>

</body>
</html>
User home page
<%--Solve garbled code--%>
<%@page contentType="text/html; UTF-8" pageEncoding="UTF-8" isELIgnored="false" %>
<!doctype html>
<html lang="en">
<head>
    <meta charset="UTF-8">
    <meta name="viewport"
          content="width=device-width, user-scalable=no, initial-scale=1.0, maximum-scale=1.0, minimum-scale=1.0">
    <meta http-equiv="X-UA-Compatible" content="ie=edge">
    <title>Document</title>
</head>
<body>

<h1 style="color: red">User home page v1.0</h1>
    <ul>
        <li><a href="">user management </a></li>
        <li><a href="">Commodity management</a></li>
        <li><a href="">Order management</a></li>
        <li><a href="">Staff management</a></li>
    </ul>

</body>
</html>
controller
@Controller
@RequestMapping("/user")
public class UserController {
}
To realize the filtering function, we can add the corresponding filter in the configuration class.
package com.cheng.config;

import com.cheng.shiro.realm.CustomerRealm;
import org.apache.shiro.realm.Realm;
import org.apache.shiro.spring.web.ShiroFilterFactoryBean;
import org.apache.shiro.web.mgt.DefaultWebSecurityManager;
import org.springframework.beans.factory.annotation.Qualifier;
import org.springframework.context.annotation.Bean;
import org.springframework.context.annotation.Configuration;

import java.util.HashMap;

@Configuration
public class ShiroConfig {

    //1. Create ShiroFilter to intercept all requests
    @Bean
    public ShiroFilterFactoryBean getShiroFilterFactoryBean(DefaultWebSecurityManager securityManager){
        ShiroFilterFactoryBean bean = new ShiroFilterFactoryBean();

        bean.setSecurityManager(securityManager);

        /*Add filter
         * anon:Access without authentication
         * authc: Must be authenticated to access
         * user: You must have the remember me function to use
         * perms: You must have permission on a resource to access it
         * role: You must have a role permission to access
         * */
        //Create a map that determines which resources are limited and which resources are public
        HashMap<String, String> map = new HashMap<String, String>();

        //Visit index JSP needs authentication
        map.put("/index.jsp","authc");

        //Put intercepted requests into the filter
        bean.setFilterChainDefinitionMap(map);

        //The default authentication interface path will automatically jump to this page for authentication when login fails
        bean.setLoginUrl("/login.jsp");

        return bean;
    }

    //2. Create SecurityManager
    @Bean
    public DefaultWebSecurityManager getDefaultWebSecurityManager(Realm realm){
        DefaultWebSecurityManager securityManager = new DefaultWebSecurityManager();

        securityManager.setRealm(realm);

        return securityManager;
    }
    //3. Create a custom Realm
    @Bean(name = "realm")
    public Realm getRealm(){
        CustomerRealm customerRealm = new CustomerRealm();
        return customerRealm;
    }
}
Start the program test. When we try to visit the home page, we jump to the login interface and the interception is successful!
3.3. Realize user authentication and exit
The user authentication function needs to use our customized Realm
First, the user submits user information in the login interface, and then the Controller receives it.
Controller receive
    @RequestMapping("/login")
    public String login(String username,String password){

        Subject subject = SecurityUtils.getSubject();

        //Encapsulate the user information submitted by the front end
        UsernamePasswordToken token = new UsernamePasswordToken(username, password);
        try {
            subject.login(token);//Execute the login method and jump to the main page if the execution is successful
            return "redirect:/index.jsp";
            //Catch possible exceptions
        } catch (UnknownAccountException e) {
            e.printStackTrace();
            System.out.println("User name error");
        } catch (IncorrectCredentialsException e) {
            e.printStackTrace();
            System.out.println("Password error");
        }
        return "redirect:/login.jsp";
    }
Login interface
<%@page contentType="text/html; UTF-8" pageEncoding="UTF-8" isELIgnored="false" %>
<!doctype html>
<html lang="en">
<head>
    <meta charset="UTF-8">
    <meta name="viewport"
          content="width=device-width, user-scalable=no, initial-scale=1.0, maximum-scale=1.0, minimum-scale=1.0">
    <meta http-equiv="X-UA-Compatible" content="ie=edge">
    <title>Document</title>
</head>
<body>

<h1>Login page</h1>
<form action="${pageContext.request.contextPath}/user/login" method="post">
    user name<input type="text" name="username"><br>
    password<input type="text" name="password"><br>
    <input type="submit" value="Sign in">

</form>
</body>
</html>
After receiving the information submitted by the user, it is encapsulated into a token, and then the token is compared with the user information saved in the customized real. If the comparison is successful, the login operation is carried out, and if the comparison fails, an exception is thrown.
CustomerRealm.java
package com.cheng.shiro.realm;

import jdk.nashorn.internal.ir.CallNode;
import org.apache.shiro.authc.AuthenticationException;
import org.apache.shiro.authc.AuthenticationInfo;
import org.apache.shiro.authc.AuthenticationToken;
import org.apache.shiro.authc.SimpleAuthenticationInfo;
import org.apache.shiro.authz.AuthorizationInfo;
import org.apache.shiro.realm.AuthorizingRealm;
import org.apache.shiro.subject.PrincipalCollection;

public class CustomerRealm extends AuthorizingRealm {

    //to grant authorization
    @Override
    protected AuthorizationInfo doGetAuthorizationInfo(PrincipalCollection principals) {
        return null;
    }

    //authentication
    @Override
    protected AuthenticationInfo doGetAuthenticationInfo(AuthenticationToken token) throws AuthenticationException {
        System.out.println("====Entered the authentication method====");

        //Get identity information
        String principal = (String) token.getPrincipal();
        //A virtual user data is used for testing,
        if ("wanli".equals(principal)){//If identity authentication is successful
            return new SimpleAuthenticationInfo(principal,"123",this.getName());
        }

        return null;
    }
}
Start the program to test:
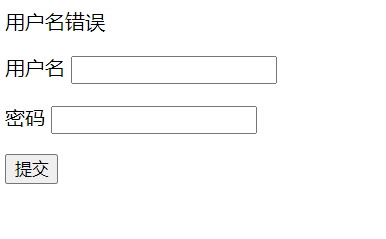
Access the login interface, enter the wrong user name, and test the user name authentication function
Then enter the wrong password and test the password authentication function
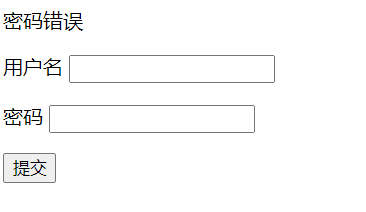
Finally, enter the correct user name and password, log in and successfully enter the home page!
User logout
Add on home page
<a href="${pageContext.request.contextPath}/user/logout">Logout login</a>
Then write the controller
@RequestMapping("/logout")
public String logout(){
    Subject subject = SecurityUtils.getSubject();
    subject.logout();
    return "redirect:/login.jsp";
}
3.4. Connect the database to realize the registration function based on MD5 salt value encryption
In order to prevent the user's password from being obtained, when the user registers, we should use the MD5 algorithm provided by shiro to encrypt the plaintext password submitted by the user before saving it to the database. After salt treatment, we can save it to the database. In the future, we can read the encrypted password in the database during authentication.
Connect database
Create a shiro database, and then create a user table
CREATE DATABASE `shiro`CHARACTER SET utf8 COLLATE utf8_general_ci;

CREATE TABLE `shiro`.`t_user
( `id` INT(6) NOT NULL AUTO_INCREMENT,
`username` VARCHAR(60), `password` VARCHAR(60),
`salt` VARCHAR(30),
 PRIMARY KEY (`id`)
) ENGINE=INNODB CHARSET=utf8 COLLATE=utf8_general_ci;
Import dependency
<!--mybatis-->
<dependency>
    <groupId>org.mybatis.spring.boot</groupId>
    <artifactId>mybatis-spring-boot-starter</artifactId>
    <version>2.2.0</version>
</dependency>
<!--Import mysql Dependence of-->
<dependency>
    <groupId>mysql</groupId>
    <artifactId>mysql-connector-java</artifactId>
    <version>5.1.49</version>
</dependency>
<!--druid-->
<dependency>
    <groupId>com.alibaba</groupId>
    <artifactId>druid</artifactId>
    <version>1.2.6</version>
</dependency>
Write database configuration file
spring.datasource.type=com.alibaba.druid.pool.DruidDataSource
spring.datasource.driver-class-name=com.mysql.jdbc.Driver
spring.datasource.url=jdbc:mysql://3306/shiro?characterEncoding=UTF-8
spring.datasource.username=root
spring.datasource.password=19990802

mybatis.type-aliases-package=pojo
mybatis.mapper-locations=classpath:mapper/*.xml
Write a tool class to generate random salt
package com.cheng.utils;

import java.util.Random;

//Tool class for generating random salt
public class SaltUtils {
    public static String getSalt(int n){
        //Define an array from which random salt is generated
        char[] chars = "ABCDEFGHIJKLMNOPQRSTUVWXYZabcdefghijklmnopqrstuvwxyz0123456789!@#$%^&*()-=+.?".toCharArray();

        /*StringBuffer Difference between and StringBuilder
        * StringBuffer String variable (thread safe) multithreaded operation string
        * StringBuilder String variable (non threaded single thread operation string)
        * */
        StringBuilder sb = new StringBuilder();
        for (int i = 0; i < n; i++) {
            //Each time, a number is returned randomly within the range of chars and executed n times. The interval of Random is [a,b)
            char aChar = chars[new Random().nextInt(chars.length)];
            sb.append(aChar);
        }
        return sb.toString();
    }
    //Test it
    public static void main(String[] args) {
        System.out.println(getSalt(6));//.8mv+#
    }
}
Realize registration business
dao layer interface
@Mapper
@Repository
public interface UserDao {

    //User registration
   public void save(User user);

}
service layer interface
public interface UserService {
   public void register(User user);
}
The service layer implements classes to realize specific business
package com.cheng.service;

import com.cheng.dao.UserDao;
import com.cheng.pojo.User;
import com.cheng.utils.SaltUtils;
import lombok.experimental.Accessors;
import org.apache.shiro.crypto.hash.Md5Hash;
import org.springframework.beans.factory.annotation.Autowired;
import org.springframework.stereotype.Service;
import org.springframework.transaction.annotation.Transactional;

@Service
@Transactional//Declarative transaction management enables normal commit transactions and abnormal rollback transactions
public class UserServiceImpl implements UserService{

    //service calls dao layer
    @Autowired
    private UserDao userDao;

    @Override
    public void register(User user) {
        //Processing business
        //1. Generate random salt 8 bits
        String salt = SaltUtils.getSalt(8);
        //2. Save the random salt to the database
        user.setSalt(salt);
        //3. Encrypt the plaintext password with MD5 + salt random salt + hash hash for 1024 times
        Md5Hash md5Hash = new Md5Hash(user.getPassword(), salt, 1024);
        //Save the encrypted password to the database
        user.setPassword(md5Hash.toHex());//toHex() string converted to hexadecimal encoding

        userDao.save(user);
    }
}
Start the program to realize user registration. The user information is saved to the database. The registration is successful!
3.5. Connect the database to realize the authentication function based on MD5 salt value encryption
To realize the authentication function, we need to query whether there is this user in the database through the user name submitted by the user, so we need to write a method to query the user according to the user name:
dao layer
//Query users by user name
User queryUserByName(String username);
service layer
//Query users by user name
User queryUserByName(String username);
service layer implementation class
@Override
public User queryUserByName(String username) {
    return userDao.queryUserByName(username);
}
Because we encrypted the plaintext password with MD5 salt value above, the password will match asymmetrically when shrio matches the password, so we need to modify the password verification matcher in the configuration class
//3. Create a custom Realm
@Bean(name = "realm")
public CustomerRealm getRealm(){
    CustomerRealm customerRealm = new CustomerRealm();
    //Modify password voucher verification matcher
    HashedCredentialsMatcher credentialsMatcher = new HashedCredentialsMatcher();
    //Set the encryption algorithm to MD5
    credentialsMatcher.setHashAlgorithmName("MD5");
    //Set the number of hashes
    credentialsMatcher.setHashIterations(1024);
    customerRealm.setCredentialsMatcher(credentialsMatcher);
    return customerRealm;
}
Implementation of user authentication in custom realm
    //authentication
    @Override
    protected AuthenticationInfo doGetAuthenticationInfo(AuthenticationToken token) throws AuthenticationException {

        //Get identity information
        String principal = (String) token.getPrincipal();

        User user = userService.queryUserByName(principal);

        if (!ObjectUtils.isEmpty(user)){//ByteSource provides an internal method to convert a string into the corresponding salt value information
            return new SimpleAuthenticationInfo(user.getUsername(), user.getPassword(), ByteSource.Util.bytes(user.getSalt()),this.getName());
        }

        return null;
    }
Start the program test and the certification is successful!
3.6 basic use of authorization
Authorization, also known as access control, is to control who can access which resources in the application (such as accessing page / editing data / page operation, etc.).
Several key objects to understand in authorization: Subject, Resource, Permission and Role:
- The Subject, that is, the user accessing the application, uses Subject in Shiro to represent the user. Users are only allowed to access the corresponding resources after authorization.
- Resources, URL s that users can access in applications, such as accessing JSP pages, viewing / editing some data, accessing a business method, printing text, etc. are resources.
- Permission represents whether the user has the right to operate a resource, that is, whether the operation reflected on a resource is allowed or not, and who will perform the operation. Therefore, it is necessary to give permissions to users later, that is, to define which user is allowed to do what operations (permissions) on a resource. Shiro will not do this, but will be provided by the implementer.
- Role, which represents a set of operations, can be understood as a set of permissions. Generally, we give users roles rather than permissions, that is, in this way, users can have a set of permissions, which is more convenient when granting permissions. Different roles have a different set of permissions.
shiro authorization process analysis
The process is as follows:
- First call subject Ispermitted / hasrole interface, which will be delegated to the SecurityManager, and then the SecurityManager will be delegated to the Authorizer;
- The Authorizer is the real Authorizer. If we call isPermitted("user:update"), it will first convert the string into the corresponding Permission instance through PermissionResolver;
- Before authorization, it will call the corresponding Realm to obtain the corresponding role / permission of the Subject to match the incoming role / permission;
- The Authorizer will judge whether the roles / permissions of realms match the incoming ones. If there are multiple realms, it will delegate to the ModularRealmAuthorizer for circular judgment. If there is a match, such as isPermitted*/hasRole *, it will return true. Otherwise, it will return false, indicating that the authorization has failed.
Authorization method
Shiro supports authorization in three ways:
1. Programming: complete by writing if/else authorization code block:
Subject subject = SecurityUtils.getSubject();
if(subject.hasRole("admin")) {
    //Have authority
} else {
    //No permission
}
2. Annotation: it is completed by placing corresponding annotations on the executed Java method:
@RequiresRoles("admin")
public void hello() {
    //Have authority
}
If there is no permission, the corresponding exception will be thrown;
3.JSP/GSP tag: complete through the corresponding tag on the JSP/GSP page:
<shiro:hasRole name="admin">
<!— Have authority to ->
</shiro:hasRole>
3.6.1. Use Jsp tag to realize authorization
Introduce shiro tag in the page header
<%@taglib prefix="shiro" uri="http://shiro.apache.org/tags" %>
1. Role based permission management
Add a role to the user first:
//to grant authorization
@Override
protected AuthorizationInfo doGetAuthorizationInfo(PrincipalCollection principals) {
    //Obtain the primary identity information during user authentication
    String primaryPrincipal = (String) principals.getPrimaryPrincipal();
    //Obtain role and permission information according to master identity information
    if ("xiaowei".equals(primaryPrincipal)){

        SimpleAuthorizationInfo simpleAuthorizationInfo = new SimpleAuthorizationInfo();
        //Add roles to users
        simpleAuthorizationInfo.addRole("user");

        return simpleAuthorizationInfo;
    }
    return null;
}
Then define the role authorization rules in the jsp page
<ul>
    <shiro:hasAnyRoles name="user,admin"><%--The resources inside can be accessed by multiple roles--%>
        <li><a href="">user management </a></li>
    </shiro:hasAnyRoles>
    <shiro:hasRole name="admin"><%--The resources inside are only admin Role to access--%>
    <li><a href="">Commodity management</a></li>
    <li><a href="">Order management</a></li>
    <li><a href="">Staff management</a></li>
    </shiro:hasRole>
</ul>
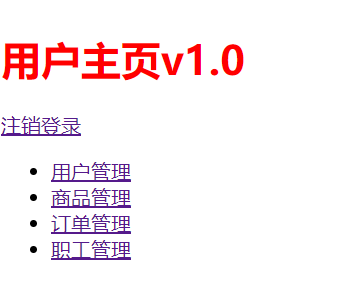
We assign a user role to the current user and start the program to access the main page:
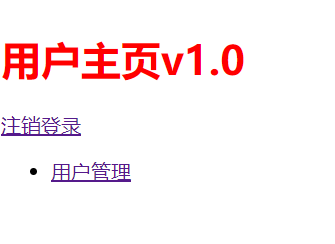
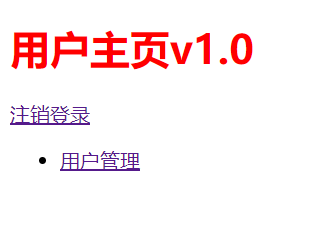
Because the current user role is user, you only have access to user management.
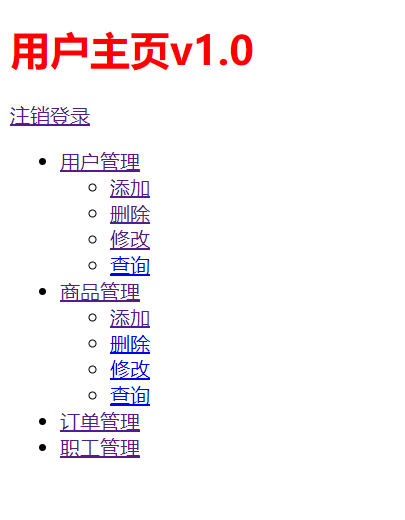
Now let's change the role of the current user to admin, and then start the program to access the main page:
2. Authorization management based on permission string
Permission string writing rule: "resource identifier: operation: object instance ID", that is, what operations can be performed on which instance of which resource. By default, it supports wildcard permission strings, ":" indicates the division of resources / Operations / instances; "," indicates the division of the operation; "*" indicates any resource / operation / instance.
Grant permissions to the current user:
//Permission string writing rule user:*:* user represents the module, the first * represents all operations, and the second * represents all resources
simpleAuthorizationInfo.addStringPermission("user:*:*");
Then define permission string authorization rules on the jsp page:
<li><a href="">user management </a>
  <ul>
      <%--The following resources need corresponding permissions to access--%>
      <shiro:hasPermission name="user:add:*">
          <li><a href="">add to</a></li>
      </shiro:hasPermission>

      <shiro:hasPermission name="user:delete:*">
          <li><a href="">delete</a></li>
      </shiro:hasPermission>

      <shiro:hasPermission name="user:update:*">
          <li><a href="">modify</a></li>
      </shiro:hasPermission>

      <shiro:hasPermission name="user:find:*">
          <li><a href="">query</a></li>
      </shiro:hasPermission>
  </ul>
</li>
Note: shiro does not provide multiple controls such as shiro:hasAnyRoles for the control of permission strings in the page, because the permission strings can be written with wildcards.
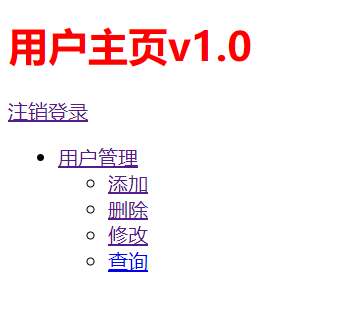
The current user is user and the permission is user: *: *. Start the program to access the home page:
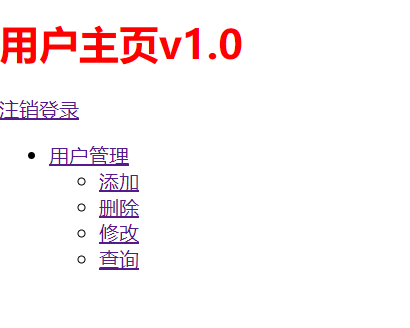
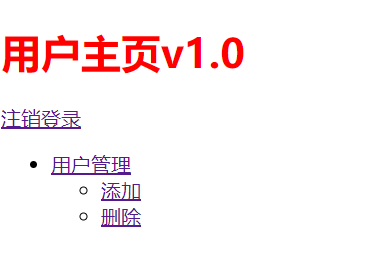
Next, we modify the user permissions to user:add: * and user:delete:*
simpleAuthorizationInfo.addStringPermission("user:add:*");
simpleAuthorizationInfo.addStringPermission("user:delete:*");
Restart the program to access the home page: at this time, the user only has access to add and delete operations
3.Shiro's handling of the missing part of the permission string
-
For example, "user:view" is equivalent to "user:view:"; "Organization" is equivalent to "organization:" or "organization::". It can be understood that prefix matching is realized in this way.
-
In addition, "` ` user:" can be matched, such as "user:delete", "user:delete" can be matched, such as "user:delete:1", "user::1" can be matched, such as "user:view:1", "user" can be matched with "user:view" or "user:view:1". That is, you can match all without prefix; However, if ": view" cannot match "system:user:view", you need to use ":: view `, that is, prefix must be specified for suffix matching (multiple colons are required to match).
3.6.2 use programming to realize authorization
Programming: complete by writing if/else authorization code block:
1. Role based permission management
Assign the admin role to the current user, and then judge whether there is this role in the code
@RequestMapping("save")
public String saveOrder(){
    //Gets the current host object
    Subject subject = SecurityUtils.getSubject();
    //If the current principal object has the admin role
    if (subject.hasRole("admin")){
        //Processing business
        System.out.println("Order saved successfully");
    }else{
        System.out.println("No access");
    }
    return "redirect:/index.jsp";
}
2. Authorization management based on permission string
Give the current user the role of admin and the permission of user:update: * and write a controller to modify the user for testing
@RequestMapping("save")
public String addUser(){
    //Gets the current host object
    Subject subject = SecurityUtils.getSubject();

    //Judge whether the current principal object has user:update: * permission
    if (subject.isPermitted("user:update:*")){
        //Processing business
        return "redirect:/update.jsp";
    }else{
        return "redirect:/index.jsp";
    }

}
Write and modify the user's jsp
<%@page contentType="text/html; UTF-8" pageEncoding="UTF-8" isELIgnored="false" %>
<%@ taglib prefix="c" uri="http://java.sun.com/jsp/jstl/core" %>
<!doctype html>
<html lang="en">
<head>
    <meta charset="UTF-8">
    <meta name="viewport"
          content="width=device-width, user-scalable=no, initial-scale=1.0, maximum-scale=1.0, minimum-scale=1.0">
    <meta http-equiv="X-UA-Compatible" content="ie=edge">
    <title>Document</title>
</head>
<body>

<h1>Modify user</h1>

</body>
</html>
Control jump on homepage
<shiro:hasPermission name="user:update:*">
    <li><a href="${pageContext.request.contextPath}/user/update">modify</a></li>
</shiro:hasPermission>
Start the program test. Because the current user has user:update: * permission, we successfully jump when we click the modify link!

shiro also provides a method isPermittedAll that requires multiple permissions to access a resource;
subject.isPermittedAll("user:delete:*","user:update:*")
3.6.3 use annotation to realize authorization
This is done by placing corresponding annotations on the executed Java method
1. Role based authorization management
Assign admin role to the current user
simpleAuthorizationInfo.addRole("admin");
controller:
@RequestMapping("/update")
@RequiresRoles("admin")//Judge whether the current user has this role. If so, you can perform the following operations
public String updateUser(){
     //Processing business
     return "redirect:/update.jsp";
Let's write another controller. This method can only be executed with the user role
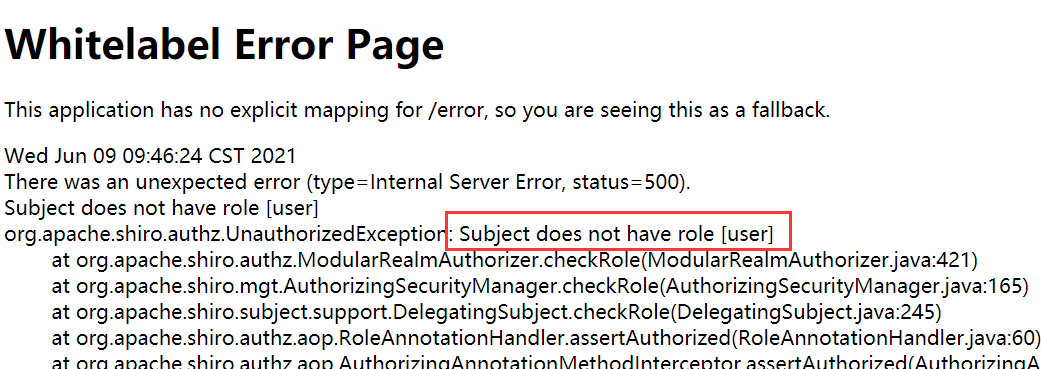
@RequestMapping("/delete")
@RequiresRoles("user")//If the current user does not have this role, an exception will be reported
public String deleteUser(){
    //Processing business
    return "redirect:/delete.jsp";
}
Start the program to test and access the request: cannot access!
@The RequiresRoles annotation can also specify multiple roles, such as:
@RequiresRoles(value={"user","admin"})//You must have all roles to access
2. Permission management based on permission string
Give the current user the role of admin and the permission of user:update: * and write a controller to modify the user for testing
simpleAuthorizationInfo.addRole("admin");
simpleAuthorizationInfo.addStringPermission("user:update:*");
controller
   @RequestMapping("/update")
   @RequiresPermissions("user:update:01")//Only with this permission can you perform the following operations,
    public String updateUser(){
            //Processing business
            return "redirect:/update.jsp";
    }
@The use of RequiresPermissions is similar to the @ RequiresRoles annotation
3.7. Authorization data persistence
The above authorization data is written dead, but under the normal development environment, our authorization data must come from the database and be persistent. Next, we will persist the authorization data into the database.
Library table relationship of permission model:
3.7.1 construction environment
Build the corresponding library table structure according to the above library table relationship
First register two users for the user table above
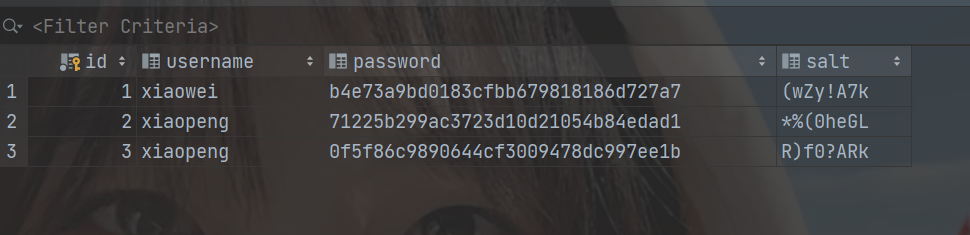
User name: xiaowei password: 123, id: 1
User name: xiaopeng password: 123, id: 2
Create role table t_role
CREATE TABLE `shiro`.`t_role`(
    `id` INT(6) NOT NULL AUTO_INCREMENT,
    `name` VARCHAR(60),
    PRIMARY KEY (`id`)
) ENGINE=INNODB CHARSET=utf8 COLLATE=utf8_general_ci;
t_role entity class role
@Data
@AllArgsConstructor
@NoArgsConstructor
@Accessors(chain = true)//Open chain programming
public class Role {
    private int id;
    private String name;
}
insert data
 INSERT INTO `shiro`.`t_role` (`id`, `name`) VALUES ('1', 'admin');
 INSERT INTO `shiro`.`t_role` (`id`, `name`) VALUES ('2', 'user');
 INSERT INTO `shiro`.`t_role` (`id`, `name`) VALUES ('3', 'product');
Create permission table t_perms
CREATE TABLE `shiro`.`t_perms`(
    `id` INT(6) NOT NULL AUTO_INCREMENT,
    `name` VARCHAR(60),
    `url` VARCHAR(255),
    PRIMARY KEY (`id`)
) ENGINE=INNODB CHARSET=utf8 COLLATE=utf8_general_ci;
t_perms entity class perms
@Data
@AllArgsConstructor
@NoArgsConstructor
@Accessors(chain = true)//Open chain programming
public class Perms {
    private int id;
    private String name;
    private String url;
}
insert data
INSERT INTO `shiro`.`t_perms` (`id`, `name`, `url`) VALUES ('1', 'user:*:*', 'user/*');
INSERT INTO `shiro`.`t_perms` (`id`, `name`, `url`) VALUES ('2', 'product:*:*', 'product/*');
Create user role table t_user_role
CREATE TABLE `shiro`.`t_user_role`(
    `id` INT(6) NOT NULL,
    `userid` INT(6),
    `roleid` INT(6),
    PRIMARY KEY (`id`)
) ENGINE=INNODB CHARSET=utf8 COLLATE=utf8_general_ci;
insert data
INSERT INTO `shiro`.`t_user_role` (`id`, `userid`, `roleid`) VALUES ('1', '1', '1');
INSERT INTO `shiro`.`t_user_role` (`id`, `userid`, `roleid`) VALUES ('2', '1', '2');
INSERT INTO `shiro`.`t_user_role` (`id`, `userid`, `roleid`) VALUES ('3', '2', '2');
The role of user No. 1 xiaowei is admin and user
The role of user 2 is user
Create role permission table t_role_perms
CREATE TABLE `shiro`.`t_role_perms`(
    `id` INT(6),
    `roleid` INT(6),
    `permsid` INT(6)
) ENGINE=INNODB CHARSET=utf8 COLLATE=utf8_general_ci;
insert data
INSERT INTO `shiro`.`t_role_perms` (`id`, `roleid`, `permsid`) VALUES ('1', '1', '1');
INSERT INTO `shiro`.`t_role_perms` (`id`, `roleid`, `permsid`) VALUES ('2', '1', '2');
INSERT INTO `shiro`.`t_role_perms` (`id`, `roleid`, `permsid`) VALUES ('3', '2', '1');
INSERT INTO `shiro`.`t_role_perms` (`id`, `roleid`, `permsid`) VALUES ('4', '3', '2');
Role 1 admin has user: *: * and product: *: * permissions
The second role user has user: *: * permission
Role 3 has product: *: * permission
3.7.2 acquisition of role information in database
Because the relationship between User and role is one to many, add another attribute to the User entity class:
//Defines a collection of characters
private List<Role> roles;
Define role authorization rules for resources:
<ul>
    <shiro:hasAnyRoles name="user,admin"><%--The resources inside can be accessed by multiple roles--%>
        <li><a href="">user management </a>
          <ul>
              <%--The following resources need corresponding permissions to access--%>
              <shiro:hasPermission name="user:add:*">
                  <li><a href="">add to</a></li>
              </shiro:hasPermission>

              <shiro:hasPermission name="user:delete:*">
                  <li><a href="${pageContext.request.contextPath}/user/delete">delete</a></li>
              </shiro:hasPermission>

              <shiro:hasPermission name="user:update:*">
                  <li><a href="${pageContext.request.contextPath}/user/update">modify</a></li>
              </shiro:hasPermission>

              <shiro:hasPermission name="user:find:*">
                  <li><a href="${pageContext.request.contextPath}/user/find">query</a></li>
              </shiro:hasPermission>
          </ul>
        </li>
    </shiro:hasAnyRoles>
    <shiro:hasRole name="admin"><%--Resource needs inside admin Role to access--%>
    <li><a href="">Commodity management</a></li>
    <li><a href="">Order management</a></li>
    <li><a href="">Staff management</a></li>
    </shiro:hasRole>
</ul>
Query the corresponding role of the user in the database according to the user name:
dao layer
//Query role by user name
User queryRoleByName(String username);
UserDao.xml
<resultMap id="userMap" type="User">
    <result column="uid" property="id"></result>
    <result column="username" property="username"></result>
    <!--Role information-->
    <collection property="roles" ofType="Role" javaType="list">
        <result column="ird" property="id"/>
        <result column="rname" property="name"/>
    </collection>
</resultMap>

<select id="queryRoleByName" resultMap="userMap" parameterType="String">
    select tu.id uid,tu.username,tr.id rid,tr.name rname
    from shiro.t_user tu left join shiro.t_user_role tur on tu.id=tur.userid
    left join shiro.t_role tr on tr.id=tur.roleid
    where username=#{username}
</select>
service layer
//Query role by user name
User queryRoleByName(String username);
service layer implementation class
@Override
public User queryRoleByName(String username) {
    return userDao.queryRoleByName(username);
}
The user role is obtained from the database and authenticated in the customized Realm
//to grant authorization
@Override
protected AuthorizationInfo doGetAuthorizationInfo(PrincipalCollection principals) {
    //Obtain the primary identity information during user authentication
    String primaryPrincipal = (String) principals.getPrimaryPrincipal();

    User user = userService.queryRoleByName(primaryPrincipal);
    List<Role> roles = user.getRoles();
    //If the role information is not empty
    if (!CollectionUtils.isEmpty(roles)){
        SimpleAuthorizationInfo simpleAuthorizationInfo = new SimpleAuthorizationInfo();
        roles.forEach(role->{     //Traverse all role s
            simpleAuthorizationInfo.addRole(role.getName());
        });
        return simpleAuthorizationInfo;
    }
    return null;
}
Start the program and log in to user xiaowei first. The roles are admin and user

Then log in to user xiaopeng and the role is user
3.7.3 obtaining permission string in database
Because the relationship between user and Role is one to many, add another attribute to the Role entity class:
//Define a collection of permissions
private List<Perms> perms;
Define permission string authorization rules for resources:
<ul>
    <shiro:hasAnyRoles name="user,admin"><%--The resources inside can be accessed by multiple roles--%>
        <li><a href="">user management </a>
          <ul>
              <%--The following resources need corresponding permissions to access--%>
              <shiro:hasPermission name="user:add:*">
                  <li><a href="">add to</a></li>
              </shiro:hasPermission>

              <shiro:hasPermission name="user:delete:*">
                  <li><a href="${pageContext.request.contextPath}/user/delete">delete</a></li>
              </shiro:hasPermission>

              <shiro:hasPermission name="user:update:*">
                  <li><a href="${pageContext.request.contextPath}/user/update">modify</a></li>
              </shiro:hasPermission>

              <shiro:hasPermission name="user:find:*">
                  <li><a href="${pageContext.request.contextPath}/user/find">query</a></li>
              </shiro:hasPermission>
          </ul>
        </li>
    </shiro:hasAnyRoles>
    <shiro:hasRole name="admin"><%--Resource needs inside admin Role to access--%>
    <li><a href="">Commodity management</a>
        <ul>
                <%--The following resources need corresponding permissions to access--%>
            <shiro:hasPermission name="product:add:*">
                <li><a href="">add to</a></li>
            </shiro:hasPermission>

            <shiro:hasPermission name="product:delete:*">
                <li><a href="${pageContext.request.contextPath}/product/delete">delete</a></li>
            </shiro:hasPermission>

            <shiro:hasPermission name="product:update:*">
                <li><a href="${pageContext.request.contextPath}/product/update">modify</a></li>
            </shiro:hasPermission>

            <shiro:hasPermission name="product:find:*">
                <li><a href="${pageContext.request.contextPath}/product/find">query</a></li>
            </shiro:hasPermission>
        </ul>
    </li>

    <li><a href="">Order management</a></li>
    <li><a href="">Staff management</a></li>
    </shiro:hasRole>
</ul>
Query permission information according to user role:
dao layer
//Query permission information according to role id
List<Perms> findAllPermsByRoleId(int id);
xml file of dao layer
<select id="findAllPermsByRoleId" resultType="Perms"  parameterType="int">
    select tp.id,tp.name,tp.url,tr.name tname from t_role tr
    left join t_role_perms trp on tr.id=trp.roleid
    left join t_perms tp on trp.permsid = tp.id
    where tr.id=#{id}
</select>
service layer
//Query permission information according to role id
List<Perms> findAllPermsByRoleId(int id);
service implementation class
@Override
public List<Perms> findAllPermsByRoleId(int id) {
    return userDao.findAllPermsByRoleId(id);
}
Custom realm
 //to grant authorization
    @Override
    protected AuthorizationInfo doGetAuthorizationInfo(PrincipalCollection principals) {
        //Obtain the primary identity information during user authentication
        String primaryPrincipal = (String) principals.getPrimaryPrincipal();
        System.out.println("primaryPrincipal-->"+primaryPrincipal);

        User user = userService.queryRoleByName(primaryPrincipal);
        System.out.println(user);
        List<Role> roles = user.getRoles();
        //If the role information is not empty
        if (!CollectionUtils.isEmpty(roles)){
            SimpleAuthorizationInfo simpleAuthorizationInfo = new SimpleAuthorizationInfo();
            roles.forEach(role -> {//Traverse all role s
                simpleAuthorizationInfo.addRole(role.getName());//Put the role information into the Authorizer for comparison

                //Get permission information
                List<Perms> perms = userService.findAllPermsByRoleId(role.getId());

                System.out.println(perms);

                if (!CollectionUtils.isEmpty(perms)&& perms.get(0)!=null ){
                    perms.forEach(perm -> {
                        simpleAuthorizationInfo.addStringPermission(perm.getName());

                    });
                }
            });
            return simpleAuthorizationInfo;
        }
        return null;
    }
Start program test:
Log in to user xiaowei first. The roles are admin and user. The admin permissions are user / * / * and product / * / *, and the user is user/*/*
Then log in to user xiaopeng. The role is user and the permission is user/*/*
Click here to complete the function of permission data persistence!
3.8. Integrate springboot cache
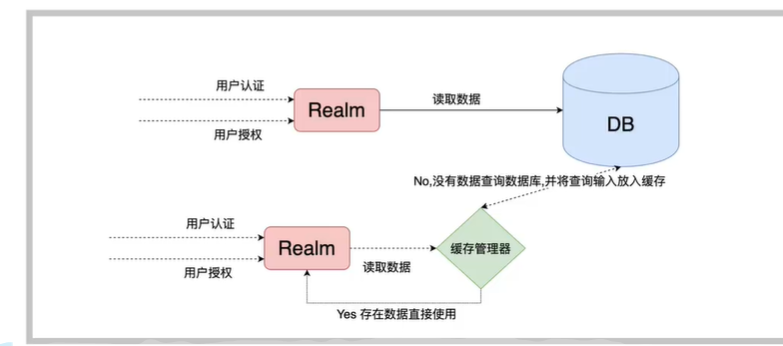
It can be clearly seen from Shiro's internal framework diagram that CacheManager is also one of the main components in Shiro's architecture. Shiro realizes permission data caching through the ` ` CacheManager 'component.
When the permission information is stored in the database, a database query is required for each front-end access request. Especially in scenarios where shiro's jsp tags are widely used, many permission query operations will occur at the same time corresponding to a page access request at the front end, which is very uneconomical for scenarios where permission information changes less frequently. It is very uneconomical to query a large number of permission databases every time the front end page is accessed. Therefore, it is very necessary to use caching scheme for permission data.
Shiro only provides an abstract API interface that can support specific cache implementations (such as Hazelcast, Ehcache, OSCache, Terracotta, Coherence, GigaSpaces, JBossCache, etc.), which allows Shiro users to flexibly select specific cachemanagers according to their own needs.
Simple caching process:
3.8.1. Using Ehcache to implement caching in shiro
Import dependency
<!--shiro and ehcache Integrated dependency-->
<dependency>
    <groupId>org.apache.shiro</groupId>
    <artifactId>shiro-ehcache</artifactId>
    <version>1.5.3</version>
</dependency>
Set the cache manager in shiro config
//3. Create a custom Realm
@Bean(name = "realm")
public Realm getRealm(){
    CustomerRealm customerRealm = new CustomerRealm();
    //Modify password voucher verification matcher
    HashedCredentialsMatcher credentialsMatcher = new HashedCredentialsMatcher();
    //Set the encryption algorithm to MD5
    credentialsMatcher.setHashAlgorithmName("MD5");
    //Set the number of hashes
    credentialsMatcher.setHashIterations(1024);
    customerRealm.setCredentialsMatcher(credentialsMatcher);


    //Enable cache ehcache management
    customerRealm.setCacheManager(new EhCacheManager());
    //Enable global cache management
    customerRealm.setCachingEnabled(true);
    //Enable authentication cache
    customerRealm.setAuthenticationCachingEnabled(true);
    //Set authentication cache name
    customerRealm.setAuthenticationCacheName("authenticationCache");
    //Enable authorization cache
    customerRealm.setAuthorizationCachingEnabled(true);
    //Set authorization cache name
    customerRealm.setAuthorizationCacheName("authorizationCache");

    return customerRealm;
}
After setting the cache, the database will be operated only in the first query, and the database will not be operated in the second query, which effectively reduces the burden of the database. However, if our application is restarted, we still need to operate the database for the first time when querying again.
3.9 implementation of picture verification code
1. Configure verification code tool class
package com.cheng.utils;

import java.io.IOException;
import javax.imageio.ImageIO;
import java.awt.*;
import java.awt.geom.AffineTransform;
import java.awt.image.BufferedImage;
import java.io.File;
import java.io.FileOutputStream;
import java.io.IOException;
import java.io.OutputStream;
import java.util.Arrays;
import java.util.Random;

public class VerifyCodeUtils {
    //When using the Algerian font, if there is no font in the system, the font needs to be installed. The font only displays uppercase, and several confusing characters such as 1, 0, I and o are removed
    public static final String VERIFY_CODES = "23456789ABCDEFGHJKLMNPQRSTUVWXYZ";
    private static Random random = new Random();


    /**
     * Generate verification code using the system default character source
     * @param verifySize    Verification code length
     * @return
     */
    public static String generateVerifyCode(int verifySize){
        return generateVerifyCode(verifySize, VERIFY_CODES);
    }
    /**
     * Generates a verification code using the specified source
     * @param verifySize    Verification code length
     * @param sources   Verification code character source
     * @return
     */
    public static String generateVerifyCode(int verifySize, String sources){
        if(sources == null || sources.length() == 0){
            sources = VERIFY_CODES;
        }
        int codesLen = sources.length();
        Random rand = new Random(System.currentTimeMillis());
        StringBuilder verifyCode = new StringBuilder(verifySize);
        for(int i = 0; i < verifySize; i++){
            verifyCode.append(sources.charAt(rand.nextInt(codesLen-1)));
        }
        return verifyCode.toString();
    }

    /**
     * Generate a random verification code file and return the verification code value
     * @param w
     * @param h
     * @param outputFile
     * @param verifySize
     * @return
     * @throws IOException
     */
    public static String outputVerifyImage(int w, int h, File outputFile, int verifySize) throws IOException{
        String verifyCode = generateVerifyCode(verifySize);
        outputImage(w, h, outputFile, verifyCode);
        return verifyCode;
    }

    /**
     * Output random verification code picture stream and return verification code value
     * @param w
     * @param h
     * @param os
     * @param verifySize
     * @return
     * @throws IOException
     */
    public static String outputVerifyImage(int w, int h, OutputStream os, int verifySize) throws IOException{
        String verifyCode = generateVerifyCode(verifySize);
        outputImage(w, h, os, verifyCode);
        return verifyCode;
    }

    /**
     * Generate the specified verification code image file
     * @param w
     * @param h
     * @param outputFile
     * @param code
     * @throws IOException
     */
    public static void outputImage(int w, int h, File outputFile, String code) throws IOException{
        if(outputFile == null){
            return;
        }
        File dir = outputFile.getParentFile();
        if(!dir.exists()){
            dir.mkdirs();
        }
        try{
            outputFile.createNewFile();
            FileOutputStream fos = new FileOutputStream(outputFile);
            outputImage(w, h, fos, code);
            fos.close();
        } catch(IOException e){
            throw e;
        }
    }

    /**
     * Output the specified verification code picture stream
     * @param w
     * @param h
     * @param os
     * @param code
     * @throws IOException
     */
    public static void outputImage(int w, int h, OutputStream os, String code) throws IOException{
        int verifySize = code.length();
        BufferedImage image = new BufferedImage(w, h, BufferedImage.TYPE_INT_RGB);
        Random rand = new Random();
        Graphics2D g2 = image.createGraphics();
        g2.setRenderingHint(RenderingHints.KEY_ANTIALIASING,RenderingHints.VALUE_ANTIALIAS_ON);
        Color[] colors = new Color[5];
        Color[] colorSpaces = new Color[] { Color.WHITE, Color.CYAN,
                Color.GRAY, Color.LIGHT_GRAY, Color.MAGENTA, Color.ORANGE,
                Color.PINK, Color.YELLOW };
        float[] fractions = new float[colors.length];
        for(int i = 0; i < colors.length; i++){
            colors[i] = colorSpaces[rand.nextInt(colorSpaces.length)];
            fractions[i] = rand.nextFloat();
        }
        Arrays.sort(fractions);

        g2.setColor(Color.GRAY);// Set border color
        g2.fillRect(0, 0, w, h);

        Color c = getRandColor(200, 250);
        g2.setColor(c);// Set background color
        g2.fillRect(0, 2, w, h-4);

        //Draw interference line
        Random random = new Random();
        g2.setColor(getRandColor(160, 200));// Sets the color of the line
        for (int i = 0; i < 20; i++) {
            int x = random.nextInt(w - 1);
            int y = random.nextInt(h - 1);
            int xl = random.nextInt(6) + 1;
            int yl = random.nextInt(12) + 1;
            g2.drawLine(x, y, x + xl + 40, y + yl + 20);
        }

        // add noise
        float yawpRate = 0.05f;// Noise rate
        int area = (int) (yawpRate * w * h);
        for (int i = 0; i < area; i++) {
            int x = random.nextInt(w);
            int y = random.nextInt(h);
            int rgb = getRandomIntColor();
            image.setRGB(x, y, rgb);
        }

        shear(g2, w, h, c);// Distort picture

        g2.setColor(getRandColor(100, 160));
        int fontSize = h-4;
        Font font = new Font("Algerian", Font.ITALIC, fontSize);
        g2.setFont(font);
        char[] chars = code.toCharArray();
        for(int i = 0; i < verifySize; i++){
            AffineTransform affine = new AffineTransform();
            affine.setToRotation(Math.PI / 4 * rand.nextDouble() * (rand.nextBoolean() ? 1 : -1), (w / verifySize) * i + fontSize/2, h/2);
            g2.setTransform(affine);
            g2.drawChars(chars, i, 1, ((w-10) / verifySize) * i + 5, h/2 + fontSize/2 - 10);
        }

        g2.dispose();
        ImageIO.write(image, "jpg", os);
    }

    private static Color getRandColor(int fc, int bc) {
        if (fc > 255)
            fc = 255;
        if (bc > 255)
            bc = 255;
        int r = fc + random.nextInt(bc - fc);
        int g = fc + random.nextInt(bc - fc);
        int b = fc + random.nextInt(bc - fc);
        return new Color(r, g, b);
    }

    private static int getRandomIntColor() {
        int[] rgb = getRandomRgb();
        int color = 0;
        for (int c : rgb) {
            color = color << 8;
            color = color | c;
        }
        return color;
    }

    private static int[] getRandomRgb() {
        int[] rgb = new int[3];
        for (int i = 0; i < 3; i++) {
            rgb[i] = random.nextInt(255);
        }
        return rgb;
    }

    private static void shear(Graphics g, int w1, int h1, Color color) {
        shearX(g, w1, h1, color);
        shearY(g, w1, h1, color);
    }

    private static void shearX(Graphics g, int w1, int h1, Color color) {

        int period = random.nextInt(2);

        boolean borderGap = true;
        int frames = 1;
        int phase = random.nextInt(2);

        for (int i = 0; i < h1; i++) {
            double d = (double) (period >> 1)
                    * Math.sin((double) i / (double) period
                    + (6.2831853071795862D * (double) phase)
                    / (double) frames);
            g.copyArea(0, i, w1, 1, (int) d, 0);
            if (borderGap) {
                g.setColor(color);
                g.drawLine((int) d, i, 0, i);
                g.drawLine((int) d + w1, i, w1, i);
            }
        }

    }

    private static void shearY(Graphics g, int w1, int h1, Color color) {

        int period = random.nextInt(40) + 10; // 50;

        boolean borderGap = true;
        int frames = 20;
        int phase = 7;
        for (int i = 0; i < w1; i++) {
            double d = (double) (period >> 1)
                    * Math.sin((double) i / (double) period
                    + (6.2831853071795862D * (double) phase)
                    / (double) frames);
            g.copyArea(i, 0, 1, h1, 0, (int) d);
            if (borderGap) {
                g.setColor(color);
                g.drawLine(i, (int) d, i, 0);
                g.drawLine(i, (int) d + h1, i, h1);
            }

        }

    }
    public static void main(String[] args) throws IOException {
        //Get verification code
        String s = generateVerifyCode(4);
        //Put the verification code into the picture
        outputImage(260,60,new File("/Users/chenyannan/Desktop/Safety data/aa.jpg"),s);
        System.out.println(s);
    }
}
2. Method of implementing verification code
//Verification code method
@RequestMapping("/getImage")
public void getImage(HttpSession session, HttpServletResponse response) throws IOException {
    //Call the verification code tool class to generate verification code, 4-digit verification code
    String code = VerifyCodeUtils.generateVerifyCode(4);
    //Save the verification code into the session and compare the verification code when logging in
    session.setAttribute("code",code);
    //Put the verification code into the picture
    ServletOutputStream os = response.getOutputStream();
    //Set response type
    response.setContentType("image/png");
    VerifyCodeUtils.outputImage(220,60,os,code);
}
3. Add a verification code input box on the login page
Please enter the verification code<input type="text" name="code" ><img src="${pageContext.request.contextPath}/user/getImage" alt=""><br>
4. Release verification code request in shiro config
map.put("/user/getImage","anon");//public resource
5. Compare the verification code in the authentication method
@RequestMapping("/login")
    public String login(String username,String password,String code,HttpSession session){

        //Verification code comparison
        String code1 = (String)session.getAttribute("code");//Get the verification code in the session
        //If the verification code is correct, log in
        try {
        if (code1.equals(code)){
            Subject subject = SecurityUtils.getSubject();
            //Encapsulate the user information submitted by the front end
            UsernamePasswordToken token = new UsernamePasswordToken(username, password);
                subject.login(token);//Execute the login method and jump to the main page if the execution is successful
                return "redirect:/index.jsp";
                //Catch possible exceptions
        }else {
            throw new RuntimeException("Verification code error");
        }
        } catch (UnknownAccountException e) {
            e.printStackTrace();
            System.out.println("User name error");
            return "redirect:/login.jsp";
        } catch (IncorrectCredentialsException e) {
            e.printStackTrace();
            System.out.println("Password error");
        }catch (Exception e){
            e.printStackTrace();
            System.out.println(e.getMessage());
        }
        return "redirect:/login.jsp";
    }
Start the program and test:

Login successfully, OK!