Spring boot integrates Redis to implement caching
Redis
redis is simply a memory based non relational database that stores data in the form of key value pairs.
The advantage is obvious. Because it is stored in memory, it reads very fast. This speed is completely unmatched by mysql and other databases, so we often use redis as cache to reduce queries to local databases.
Redis can be used as resource sharing between system processes, such as spring session sharing using redis
I won't say much about the installation and operation of redis here. Baidu has a very detailed tutorial. I still suggest deploying redis on linux virtual machine or server.
cache
The function of cache is to store data in memory. After querying the same data, you can get it directly from memory instead of executing the method again. This will undoubtedly save a lot of time.
For example, I have a method getById(Integer id), which queries the database through the id and obtains the entity class. When I first query, there is no cache, so I execute this method to get data from the database through mybatis. However, in the second query, if you still check the id passed in before, the program will find the result in the cache and directly get the result in memory instead of executing the method.
Application in SpringBoot
Mysql preparation
Because it is only a simple demo, we continue to use the previous Customer table here
CREATE TABLE `customer` (
  `id` bigint NOT NULL AUTO_INCREMENT COMMENT 'id',
  `name` varchar(64) DEFAULT NULL COMMENT 'full name',
  `age` smallint DEFAULT NULL COMMENT 'Age',
  `create_time` timestamp NOT NULL DEFAULT CURRENT_TIMESTAMP COMMENT 'Establishment time',
  `modify_time` timestamp NOT NULL DEFAULT CURRENT_TIMESTAMP ON UPDATE CURRENT_TIMESTAMP COMMENT 'Update time',
  PRIMARY KEY (`id`)
) ENGINE=InnoDB AUTO_INCREMENT=7 DEFAULT CHARSET=utf8
Establish connection
  datasource:
    driver-class-name: com.mysql.cj.jdbc.Driver
    url: jdbc:mysql://localhost:3306/springboot?characterEncoding=utf-8&serverTimezone=GMT%2B8
    username: root
    password: 1234

mybatis-plus:
  configuration:
    map-underscore-to-camel-case: true
    log.impl: org.apache.ibatis.logging.stdout.StdOutImpl
  type-aliases-package: com.cwh.springboot.redis.model.entity
  mapper-locations: classpath:mapper/*Mapper.xml
Customer
@Data
@TableName("customer")
public class Customer {
    //    Set the primary key and the primary key generation policy
//    AUTO is database AUTO increment
    @TableId(type = IdType.AUTO)
    private Long id;

    //    @TableField(value="",exist=true)
//    Mapping non primary key field value field name exist indicates whether the attribute is in the database
    @TableField(value = "name")
    private String name;

    private Integer age;

    @TableField(value = "create_time",fill = FieldFill.INSERT)
//    Fill auto fill policy
//    INSERT plug-in filling, filling when UPDATE is updated, INSERT_UPDATE is populated when inserting updates
    private Date createTime;

    @TableField(value = "modify_time",fill = FieldFill.INSERT_UPDATE)
    private Date modifyTime;
}
Simple use of Redis
First, let's take a look at the redis configuration in spring boot
pom.xml
<!--        redis-->
        <dependency>
            <groupId>redis.clients</groupId>
            <artifactId>jedis</artifactId>
            <version>3.6.0</version>
        </dependency>
        <dependency>
            <groupId>org.springframework.boot</groupId>
            <artifactId>spring-boot-starter-data-redis</artifactId>
        </dependency>
application.yml
spring:
  redis:
#    Database index, 0 by default
    database: 0
#    redis host ip
    host: 192.168.56.129
#    redis connection port
    port: 6379
#    Server connection password (blank by default)
    password:
#    Connection timeout (MS)
    timeout: 1000
    jedis:
#      Connection pool configuration
      pool:
#        Maximum connections in connection pool
        max-active: 8
#        Maximum blocking waiting time of connection pool (negative value indicates no limit)
        max-wait: -1
#        Connection pool maximum free connections
        max-idle: 8
#        Connection pool minimum free connections
        min-idl: 0
Here we connect to db0 and configure jedis connection pool
The main function of connection pool is to buffer connections, avoid repeated creation and destruction of connection objects, and improve performance
Redistemplate
redis provides two template s in springboot by default:
Stringredistemplate < String, String >: implements operations in which key value pairs are of String type
Redistemplate < object, Object > generic class, which is the parent class of StringRedisTempalte. It is generally used to customize the redistemplate of type key value pairs
    /**
     *  Set redistemplate < string, obejct > serialization
     * @param factory
     * @return
     */
    public RedisTemplate<String,Object> redisTemplate(RedisConnectionFactory factory){
        RedisTemplate<String,Object> redisTemplate = new RedisTemplate<>();

        redisTemplate.setConnectionFactory(factory);

//        Replace the default serialization with JackSon2JsonRedisSerialize
        Jackson2JsonRedisSerializer jackson2JsonRedisSerializer = new Jackson2JsonRedisSerializer(Object.class);
//        Configure ObjecetMapper
        ObjectMapper om = new ObjectMapper();

//        Specify the fields to be serialized, field,get, set, and modifier range. ANY includes private and public
//        setVisibility(forMethod,visibility)
//        Used to replace the default serialization detection (default public files or public getXXX())
//        Formmethod is the affected property (field/getter/setter)
//        visibility setting attribute minimum setting (can be PUBLIC,ANY,PRIVATE)
        om.setVisibility(PropertyAccessor.ALL, JsonAutoDetect.Visibility.ANY);
//      Specify the type of serialized input. The class must be non final modified. Final modified classes, such as string and integer, will run exceptions
        			activeDefaultTyping(PolymorphicTypeValidator,ObjectMapper.DefaultTyping,JsonTypeInfo.As)
//        om.enableDefaultTyping(ObjectMapper.DefaultTyping.NON_FINAL);
        om.activateDefaultTyping(LaissezFaireSubTypeValidator.instance,ObjectMapper.DefaultTyping.NON_FINAL);
        jackson2JsonRedisSerializer.setObjectMapper(om);
//        Configure redistemplate serialization
        RedisSerializer stringSerializer = new StringRedisSerializer();
        redisTemplate.setKeySerializer(stringSerializer);
        redisTemplate.setValueSerializer(jackson2JsonRedisSerializer);
        redisTemplate.setHashKeySerializer(stringSerializer);
        redisTemplate.setHashValueSerializer(jackson2JsonRedisSerializer);
        redisTemplate.afterPropertiesSet();

        return redisTemplate;
    }
The above code mainly implements the operation template of redis whose key value pair is < string, Object >
In fact, the main work of user-defined Redistemplate is to set the serialization of key value pairs
public class StringRedisTemplate extends RedisTemplate<String, String> {
    public StringRedisTemplate() {
        this.setKeySerializer(RedisSerializer.string());
        this.setValueSerializer(RedisSerializer.string());
        this.setHashKeySerializer(RedisSerializer.string());
        this.setHashValueSerializer(RedisSerializer.string());
    }
StringRedisTemplate is mainly used to set serialization to stringredisserializer UTF_ eight
If we don't set anything, it can also be saved in redis, but the default JdkSerializationRedisSerializer is used, which stores data in redis in the form of binary stream, which has poor operability and readability.
So here we use JackSon2JsonRedisSerialize to replace the default serialization
JackSon2JsonRedisSerialize stores data in Redis in JSON
We need to configure JackSon2JsonRedisSerialize
public void setObjectMapper(ObjectMapper objectMapper) sets ObjectMapper
ObjectMapper is the simplest way for Jackson to parse JSON. It can parse java objects into JSON or create java objects by parsing JSON (that is, deserialization)
Here, we set the serialized field and the type of serialized input through ObjectMapper
-
Setvisibility (for method, visibility): Specifies the domain to serialize
- forMethod: affected properties (file / getter / setter)
- visibility: attribute minimum setting (PUBLIC/ANY/PRIVATE)
- om.setVisibility(PropertyAccessor.ALL, JsonAutoDetect.Visibility.ANY) refers to all properties that set and serialize all access permissions
-
activateDefaultTyping(PolymorphicTypeValidator,ObjectMapper.DefaultTyping): it is used to save the full class name of the object during serialization to facilitate deserialization
Many online tutorials use objectmapper enableDefaultTyping(ObjectMapper.DefaultTyping.NON_FINAL)
This is the practice that the old version has been abandoned, which is said to have major security risks
- PolymorphicTypeValidator: polymorphic validator, mainly used to obtain class name
- ObjectMapper.DefaultTyping: serializes the default type, NON_FINAL non final object
After setting jackson2JsonRedisSerializer, you only need to serialize the key value pairs of redistemplate
Because I customize it as redistemplate < string, Object >, I still use StringRedisSerializer for KEY and jackson2JsonRedisSerializer for VALUE
        redisTemplate.setKeySerializer(stringSerializer);
        redisTemplate.setValueSerializer(jackson2JsonRedisSerializer);
        redisTemplate.setHashKeySerializer(stringSerializer);
        redisTemplate.setHashValueSerializer(jackson2JsonRedisSerializer)
In this way, we have set the RedisTemplate for the < string, Object > key value pair. Next, let's look at the simple operations and results
    @Autowired
    private RedisTemplate<String, Object> redisTemplate;

    @Autowired
    private CustomerService customerService;

    /**
     * Add data for < name, customer >
     * @param name
     * @return
     */
    @PostMapping("/add")
    public Customer addCustomer(@RequestParam("name")String name){
        Customer customer = customerService.getByName(name);
        redisTemplate.opsForValue().set(name,customer);
        return customer;
    }
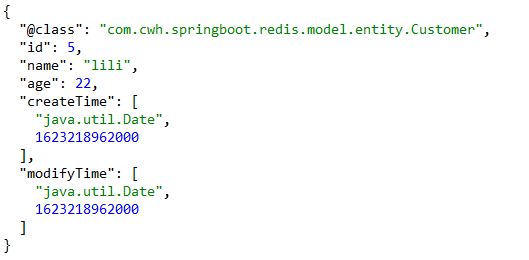
Here we first obtain the incoming name parameters, then call the service method to get the Customer object, then name is KEY, Customer object is VALUE stored in redis.
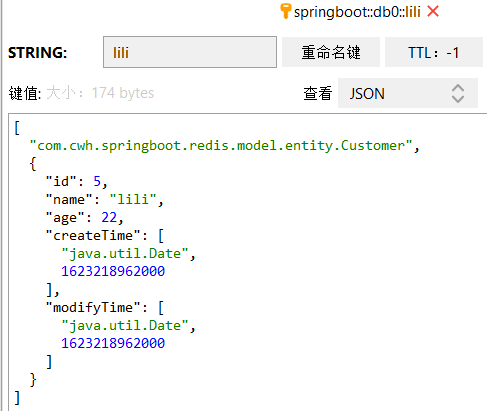
You can see that the storage is successful
RDM tool is used here to connect redis for visual management
redisTemplate.opsForValue().set(key,value): encapsulates redis related operations for springboot
opsForValue is the operation on the string,
set(key,value) adds data to the database
See the native redis operation guide for details This link , it's very comprehensive
Spring Cache
spring cache is actually an annotation based caching function using the idea of AOP
You only need to add @ Cacheable() and other annotations to the method to be cached to complete the annotation
to configure
First, we configure the project to use redis cache
  cache:
    type: redis
Define our cache configuration class
@Configuration
@EnableCaching
@Slf4j
public class RedisConfig extends CachingConfigurerSupport {

    /**
     * Configure cacheManager
     * @return
     */
    @Bean
    public RedisCacheManager cacheManager(RedisConnectionFactory redisConnectionFactory){
//      The redisCacheManager constructor needs to provide a redisCacheWriter and a redisCacheConfigurer
        RedisCacheWriter redisCacheWriter = RedisCacheWriter.nonLockingRedisCacheWriter(redisConnectionFactory);
//      Configure cache serialization as jsonSerializer
        RedisSerializer<Object> jsonSerializer = new GenericJackson2JsonRedisSerializer();
        RedisSerializationContext.SerializationPair<Object> pair = RedisSerializationContext.SerializationPair.fromSerializer(jsonSerializer);
        RedisCacheConfiguration defaultCacheConfig = RedisCacheConfiguration.defaultCacheConfig().serializeValuesWith(pair);
//      Set the default expiration time to one day
        defaultCacheConfig.entryTtl(Duration.ofDays(1));

//        It can also be built by builder
//        RedisCacheManager redisCacheManager = RedisCacheManager.builder(redisConnectionFactory).cacheDefaults(defaultCacheConfig).transactionAware().build();
        return new RedisCacheManager(redisCacheWriter,defaultCacheConfig);

    }
Here, the cache is enabled by adding @ EnableCaching, which inherits CachingConfigurerSupport, indicating that this is a cache configuration class
Our main task is to define our own cache manager
cacheManager: as the name suggests, it is used to manage and configure the cache
There are two ways to build a cacheManager:
- new RedisCacheManager(redisCacheWriter,redisCacheConfig): the constructor constructs and passes in a cached writer object and a cached configuration object
- RedisCacheManager.builder(redisConnectionFactory).cacheDefaults(defaultCacheConfig).transactionAware().build(): call builder().build() method and can assign values to attributes
There are two concepts
- redisCacheWriter is a cache write object, which can be built through nonLockingRedisCacheWriter() and lockingRedisCacaheWriter, corresponding to locked writes and unlocked writes respectively
- defaultCacheConfig is a cache configuration object that configures some cache properties, such as setting the serialization party and cache expiration time of the cache
You can configure the cache manager by building and setting these two objects
@Cacheable
    @Cacheable(cacheNames = "customer",key = "#id" )
    public Customer getCustomerById(Integer id) {
        log.info("===========Call method============");
        return baseMapper.selectById(id);
    }
We put the return value into the cache by adding @ Cacheable
He has several attributes:
- cacheNames/value: Specifies the name of the cache component. It can be simply understood as the table name in the database, but it is not accurate
- Key: the key used to cache data, which can be specified. key="#param" can specify parameter values or other attributes
- keyGenerator: the generator of the key. It is used to customize the generation of keys. It can be selected from the key and cannot be saved at the same time
- Condition: set condition = "#id > 0" to be cached only under specified conditions
- Unless: negative caching. When the condition in unless is true, the method return value will not be cached. unless = "result==null"
- sync: whether to use asynchronous mode
    @Cacheable(cacheNames = "customer",key = "#id" )
    public Customer getCustomerById(Integer id) {
        log.info("===========Call method============");
        return baseMapper.selectById(id);
    }
Here we test whether to call the method or get the value directly from the cache by outputting the log
First request:
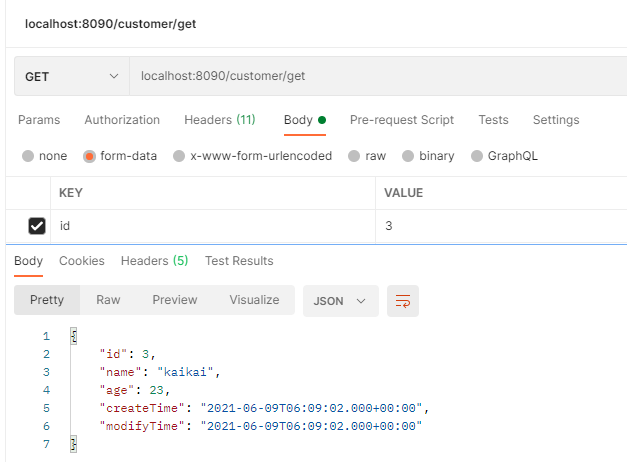

The console shows that the method was called for the first request
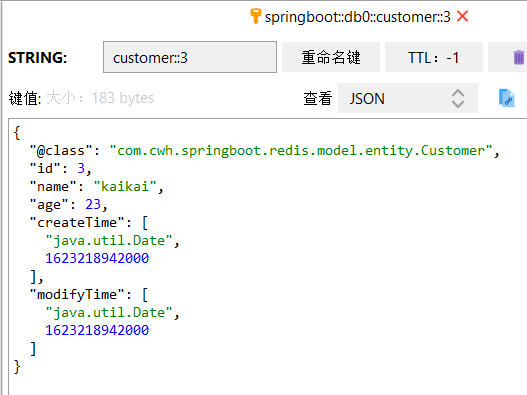
The cache has also been successfully added to redis
Second request:

You can find that instead of calling the method this time, you get the value directly from the cache
@CachePut
//  cacheput calls the method first, and then updates the data in the cache
    @CachePut(cacheNames = "customer",key = "#customer.id")
    public Customer updateCustomer(Customer customer){
        baseMapper.updateById(customer);
        return customer;
    }
@CachePut indicates that the method is called first, and then the data is updated in the cache
Property is the same as @ Cacheable
@CacheEvict
    @CacheEvict(cacheNames = "customer",key = "#id" ,beforeInvocation = false)
    public int deleteById(Integer id){
        return baseMapper.deleteById(id);
    }
@CacheEvict indicates to clear the cache
Properties:
-
key: Specifies the data to delete
-
Before invocation: whether the cache is cleared before the method is executed,
- True means to delete before the method, false means to delete after the method. If an exception occurs, it will not be cleared (it will be deleted if true)
- The default is false
-
allEntries: indicates whether to clear all data
@Caching()
    @Caching(
            cacheable = {
                    @Cacheable(cacheNames = "customer",key = "#name" )
            },
            put = {
                    @CachePut(cacheNames = "customer",key = "#result.id")
            }
    )
    public Customer getByName(String name){
        QueryWrapper<Customer> queryWrapper = new QueryWrapper<>();
        queryWrapper.eq("name",name);
        return baseMapper.getByName(queryWrapper);
    }
Define complex caching rules, in which multiple @ Cacheable,@CachePut,@CacheEvict can be nested
keyGenerator
As mentioned earlier, you can customize the keyGenerator to store data. The KEY can be the format we expect
@Component
public class MyKeyGenerator implements KeyGenerator {

//    Define item prefix
    private String prefix = "redis";

    @Override
    public Object generate(Object target, Method method, Object... objects) {
        char sp =':';
        StringBuilder stringBuilder = new StringBuilder();
        stringBuilder.append(prefix);
        stringBuilder.append(sp);
//        Class name
        stringBuilder.append(target.getClass().getSimpleName());
        stringBuilder.append(sp);
//        Method name
        stringBuilder.append(method.getName());
        stringBuilder.append(sp);
//        Parameter name
        if(objects.length>0){
            for(Object object: objects){
                stringBuilder.append(object);
            }
        }
        else {
            stringBuilder.append("0");
        }
        return stringBuilder.toString();
    }
}
By implementing the KeyGenerator interface, we implement the generate method to define the generation rules of keys
Target: target object, which can be accessed through target getClass(). Getsimplename() gets the class name
Method: target method, which can be through method Getname() get method name
objects: parameter name
    @Autowired
    private MyKeyGenerator myKeyGenerator;

    @Cacheable(cacheNames = "getall",keyGenerator = "myKeyGenerator" )
    public List<Customer> getAll(){
        return baseMapper.getAll();
    }
Here, we simply define a method to generate keys using our custom myKeyGenerator
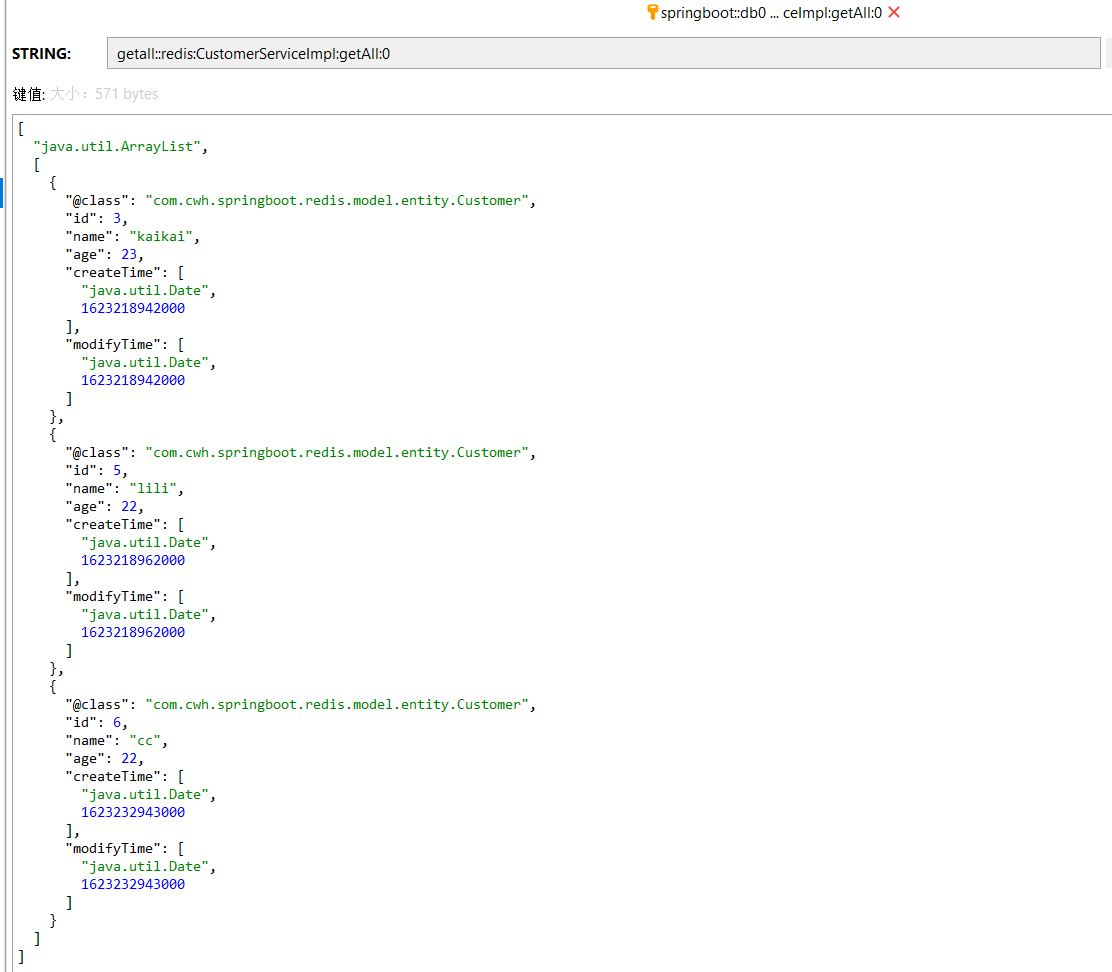
You can see that the keys stored in redis are generated logically
summary
Here is a brief introduction to the use of redis as a cache in spring boot. In fact, redis has many other uses, such as using redis to realize session sharing, etc.
Refer to the related operations of redis database This link
etName() ` get method name
objects: parameter name
    @Autowired
    private MyKeyGenerator myKeyGenerator;

    @Cacheable(cacheNames = "getall",keyGenerator = "myKeyGenerator" )
    public List<Customer> getAll(){
        return baseMapper.getAll();
    }
Here, we simply define a method to generate keys using our custom myKeyGenerator
[external chain picture transferring... (img-PFV8wYAe-1624582894635)]
You can see that the keys stored in redis are generated logically
summary
Here is a brief introduction to the use of redis as a cache in springboot. In fact, there are many uses of redis, such as using redis to realize session sharing and so on.
Refer to the related operations of redis database This link