Generally speaking, Spring Security is the mainstream solution for privilege management in Spring Boot, but Shiro can be used only from a technical point of view.
Generally speaking, the comparison between Spring Security and Shiro is as follows:
- Spring Security is a heavyweight security management framework; Shiro is a lightweight security management framework
- The concept of Spring Security is complex and its configuration is tedious; the concept of Shiro is simple and its configuration is simple.
- Spring Security is powerful; Shiro is simple
Although Shiro has simple functions, it can also satisfy most business scenarios. So in traditional SSM projects, Shiro can be integrated in general.
In Spring Boot, because Spring Boot officially provides a large number of very convenient out-of-the-box Starters, and of course Spring Security Starters, Spring Security makes it easier to use Spring Security in Spring Boot, and even all interfaces can be protected by adding only one dependency. If it is a Spring Book project, Spring Security is generally chosen.
There are two different ways to integrate Shiro in Spring Boot:
- Rewrite the configuration of SSM integrated Shiro in Java.
- The second is to use a Starter provided by Shiro, but it doesn't simplify the configuration much.
Primary integration
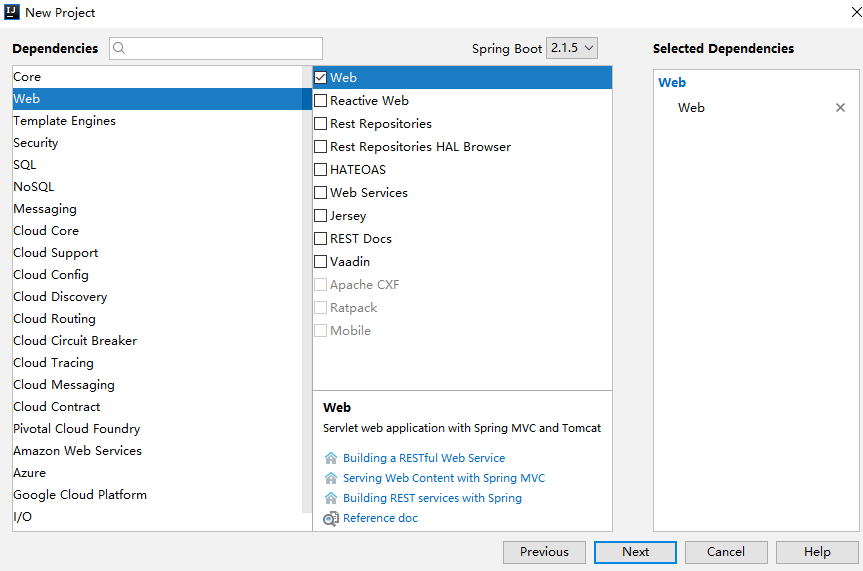
- Create a project
To create a Spring Book project, you just need to add Web dependencies:
After the project is successfully created, Shiro-related dependencies are added. The dependencies in the complete pom.xml file are as follows:
<dependencies>
    <dependency>
        <groupId>org.springframework.boot</groupId>
        <artifactId>spring-boot-starter-web</artifactId>
    </dependency>
    <dependency>
        <groupId>org.apache.shiro</groupId>
        <artifactId>shiro-web</artifactId>
        <version>1.4.0</version>
    </dependency>
    <dependency>
        <groupId>org.apache.shiro</groupId>
        <artifactId>shiro-spring</artifactId>
        <version>1.4.0</version>
    </dependency>
</dependencies>
- Create Realm
Next we customize the core component Realm:
public class MyRealm extends AuthorizingRealm {
    @Override
    protected AuthorizationInfo doGetAuthorizationInfo(PrincipalCollection principals) {
        return null;
    }
    @Override
    protected AuthenticationInfo doGetAuthenticationInfo(AuthenticationToken token) throws AuthenticationException {
        String username = (String) token.getPrincipal();
        if (!"javaboy".equals(username)) {
            throw new UnknownAccountException("Account does not exist!");
        }
        return new SimpleAuthenticationInfo(username, "123", getName());
    }
}
Simple authentication operation can be implemented in Realm without authorization. The specific writing of authorization is the same as Shiro in SSM. The authentication here means that the user name must be javaboy, and the user password must be 123. If this condition is satisfied, the login will be successful!
- Configure Shiro
Next, configure Shiro:
@Configuration
public class ShiroConfig {
    @Bean
    MyRealm myRealm() {
        return new MyRealm();
    }

    @Bean
    SecurityManager securityManager() {
        DefaultWebSecurityManager manager = new DefaultWebSecurityManager();
        manager.setRealm(myRealm());
        return manager;
    }

    @Bean
    ShiroFilterFactoryBean shiroFilterFactoryBean() {
        ShiroFilterFactoryBean bean = new ShiroFilterFactoryBean();
        bean.setSecurityManager(securityManager());
        bean.setLoginUrl("/login");
        bean.setSuccessUrl("/index");
        bean.setUnauthorizedUrl("/unauthorizedurl");
        Map<String, String> map = new LinkedHashMap<>();
        map.put("/doLogin", "anon");
        map.put("/**", "authc");
        bean.setFilterChainDefinitionMap(map);
        return bean;
    }
}
The Shiro configuration here configures three beans:
- First, you need to provide an example of Realm.
- You need to configure a Security Manager and Realm in the Security Manager.
- Configure a ShiroFilterFactoryBean, specify path interception rules in ShiroFilterFactoryBean, etc.
- Configure login and test interfaces.
ShiroFilterFactoryBean has a slightly more configuration meaning as follows:
- setSecurityManager represents the specified SecurityManager.
- setLoginUrl represents the specified login page.
- setSuccessUrl represents the specified logon success page.
- Next, the path interception rules are configured in Map. Be careful, be orderly.
After configuring all of these things, configure login Controller:
@RestController
public class LoginController {
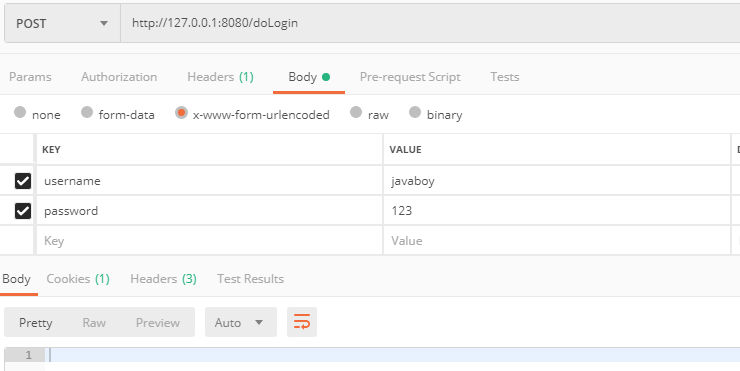
@PostMapping("/doLogin")
public void doLogin(String username, String password) {
Subject subject = SecurityUtils.getSubject();
try {
subject.login(new UsernamePasswordToken(username, password));
System.out.println("Successful login!");
} catch (AuthenticationException e) {
e.printStackTrace();
System.out.println("Logon failure!");
}
}
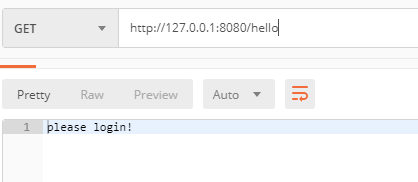
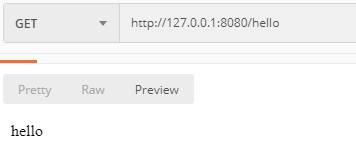
@GetMapping("/hello")
public String hello() {
return "hello";
}
@GetMapping("/login")
public String login() {
return "please login!";
}
}
When testing, you first access the / hello interface. Because you are not logged in, you automatically jump to the / login interface:
Then call the / doLogin interface to complete the login:
Access the / hello interface again, and you can successfully access:
Using Shiro Starter
In fact, the above configuration is equivalent to taking the XML configuration in SSM to Spring Boot and rewriting it in Java code. In addition to this, we can also directly use the Starter provided by Shiro.
- Create projects, as above
After successful creation, add shiro-spring-boot-web-starter, which can replace the previous shiro-web and shiro-spring dependencies. The pom.xml file is as follows:
<dependencies>
    <dependency>
        <groupId>org.springframework.boot</groupId>
        <artifactId>spring-boot-starter-web</artifactId>
    </dependency>
    <dependency>
        <groupId>org.apache.shiro</groupId>
        <artifactId>shiro-spring-boot-web-starter</artifactId>
        <version>1.4.0</version>
    </dependency>
</dependencies>
- Create Realm
Realm here is the same as before, so I won't go into it any more.
- Configuring Shiro Basic Information
Next, configure Shiro's basic information in application.properties:
shiro.sessionManager.sessionIdCookieEnabled=true
shiro.sessionManager.sessionIdUrlRewritingEnabled=true
shiro.unauthorizedUrl=/unauthorizedurl
shiro.web.enabled=true
shiro.successUrl=/index
shiro.loginUrl=/login
Configuration Explanation:
- The first line indicates whether sessionId is allowed to be placed in cookie s
- The second line indicates whether sessionId is allowed to be placed in the Url address block.
- The third line represents the default jump path when accessing an unauthorized page
- The fourth line opens shiro
- The fifth line represents the jump page for successful login
- Line 6 represents the login page
- Configure ShiroConfig
@Configuration
public class ShiroConfig {
    @Bean
    MyRealm myRealm() {
        return new MyRealm();
    }
    @Bean
    DefaultWebSecurityManager securityManager() {
        DefaultWebSecurityManager manager = new DefaultWebSecurityManager();
        manager.setRealm(myRealm());
        return manager;
    }
    @Bean
    ShiroFilterChainDefinition shiroFilterChainDefinition() {
        DefaultShiroFilterChainDefinition definition = new DefaultShiroFilterChainDefinition();
        definition.addPathDefinition("/doLogin", "anon");
        definition.addPathDefinition("/**", "authc");
        return definition;
    }
}
The configuration here is similar to the previous one, but the ShiroFilterFactoryBean instance is no longer needed. Instead, it is ShiroFilterChain Definition, where Shiro's path matching rules can be defined.
After this definition, the following login interface definitions and test methods are consistent with the previous ones, so I will not go into any more details. You can refer to the above.
Reference resources: http://springboot.javaboy.org/2019/0611/springboot-shiro