This article is originally written by the author. Please indicate the source for reprinting.
Summary
Spring Boot can easily create independent production-level Spring-based applications. It follows the principle of "convention is greater than configuration", uses the least configuration, and automates everything as much as possible, making Rapid Application Development so simple and elegant.
Version agreement
Spring Boot update iteration speed is very fast, has developed to 2.X series, the latest version of the official website is 2.1.3.RELEASE. In order to let readers know the new features and usages of Spring Boot, I use the latest Spring Boot version as much as possible to demonstrate. Spring Boot 2.X requires jdk 1.8+, apache maven 3.3+ environments, and development tools can choose open source eclipse or commercial IntelliJ ideas (JetBrains is officially launched). Student Free Authorization Scheme If you are a student, you can use the full range of products free of charge as long as you provide a campus mailbox, an International Student Card (ISIC) or a valid certificate to verify your student identity.
Create the first Spring Book application
Create a new maven project, edit the pom.xml project file and introduce Spring Boot dependencies
<?xml version="1.0" encoding="UTF-8"?>

<project xmlns="http://maven.apache.org/POM/4.0.0" xmlns:xsi="http://www.w3.org/2001/XMLSchema-instance"
  xsi:schemaLocation="http://maven.apache.org/POM/4.0.0 http://maven.apache.org/xsd/maven-4.0.0.xsd">
  <modelVersion>4.0.0</modelVersion>

  <groupId>com.tutorial</groupId>
  <artifactId>study</artifactId>
  <version>1.0-SNAPSHOT</version>
  <packaging>war</packaging>

  <name>study Maven Webapp</name>
  <!-- FIXME change it to the project's website -->
  <url>http://www.example.com</url>

  <!-- Inherit defaults from Spring Boot -->
  <parent>
    <groupId>org.springframework.boot</groupId>
    <artifactId>spring-boot-starter-parent</artifactId>
    <version>2.1.3.RELEASE</version>
  </parent>

  <dependencies>
    <!-- Add typical dependencies for a web application -->
    <dependency>
      <groupId>org.springframework.boot</groupId>
      <artifactId>spring-boot-starter-web</artifactId>
    </dependency>
  </dependencies>

  <build>
    <finalName>study</finalName>
    <plugins>
      <plugin>
        <groupId>org.springframework.boot</groupId>
        <artifactId>spring-boot-maven-plugin</artifactId>
      </plugin>
    </plugins>
  </build>
</project>
Catalog structure of projects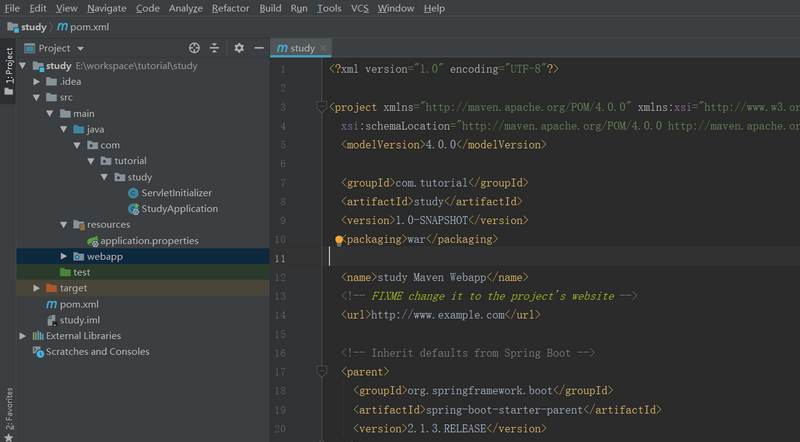
Next, configure a startup class, commonly named * Application, which is the entry point for the entire Spring Book application.
package com.tutorial.study;

import org.springframework.boot.SpringApplication;
import org.springframework.boot.autoconfigure.SpringBootApplication;

@SpringBootApplication
public class StudyApplication {
    public static void main(String[] args) {
        SpringApplication.run(StudyApplication.class, args);
    }
}
You can see that the @SpringBootApplication annotation is used to indicate that this is a startup class. @ SpringBoot Application is a combination of @Configuration, @Enable AutoConfiguration and @ComponentScan annotations.
In order to package and deploy Spring Boot applications war mly to tomcat, we need to write an extension class that inherits the org. spring framework. boot. web. servlet. support. Spring Boot Servlet Initializer class and overrides its configure (Spring Application Builder) method.
package com.tutorial.study;

import org.springframework.boot.builder.SpringApplicationBuilder;
import org.springframework.boot.web.servlet.support.SpringBootServletInitializer;

public class ServletInitializer extends SpringBootServletInitializer {
    @Override
    protected SpringApplicationBuilder configure(SpringApplicationBuilder application){
        return application.sources(StudyApplication.class);
    }
}
Create a Controller
package com.tutorial.study.controllers;

import org.springframework.web.bind.annotation.RequestMapping;
import org.springframework.web.bind.annotation.RequestMethod;
import org.springframework.web.bind.annotation.RestController;

@RestController
public class IndexController {
    @RequestMapping(value = "/", method = RequestMethod.GET)
    public String index() {
        return "Hello, world!";
    }
}
Here we have completed our first Spring Book application. Select your tomcat server in the development tool and run the application. Browser access after application startuplocalhost:8080 / application name Hello, world!
The code in this section is available in https://github.com/HuasLeung/spring-boot-tutorial Download, this series of tutorials has been synchronized to my personal website https://www.huasleung.com If you have any questions or questions, please come to my blog to ask and discuss them.