When it comes to RPC (Remote Procedure Call Protocol), the estimates in the minds of the partners are RESTful API, Dubbo, WebService, Java RMI, CORBA, etc.
In fact, RabbitMQ also provides us with RPC function, which is very simple to use.
Today, SongGe will share with you how spring boot + rabbit MQ implements a simple RPC call through a simple case.
be careful
Some partners may have some misunderstandings about RabbitMQ's implementation of RPC calls, thinking that this is not simple? Two message queues_ 1 and queue_2. First, the client sends a message to the queue_ On 1, the server listens to the queue_1. Process the message after receiving it; After processing, the server sends a message to the queue_2 on the queue, and then the client listens to the queue_2 messages on the queue, so you can know the processing results of the server.
This way is either impossible or a little troublesome! RabbitMQ provides ready-made solutions that can be used directly and are very convenient. Next, let's study together.
- framework
Let's take a look at a simple architecture diagram:
This picture makes the problem clear:
First, the Client sends a message. Compared with ordinary messages, this message has two more key contents: one is correlation_id, which represents the unique id of the message. Another content is reply_to, which indicates the name of the message reply queue.
The Server obtains messages from the message sending queue and processes the corresponding business logic. After processing, the Server sends the processing results to reply_to the specified callback queue.
When the Client reads the message from the callback queue, it can know what the execution of the message looks like.
This situation is actually very suitable for handling asynchronous calls.
- practice
Next, let's take a concrete example to see how to play this.
2.1 client development
First, let's create a Spring Boot project named producer as a message producer. When creating, we add web and rabbitmq dependencies, as shown in the following figure:
After the project is created successfully, first configure the basic information of RabbitMQ in application.properties, as follows:
spring.rabbitmq.host=localhost
spring.rabbitmq.port=5672
spring.rabbitmq.username=guest
spring.rabbitmq.password=guest
spring.rabbitmq.publisher-confirm-type=correlated
spring.rabbitmq.publisher-returns=true
The first four lines of this configuration are easy to understand, so I won't repeat them. The second two lines are: first, configure the message confirmation method. We confirm it through correlated. Only when this configuration is enabled will correlation be carried in future messages_ ID, only through correlation_id so that we can associate the sent message with the return value. The last line is configured to enable sending failure return. Big data training
Next, let's provide a configuration class, as follows:
@Configuration
public class RabbitConfig {
public static final String RPC_QUEUE1 = "queue_1";
public static final String RPC_QUEUE2 = "queue_2";
public static final String RPC_EXCHANGE = "rpc_exchange";

/**
 * Set message sending RPC queue
 */
@Bean
Queue msgQueue() {
    return new Queue(RPC_QUEUE1);
}

/**
 * Set return queue
 */
@Bean
Queue replyQueue() {
    return new Queue(RPC_QUEUE2);
}

/**
 * Set up switch
 */
@Bean
TopicExchange exchange() {
    return new TopicExchange(RPC_EXCHANGE);
}

/**
 * Request queue and switch binding
 */
@Bean
Binding msgBinding() {
    return BindingBuilder.bind(msgQueue()).to(exchange()).with(RPC_QUEUE1);
}

/**
 * Return queue and switch binding
 */
@Bean
Binding replyBinding() {
    return BindingBuilder.bind(replyQueue()).to(exchange()).with(RPC_QUEUE2);
}


/**
 * Sending and receiving messages using the RabbitTemplate
 * And set the callback queue address
 */
@Bean
RabbitTemplate rabbitTemplate(ConnectionFactory connectionFactory) {
    RabbitTemplate template = new RabbitTemplate(connectionFactory);
    template.setReplyAddress(RPC_QUEUE2);
    template.setReplyTimeout(6000);
    return template;
}


/**
 * Set listener for return queue
 */
@Bean
SimpleMessageListenerContainer replyContainer(ConnectionFactory connectionFactory) {
    SimpleMessageListenerContainer container = new SimpleMessageListenerContainer();
    container.setConnectionFactory(connectionFactory);
    container.setQueueNames(RPC_QUEUE2);
    container.setMessageListener(rabbitTemplate(connectionFactory));
    return container;
}
}
In this configuration class, we configure the message sending queue msgQueue and the message returning queue replyQueue respectively, and then bind the two queues to the message switch. This is the normal operation of RabbitMQ. There's nothing to say.
In Spring Boot, our tool for message sending is RabbitTemplate. By default, the system automatically provides this tool, but here we need to customize this tool again, mainly to add the return queue for message sending. Finally, we need to set a listener for the return queue.
OK, then we can start sending specific messages:
@RestController
public class RpcClientController {
private static final Logger logger = LoggerFactory.getLogger(RpcClientController.class);

@Autowired
private RabbitTemplate rabbitTemplate;

@GetMapping("/send")
public String send(String message) {
    // Create message object
    Message newMessage = MessageBuilder.withBody(message.getBytes()).build();

    logger.info("client send: {}", newMessage);

    //Client send message
    Message result = rabbitTemplate.sendAndReceive(RabbitConfig.RPC_EXCHANGE, RabbitConfig.RPC_QUEUE1, newMessage);

    String response = "";
    if (result != null) {
        // Gets the correlationId of the sent message
        String correlationId = newMessage.getMessageProperties().getCorrelationId();
        logger.info("correlationId:{}", correlationId);

        // Get response header information
        HashMap<String, Object> headers = (HashMap<String, Object>) result.getMessageProperties().getHeaders();

        // Get the message id returned by the server
        String msgId = (String) headers.get("spring_returned_message_correlation");

        if (msgId.equals(correlationId)) {
            response = new String(result.getBody());
            logger.info("client receive: {}", response);
        }
    }
    return response;
}
}
In fact, this code is also some conventional code. I'll pick a few key nodes and say:
Message sending calls the sendAndReceive method, which has its own return value, which is the message returned by the server.
In the message returned by the server, the header contains spring_ returned_ message_ The correlation field, which is the correlation when the message is sent_ ID, the correlation when the message is sent_ ID and return the spring in the message header_ returned_ message_ With the value of the correlation field, we can bind the returned message content with the sent message, and confirm that the returned content is for the sent message.
This is the development of the whole client. In fact, the core is the call of sendAndReceive method. Although the call is simple, the preparation work still needs to be done enough. For example, if we do not configure correlated in application.properties, there will be no correlation in the sent message_ ID, so the returned message content cannot be associated with the sent message content.
2.2 server development
Let's take a look at the development of the server.
First, create a Spring Boot project named consumer. The dependencies added by the project are consistent with those created by client development. I won't repeat it.
Then configure the application.properties configuration file. The configuration of this file is also consistent with that in the client. I won't repeat it.
Next, a RabbitMQ configuration class is provided. This configuration class is relatively simple. Simply configure the message queue and bind it to the message switch, as follows:
@Configuration
public class RabbitConfig {
public static final String RPC_QUEUE1 = "queue_1";
public static final String RPC_QUEUE2 = "queue_2";
public static final String RPC_EXCHANGE = "rpc_exchange";

/**
 * Configure message sending queue
 */
@Bean
Queue msgQueue() {
    return new Queue(RPC_QUEUE1);
}

/**
 * Set return queue
 */
@Bean
Queue replyQueue() {
    return new Queue(RPC_QUEUE2);
}

/**
 * Set up switch
 */
@Bean
TopicExchange exchange() {
    return new TopicExchange(RPC_EXCHANGE);
}

/**
 * Request queue and switch binding
 */
@Bean
Binding msgBinding() {
    return BindingBuilder.bind(msgQueue()).to(exchange()).with(RPC_QUEUE1);
}

/**
 * Return queue and switch binding
 */
@Bean
Binding replyBinding() {
    return BindingBuilder.bind(replyQueue()).to(exchange()).with(RPC_QUEUE2);
}
}
Finally, let's look at the consumption of news:
@Component
public class RpcServerController {
private static final Logger logger = LoggerFactory.getLogger(RpcServerController.class);
@Autowired
private RabbitTemplate rabbitTemplate;

@RabbitListener(queues = RabbitConfig.RPC_QUEUE1)
public void process(Message msg) {
    logger.info("server receive : {}",msg.toString());
    Message response = MessageBuilder.withBody(("i'm receive:"+new String(msg.getBody())).getBytes()).build();
    CorrelationData correlationData = new CorrelationData(msg.getMessageProperties().getCorrelationId());
    rabbitTemplate.sendAndReceive(RabbitConfig.RPC_EXCHANGE, RabbitConfig.RPC_QUEUE2, response, correlationData);
}
}
The logic here is relatively simple:
The server first receives the message and prints it out.
The server extracts the correlation in the original message_ id.
The server calls the sendAndReceive method to send the message to RPC_QUEUE2 queue with correlation_id parameter.
After the server sends the message, the client will receive the result returned by the server.
OK, it's done.
2.3 testing
Next, let's do a simple test.
Start RabbitMQ first.
Next, start producer and consumer respectively, then test the interface of producer in postman, as follows: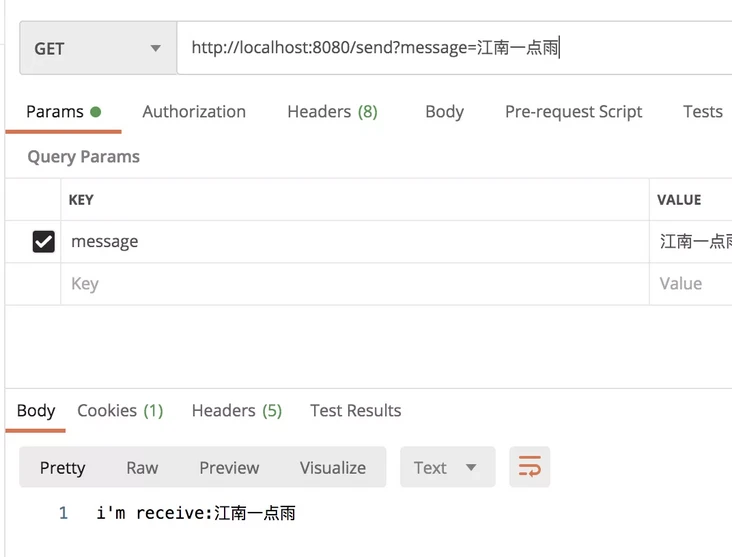
You can see that the return information from the server has been received.
Let's take a look at the running log of producer:
You can see that after the message is sent, the information returned by the consumer is also received.
As you can see, the consumer also received a message from the client.