Building microservices: an introduction to Spring boot
What is spring boot
Spring boot is a new framework provided by pivot team. It is designed to simplify the initial construction and development process of new spring applications. The framework uses a specific way to configure, so that developers no longer need to define templated configurations. In my words, spring boot is not a new framework. It configures the use of many frameworks by default, just as maven integrates all jar packages and spring boot integrates all frameworks (I don't know whether this metaphor is appropriate).
What are the benefits of using spring boot
In fact, it is simple, fast and convenient! What should we do if we need to build a spring web project?
1) Configure web.xml, load spring and spring mvc
2) Configure database connection and spring transaction
3) Read the configuration file and open the annotation
4) Configuration log file
...
Deploy tomcat debugging after configuration
...
Microservices are very popular now. If my project only needs to send an email, if my project only produces a point; I need to do this again!
But what if you use spring boot?
Very simple, I only need a few configurations to quickly and easily build a web project or build a micro service!
quick get start
After talking so much, my hands are itchy. I'll try it right away!
maven build project
1. Visit http://start.spring.io/
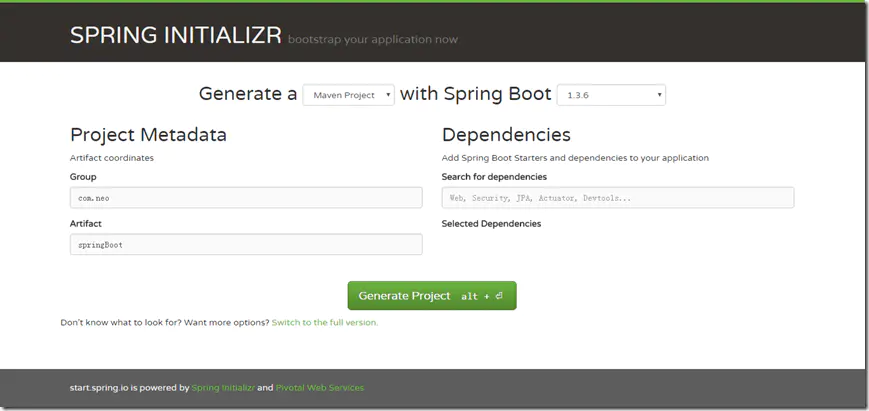
2. Select the build tool Maven Project, Spring Boot version 1.3.6 and some basic project information, click "Switch to the full version." java version 1.7, as shown in the figure below:

3. Click Generate Project to download the project package
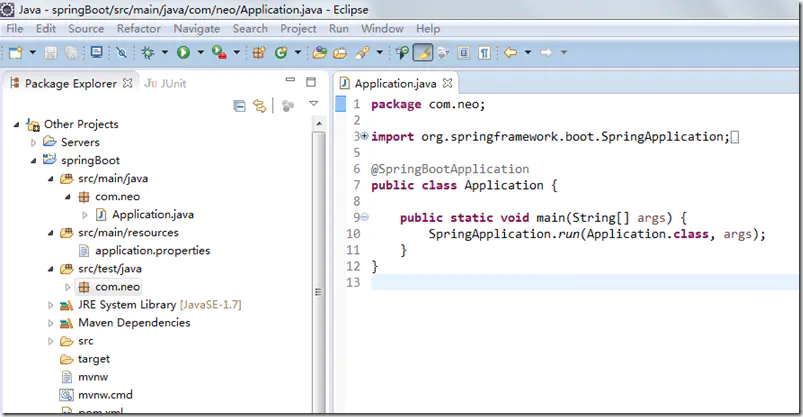
4. After decompression, use eclipse, import - > existing Maven Projects - > next - > select the extracted folder - > find, OK, done!

As shown in the figure above, the Spring Boot infrastructure consists of three files:
l src/main/java program development and main program entry
l src/main/resources configuration file
l src/test/java test program
In addition, the recommended directory results of spingboot are as follows:
root package structure: com.example.myproject
com
  +- example
    +- myproject
      +- Application.java
      |
      +- domain
      |  +- Customer.java
      |  +- CustomerRepository.java
      |
      +- service
      |  +- CustomerService.java
      |
      +- controller
      |  +- CustomerController.java
      |
1. Application.java is recommended to be placed under the following directory, which is mainly used for some framework configuration
2. The domain directory is mainly used for entities and data access layers (repositories)
3. The service layer is mainly business code
4. The controller is responsible for page access control
Using the default configuration can save a lot of configuration. Of course, you can change it according to your preference. Finally, start the Application main method. So far, a java project has been built!
Introducing web module
1. Add a web supporting module to pom.xml:
<dependency>
        <groupId>org.springframework.boot</groupId>
        <artifactId>spring-boot-starter-web</artifactId>
 </dependency>
There are two modules in the pom.xml file by default:
Spring boot starter: core module, including automatic configuration support, log and YAML;
Spring boot starter test: test module, including JUnit, Hamcrest and Mockito.
2. Write controller content
@RestController
public class HelloWorldController {
    @RequestMapping("/hello")
    public String index() {
        return "Hello World";
    }
}
@RestController means that the methods in the controller are output in json format, so there is no need to write any jackjson configuration!
3. Start the main program and open the browser to access http://localhost:8080/hello , you can see the effect. It's very simple to have wood!
How to do unit test
Open the test entry under src/test / and write a simple http request to test; Use mockmvc to print the execution results using MockMvcResultHandlers.print().
@RunWith(SpringJUnit4ClassRunner.class)
@SpringApplicationConfiguration(classes = MockServletContext.class)
@WebAppConfiguration
public class HelloWorldControlerTests {
    private MockMvc mvc;
    @Before
    public void setUp() throws Exception {
        mvc = MockMvcBuilders.standaloneSetup(new HelloWorldController()).build();
    }
    @Test
    public void getHello() throws Exception {
    mvc.perform(MockMvcRequestBuilders.get("/hello").accept(MediaType.APPLICATION_JSON))
                .andExpect(MockMvcResultMatchers.status().isOk())
                .andDo(MockMvcResultHandlers.print())
                .andReturn();
    }
}
<dependencies>
    <dependency>
        <groupId>org.springframework.boot</groupId>
        <artifactId>spring-boot-devtools</artifactId>
        <optional>true</optional>
   </dependency>
</dependencies>
<build>
    <plugins>
        <plugin>
            <groupId>org.springframework.boot</groupId>
            <artifactId>spring-boot-maven-plugin</artifactId>
            <configuration>
                <fork>true</fork>
            </configuration>
        </plugin>
   </plugins>
</build>
The module will be disabled when running in a complete packaging environment. If you start an application using java -jar or a specific classloader, it will consider it a "production environment".
summary
Using spring boot can easily and quickly build projects, so that we don't need to care about the compatibility between frameworks, applicable versions and other issues. If we want to use anything, we can just add a configuration. Therefore, using spring boot is very suitable for building microservices.
demo address attached: https://github.com/ityouknow/spring-boot-starter/tree/master/spring-boot-helloWorld