This page will introduce an example of CRUD using Spring Boot REST + Angular + JPA + Hibernate + MySQL.
We will create a REST web service application using Spring Boot and a client application using angular. REST Web Services expose the methods of creating, reading, updating, and deleting operations. Angular applications will use angular's Http API for CRUD operations. If our client application runs on a domain different from the web service domain, the Spring Boot Web service controller will use the @ CrossOrigin annotation to configure the URL of the client domain to handle cross domain resource sharing (CORS).
The Angular application will be a single page application that will perform CRUD operations. Based on the HTTP status code of the REST network service response, the Angular application will display the success and failure information of the crud operation.
In our REST Web service application, we will provide two methods for reading operations, one for getting data by ID and the other for getting all data. In our example, we will CRUD the article table. When we create an article, the article ID will be automatically generated by the database. In order to get and delete articles by ID, we will pass the ID of the article from the client to the REST Web service application using the request parameters.
In our Spring Boot application, we will use the application.properties file to configure the database. To interact with the database, we will use JPA EntityManager. Now find the steps for a complete client and REST web services application.
HTTP URL, method and response status code of CRUD operation
In our example, we will use the following HTTP URL, method and response status code for CRUD operation.
1. Create :
HTTP method: POST, web address: / user/article
Angular API: Http.post()
HTTP response status codes: 201 CREATED and 409 CONFLICT
2. Read :
HTTP method: GET, web address: / user/article?id={id} (Fetches article by id)
HTTP method: GET, web address: / user / all articles (fetches all articles)
Angular API: Http.get()
HTTP response status code: 200 OK
3. Update :
HTTP method: PUT, website: / user/article
Angular API: Http.put()
HTTP response status code: 200 OK
4. Delete :
HTTP method: DELETE, web address: / user/article?id={id}
Angular API: Http.delete()
HTTP response status code: 204 NO CONTENT
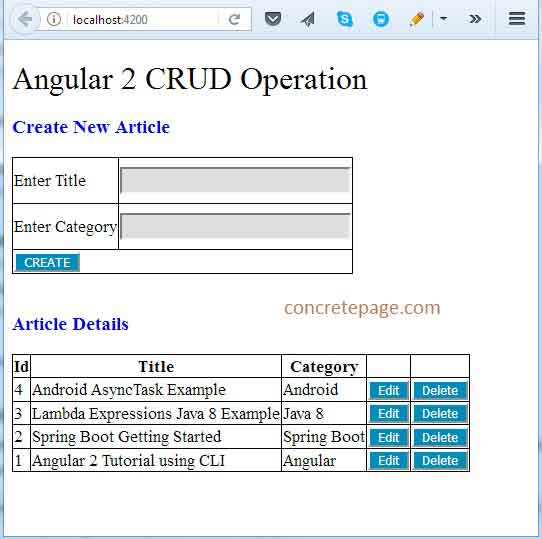
The output of the CRUD operation of our Angular application will be as follows.
Use Angular's Http.post() to create
We will use Angular's Http.post() method for the creation operation. It uses the HTTP POST method to access the URL. The syntax of the Http.post() method is as follows.
post(url: string, body: any, options?: RequestOptionsArgs) : Observable<Response>
The parameters are described below.
URL: This is the URL of the REST web service that created the article.
Body: This is an object of any type that will be passed to the REST web service server. In our example, we will create an Angular class Article and pass its instance to the body parameter.
options: This is optional. It accepts the instance of Angular RequestOptions, which is instantiated with Angular RequestOptionsArgs. Using RequestOptions, we pass request parameters, request header information, etc.
Http.post() returns an instance of observable. Observable is a representation of any set of values at any time.
Client code
Find the client code to create the article. Here we will use Angular's Http.post() method.
articleUrl = "http://localhost:8080/user/article";
createArticle(article: Article):Observable<number> {
    let cpHeaders = new Headers({ 'Content-Type': 'application/json' });
    let options = new RequestOptions({ headers: cpHeaders });
    return this.http.post(this.articleUrl, article, options)
        .map(success => success.status)
        .catch(this.handleError);
}
We pass the header information content type as application/json. After the operation is successful, we return the status code as an instance of Observable.
Server code
Find the Web service method to create the operation.
@PostMapping("article")
public ResponseEntity<Void> createArticle(@RequestBody Article article, UriComponentsBuilder builder) {
   boolean flag = articleService.createArticle(article);
   if (flag == false) {
       	return new ResponseEntity<Void>(HttpStatus.CONFLICT);
   }
   HttpHeaders headers = new HttpHeaders();
   headers.setLocation(builder.path("/article?id={id}").buildAndExpand(article.getArticleId()).toUri());
   return new ResponseEntity<Void>(headers, HttpStatus.CREATED);
}
In the above code, Article is a java entity, equivalent to the Article class of Angular@ PostMapping is the request mapping of the HTTP POST method. When the process is successful, it returns the HTTP status 201 CREATED and the URL of the new Article in the location header. If the Article already exists, the above server code will return HTTP status 09 CONFLICT.
Use Http.get() of Angular to read
We will use Angular's Http.get() method for reading. It uses the HTTP GET method to access the URL. Find its syntax.
get(url: string, options?: RequestOptionsArgs) : Observable<Response>
Find parameter description.
URL: the Web service URL to read the article.
options: This is optional. It is used to pass request parameters, header files, etc.
Http.get() returns an instance of Observable.
Client code
Find the Angular code using Http.get(), which passes the request parameters to filter the results.
articleUrl = "http://localhost:8080/user/article";
getArticleById(articleId: string): Observable<Article> {
   let cpHeaders = new Headers({ 'Content-Type': 'application/json' });
   let cpParams = new URLSearchParams();
   cpParams.set('id', articleId);
   let options = new RequestOptions({ headers: cpHeaders, params: cpParams });
   return this.http.get(this.articleUrl, options)
	   .map(this.extractData)
	   .catch(this.handleError);
}
The above code will get the article with the specified id.
Now look for the angular client code, which will get all the articles from the server.
allArticlesUrl = "http://localhost:8080/user/all-articles";
getAllArticles(): Observable<Article[]> {
    return this.http.get(this.allArticlesUrl)
	.map(this.extractData)
        .catch(this.handleError);
}
Server code
Find the network service method that will accept the request parameters to filter the results.
@GetMapping("article")
public ResponseEntity<Article> getArticleById(@RequestParam("id") String id) {
   Article article = articleService.getArticleById(Integer.parseInt(id));
   return new ResponseEntity<Article>(article, HttpStatus.OK);
}
@GetMapping is the request mapping of the HTTP GET method. It accepts the id of the article as the request parameter and is used to get the article by id. After the operation is successful, it will return the article with the given id and HTTP status code 200 OK.
Now find the web service method that will return all articles.
@GetMapping("all-articles")
public ResponseEntity<List<Article>> getAllArticles() {
	List<Article> list = articleService.getAllArticles();
	return new ResponseEntity<List<Article>>(list, HttpStatus.OK);
}
After the operation is successful, it will return all articles and HTTP status code 200 OK.
Use Http.put() of Angular to update
We will use Angular's Http.put() method for the update operation. It uses the HTTP PUT method to access the URL. Find its syntax.
put(url: string, body: any, options?: RequestOptionsArgs) : Observable<Response>
Find parameter description.
URL: This is the REST web service URL used to update the article.
Body: This is an object of any type that will be passed to the REST web service server. In our example, we will create an Angular Article class and pass its instance to the body parameter. The instance of the Article must have the ID of the Article, and other fields of the Article will be updated on this basis.
options: This is optional. This is used to pass request parameters and request header information.
Http.put() returns an Observable instance.
Client code
Find the angular code that uses the Http.put() method to update the article.
articleUrl = "http://localhost:8080/user/article";
updateArticle(article: Article):Observable<number> {
    let cpHeaders = new Headers({ 'Content-Type': 'application/json' });
    let options = new RequestOptions({ headers: cpHeaders });
    return this.http.put(this.articleUrl, article, options)
          .map(success => success.status)
          .catch(this.handleError);
}
In our Angular application, we have created an Article class and passed its instance to the Http.put() method. The Article will be updated based on the Article ID, which is a field of our Angular Article class.
Server code
Find the Web service method to update the article.
@PutMapping("article")
public ResponseEntity<Article> updateArticle(@RequestBody Article article) {
	articleService.updateArticle(article);
	return new ResponseEntity<Article>(article, HttpStatus.OK);
}
In the above code, Article is a java entity, equivalent to the Article class of Angular@ PutMapping is the request mapping of the HTTP PUT method. After the operation is successful, the HTTP status 200 OK will be returned.
Use Http.delete() of Angular to delete
We will use Angular's Http.delete() method to delete. Http.delete() uses the HTTP DELETE method to access the URL. Find its syntax.
delete(url: string, options?: RequestOptionsArgs) : Observable<Response>
Find parameter description.
URL: the URL of the Web service used to delete the article.
options: This is optional. It is used to pass request parameters, header files, etc.
Http.get() returns an Observable instance.
Client code
Find the client code using Http.delete() method and delete the article by ID.
articleUrl = "http://localhost:8080/user/article";
deleteArticleById(articleId: string): Observable<number> {
     let cpHeaders = new Headers({ 'Content-Type': 'application/json' });
     let cpParams = new URLSearchParams();
     cpParams.set('id', articleId);
     let options = new RequestOptions({ headers: cpHeaders, params: cpParams });
     return this.http.delete(this.articleUrl, options)
	   .map(success => success.status)
	   .catch(this.handleError);
}
In the request parameter, we pass the article ID to delete the article.
Server code
Find the network service method that will delete the article with the given article ID as the request parameter.
@DeleteMapping("article")
public ResponseEntity<Void> deleteArticle(@RequestParam("id") String id) {
	articleService.deleteArticle(Integer.parseInt(id));
	return new ResponseEntity<Void>(HttpStatus.NO_CONTENT);
}
After the operation is successful, the HTTP status code 204 NO CONTENT will be returned.
Complete client application using Angular and TypeScript
We will use Angular and TypeScript to create a complete client application. For the development environment, we use Angular CLI. Our client project will be a separate project from the REST web service project. Now let's talk about the complete client project.
1. Technologies used in client applications
- Angular 4.0.0
- TypeScript 2.2.0
- Node.js 6.10.1
- Angular CLI 1.0.4
- Angular Compiler CLI 4.0.0
2. Customer project structure
angular-demo
|
|--src
|   |
|   |--app
|   |   |
|   |   |--article.component.ts
|   |   |--article.service.ts
|   |   |--article.ts
|   |   |--article.component.html
|   |   |--article.component.css
|   |   |
|   |   |--app.component.ts
|   |   |--app.module.ts
|   |
|   |--assets
|   |   |
|   |   |--images
|   |   |    |
|   |   |    |--loading.gif
|   |   |
|   |
|   |--main.ts
|   |--index.html
|   |--styles.css
|
|--node_modules
|--package.json
3. Use Angular's Http API to create services for CRUD operations
We will create a service where we will handle all HTTP operations to create, read, update, and delete articles. Angular provides HTTP classes in the @ angular/http library. It has get(), post(), put (), delete () and other methods. We will write the creation method using the Http.post() method. To get articles, we will use Http.get() to create two methods, one for getting articles by ID and the other for getting all articles. To update an article, we will use Http.put() to create an update method, and to delete an article, we will use Http.delete() to create a delete method. Now find the service class.
article.service.ts
import { Injectable } from '@angular/core';
import { Http, Response, Headers, URLSearchParams, RequestOptions } from '@angular/http';
import { Observable } from 'rxjs';
import 'rxjs/add/operator/map';
import 'rxjs/add/operator/catch';

import { Article } from './article';

@Injectable()
export class ArticleService {
    //URLs for CRUD operations
    allArticlesUrl = "http://localhost:8080/user/all-articles";
    articleUrl = "http://localhost:8080/user/article";
    //Create constructor to get Http instance
    constructor(private http:Http) {
    }
    //Fetch all articles
    getAllArticles(): Observable<Article[]> {
        return this.http.get(this.allArticlesUrl)
	       .map(this.extractData)
	       .catch(this.handleError);

    }
    //Create article
    createArticle(article: Article):Observable<number> {
	let cpHeaders = new Headers({ 'Content-Type': 'application/json' });
        let options = new RequestOptions({ headers: cpHeaders });
        return this.http.post(this.articleUrl, article, options)
               .map(success => success.status)
               .catch(this.handleError);
    }
    //Fetch article by id
    getArticleById(articleId: string): Observable<Article> {
	let cpHeaders = new Headers({ 'Content-Type': 'application/json' });
	let cpParams = new URLSearchParams();
	cpParams.set('id', articleId);
	let options = new RequestOptions({ headers: cpHeaders, params: cpParams });
	return this.http.get(this.articleUrl, options)
		.map(this.extractData)
		.catch(this.handleError);
    }
    //Update article
    updateArticle(article: Article):Observable<number> {
	let cpHeaders = new Headers({ 'Content-Type': 'application/json' });
        let options = new RequestOptions({ headers: cpHeaders });
        return this.http.put(this.articleUrl, article, options)
               .map(success => success.status)
               .catch(this.handleError);
    }
    //Delete article
    deleteArticleById(articleId: string): Observable<number> {
	let cpHeaders = new Headers({ 'Content-Type': 'application/json' });
	let cpParams = new URLSearchParams();
	cpParams.set('id', articleId);
	let options = new RequestOptions({ headers: cpHeaders, params: cpParams });
	return this.http.delete(this.articleUrl, options)
	       .map(success => success.status)
	       .catch(this.handleError);
    }
    private extractData(res: Response) {
	let body = res.json();
        return body;
    }
    private handleError (error: Response | any) {
	console.error(error.message || error);
	return Observable.throw(error.status);
    }
}
article.ts
export class Article {
   constructor(public articleId: string, public title: string, public category: string) {
   }
}
4. Create components and HTML templates for CRUD operations
In our example, we are creating an Angular responsive form to submit articles, which uses FormGroup and FormControl in the @ angular/forms library. We will create different methods to call service methods to handle the CRUD operation of the article. Now find the article component.
article.component.ts
import { Component, OnInit } from '@angular/core';
import { FormControl, FormGroup, Validators } from '@angular/forms';

import { ArticleService } from './article.service';
import { Article } from './article';

@Component({
   selector: 'app-article',
   templateUrl: './article.component.html',
   styleUrls: ['./article.component.css']
})
export class ArticleComponent implements OnInit {
   //Component properties
   allArticles: Article[];
   statusCode: number;
   requestProcessing = false;
   articleIdToUpdate = null;
   processValidation = false;
   //Create form
   articleForm = new FormGroup({
       title: new FormControl('', Validators.required),
       category: new FormControl('', Validators.required)
   });
   //Create constructor to get service instance
   constructor(private articleService: ArticleService) {
   }
   //Create ngOnInit() and and load articles
   ngOnInit(): void {
	   this.getAllArticles();
   }
   //Fetch all articles
   getAllArticles() {
        this.articleService.getAllArticles()
	   .subscribe(
                data => this.allArticles = data,
                errorCode =>  this.statusCode = errorCode);
   }
   //Handle create and update article
   onArticleFormSubmit() {
	  this.processValidation = true;
	  if (this.articleForm.invalid) {
	       return; //Validation failed, exit from method.
	  }
	  //Form is valid, now perform create or update
          this.preProcessConfigurations();
	  let title = this.articleForm.get('title').value.trim();
          let category = this.articleForm.get('category').value.trim();
	  if (this.articleIdToUpdate === null) {
	    //Handle create article
	    let article= new Article(null, title, category);
	    this.articleService.createArticle(article)
	      .subscribe(successCode => {
		              this.statusCode = successCode;
			      this.getAllArticles();
			      this.backToCreateArticle();
			},
		        errorCode => this.statusCode = errorCode);
	  } else {
   	    //Handle update article
	    let article= new Article(this.articleIdToUpdate, title, category);
	    this.articleService.updateArticle(article)
	      .subscribe(successCode => {
		        this.statusCode = successCode;
			      this.getAllArticles();
			      this.backToCreateArticle();
			},
		        errorCode => this.statusCode = errorCode);
	  }
   }
   //Load article by id to edit
   loadArticleToEdit(articleId: string) {
      this.preProcessConfigurations();
      this.articleService.getArticleById(articleId)
	      .subscribe(article => {
		            this.articleIdToUpdate = article.articleId;
		            this.articleForm.setValue({ title: article.title, category: article.category });
			    this.processValidation = true;
			    this.requestProcessing = false;
		    },
		    errorCode =>  this.statusCode = errorCode);
   }
   //Delete article
   deleteArticle(articleId: string) {
      this.preProcessConfigurations();
      this.articleService.deleteArticleById(articleId)
	      .subscribe(successCode => {
		      this.statusCode = successCode;
		      this.getAllArticles();
		      this.backToCreateArticle();
		   },
		   errorCode => this.statusCode = errorCode);
   }
   //Perform preliminary processing configurations
   preProcessConfigurations() {
          this.statusCode = null;
	  this.requestProcessing = true;
   }
   //Go back from update to create
   backToCreateArticle() {
          this.articleIdToUpdate = null;
          this.articleForm.reset();
	  this.processValidation = false;
   }
}
article.component.html
<h1>Angular 2 CRUD Operation</h1>
<h3 *ngIf="articleIdToUpdate; else create">
   Update Article for Id: {{articleIdToUpdate}}
</h3>
<ng-template #create>
   <h3> Create New Article </h3>
</ng-template>
<div>
 <form [formGroup]="articleForm" (ngSubmit)="onArticleFormSubmit()">
  <table>
    <tr><td>Enter Title</td><td><input formControlName="title">
	       <label *ngIf="articleForm.get('title').invalid && processValidation" [ngClass] = "'error'"> Title is required. </label>
    </td></tr>
    <tr><td>Enter Category</td><td><input formControlName="category">
	       <label *ngIf="articleForm.get('category').invalid && processValidation" [ngClass] = "'error'"> Category is required. </label>
    </td></tr>
    <tr><td colspan="2">
	    <button *ngIf="!articleIdToUpdate">CREATE</button>
	    <button *ngIf="articleIdToUpdate">UPDATE</button>
	    <button (click)="backToCreateArticle()" *ngIf="articleIdToUpdate">Go Back</button>
    </td></tr>
  </table>
 </form>
 <br/>
 <div *ngIf="statusCode; else processing">
   <div *ngIf="statusCode === 201" [ngClass] = "'success'">
	 Article added successfully.
   </div>
   <div *ngIf="statusCode === 409" [ngClass] = "'success'">
        Article already exists.
   </div>
   <div *ngIf="statusCode === 200" [ngClass] = "'success'">
        Article updated successfully.
   </div>
   <div *ngIf="statusCode === 204" [ngClass] = "'success'">
        Article deleted successfully.
   </div>
   <div *ngIf="statusCode === 500" [ngClass] = "'error'">
        Internal Server Error.
   </div>
 </div>
 <ng-template #processing>
	<img *ngIf="requestProcessing" src="assets/images/loading.gif">
 </ng-template>
</div>
<h3>Article Details</h3>
<table>
  <tr><th> Id</th> <th>Title</th><th>Category</th><th></th><th></th></tr>
  <tr *ngFor="let article of allArticles" >
        <td>{{article.articleId}}</td> <td>{{article.title}}</td> <td>{{article.category}}</td>
	<td><button type="button" (click)="loadArticleToEdit(article.articleId)">Edit</button> </td>
	<td><button type="button" (click)="deleteArticle(article.articleId)">Delete</button></td>
  </tr>
</table>
article.component.css
h1 {
    font-size: 2.0em;
    margin: 20px 0 0 0;
    font-weight: 400;
}
h3 {
   color: blue;
}
table {
    border-collapse: collapse;
}
table, th, td {
    border: 1px solid black;
    font-size:17px;
}
input {
    width: 225px;
    margin: 8px 0;
    background-color: #dfdfdf;
    font-size:17px;
}
button {
    background-color: #008CBA;
    color: white;
}
.error{
    color: red;
    font-size: 20px;
}
.success{
    color: green;
    font-size: 20px;
}
5. Create application components and modules
app.component.ts
import { Component } from '@angular/core';

@Component({
   selector: 'app-root',
   template: `
		<app-article></app-article>
             `
})
export class AppComponent {
}
app.module.ts
import { NgModule } from '@angular/core';
import { BrowserModule } from '@angular/platform-browser';
import { ReactiveFormsModule } from '@angular/forms';
import { HttpModule } from '@angular/http';

import { AppComponent }  from './app.component';
import { ArticleComponent }  from './article.component';
import { ArticleService } from './article.service';

@NgModule({
  imports: [
        BrowserModule,
	HttpModule,
	ReactiveFormsModule
  ],
  declarations: [
        AppComponent,
	ArticleComponent
  ],
  providers: [
        ArticleService
  ],
  bootstrap: [
        AppComponent
  ]
})
export class AppModule { }
Complete REST Web service application using Maven's Spring Boot
Here, we will use Spring Boot and Maven to create a complete REST Web service application. We will create a table in the MySQL database. Using JPA and Hibernate, our Spring Boot application will interact with the database. When creating an article, we will not pass the article ID because the article ID will be automatically generated by the database. In our Web service controller, we will expose the methods of creating, reading, updating and deleting articles.
1. Technologies used in rest network service applications
- Java 8
- Spring Boot 1.5.3.RELEASE
- Maven 3.3
- MySQL 5.5
- Eclipse Mars
2. MySQL database structure
In our database, we created a table called articles. Find the structure of the database.
Database Schema
-- Dumping database structure for concretepage
CREATE DATABASE IF NOT EXISTS `concretepage`;
USE `concretepage`;
-- Dumping structure for table concretepage.articles
CREATE TABLE IF NOT EXISTS `articles` (
  `article_id` int(5) NOT NULL AUTO_INCREMENT,
  `title` varchar(200) NOT NULL,
  `category` varchar(100) NOT NULL,
  PRIMARY KEY (`article_id`)
) ENGINE=InnoDB AUTO_INCREMENT=5 DEFAULT CHARSET=latin1;
-- Dumping data for table concretepage.articles: ~4 rows (approximately)
/*!40000 ALTER TABLE `articles` DISABLE KEYS */;
INSERT INTO `articles` (`article_id`, `title`, `category`) VALUES
	(1, 'Angular 2 Tutorial using CLI', 'Angular'),
	(2, 'Spring Boot Getting Started', 'Spring Boot'),
	(3, 'Lambda Expressions Java 8 Example', 'Java 8'),
	(4, 'Android AsyncTask Example', 'Android');
When we create an article, the article ID will be automatically generated by the database. Now find the corresponding java entity for the above table.
Article.java
package com.concretepage.entity;
import java.io.Serializable;
import javax.persistence.Column;
import javax.persistence.Entity;
import javax.persistence.GeneratedValue;
import javax.persistence.GenerationType;
import javax.persistence.Id;
import javax.persistence.Table;
@Entity
@Table(name="articles")
public class Article implements Serializable {
	private static final long serialVersionUID = 1L;
	@Id
	@GeneratedValue(strategy=GenerationType.AUTO)
	@Column(name="article_id")
        private int articleId;
	@Column(name="title")
        private String title;
	@Column(name="category")
	private String category;
	public int getArticleId() {
		return articleId;
	}
	public void setArticleId(int articleId) {
		this.articleId = articleId;
	}
	public String getTitle() {
		return title;
	}
	public void setTitle(String title) {
		this.title = title;
	}
	public String getCategory() {
		return category;
	}
	public void setCategory(String category) {
		this.category = category;
	}
}
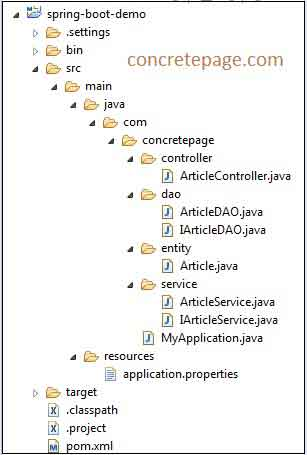
3. Project structure
4. Maven document
pom.xml
<?xml version="1.0" encoding="UTF-8"?>
<project xmlns="http://maven.apache.org/POM/4.0.0" xmlns:xsi="http://www.w3.org/2001/XMLSchema-instance"
	xsi:schemaLocation="http://maven.apache.org/POM/4.0.0 http://maven.apache.org/xsd/maven-4.0.0.xsd">
	<modelVersion>4.0.0</modelVersion>
	<groupId>com.concretepage</groupId>
	<artifactId>spring-boot-demo</artifactId>
	<version>0.0.1-SNAPSHOT</version>
	<packaging>jar</packaging>
	<name>spring-demo</name>
	<description>Spring Boot Demo Project</description>
	<parent>
		<groupId>org.springframework.boot</groupId>
		<artifactId>spring-boot-starter-parent</artifactId>
		<version>1.5.3.RELEASE</version>
	</parent>
	<properties>
		<java.version>1.8</java.version>
	</properties>
	<dependencies>
	    <dependency>
	   	    <groupId>org.springframework.boot</groupId>
		    <artifactId>spring-boot-starter-web</artifactId>
	    </dependency>
	    <dependency>
		    <groupId>org.springframework.boot</groupId>
		    <artifactId>spring-boot-starter-data-jpa</artifactId>
	    </dependency>
	    <dependency>
		    <groupId>mysql</groupId>
		    <artifactId>mysql-connector-java</artifactId>
	    </dependency>
    	<dependency>
            <groupId>org.springframework.boot</groupId>
            <artifactId>spring-boot-devtools</artifactId>
            <optional>true</optional>
        </dependency>
	</dependencies>
	<build>
	   <plugins>
		  <plugin>
			<groupId>org.springframework.boot</groupId>
			<artifactId>spring-boot-maven-plugin</artifactId>
		  </plugin>
	   </plugins>
	</build>
</project>
Locate the description of the spring boot initiator configured in the maven file.
Spring boot starter parent: parent POM for dependency management.
Spring boot starter Web: a launcher for building web and REST applications. It uses the Tomcat server as the default embedded server.
Spring boot starter data JPA: the startup program of spring data JPA with hibernate.
Spring boot devtools: it provides developer tools. These tools are very helpful in application development mode. A feature of developer tools is to automatically restart the server when any code changes.
Spring boot Maven plugin: it is used to create the executable JAR of the application.
5. Configure properties in application.properties
The properties related to the data source, JPA using Hibernate and logs will be configured in the application.properties file.
application.properties
#spring.datasource.driver-class-name=com.mysql.jdbc.Driver
spring.datasource.url=jdbc:mysql://localhost:3306/concretepage
spring.datasource.username=root
spring.datasource.password=
spring.datasource.tomcat.max-wait=20000
spring.datasource.tomcat.max-active=50
spring.datasource.tomcat.max-idle=20
spring.datasource.tomcat.min-idle=15

spring.jpa.properties.hibernate.dialect = org.hibernate.dialect.MySQLDialect
spring.jpa.properties.hibernate.id.new_generator_mappings = false
spring.jpa.properties.hibernate.format_sql = true

logging.level.org.hibernate.SQL=DEBUG
logging.level.org.hibernate.type.descriptor.sql.BasicBinder=TRACE
6. Create DAO for CRUD operation
In our example, find the DAO used to perform CRUD operations. We will use JPA EntityManager to query the database.
IArticleDAO.java
package com.concretepage.dao;
import java.util.List;
import com.concretepage.entity.Article;
public interface IArticleDAO {
    List<Article> getAllArticles();
    Article getArticleById(int articleId);
    void createArticle(Article article);
    void updateArticle(Article article);
    void deleteArticle(int articleId);
    boolean articleExists(String title, String category);
}
ArticleDAO.java
package com.concretepage.dao;
import java.util.List;
import javax.persistence.EntityManager;
import javax.persistence.PersistenceContext;
import org.springframework.stereotype.Repository;
import org.springframework.transaction.annotation.Transactional;
import com.concretepage.entity.Article;
@Transactional
@Repository
public class ArticleDAO implements IArticleDAO {
	@PersistenceContext
	private EntityManager entityManager;
	@Override
	public Article getArticleById(int articleId) {
		return entityManager.find(Article.class, articleId);
	}
	@SuppressWarnings("unchecked")
	@Override
	public List<Article> getAllArticles() {
		String hql = "FROM Article as atcl ORDER BY atcl.articleId DESC";
		return (List<Article>) entityManager.createQuery(hql).getResultList();
	}
	@Override
	public void createArticle(Article article) {
		entityManager.persist(article);
	}
	@Override
	public void updateArticle(Article article) {
		Article artcl = getArticleById(article.getArticleId());
		artcl.setTitle(article.getTitle());
		artcl.setCategory(article.getCategory());
		entityManager.flush();
	}
	@Override
	public void deleteArticle(int articleId) {
		entityManager.remove(getArticleById(articleId));
	}
	@Override
	public boolean articleExists(String title, String category) {
		String hql = "FROM Article as atcl WHERE atcl.title = ? and atcl.category = ?";
		int count = entityManager.createQuery(hql).setParameter(1, title)
		              .setParameter(2, category).getResultList().size();
		return count > 0 ? true : false;
	}
}
7. Create Service
IArticleService.java
package com.concretepage.service;
import java.util.List;
import com.concretepage.entity.Article;
public interface IArticleService {
     List<Article> getAllArticles();
     Article getArticleById(int articleId);
     boolean createArticle(Article article);
     void updateArticle(Article article);
     void deleteArticle(int articleId);
}
ArticleService.java
package com.concretepage.service;
import java.util.List;
import org.springframework.beans.factory.annotation.Autowired;
import org.springframework.stereotype.Service;
import com.concretepage.dao.IArticleDAO;
import com.concretepage.entity.Article;
@Service
public class ArticleService implements IArticleService {
	@Autowired
	private IArticleDAO articleDAO;
	@Override
	public Article getArticleById(int articleId) {
		Article obj = articleDAO.getArticleById(articleId);
		return obj;
	}
	@Override
	public List<Article> getAllArticles(){
		return articleDAO.getAllArticles();
	}
	@Override
	public synchronized boolean createArticle(Article article){
               if (articleDAO.articleExists(article.getTitle(), article.getCategory())) {
    	           return false;
               } else {
    	           articleDAO.createArticle(article);
    	           return true;
               }
	}
	@Override
	public void updateArticle(Article article) {
		articleDAO.updateArticle(article);
	}
	@Override
	public void deleteArticle(int articleId) {
		articleDAO.deleteArticle(articleId);
	}
}
8. Create Controller
Find the REST network service controller, which exposes the network service methods for CRUD operations.
ArticleController.java
package com.concretepage.controller;
import java.util.List;
import org.springframework.beans.factory.annotation.Autowired;
import org.springframework.http.HttpHeaders;
import org.springframework.http.HttpStatus;
import org.springframework.http.ResponseEntity;
import org.springframework.stereotype.Controller;
import org.springframework.web.bind.annotation.CrossOrigin;
import org.springframework.web.bind.annotation.DeleteMapping;
import org.springframework.web.bind.annotation.GetMapping;
import org.springframework.web.bind.annotation.PostMapping;
import org.springframework.web.bind.annotation.PutMapping;
import org.springframework.web.bind.annotation.RequestBody;
import org.springframework.web.bind.annotation.RequestMapping;
import org.springframework.web.bind.annotation.RequestParam;
import org.springframework.web.util.UriComponentsBuilder;
import com.concretepage.entity.Article;
import com.concretepage.service.IArticleService;
@Controller
@RequestMapping("user")
@CrossOrigin(origins = {"http://localhost:4200"})
public class ArticleController {
	@Autowired
	private IArticleService articleService;
	@GetMapping("article")
	public ResponseEntity<Article> getArticleById(@RequestParam("id") String id) {
		Article article = articleService.getArticleById(Integer.parseInt(id));
		return new ResponseEntity<Article>(article, HttpStatus.OK);
	}
	@GetMapping("all-articles")
	public ResponseEntity<List<Article>> getAllArticles() {
		List<Article> list = articleService.getAllArticles();
		return new ResponseEntity<List<Article>>(list, HttpStatus.OK);
	}
	@PostMapping("article")
	public ResponseEntity<Void> createArticle(@RequestBody Article article, UriComponentsBuilder builder) {
		boolean flag = articleService.createArticle(article);
		if (flag == false) {
		     return new ResponseEntity<Void>(HttpStatus.CONFLICT);
		}
		HttpHeaders headers = new HttpHeaders();
		headers.setLocation(builder.path("/article?id={id}").buildAndExpand(article.getArticleId()).toUri());
		return new ResponseEntity<Void>(headers, HttpStatus.CREATED);
	}
	@PutMapping("article")
	public ResponseEntity<Article> updateArticle(@RequestBody Article article) {
		articleService.updateArticle(article);
		return new ResponseEntity<Article>(article, HttpStatus.OK);
	}
	@DeleteMapping("article")
	public ResponseEntity<Void> deleteArticle(@RequestParam("id") String id) {
		articleService.deleteArticle(Integer.parseInt(id));
		return new ResponseEntity<Void>(HttpStatus.NO_CONTENT);
	}
}
@The cross origin annotation can handle cross resource sharing (CORS). This annotation can be used at the class and method levels of the RESTful Web service controller. In our example, the Angular project will run on the following URL.
http://localhost:4200
The REST web service project will run on the following URL.
http://localhost:8080
In order for our Angular project script to access network services, we need to configure @ CrossOrigin as follows
@CrossOrigin(origins = {"http://localhost:4200"})
We use it at the class level so that all REST web service methods can be used in our Angular application.
9. Create a Java main class to run the Spring Boot application
Create a java class with a main() method that will call SpringApplication.run() to run the application.
MyApplication.java
package com.concretepage;
import org.springframework.boot.SpringApplication;
import org.springframework.boot.autoconfigure.SpringBootApplication;
@SpringBootApplication
public class MyApplication {
    public static void main(String[] args) {
	SpringApplication.run(MyApplication.class, args);
    }
}
We need to annotate the above classes with @ SpringBootApplication, which is equivalent to @ Configuration, @ EnableAutoConfiguration and @ ComponentScan annotations.
Running REST web services and Angular applications
Find the steps to run the REST Web Services Application and the angular application.
1. Use Spring Boot to run REST network services
To run the REST web service application, first create a table in MySQL, as shown in the example. Now we can run REST web services in the following ways.
1. Using Eclipse: use the download link given in the download section of this page to download the source code of the Web service project. Import the project into eclipse. Using the command prompt, go to the root folder of the project and run.
mvn clean eclipse:eclipse
Then refresh the project in eclipse. Run the main class MyApplication by clicking run as - > java application. The embedded tomcat server will be started.
2. Use Maven command: download the source code of the Web service project. Use the command prompt to enter the root folder of the project and run the command.
mvn spring-boot:run
The embedded tomcat server will be started.
3. Use executable jars: use the command prompt to enter the root folder of the project and run the command.
mvn clean package
We will get the executable JAR package spring-boot-demo-0.0.1-SNAPSHOT.jar in the target folder. Run the JAR as follows
java -jar target/spring-boot-demo-0.0.1-SNAPSHOT.jar
The embedded tomcat server will be started.
2. Run the Angular application using the Angular CLI
To run the angular application, find the following steps.
1. Visit link Install angular cli quickstar.
2. Use the download link given in the download section of this page to download the source code of Angular project.
3. In your angular CLI application, replace the src folder with the downloaded folder.
4. Run the ng serve command.
5. Our Angular application is ready on the following website.
http://localhost:4200
a. Visit the link. When we click the CREATE button without entering data, we will get the following verification information.
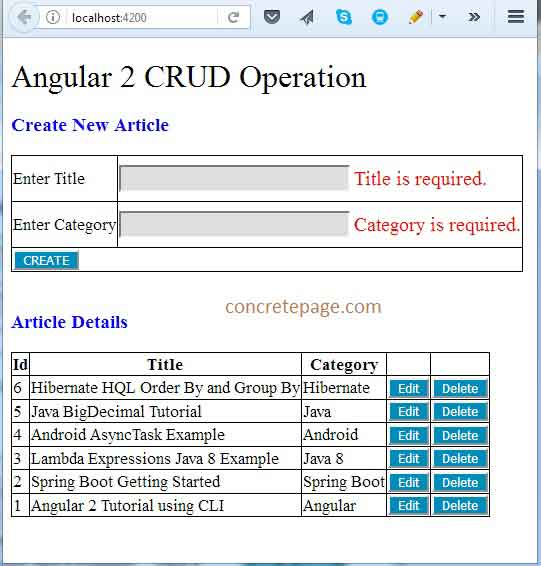
Enter data in the table field and click the CREATE button to CREATE a new article.
b. When we click the "EDIT" button, we load the article in the table field to update, as shown in the figure.
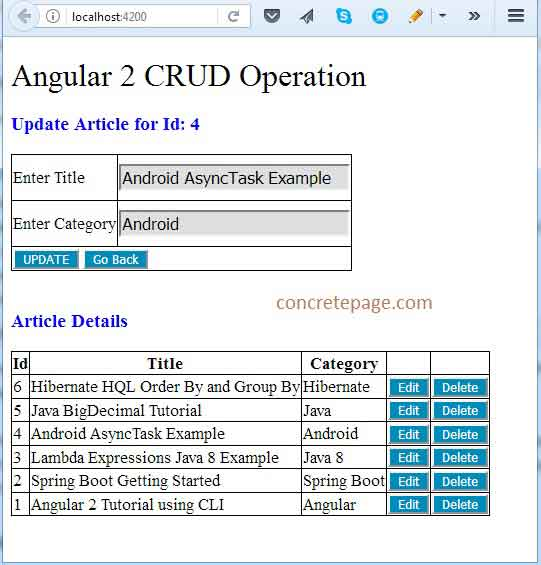
Click the UPDATE button to UPDATE the article with the given article ID. By clicking the "Go Back" button, we can return to the "CREATE" page. Using the DELETE button, we can DELETE the article.
reference
[1]Angular Http
[2]Spring Boot REST + JPA + Hibernate + MySQL Example
[3]Angular 2 Http get() Parameters + Headers + URLSearchParams + RequestOptions Example
[4]Angular 2 Http post() Example
[5]Spring Boot REST + Angular 2/4 + JPA + Hibernate + MySQL CRUD Example
Source download
Extraction code: mao4