preface
In the previous article, we talked about how to use Spring Boot to integrate Swagger2. The details can be summarized as follows: Spring Boot integrates Swagger2 to build powerful API documents . But in fact, the mainstream 2.9.2 of Swagger2 has not been updated for a long time since it was released in 2018, and Swagger3 was finally released in 2020 after a lapse of two years.
Compared with the previous Swagger2, Swagger3 undoubtedly adds more features. Relatively, it mainly focuses on the following points.
- Support OpenApi 3.0.3
- It is compatible with the notes of Swagger2 and further enriches the specification of open API 3.0
- Support Webflux
Since Swagger3 has changed so much, is its usage still the same as Swagger2? The answer is: different.
However, although the use methods of the two are different, the overall process is almost the same, but there are some small changes in some steps. As long as you master the use method of Swagger2, you need to pay attention to small changes when using Swagger3. Next, let's take a look at how to use Spring Boot to integrate Swagger3 and upgrade our Swagger2!
Spring Boot integration Swagger
Create a Spring Boot project
Similarly, before starting, we need to create a simple Spring Boot project, which will not be discussed here. If you have any doubts about this, you can get familiar with it first. Here, I suggest to refer to an article I wrote earlier: Three ways to create Spring Boot projects.
After the project is successfully created, the overall structure is as follows:
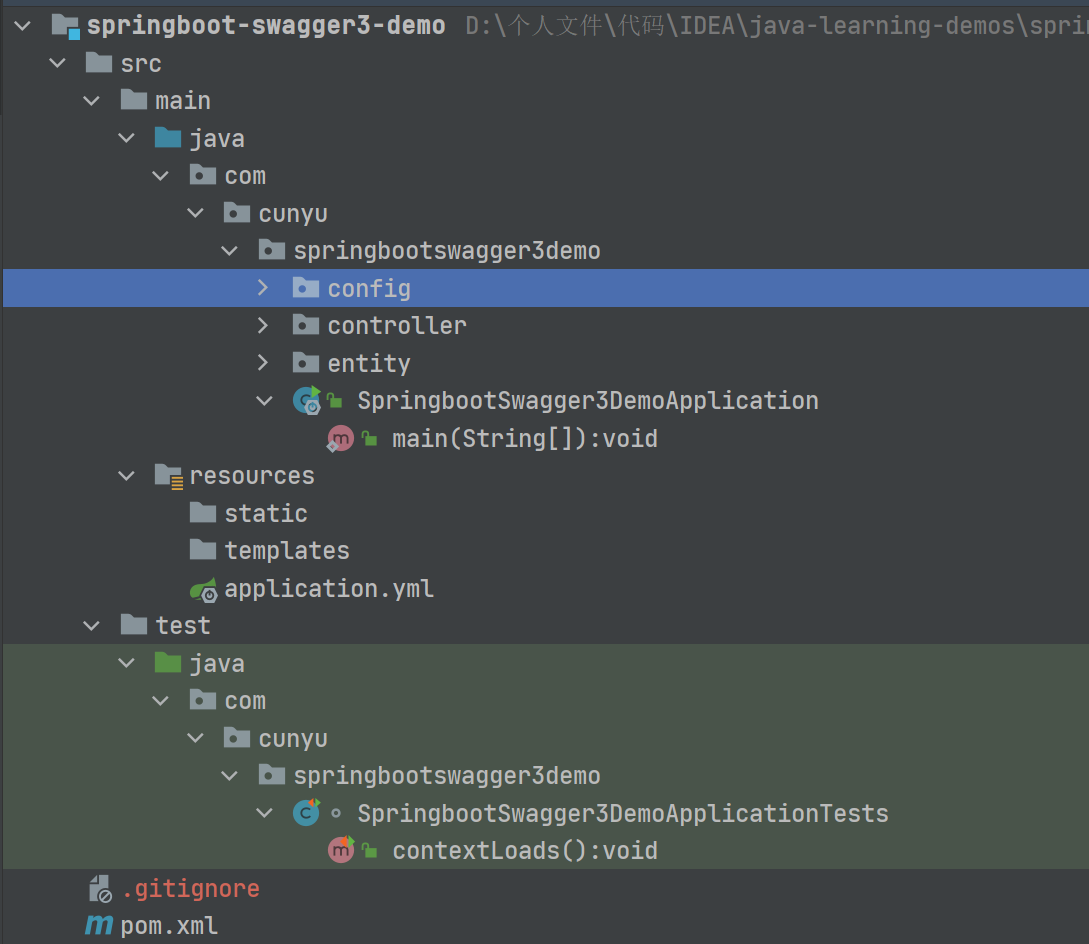
The config, controller and entity modules here are added later, so I don't need to pay attention to them. That is to say, the project you create does not include these three parts. I'll talk about their uses later in the article.
Introduce dependency
After creating the project, in POM The related dependencies of Swagger3 are introduced into the XML file. Recall that when we integrated Swagger2, we introduced the following dependencies:
<dependency>
    <groupId>io.springfox</groupId>
    <artifactId>springfox-swagger2</artifactId>
    <version>2.9.2</version>
</dependency>

<dependency>
    <groupId>io.springfox</groupId>
    <artifactId>springfox-swagger-ui</artifactId>
    <version>2.9.2</version>
</dependency>
In Swagger3, we do not need to introduce two different dependencies. We only need to introduce one dependency. The specific dependencies introduced are as follows:
<dependency>
    <groupId>io.springfox</groupId>
    <artifactId>springfox-boot-starter</artifactId>
    <version>3.0.0</version>
</dependency>
In this part, swagger2 and Swagger3 are different. Swagger2 needs to add two different dependencies, while Swagger3 only needs to add one dependency.
Building Swagger configuration classes
In order to uniformly manage Swagger, it is recommended to add a configuration class to Swagger3. Of course, it can also be used according to your own needs, whether you want it or not, but generally speaking, it is recommended to configure it.
In addition, in the previous article on integrating Swagger2, I forgot to tell you something. In normal work, Swagger is only used in the development environment, while in the production environment, we want to remove it. For flexible management, it is recommended that you use the project configuration file application Add the configuration of Swagger switch in YML. For example, the configuration I added here is as follows. true means to turn on Swagger, and false means to turn off Swagger.
swagger:
  enabled: true
After configuration, we need to get the value of Swagger switch in Swagger configuration class. For specific usage, see the configuration code below.
package com.cunyu.springbootswagger3demo.config;

import org.springframework.beans.factory.annotation.Value;
import org.springframework.context.annotation.Bean;
import org.springframework.context.annotation.Configuration;
import springfox.documentation.builders.ApiInfoBuilder;
import springfox.documentation.builders.PathSelectors;
import springfox.documentation.builders.RequestHandlerSelectors;
import springfox.documentation.oas.annotations.EnableOpenApi;
import springfox.documentation.service.ApiInfo;
import springfox.documentation.service.Contact;
import springfox.documentation.spi.DocumentationType;
import springfox.documentation.spring.web.plugins.Docket;

import java.util.ArrayList;

/**
 * Created with IntelliJ IDEA.
 *
 * @author : Village Yuyao
 * @version : 1.0
 * @project : springboot-swagger3-demo
 * @package : com.cunyu.springbootswagger3demo.config
 * @className : SwaggerConfig
 * @createTime : 2022/1/6 14:19
 * @email : 747731461@qq.com
 * @Wechat: cunyu1024
 * @Official account: Village rain
 * @Website: https://cunyu1943.github.io
 * @description :
 */

@Configuration
@EnableOpenApi
public class SwaggerConfig {
    /**
     * Used to read the configuration file application Whether the swagger property in properties is enabled
     */
    @Value("${swagger.enabled}")
    Boolean swaggerEnabled;

    @Bean
    public Docket docket() {
        return new Docket(DocumentationType.OAS_30)
                .apiInfo(apiInfo())
                // Start swagger
                .enable(swaggerEnabled)
                .select()
                // Filter conditions, scan the files under the specified path
                .apis(RequestHandlerSelectors.basePackage("com.cunyu.springbootswagger3demo.controller"))
                // Specify path processing, pathselectors Any() means no path is filtered
                //.paths(PathSelectors.any())
                .build();
    }

    private ApiInfo apiInfo() {
        /*Author information*/
        Contact contact = new Contact("Village Yuyao", "https://cunyu1943.github.io", "747731461@qq.com");
        return new ApiInfo(
                "Spring Boot integrate Swagger3 test",
                "Spring Boot integrate Swagger3 Test interface documentation",
                "v1.0",
                "https://cunyu1943.github.io",
                contact,
                "Apache 2.0",
                "http://www.apache.org/licenses/LICENSE-2.0",
                new ArrayList()
        );
    }
}
The configuration here is similar to Swagger2. The biggest difference here is that the swagger switch attribute is obtained from the configuration file. Here, you can also choose to add it to the configuration class of Swagger2, and also control whether Swagger2 is enabled through the configuration file. In addition, the DocumentationType attribute is different. Swagger is used in Swagger2_ 2. In Swagger3, we use OAS_30. In fact, by clicking into the source code of DocumentationType, we can find that swagger has been defined for us. Which version of swagger you use, the attribute value we use should select the corresponding version. The attribute values of the three versions correspond to the following:
public static final DocumentationType SWAGGER_12 = new DocumentationType("swagger", "1.2");
public static final DocumentationType SWAGGER_2 = new DocumentationType("swagger", "2.0");
public static final DocumentationType OAS_30 = new DocumentationType("openApi", "3.0");
Writing entity classes
After completing the above steps, our Swagger is configured. Next, we will add an interface to see the difference between Swagger3 and Swagger2.
- New entity class
Here, I take a user class as an example, with two attributes of name and age, which is the content under the entity package in the screenshot of the project structure at the beginning of this article.
package com.cunyu.springbootswagger3demo.entity;

import io.swagger.annotations.ApiModel;
import io.swagger.annotations.ApiModelProperty;
import lombok.AllArgsConstructor;
import lombok.Data;
import lombok.NoArgsConstructor;

/**
 * Created with IntelliJ IDEA.
 *
 * @author : Village Yuyao
 * @version : 1.0
 * @project : springboot-swagger3-demo
 * @package : com.cunyu.springbootswagger3demo.entity
 * @className : User
 * @createTime : 2022/1/6 11:17
 * @email : 747731461@qq.com
 * @Wechat: cunyu1024
 * @Official account: Village rain
 * @Website: https://cunyu1943.github.io
 * @description :
 */

@Data
@AllArgsConstructor
@NoArgsConstructor
@ApiModel("User entity class")
public class User {
    @ApiModelProperty(value = "full name", required = true, example = "Village Yuyao")
    private String name;

    @ApiModelProperty(value = "Age", required = true, example = "20")
    private Integer age;
}
- New interface
Two interfaces are written here, one is to directly transfer parameters, and the other is to transfer by using the created User entity class, that is, the content in the controller package in the project structure.
package com.cunyu.springbootswagger3demo.controller;

import com.cunyu.springbootswagger3demo.entity.User;
import io.swagger.annotations.Api;
import io.swagger.annotations.ApiOperation;
import io.swagger.annotations.ApiParam;
import org.springframework.web.bind.annotation.PostMapping;
import org.springframework.web.bind.annotation.RequestBody;
import org.springframework.web.bind.annotation.RequestMapping;
import org.springframework.web.bind.annotation.RestController;

/**
 * Created with IntelliJ IDEA.
 *
 * @author : Village Yuyao
 * @version : 1.0
 * @project : springboot-swagger3-demo
 * @package : com.cunyu.springbootswagger3demo.controller
 * @className : UserController
 * @createTime : 2022/1/6 11:02
 * @email : 747731461@qq.com
 * @Wechat: cunyu1024
 * @Official account: Village rain
 * @Website: https://cunyu1943.github.io
 * @description :
 */

@Api(tags = "test")
@RestController
@RequestMapping("/user")
public class UserController {

    @ApiOperation("Test interface 1")
    @PostMapping("/show1")
    public String show1(@ApiParam(value = "full name", required = true, example = "Village Yuyao") @RequestBody String name) {
        return "hello," + name + ",welcome to springboot swagger3!";
    }

    @ApiOperation("Test interface 2")
    @PostMapping("/show2")
    public String show2(@ApiParam(value = "User object", required = true) @RequestBody User user) {
        return "hello," + user.getName() + ",welcome to springboot swagger3!";
    }
}
View and test interfaces
Start our project, and then access the following address in the browser to access the interface document of the project.
http://localhost:8080/swagger-ui/index.html
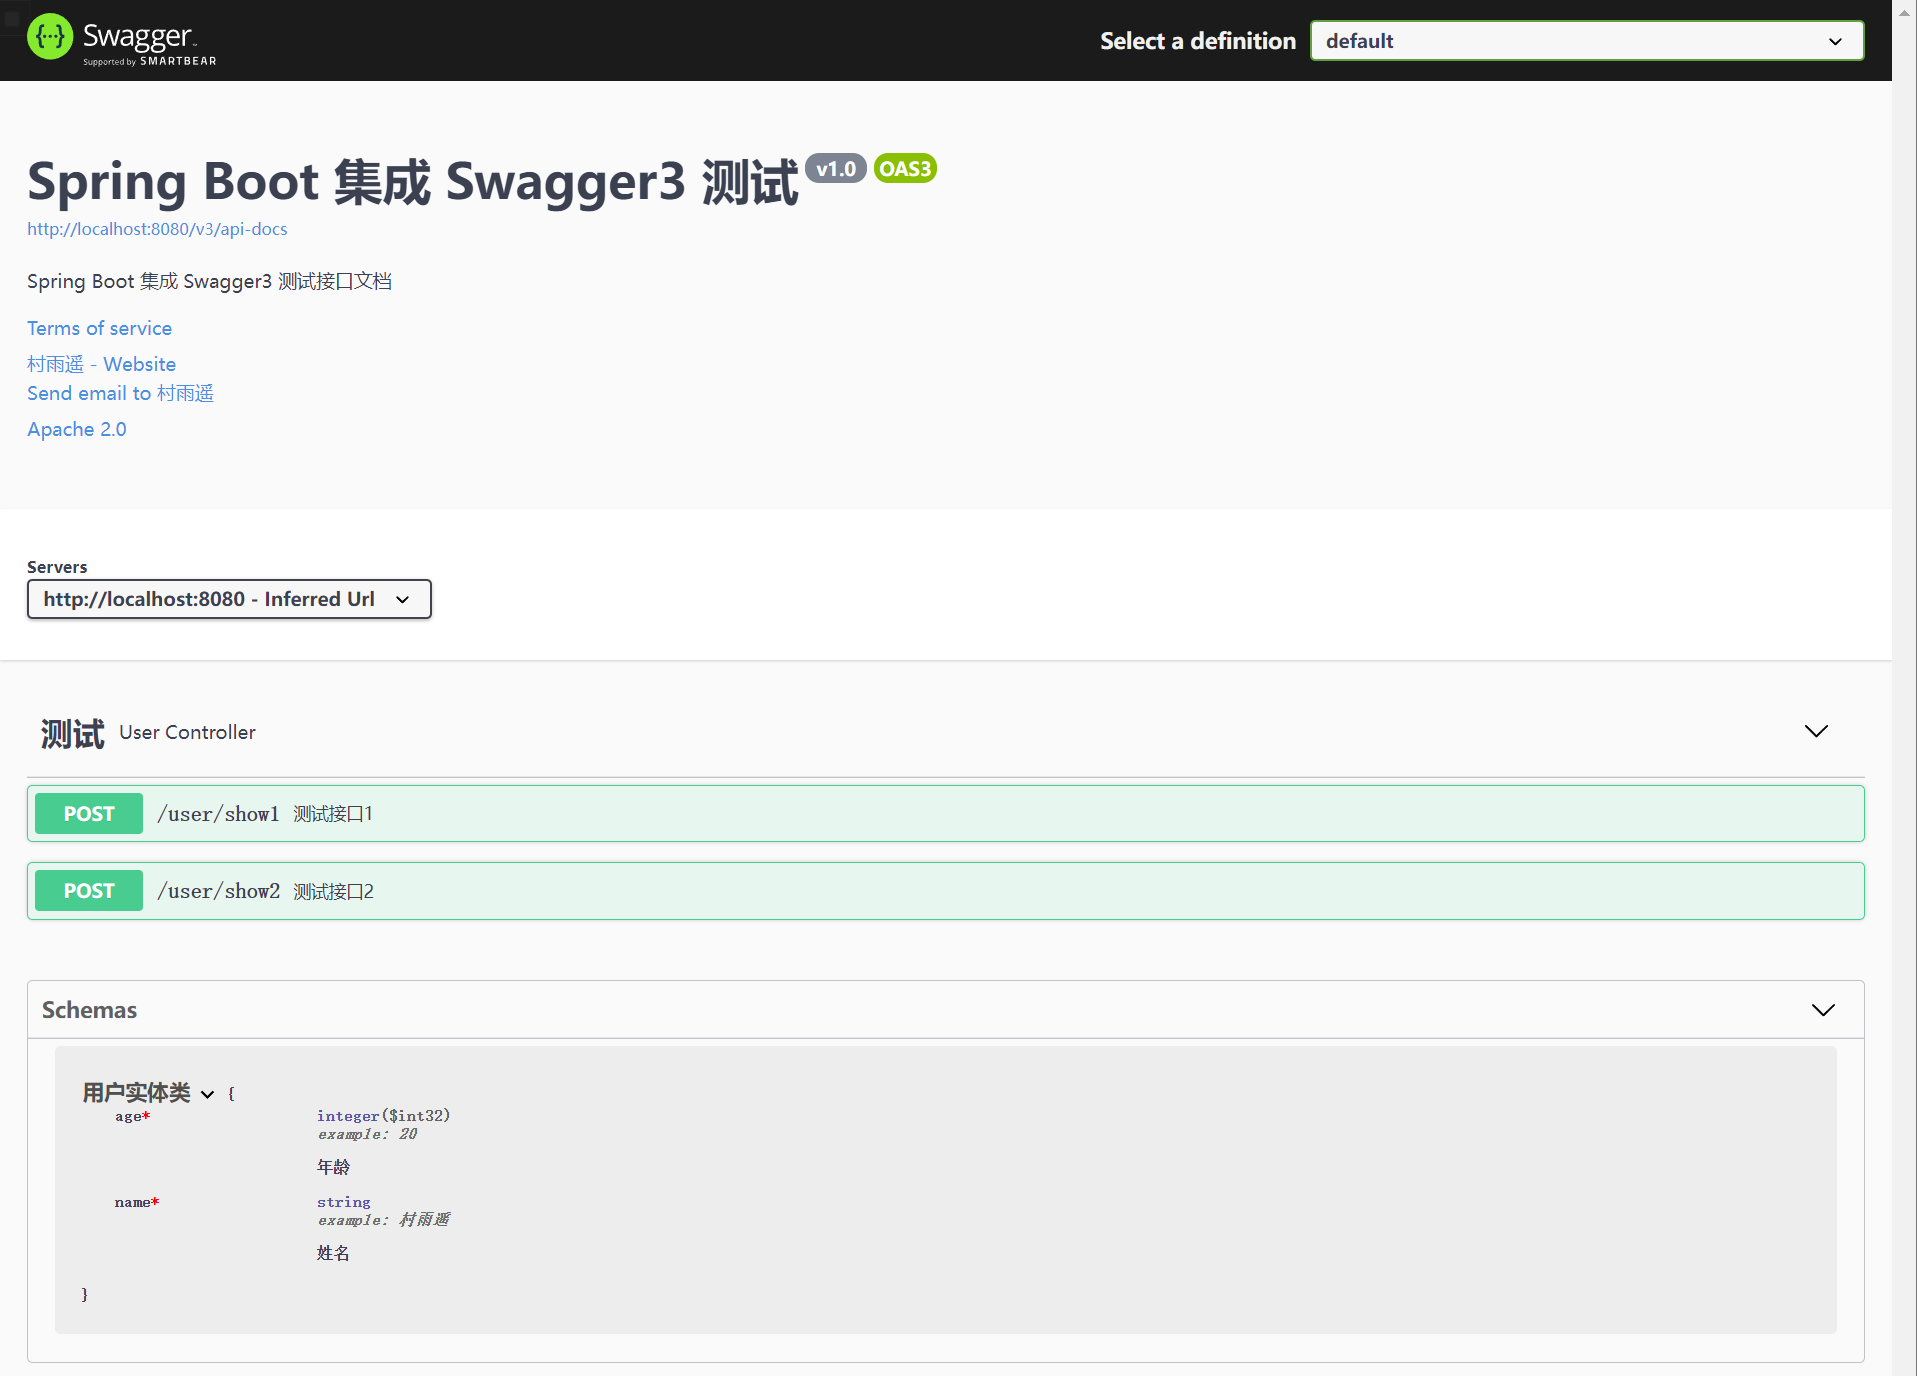
After accessing the above address, if the following interface appears, the integration of Swagger3 is successful.
It should also be noted that the interface access address in Swagger2 is:
http://localhost:8080/swagger-ui.html
Swagger2 and Swagger3 are different here. You must pay attention here. Otherwise, you may continue to put swagger2 interface access address in Swagger3 project, which is not applicable.
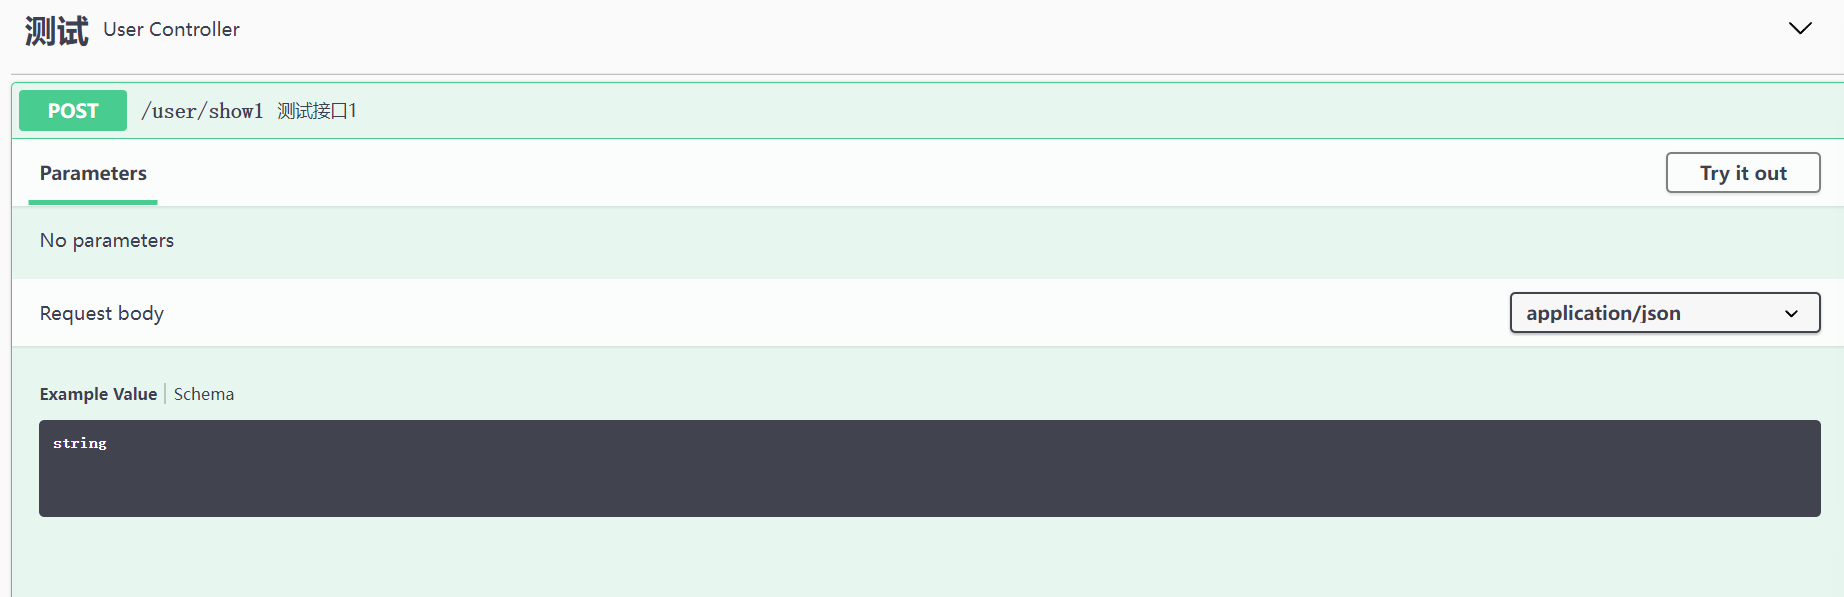
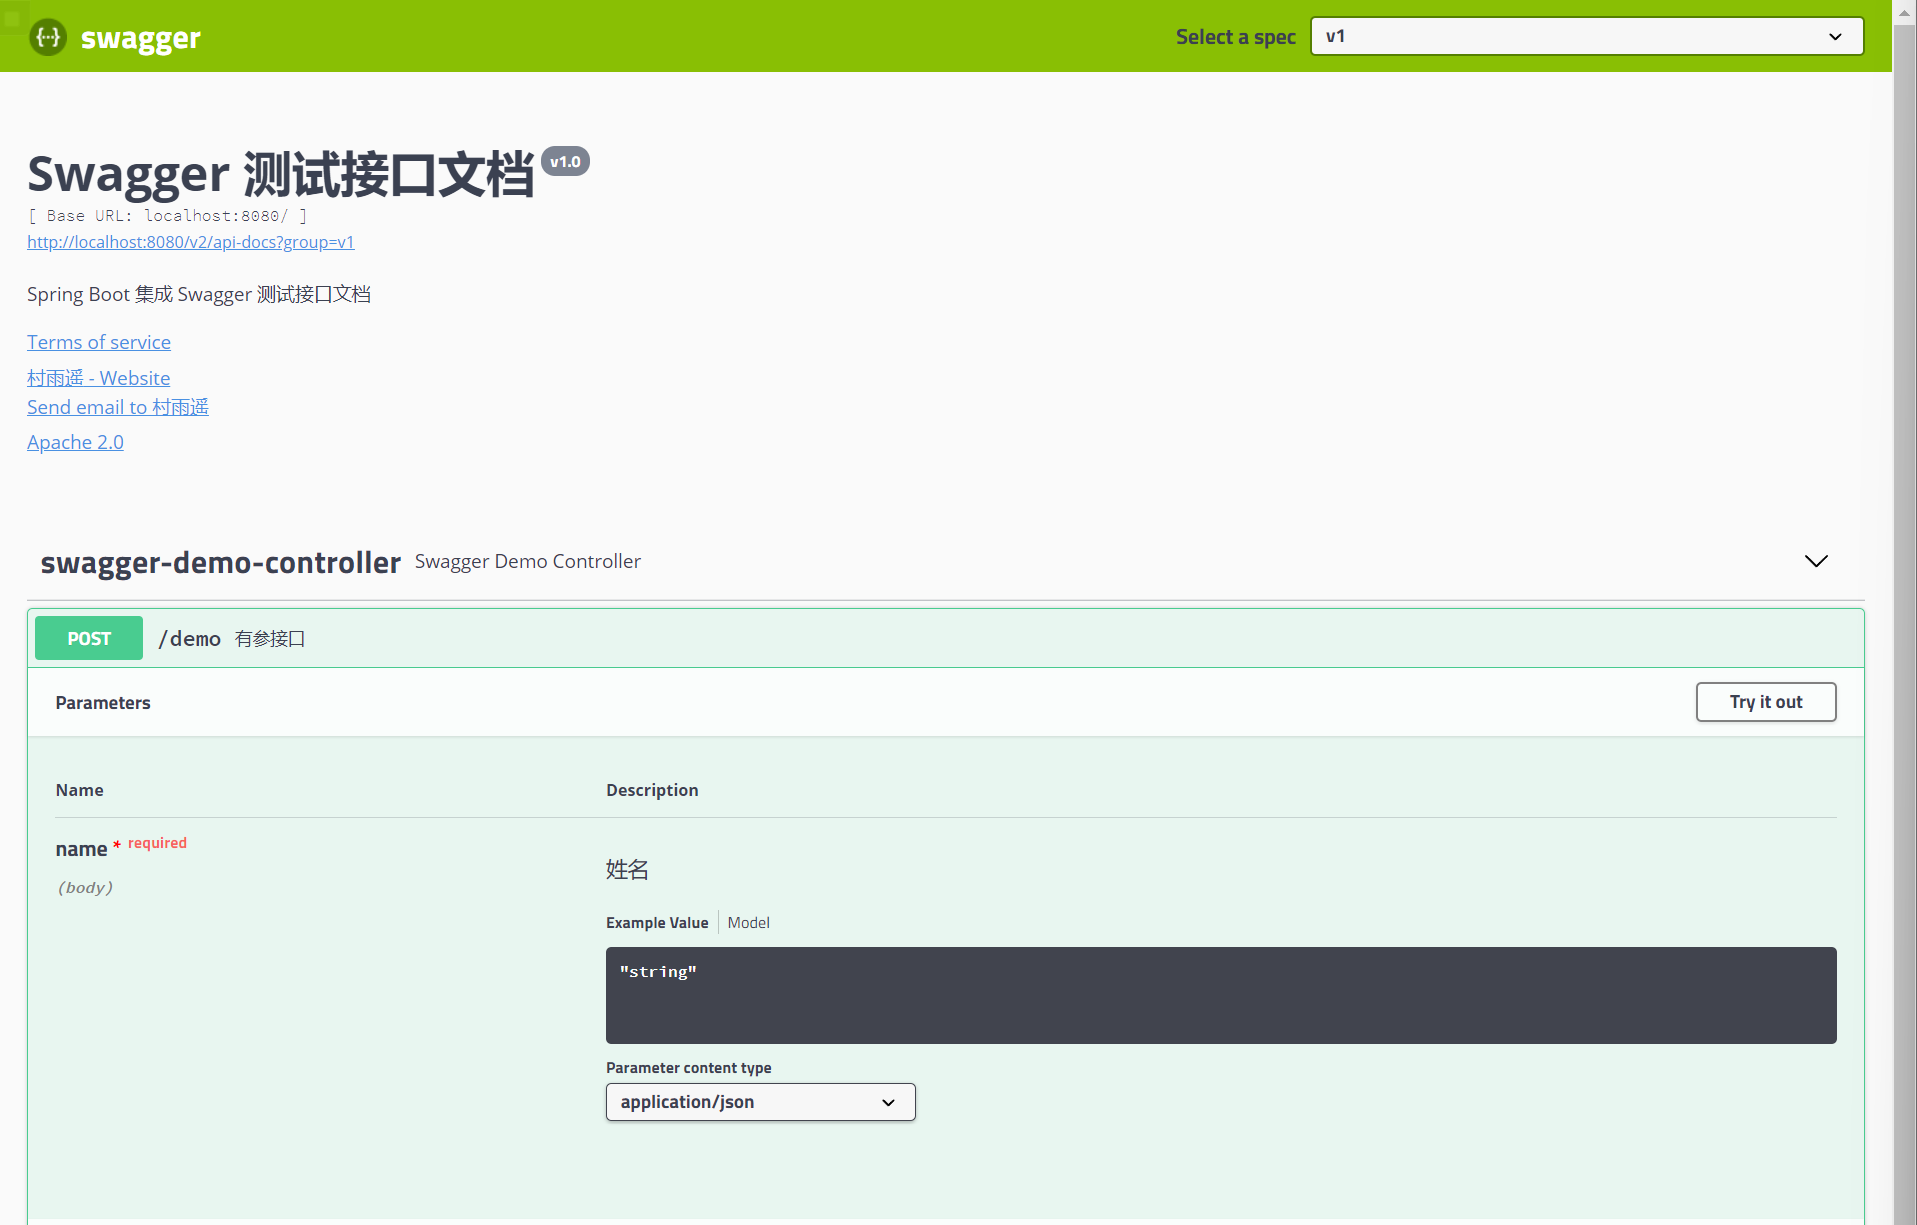
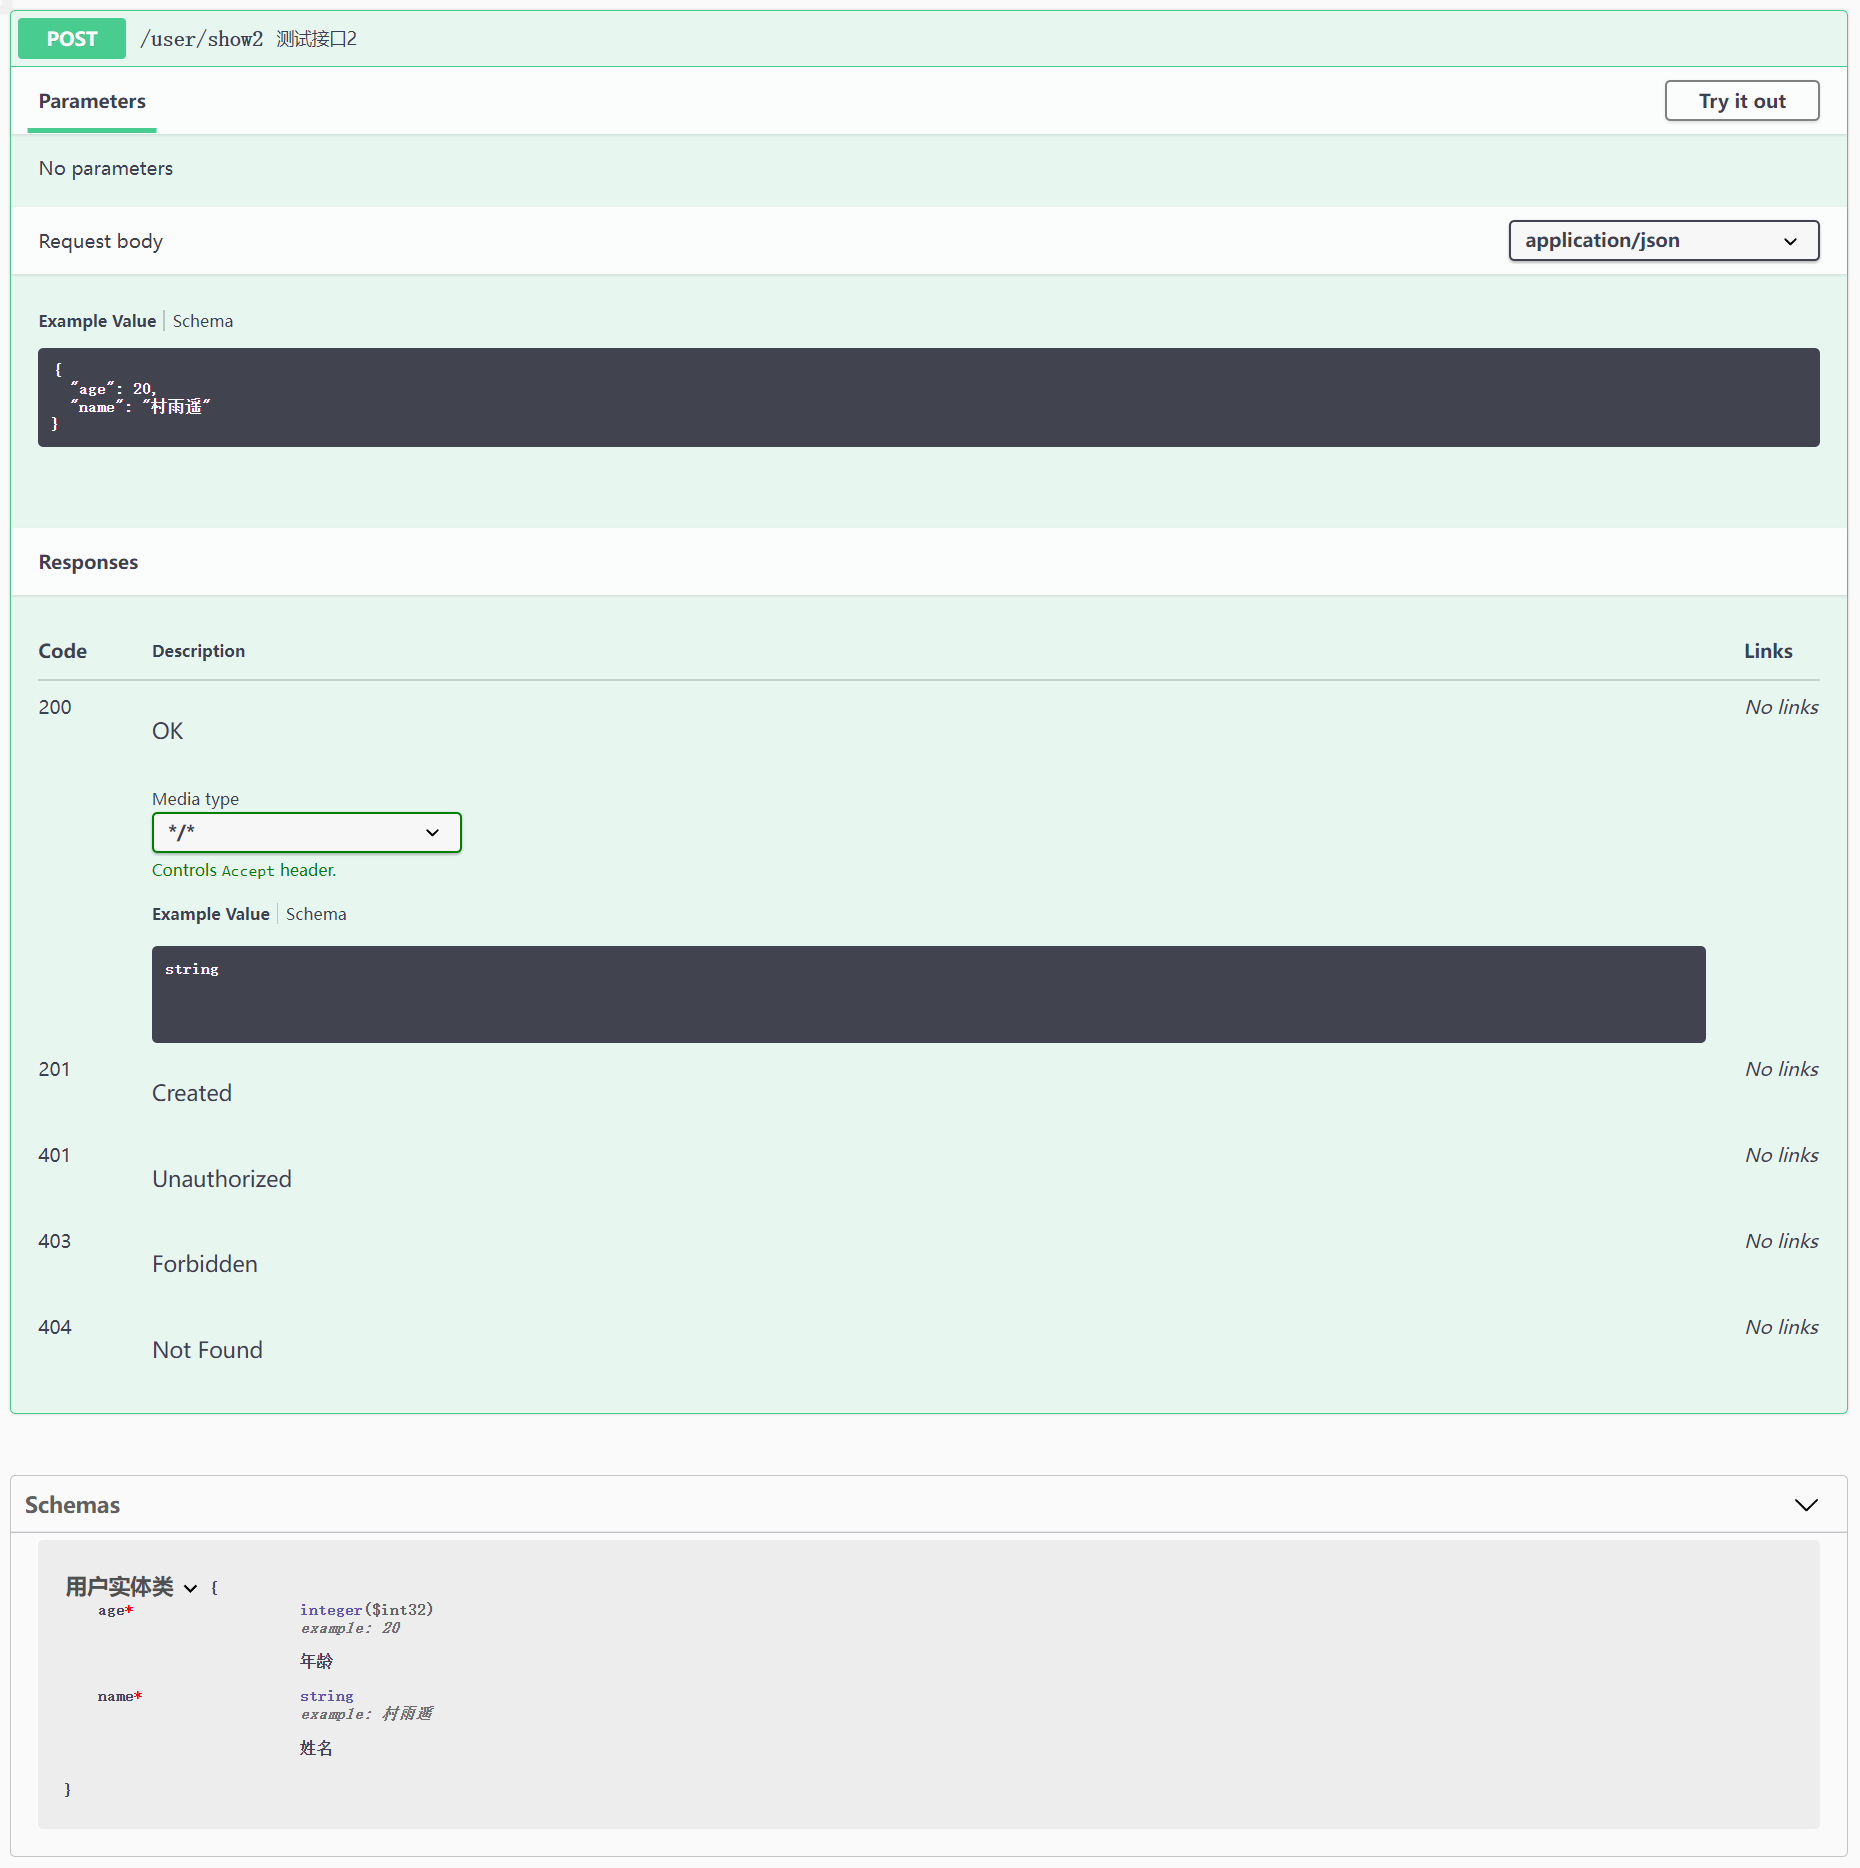
Click the specific interface. We compare the difference between Swagger3 and Swagger2 with the interface of direct parameter transmission. The first figure is in Swagger3 and the second figure is in Swagger2. It can be found here that we all pass a name attribute. The Parameters in our interface will be directly identified in Swagger2, but not in Swagger3. Note here.
- Interface code in Swagger2
@ApiOperation(value = "Parametric interface")
@PostMapping("demo")
public String demo(@ApiParam(value = "full name", required = true, example = "Village Yuyao") @RequestBody String name) {
    return "hello," + name;
}
- Interface code in Swagger3
@ApiOperation("Test interface 1")
@PostMapping("/show1")
public String show1(@ApiParam(value = "full name", required = true, example = "Village Yuyao") @RequestBody String name) {
    return "hello," + name + ",welcome to springboot swagger3!";
}
In addition, let's look at another interface in Swagger3. Here we pass a user object, which passes the default value we set in the interface. In the following figure, the first picture is a screenshot in Swagger3 and the second picture is a screenshot in Swagger2. Similarly, the Parameters in Swagger2 will be identified in the Parameters module, while Swagger3 will not.
It is also worth noting that if the part passed in Swagger is an object, Swagger2 will be identified in the Models part, while Swagger3 will become the Schemas part, which is a small change.

Finally, let's do the same test. The test method is the same as Swagger2. Click Try it out at the top right of the interface, and then edit the parameter value. After editing, click Execute at the bottom to view the interface call results.

Swagger2 VS Swagger3
Through the above steps, we have completed the example test of Spring Boot integration with Swagger3. Through comparison, we also summarized the differences between Swagger2 and Swagger3, mainly reflected in the following aspects:
- The required dependencies are different. Swagger2 needs to add two dependencies, while Swagger3 only needs to add one dependency;
- The annotation for enabling Swagger is different. I wonder if you have found that there is an annotation for enabling Swagger in both Swagger2 and Swagger3. The difference is that @ EnableSwagger2 is used in Swagger2 and @ enableopapi is used in Swagger3;
- The types of Docket files are different. It can be found that Swagger 2 uses Swagger in Swagger's configuration class_ 2. In Swagger3, OAS is used_ 3;
- The access address of Swagger UI is different. In Swagger2, if we want to access the document address, we need to access http://localhost:8080/swagger-ui.html, and in Swagger3, access http://localhost:8080/swagger-ui/index.html;
summary
The above is all the content of this article. It mainly introduces how to integrate Swagger3 with Spring Boot, and compares some differences between Swagger2 and Swagger3 in this process. Overall, the upgrade from Swagger2 to Swagger3 is relatively smooth. If you have mastered the use of Swagger2, it is easy to transition to Swagger3. Just pay attention to some of the main differences in the previous section. Other annotations used to describe the interface can still be used in the way of Swagger2. After all, Swagger3 is downward compatible with Swagger2.
Code example
Finally, I have uploaded the code of this article's example to GitCode, and the required partners can get it themselves:
🎉 Portal: https://gitcode.net/github_39655029/java-learning-demos
If you think this article is good, welcome Star's support. Your attention is the driving force for me to keep updating!