Spring Boot + Vue is developed separately from the front and back ends, and the front-end network request is encapsulated and configured
Ajax is the mainstream solution for front-end network access, and Vue is no exception. In vue2 Before 0, Vue resources and vue2.com were used for more network access After 0, the official does not recommend the use of Vue resources, and the maintenance of the project itself is stopped. At present, the recommended scheme is axios. Today, brother song will show you the use of axios.
axios introduction
The steps to use axios are very simple. First, introduce axios into the front-end project:
npm install axios -S
After it is installed, it can be used directly. However, generally, in the production environment, we need to encapsulate the network request.
Because there may be errors in network requests. Some of these errors are caused by code errors and some are business errors. No matter what kind of errors, developers need to deal with them, and we can't enumerate all kinds of errors every time we send a request.
Therefore, we need to encapsulate the front-end request. After the encapsulation is completed, the front-end errors will be handled uniformly. In this way, the developer only needs to handle the successful request at the place where the request is sent every time.
Request encapsulation
In axios, we can use the built-in interceptor of axios to realize the unified processing of errors.
In axios, there are both request interceptors and response interceptors.
Common request parameters can be uniformly added in the request interceptor, for example, token parameters can be uniformly added at the front end in single sign on.
The response interceptor can realize the unified processing of errors.
Another thing to note is that the error display needs to use a general method, which can not be bound to the page (for example, if the login fails, the error information is displayed behind the user name / password input box, which is not supported). It is recommended to use the Massage in the ElementUI to display the error information, which is a page independent component.
The packaged axios are as follows:
import axios from 'axios'
import {Message} from 'element-ui'
axios.interceptors.request.use(config => {
  return config;
}, err => {
  Message.error({message: 'request timeout!'});
})
axios.interceptors.response.use(data => {
  if (data.status && data.status == 200 && data.data.status == 500) {
    Message.error({message: data.data.msg});
    return;
  }
  if (data.data.msg) {
    Message.success({message: data.data.msg});
  }
  return data.data;
}, err => {
  if (err.response.status == 504 || err.response.status == 404) {
    Message.error({message: 'The server was eaten⊙﹏⊙∥'});
  } else if (err.response.status == 403) {
    Message.error({message: 'Insufficient permissions,Please contact the administrator!'});
  } else if (err.response.status == 401) {
    Message.error({message: err.response.data.msg});
  } else {
    if (err.response.data.msg) {
      Message.error({message: err.response.data.msg});
    }else{
      Message.error({message: 'unknown error!'});
    }
  }
})
Code interpretation:
- First, import axios and Massage components
- Next, define a request interceptor
- Finally, define a response interceptor. This interceptor has two parameters. The first parameter data represents the response of the server processing success, and the second err represents the response of the server processing failure. Compared with Ajax in jQuery, the first is equivalent to success callback and the second is equivalent to error callback.
- The data of the response represents the data returned by the server. The data format is {data: {status: 200, MSG '', obj: {}, status: 200}. Among them, the object in the data is the specific JSON returned by the server, the outer status represents the HTTP response code, and the inner status is the data returned in the custom RespBean
- First, judge that the HTTP response code is 200 and the status returned by the server is 500, indicating a business logic error. At this time, directly display the error Message through Message, and then return.
- If the field returned by the server contains MSG, the MSG will be displayed. This msg is generally a prompt of success.
- Finally, return data Data, that is, the data returned by the server. This data will eventually come to the place where the request is called.
- When the HTTP response code is greater than or equal to 400, enter err.
Method encapsulation
After the request encapsulation is completed, the method also needs to be encapsulated to facilitate Calling:
let base = '';
export const postRequest = (url, params) => {
  return axios({
    method: 'post',
    url: `${base}${url}`,
    data: params,
    headers: {
      'Content-Type': 'application/json'
    }
  });
}
export const putRequest = (url, params) => {
  return axios({
    method: 'put',
    url: `${base}${url}`,
    data: params,
    headers: {
      'Content-Type': 'application/json'
    }
  });
}
export const deleteRequest = (url) => {
  return axios({
    method: 'delete',
    url: `${base}${url}`
  });
}
export const getRequest = (url) => {
  return axios({
    method: 'get',
    url: `${base}${url}`
  });
}
In the front-end and back-end separation project, in most cases, the back-end interface is designed in a RESTful style, so the front-end mainly encapsulates the GET\POST\PUT\DELETE method, and then all request parameters are JSON.
Here, a base variable is defined at the beginning, which is the prefix of the request for later maintenance (if the request prefix needs to be modified uniformly).
Making Vue plug-ins
The encapsulated method can be used directly, but it is troublesome. Each time you use it, you need to introduce the method into the relevant vue file, as follows:
import {postRequest} from "../utils/api";
However, this operation method is too cumbersome, so we can consider further encapsulating the method into Vue plug-in, so that the method can be called directly without introducing a method in each Vue file.
Vue official reference document https://cn.vuejs.org/v2/guide/plugins.html , as follows:
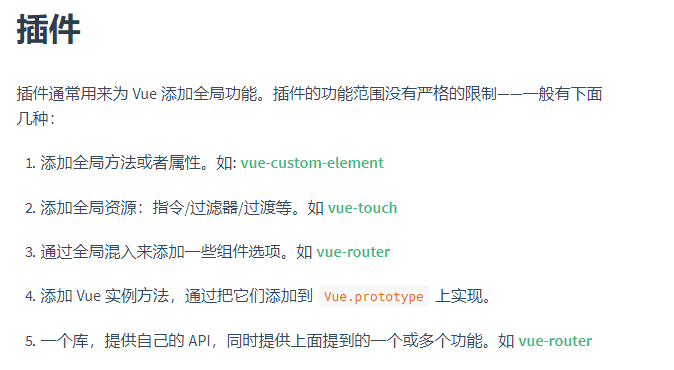
There are five official plug-in production methods, and we use the fourth scheme here.
The specific operation is in main JS, and then mount it to Vue On prototype, as follows:
import {postRequest} from "./utils/api";
import {putRequest} from "./utils/api";
import {deleteRequest} from "./utils/api";
import {getRequest} from "./utils/api";
Vue.prototype.getRequest = getRequest;
Vue.prototype.deleteRequest = deleteRequest;
Vue.prototype.putRequest = putRequest;
Vue.prototype.postRequest = postRequest;
After encapsulation, you can get the reference of the network request method directly through this in the vue file, as follows:
this.postRequest("/doLogin", this.user).then(msg=>{
  if (msg) {
    //Login successful, page Jump
  }
})
Note that the MSG in then is the MSG returned in the response interceptor. If there is no value for this msg, it indicates that the request failed (the failure has been processed in the interceptor). If there is a value, it indicates that the request was successful!
Configure request forwarding
In front end and back end separation, the front end and the back end run on different ports or addresses. If the front end sends a request directly to the back end, the request is cross domain.
However, when the project is deployed, the front end is packaged and compiled, copied to the Java project, and run together with the Java project. At this time, there is no cross domain problem.
Therefore, our solution here is not to solve the cross domain problem, but to realize the smooth sending of network requests by configuring the request forwarding of NodeJS.
The request is forwarded in the config / index. Of the vue project JS file:
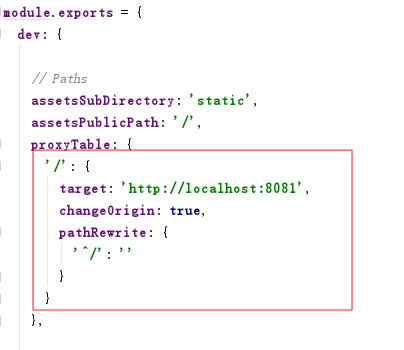
After adding the request forwarding configuration, you must restart the front-end project before it takes effect.
At this point, start the front-end project and you can send the network request smoothly.