The article is long, recommend, recommend forwarding, suggest collecting, suggest paying attention to the public account.
There are four authorization modes in OAuth 2, namely authorization code mode, implicit mode, resource owner password credentials and client credentials. For details, please refer to this chapter. (http://www.ruanyifeng.com/blog/2014/05/oauth_. HTML)
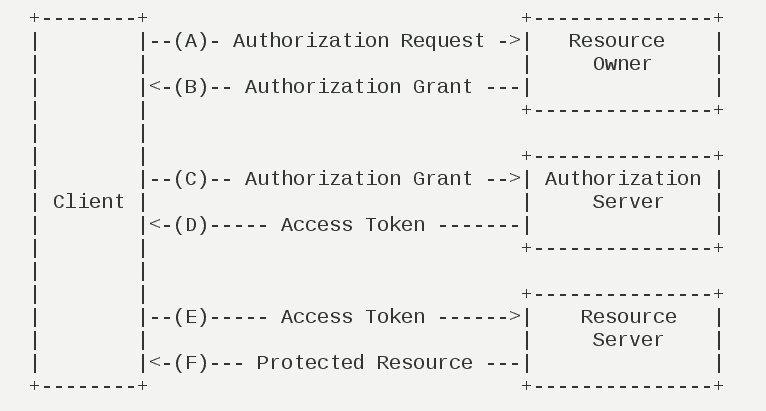
In this paper, we will use authorization code mode and password mode to achieve user authentication and authorization management.
OAuth2 is actually a network standard about authorization. It has developed the design idea and operation process. Using this standard, we can realize the authentication process of OAuth2 by ourselves. The Spring Cloud starter OAuth2 to be introduced today is actually a specific implementation of Spring Cloud according to OAuth2 standard and combined with spring security package.
When to use OAuth2
First of all, what you are most familiar with is what almost everyone has used, such as logging in with wechat, QQ, microblog, Google account, and github authorization. These are typical OAuth2 usage scenarios. Suppose we have built a service platform of our own. If we do not use OAuth2 login mode, we need users to complete the registration first, and then use the account password of the registration number or the mobile phone verification code to log in. After using OAuth2, it is believed that many people have used or even developed the public account web services and small programs. When we enter the web page and small program interface, we do not need to register for the first time. We can directly log in with wechat authorization, which greatly improves the efficiency of use. Because everyone has wechat, you can use the third-party service immediately with wechat. This experience is not too good. For our service, we do not need to store the password of the user, as long as we store the unique ID and user information returned by the authentication platform.
The above is to use the authorization code mode of OAuth2, and use the authority platform of the third party to realize the authentication of user identity. Of course, if there are many services in your company, you can specially extract a certification center, which will act as the role of the above-mentioned authoritative certification platform, and all services will be certified in this certification center.
In this way, I found that this is actually a single sign on function. This is another use scenario. For a multi service platform, you can use OAuth2 to implement single sign on of services. You can only log in once and walk through multiple services freely. Of course, it is only limited to services and interfaces within the scope of authorization.
Realize unified authentication function
This article first introduces the single sign on implemented by password mode, and then continues to talk about authorization code mode.
Today, when micro services are rampant, who dares to say that there are few micro services in his hands? Microservices reduce the coupling between services, but also increase the complexity of the system in some aspects, such as user authentication. Suppose we implement an e-commerce platform here. What users see is an APP or a web site, which is actually composed of multiple independent services, such as user services, order services, product services, etc. As long as the user enters the user name and password for the first time, after logging in, within a period of time, the user can access each page at will, such as product list page, my order page, my attention page, etc.
We can imagine, naturally, that when we request each service or interface, we must carry what credentials, and then each service will know which user is requesting the interface. Otherwise, there must be a problem. In fact, the credentials in this are simply a Token, a Token identifying the user's identity.
System architecture description
Authentication center: OAuth2 auth server. OAuth2 is the main implementation end. Token generation, refresh and verification are all completed in the authentication center.
Order service: oauth2 client order server, one of the microservices, will go to the certification center to verify after receiving the request.
User service: oauth2-client-user-server, the second microservice, after receiving the request, it will go to the authentication center to verify.
Client: such as APP, web and other terminals
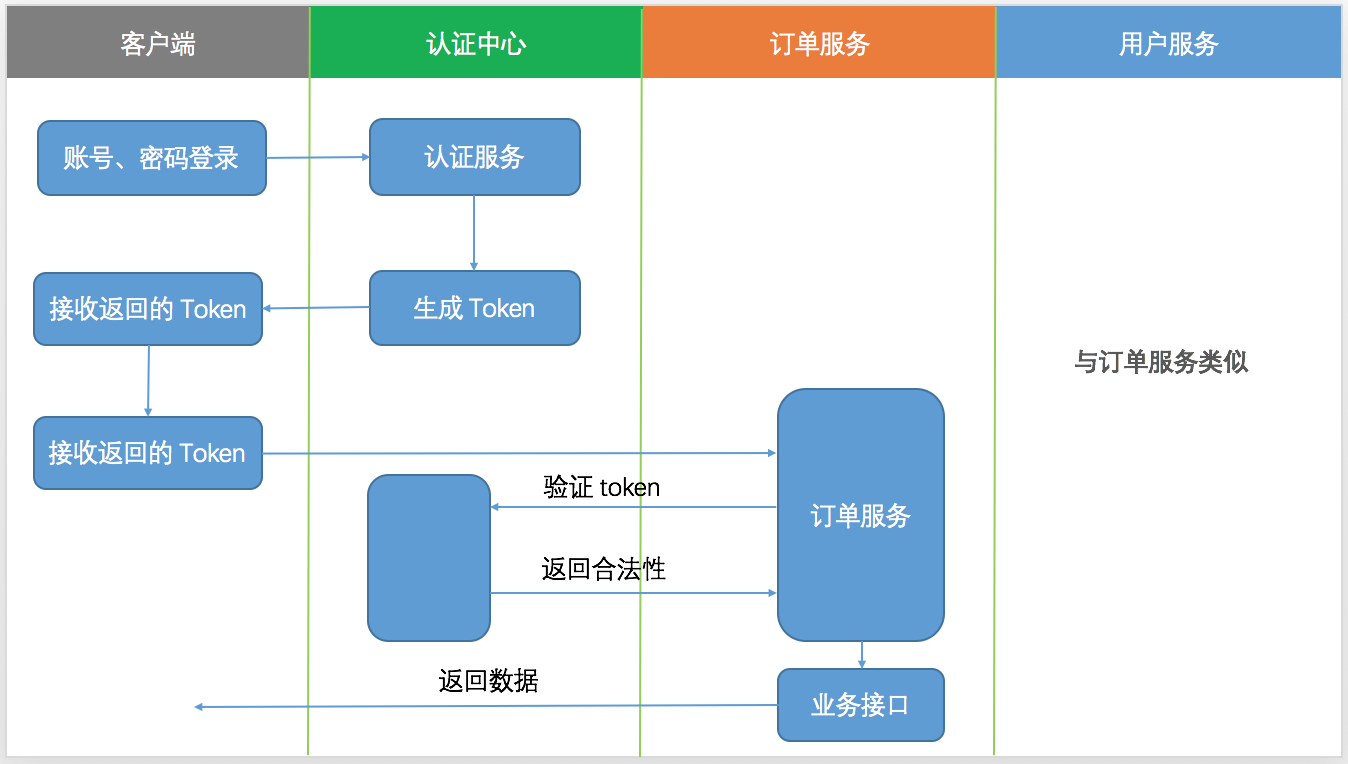
The figure above describes the request process between the client using OAuth2 and the microservice. The general process is that the client exchanges the user name and password to the authentication server for the token and returns it to the client. The client takes the token to each micro service request data interface. Generally, the token is put in the header. When the microservice receives the request, it first takes the token to authenticate the server to check the validity of the token. If it is legal, then it dynamically returns data according to the user's role and permission.
Create and configure authentication server
The most frequently configured is the authentication server. The work of authentication server is to verify account, password, store token, check token, refresh token, etc.
1. Introduce the required maven package
<dependency>
    <groupId>org.springframework.boot</groupId>
    <artifactId>spring-boot-starter-web</artifactId>
</dependency>
<dependency>
    <groupId>org.springframework.cloud</groupId>
    <artifactId>spring-cloud-starter-oauth2</artifactId>
</dependency>
<dependency>
    <groupId>org.springframework.boot</groupId>
    <artifactId>spring-boot-starter-data-redis</artifactId>
</dependency>
<dependency>
    <groupId>org.springframework.boot</groupId>
    <artifactId>spring-boot-starter-actuator</artifactId>
</dependency>
Spring cloud starter oauth2 includes spring cloud starter security, so it doesn't need to be introduced separately. The reason why the redis package is introduced is that we will introduce a way to store token s with redis.
2. Configure application.yml
Set the basic configuration of the project, and add the redis configuration, which will be used later.
spring:
  application:
    name: auth-server
  redis:
    database: 2
    host: localhost
    port: 32768
    password: 1qaz@WSX
    jedis:
      pool:
        max-active: 8
        max-idle: 8
        min-idle: 0
    timeout: 100ms

server:
  port: 6001

management:
  endpoint:
    health:
      enabled: true
3. Basic configuration of spring security
@EnableWebSecurity
public class WebSecurityConfig extends WebSecurityConfigurerAdapter {

    @Bean
    public PasswordEncoder passwordEncoder() {
        return new BCryptPasswordEncoder();
    }

    @Bean
    @Override
    public AuthenticationManager authenticationManagerBean() throws Exception {
        return super.authenticationManagerBean();
    }

    /**
     * Allow anonymous access to all interfaces, mainly oauth interface
     * @param http
     * @throws Exception
     */
    @Override
    protected void configure(HttpSecurity http) throws Exception {
        http.authorizeRequests()
                .antMatchers("/**").permitAll();
    }
}
Decorated with @ EnableWebSecurity annotation and inherited from websecurityconfigureadapter class.
The focus of this class is to declare two beans, PasswordEncoder and AuthenticationManager. It will be used later. BCryptPasswordEncoder is a password encryption tool class, which can implement irreversible encryption. Authentication manager is the authorization management Bean that must be specified to implement the password mode of OAuth2.
4. Implement UserDetailsService
If you have used Security before, you must be familiar with this class. It is a way to implement user authentication and the simplest and most convenient one. In addition, there is also a way of combining authentication provider. When you have the opportunity to talk about Security, let's talk about it.
The core of UserDetailsService is the loadUserByUsername method, which receives a string parameter, that is, the user name passed in, and returns a UserDetails object.
@Slf4j
@Component(value = "kiteUserDetailsService")
public class KiteUserDetailsService implements UserDetailsService {


    @Autowired
    private PasswordEncoder passwordEncoder;

    @Override
    public UserDetails loadUserByUsername(String username) throws UsernameNotFoundException {
        log.info("usernameis:" + username);
        // Query database operation
        if(!username.equals("admin")){
            throw new UsernameNotFoundException("the user is not found");
        }else{
            // User roles should also be obtained in the database
            String role = "ROLE_ADMIN";
            List<SimpleGrantedAuthority> authorities = new ArrayList<>();
            authorities.add(new SimpleGrantedAuthority(role));
            // Online environment should query database through user name to obtain encrypted password
            String password = passwordEncoder.encode("123456");
            return new org.springframework.security.core.userdetails.User(username,password, authorities);
        }
    }
}
In order to demonstrate, the user name, password and role are all written in the code. In the formal environment, the encrypted password and role should be found from the database or other places according to the user name. Account admin, password 123456, will be used later in exchange for token. And set the role of "role" for this user.
5. OAuth2 configuration file
Create a configuration file that inherits from the AuthorizationServerConfigurerAdapter.
@Configuration
@EnableAuthorizationServer
public class OAuth2Config extends AuthorizationServerConfigurerAdapter {

    @Autowired
    public PasswordEncoder passwordEncoder;

    @Autowired
    public UserDetailsService kiteUserDetailsService;

    @Autowired
    private AuthenticationManager authenticationManager;

    @Autowired
    private TokenStore redisTokenStore;

    @Override
    public void configure(final AuthorizationServerEndpointsConfigurer endpoints) throws Exception {
        /**
         * redis token mode
         */
        endpoints.authenticationManager(authenticationManager)
                .userDetailsService(kiteUserDetailsService)
                .tokenStore(redisTokenStore);

    }

    @Override
    public void configure(ClientDetailsServiceConfigurer clients) throws Exception {
        clients.inMemory()
                .withClient("order-client")
                .secret(passwordEncoder.encode("order-secret-8888"))
                .authorizedGrantTypes("refresh_token", "authorization_code", "password")
                .accessTokenValiditySeconds(3600)
                .scopes("all")
                .and()
                .withClient("user-client")
                .secret(passwordEncoder.encode("user-secret-8888"))
                .authorizedGrantTypes("refresh_token", "authorization_code", "password")
                .accessTokenValiditySeconds(3600)
                .scopes("all");
    }

    @Override
    public void configure(AuthorizationServerSecurityConfigurer security) throws Exception {
        security.allowFormAuthenticationForClients();
        security.checkTokenAccess("isAuthenticated()");
        security.tokenKeyAccess("isAuthenticated()");
    }
}
There are three overrides of the configure method.
Override of the AuthorizationServerEndpointsConfigurer parameter
endpoints.authenticationManager(authenticationManager)
                .userDetailsService(kiteUserDetailsService)
                .tokenStore(redisTokenStore);
authenticationManage() calls this method to support password mode.
userDetailsService() sets the user authentication service.
tokenStore() specifies how the token is stored.
redisTokenStore Bean is defined as follows:
@Configuration
public class RedisTokenStoreConfig {

    @Autowired
    private RedisConnectionFactory redisConnectionFactory;

    @Bean
    public TokenStore redisTokenStore (){
        return new RedisTokenStore(redisConnectionFactory);
    }
}
Override of the ClientDetailsServiceConfigurer parameter, where the constraints of each end are defined. Include
Client ID, client secret: these two parameters correspond to the cleint ID and client secret defined by the requester.
Authorized grant types can include one or more of the following settings:
- Authorization code: authorization code type.
- Implicit: implicit authorization type.
- Password: resource owner (i.e. user) password type.
- Client "credentials: client credentials (client ID and Key) type.
- refresh_token: obtain a new token through the refresh token obtained by the above authorization.
accessTokenValiditySeconds: the validity of the token
scopes: used to restrict the access rights of the client. When exchanging tokens, the scope parameter will be brought. Only those within the scope definition can the tokens be exchanged normally.
In the above code, inMemory is used to store the configuration in memory, which is equivalent to hard coding. In the formal environment, it is persisted to the database, such as mysql.
The specific methods are as follows:
- Add tables to the database and insert data
create table oauth_client_details (
    client_id VARCHAR(256) PRIMARY KEY,
    resource_ids VARCHAR(256),
    client_secret VARCHAR(256),
    scope VARCHAR(256),
    authorized_grant_types VARCHAR(256),
    web_server_redirect_uri VARCHAR(256),
    authorities VARCHAR(256),
    access_token_validity INTEGER,
    refresh_token_validity INTEGER,
    additional_information VARCHAR(4096),
    autoapprove VARCHAR(256)
);
INSERT INTO oauth_client_details
    (client_id, client_secret, scope, authorized_grant_types,
    web_server_redirect_uri, authorities, access_token_validity,
    refresh_token_validity, additional_information, autoapprove)
VALUES
    ('user-client', '$2a$10$o2l5kA7z.Caekp72h5kU7uqdTDrlamLq.57M1F6ulJln9tRtOJufq', 'all',
    'authorization_code,refresh_token,password', null, null, 3600, 36000, null, true);

INSERT INTO oauth_client_details
    (client_id, client_secret, scope, authorized_grant_types,
    web_server_redirect_uri, authorities, access_token_validity,
    refresh_token_validity, additional_information, autoapprove)
VALUES
    ('order-client', '$2a$10$GoIOhjqFKVyrabUNcie8d.ADX.qZSxpYbO6YK4L2gsNzlCIxEUDlW', 'all',
    'authorization_code,refresh_token,password', null, null, 3600, 36000, null, true);
Note: the client "secret" field cannot be the original value of secret directly. It needs to be encrypted. Because BCryptPasswordEncoder is used, the final inserted value should be the value after BCryptPasswordEncoder.encode().
- Then add the configuration about the database in the configuration file application.yml
spring:
  datasource:
    url: jdbc:mysql://localhost:3306/spring_cloud?characterEncoding=UTF-8&useSSL=false
    username: root
    password: password
    hikari:
      connection-timeout: 30000
      idle-timeout: 600000
      max-lifetime: 1800000
      maximum-pool-size: 9
After Spring Boot 2.0, hikari is used as the database connection pool by default. If you use other connection pools, you need to introduce related packages, and then increase the configuration accordingly.
- Add DataSource injection to oauth2config
@Autowired
private DataSource dataSource;
- Modify the rewrite method of public void configure(ClientDetailsServiceConfigurer clients) as follows:
@Override
public void configure(ClientDetailsServiceConfigurer clients) throws Exception {
    JdbcClientDetailsServiceBuilder jcsb = clients.jdbc(dataSource);
    jcsb.passwordEncoder(passwordEncoder);
}
There is also an overriding method, public void configure(AuthorizationServerSecurityConfigurer security), which restricts the client's access to the authentication interface.
security.allowFormAuthenticationForClients();
security.checkTokenAccess("isAuthenticated()");
security.tokenKeyAccess("isAuthenticated()");
The first line of code is to allow the client to access the OAuth2 authorization interface, otherwise the request token will return 401.
The second and third lines allow authorized users to access the checkToken interface and get the token interface, respectively.
After completion, start the project. If you use IDEA, you will see the relevant RESTful interface of oauth2 in the Mapping window below.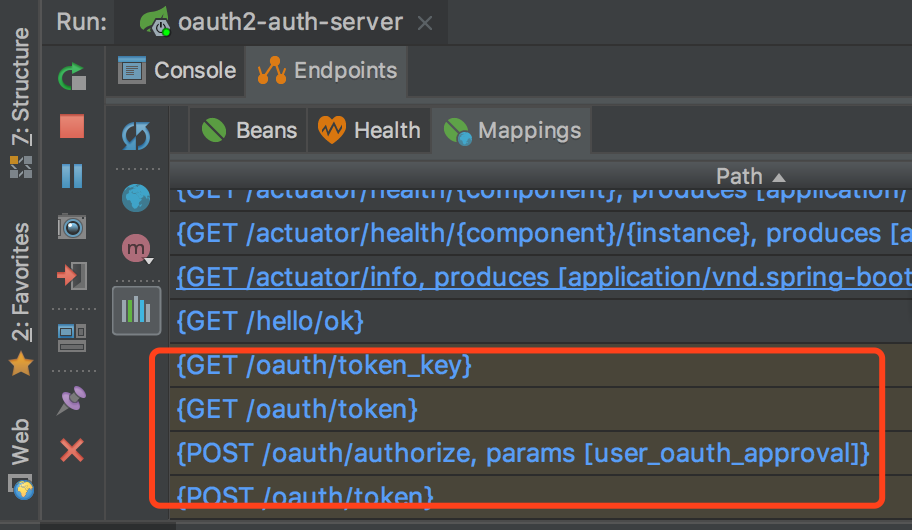
There are mainly the following:
POST /oauth/authorize authorization code mode authentication authorization interface
 GET/POST /oauth/token get token interface
 Post / OAuth / check_token check token validity interface
Create user client project
The above creation completes the authentication server, and the next start to create a client, corresponding to the business-related micro services in our system. We assume that this microservice project is to manage user related data, so it is called user client.
1. Reference related maven packages
<dependency>
    <groupId>org.springframework.boot</groupId>
    <artifactId>spring-boot-starter-web</artifactId>
</dependency>
<dependency>
    <groupId>org.springframework.cloud</groupId>
    <artifactId>spring-cloud-starter-oauth2</artifactId>
</dependency>
<dependency>
    <groupId>org.springframework.boot</groupId>
    <artifactId>spring-boot-starter-data-redis</artifactId>
</dependency>
2. application.yml configuration file
spring:
  application:
    name: client-user
  redis:
    database: 2
    host: localhost
    port: 32768
    password: 1qaz@WSX
    jedis:
      pool:
        max-active: 8
        max-idle: 8
        min-idle: 0
    timeout: 100ms
server:
  port: 6101
  servlet:
    context-path: /client-user

security:
  oauth2:
    client:
      client-id: user-client
      client-secret: user-secret-8888
      user-authorization-uri: http://localhost:6001/oauth/authorize
      access-token-uri: http://localhost:6001/oauth/token
    resource:
      id: user-client
      user-info-uri: user-info
    authorization:
      check-token-access: http://localhost:6001/oauth/check_token
The above is the general configuration information and redis configuration, focusing on the following security configuration. If you don't pay attention to the configuration, 401 or other problems will occur.
The client ID and client secret should be consistent with the configuration in the authentication service. If the inMemory or jdbc mode is used.
User authorization URI is required by the authorization code authentication method, which will be discussed in the next article.
Access token URI is the interface to get token needed by password mode.
authorization.check-token-access is also the key information. When the server receives the request from the client, it needs to take the token in the request to the authentication server for token verification, which is the interface of the request.
3. Resource configuration file
In the concept of OAuth2, all interfaces are called resources, and the permission of the interface is also the permission of resources. Therefore, Spring Security OAuth2 provides the annotation @ EnableResourceServer about resources, which is similar to @ EnableWebSecurity.
@Configuration
@EnableResourceServer
@EnableGlobalMethodSecurity(prePostEnabled = true)
public class ResourceServerConfig extends ResourceServerConfigurerAdapter {

    @Value("${security.oauth2.client.client-id}")
    private String clientId;

    @Value("${security.oauth2.client.client-secret}")
    private String secret;

    @Value("${security.oauth2.authorization.check-token-access}")
    private String checkTokenEndpointUrl;

    @Autowired
    private RedisConnectionFactory redisConnectionFactory;

    @Bean
    public TokenStore redisTokenStore (){
        return new RedisTokenStore(redisConnectionFactory);
    }

    @Bean
    public RemoteTokenServices tokenService() {
        RemoteTokenServices tokenService = new RemoteTokenServices();
        tokenService.setClientId(clientId);
        tokenService.setClientSecret(secret);
        tokenService.setCheckTokenEndpointUrl(checkTokenEndpointUrl);
        return tokenService;
    }

    @Override
    public void configure(ResourceServerSecurityConfigurer resources) throws Exception {
        resources.tokenServices(tokenService());
    }
}
Because redis is used as the token storage, you need to specially configure a Bean called tokenService to verify the token.
4. Finally, add a RESTful interface
@Slf4j
@RestController
public class UserController {

    @GetMapping(value = "get")
    //@PreAuthorize("hasAuthority('ROLE_ADMIN')")
    @PreAuthorize("hasAnyRole('ROLE_ADMIN')")
    public Object get(Authentication authentication){
        //Authentication authentication = SecurityContextHolder.getContext().getAuthentication();
        authentication.getCredentials();
        OAuth2AuthenticationDetails details = (OAuth2AuthenticationDetails)authentication.getDetails();
        String token = details.getTokenValue();
        return token;
    }
}
A RESTful method can only be accessed when the access user has the role admin permission, otherwise, 401 is not authorized.
Through the Authentication parameter or SecurityContextHolder.getContext().getAuthentication(), you can get the authorization information to view.
Test certification function
1. Start the authentication server with the start port of 6001.
2. Start the user service client, and the start port is 6101.
3. Request authentication server to obtain token
I use REST Client to make access request. The request format is as follows:
POST http://localhost:6001/oauth/token?grant_type=password&username=admin&password=123456&scope=all
Accept: */*
Cache-Control: no-cache
Authorization: Basic dXNlci1jbGllbnQ6dXNlci1zZWNyZXQtODg4OA==
Suppose we use it on a web side, grant'u type is password, indicating that this is the password mode of OAuth2.
username=admin and password=123456 are equivalent to the user name and password entered in the web login interface. We have fixed the user name as admin and password as 123456 in the authentication server configuration, and the online environment should be obtained by querying the database.
scope=all is permission related. The scope is specified as all in OAuthConfig of the authentication service.
Authorization should be added to the request header in the form of Basic space Base64 (client ID: client secret). The client ID of this microservice client is user client, and the client secret is user-secret-8888. Connect these two values with a colon, and the value after Base64 encoding (user client: user-secret-8888) is dxnlci1jbgllbnq6dxnlci1zwnyzqtodg4oa = =, you can use HT to Tps://www.sojson.com/base64.html is obtained by online encoding.

After running the request, if the parameters are correct, the returned content is as follows, which is a json format
{
  "access_token": "9f958300-5005-46ea-9061-323c9e6c7a4d",
  "token_type": "bearer",
  "refresh_token": "0f5871f5-98f1-405e-848e-80f641bab72e",
  "expires_in": 3599,
  "scope": "all"
}
access_token: it is the token that the request needs to bring later, and it is also the main purpose of this request
token_type: it is a bear, which is the most commonly used form of access token
refresh_token: you can use this value in exchange for a new token instead of entering the account password.
Expires in: token's expiration time (seconds)
4. Use the obtained token to request the resource interface
We have defined an interface http://localhost:6101/client-user/get in the user client. Now, take the token obtained in the previous step to request this interface.
GET http://localhost:6101/client-user/get
Accept: */*
Cache-Control: no-cache
Authorization: bearer ce334918-e666-455a-8ecd-8bd680415d84
The request header Authorization is also required in the format of Bear + space + token. Under normal circumstances, the token will be returned as is according to the logic of the interface.
5. After the token expires, exchange the refresh_token for the access_token
Generally, the expiration time of access UU token is set to be less than the expiration time of refresh UU token, so that after the expiration of access UU token, a new access UU token can be obtained without the user logging in again.
### Exchange for access Ou token
POST http://localhost:6001/oauth/token?grant_type=refresh_token&refresh_token=706dac10-d48e-4795-8379-efe8307a2282
Accept: */*
Cache-Control: no-cache
Authorization: Basic dXNlci1jbGllbnQ6dXNlci1zZWNyZXQtODg4OA==
Grant'type is set to refresh'token.
Refresh'token is set to the value of the refresh'token returned when the token is requested.
Authorization is added to the request header in the format of Basic + space + Base64 (client ID: client secret)
After the request is successful, it will return the same data format as the request token.
Replace redisToken with JWT
The above token storage uses the redis scheme. Spring Security OAuth2 also provides jdbc and JWT support. jdbc is not considered for the moment. Now we will introduce the JWT method to realize token storage.
With JWT, you don't need to store the token to the server. JWT has its own special encryption method, which can effectively prevent data from being tampered. As long as you don't put the user password and other key information into JWT, you can ensure the security.
Transformation of authentication server
First, remove the configuration of redis.
Add JwtConfig configuration class
@Configuration
public class JwtTokenConfig {

    @Bean
    public TokenStore jwtTokenStore() {
        return new JwtTokenStore(jwtAccessTokenConverter());
    }

    @Bean
    public JwtAccessTokenConverter jwtAccessTokenConverter() {
        JwtAccessTokenConverter accessTokenConverter = new JwtAccessTokenConverter();
        accessTokenConverter.setSigningKey("dev");
        return accessTokenConverter;
    }
}
JwtAccessTokenConverter is used for JWT data conversion, because JWT has its own unique data format. If you don't know about JWT, you can search for it first.
Change OAuthConfig configuration class
@Autowired
private TokenStore jwtTokenStore;

@Autowired
private JwtAccessTokenConverter jwtAccessTokenConverter;

@Override
public void configure(final AuthorizationServerEndpointsConfigurer endpoints) throws Exception {
        /**
         * Normal jwt mode
         */
         endpoints.tokenStore(jwtTokenStore)
                .accessTokenConverter(jwtAccessTokenConverter)
                .userDetailsService(kiteUserDetailsService)
                /**
                 * Support password mode
                 */
                .authenticationManager(authenticationManager);
}
Inject JWT related beans, and modify the configure (final authorization server endpoints configurer endpoints) method to JWT storage mode.
Transform user client
Modify the application.yml configuration file
security:
  oauth2:
    client:
      client-id: user-client
      client-secret: user-secret-8888
      user-authorization-uri: http://localhost:6001/oauth/authorize
      access-token-uri: http://localhost:6001/oauth/token
    resource:
      jwt:
        key-uri: http://localhost:6001/oauth/token_key
        key-value: dev
Note that the SigningKey set by the authentication server JwtAccessTokenConverter should be the same as the key value in the configuration file, otherwise JWT cannot be decoded normally, resulting in authentication failure.
Configuration of ResourceServerConfig class
@Configuration
@EnableResourceServer
@EnableGlobalMethodSecurity(prePostEnabled = true)
public class ResourceServerConfig extends ResourceServerConfigurerAdapter {
    @Bean
    public TokenStore jwtTokenStore() {
        return new JwtTokenStore(jwtAccessTokenConverter());
    }

    @Bean
    public JwtAccessTokenConverter jwtAccessTokenConverter() {
        JwtAccessTokenConverter accessTokenConverter = new JwtAccessTokenConverter();

        accessTokenConverter.setSigningKey("dev");
        accessTokenConverter.setVerifierKey("dev");
        return accessTokenConverter;
    }

    @Autowired
    private TokenStore jwtTokenStore;

    @Override
    public void configure(ResourceServerSecurityConfigurer resources) throws Exception {
        resources.tokenStore(jwtTokenStore);
    }
}
Run request for token interface
POST http://localhost:6001/oauth/token?grant_type=password&username=admin&password=123456&scope=all
Accept: */*
Cache-Control: no-cache
Authorization: Basic dXNlci1jbGllbnQ6dXNlci1zZWNyZXQtODg4OA==
The results are as follows:
{
  "access_token": "eyJhbGciOiJIUzI1NiIsInR5cCI6IkpXVCJ9.eyJleHAiOjE1NzE3NDM0OTQsInVzZXJfbmFtZSI6ImFkbWluIiwiYXV0aG9yaXRpZXMiOlsiUk9MRV9BRE1JTiJdLCJqdGkiOiI4Y2NhMjlhZi1lYTc3LTRmZTYtOWZlMS0zMjc0MTVkY2QyMWQiLCJjbGllbnRfaWQiOiJ1c2VyLWNsaWVudCIsInNjb3BlIjpbImFsbCJdfQ.0Ik3UwB1xjX2le5luEdtVAI_MEyu_OloRRYtPOvtvwM",
  "token_type": "bearer",
  "refresh_token": "eyJhbGciOiJIUzI1NiIsInR5cCI6IkpXVCJ9.eyJ1c2VyX25hbWUiOiJhZG1pbiIsInNjb3BlIjpbImFsbCJdLCJhdGkiOiI4Y2NhMjlhZi1lYTc3LTRmZTYtOWZlMS0zMjc0MTVkY2QyMWQiLCJleHAiOjE1NzE3NzU4OTQsImF1dGhvcml0aWVzIjpbIlJPTEVfQURNSU4iXSwianRpIjoiZjdkMjg4NDUtMmU2ZC00ZmRjLTg1OGYtMWNiY2RlNzI1ZmMyIiwiY2xpZW50X2lkIjoidXNlci1jbGllbnQifQ.vk_msYtbrAr93h5sK4wy6EC2_wRD_cD_UBS8O6eRziw",
  "expires_in": 3599,
  "scope": "all",
  "jti": "8cca29af-ea77-4fe6-9fe1-327415dcd21d"
}
We have seen that the returned token is in JWT format. Go to JWT online decoding website. https://jwt.io/ perhaps http://jwt.calebb.net/ Decoding the token
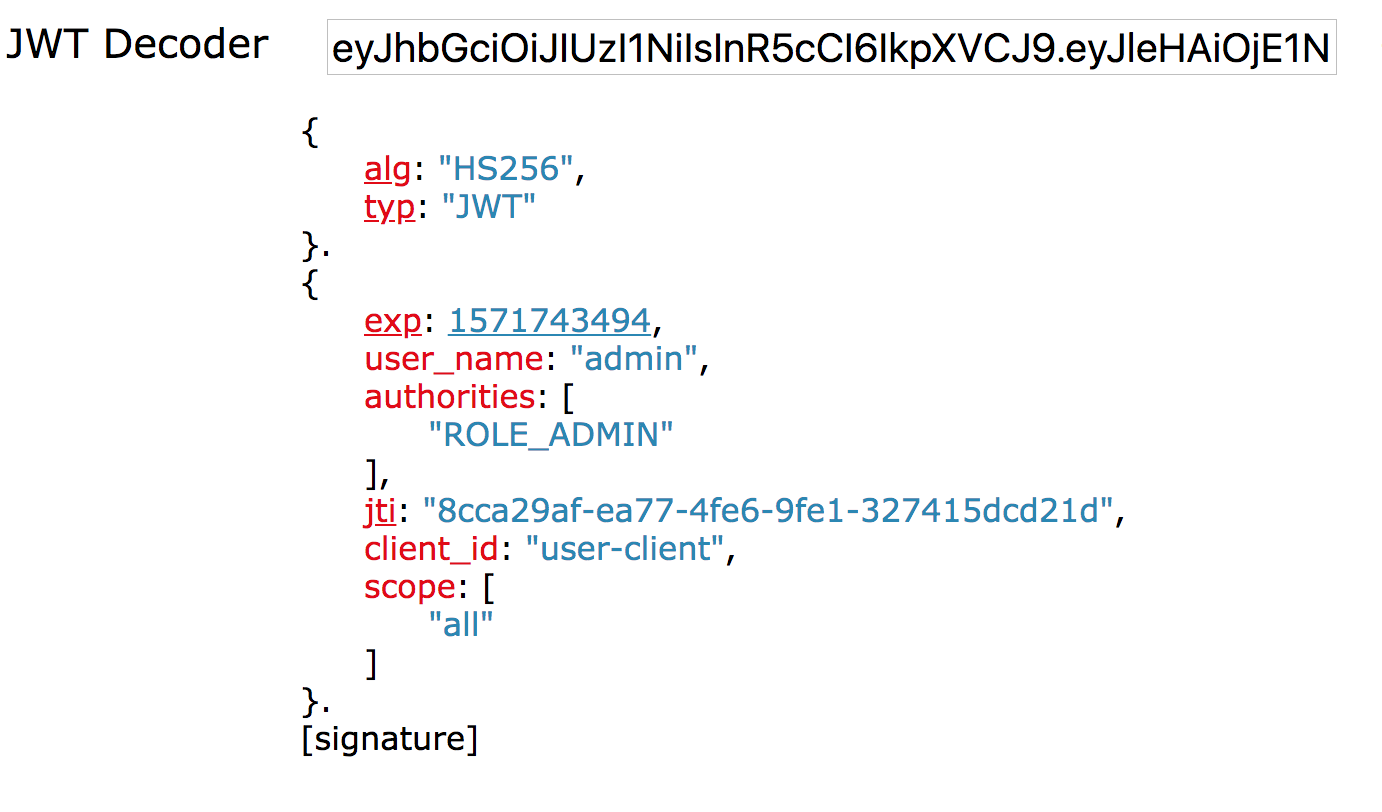
Have you seen that user name, client ID and other information are all in it?
Request the user client interface with the returned token
GET http://localhost:6101/client-user/get
Accept: */*
Cache-Control: no-cache
Authorization: bearer eyJhbGciOiJIUzI1NiIsInR5cCI6IkpXVCJ9.eyJleHAiOjE1NzE3NDM0OTQsInVzZXJfbmFtZSI6ImFkbWluIiwiYXV0aG9yaXRpZXMiOlsiUk9MRV9BRE1JTiJdLCJqdGkiOiI4Y2NhMjlhZi1lYTc3LTRmZTYtOWZlMS0zMjc0MTVkY2QyMWQiLCJjbGllbnRfaWQiOiJ1c2VyLWNsaWVudCIsInNjb3BlIjpbImFsbCJdfQ.0Ik3UwB1xjX2le5luEdtVAI_MEyu_OloRRYtPOvtvwM
Enhanced JWT
What if I want to add additional fields (such as other user information) to JWT, of course. spring security oauth2 provides TokenEnhancer enhancer. In fact, not only JWT, but also RedisToken.
Declare an enhancer
public class JWTokenEnhancer implements TokenEnhancer {

    @Override
    public OAuth2AccessToken enhance(OAuth2AccessToken oAuth2AccessToken, OAuth2Authentication oAuth2Authentication) {
        Map<String, Object> info = new HashMap<>();
        info.put("jwt-ext", "JWT Extended information");
        ((DefaultOAuth2AccessToken) oAuth2AccessToken).setAdditionalInformation(info);
        return oAuth2AccessToken;
    }
}
Through oauthentication, we can get the user name and other information, through which we can query the database or cache to get more information, which can be added as JWT extension information.
OAuthConfig configuration class modification
Injection intensifier
@Autowired
private TokenEnhancer jwtTokenEnhancer;

@Bean
public TokenEnhancer jwtTokenEnhancer(){
    return new JWTokenEnhancer();
}
Modify the configure (final authorizationserverendpoints configurer endpoints) method
@Override
public void configure( final AuthorizationServerEndpointsConfigurer endpoints ) throws Exception{
    /**
     * jwt Enhancement mode
     */
    TokenEnhancerChain  enhancerChain   = new TokenEnhancerChain();
    List<TokenEnhancer> enhancerList    = new ArrayList<>();
    enhancerList.add( jwtTokenEnhancer );
    enhancerList.add( jwtAccessTokenConverter );
    enhancerChain.setTokenEnhancers( enhancerList );
    endpoints.tokenStore( jwtTokenStore )
    .userDetailsService( kiteUserDetailsService )
    /**
     * Support password mode
     */
    .authenticationManager( authenticationManager )
    .tokenEnhancer( enhancerChain )
    .accessTokenConverter( jwtAccessTokenConverter );
}
Request the token again, and return multiple JWT ext fields just added in the content.
{
  "access_token": "eyJhbGciOiJIUzI1NiIsInR5cCI6IkpXVCJ9.eyJ1c2VyX25hbWUiOiJhZG1pbiIsImp3dC1leHQiOiJKV1Qg5omp5bGV5L-h5oGvIiwic2NvcGUiOlsiYWxsIl0sImV4cCI6MTU3MTc0NTE3OCwiYXV0aG9yaXRpZXMiOlsiUk9MRV9BRE1JTiJdLCJqdGkiOiJhNDU1MWQ5ZS1iN2VkLTQ3NTktYjJmMS1mMGI5YjIxY2E0MmMiLCJjbGllbnRfaWQiOiJ1c2VyLWNsaWVudCJ9.5j4hNsVpktG2iKxNqR-q1rfcnhlyV3M6HUBx5cd6PiQ",
  "token_type": "bearer",
  "refresh_token": "eyJhbGciOiJIUzI1NiIsInR5cCI6IkpXVCJ9.eyJ1c2VyX25hbWUiOiJhZG1pbiIsImp3dC1leHQiOiJKV1Qg5omp5bGV5L-h5oGvIiwic2NvcGUiOlsiYWxsIl0sImF0aSI6ImE0NTUxZDllLWI3ZWQtNDc1OS1iMmYxLWYwYjliMjFjYTQyYyIsImV4cCI6MTU3MTc3NzU3OCwiYXV0aG9yaXRpZXMiOlsiUk9MRV9BRE1JTiJdLCJqdGkiOiJmNTI3ODJlOS0wOGRjLTQ2NGUtYmJhYy03OTMwNzYwYmZiZjciLCJjbGllbnRfaWQiOiJ1c2VyLWNsaWVudCJ9.UQMf140CG8U0eWh08nGlctpIye9iJ7p2i6NYHkGAwhY",
  "expires_in": 3599,
  "scope": "all",
  "jwt-ext": "JWT Extended information",
  "jti": "a4551d9e-b7ed-4759-b2f1-f0b9b21ca42c"
}
User client parsing JWT data
If we add additional information to JWT, we may use it. After receiving the token in JWT format, the user client needs to parse it out.
Introducing JWT package
<dependency>
    <groupId>io.jsonwebtoken</groupId>
    <artifactId>jjwt</artifactId>
    <version>0.9.1</version>
</dependency>
Add a RESTful interface to parse JWT
@GetMapping(value = "jwt")
@PreAuthorize("hasAnyRole('ROLE_ADMIN')")
public Object jwtParser(Authentication authentication){
    authentication.getCredentials();
    OAuth2AuthenticationDetails details = (OAuth2AuthenticationDetails)authentication.getDetails();
    String jwtToken = details.getTokenValue();
    Claims claims = Jwts.parser()
                .setSigningKey("dev".getBytes(StandardCharsets.UTF_8))
                .parseClaimsJws(jwtToken)
                .getBody();
    return claims;
}
Also note that the signature settings should be the same as the authentication server.
Request the above interface with the token of the previous step
### Parsing jwt
GET http://localhost:6101/client-user/jwt
Accept: */*
Cache-Control: no-cache
Authorization: bearer eyJhbGciOiJIUzI1NiIsInR5cCI6IkpXVCJ9.eyJ1c2VyX25hbWUiOiJhZG1pbiIsImp3dC1leHQiOiJKV1Qg5omp5bGV5L-h5oGvIiwic2NvcGUiOlsiYWxsIl0sImV4cCI6MTU3MTc0NTE3OCwiYXV0aG9yaXRpZXMiOlsiUk9MRV9BRE1JTiJdLCJqdGkiOiJhNDU1MWQ5ZS1iN2VkLTQ3NTktYjJmMS1mMGI5YjIxY2E0MmMiLCJjbGllbnRfaWQiOiJ1c2VyLWNsaWVudCJ9.5j4hNsVpktG2iKxNqR-q1rfcnhlyV3M6HUBx5cd6PiQ
The returned contents are as follows:
{
  "user_name": "admin",
  "jwt-ext": "JWT Extended information",
  "scope": [
    "all"
  ],
  "exp": 1571745178,
  "authorities": [
    "ROLE_ADMIN"
  ],
  "jti": "a4551d9e-b7ed-4759-b2f1-f0b9b21ca42c",
  "client_id": "user-client"
}
The above is the complete process of password mode. The source code is put on github. You can have a look at it if you need.
Don't grudge your "recommendation"
Welcome to update this series and other articles from time to time
Ancient kites can join the communication group when entering the public account
