1, SpringCloud Stream
In the previous article, we explained the function of config + bus to automatically refresh all service configurations. This article continues to explain the message driven Stream
Last article address: https://blog.csdn.net/qq_43692950/article/details/122025347
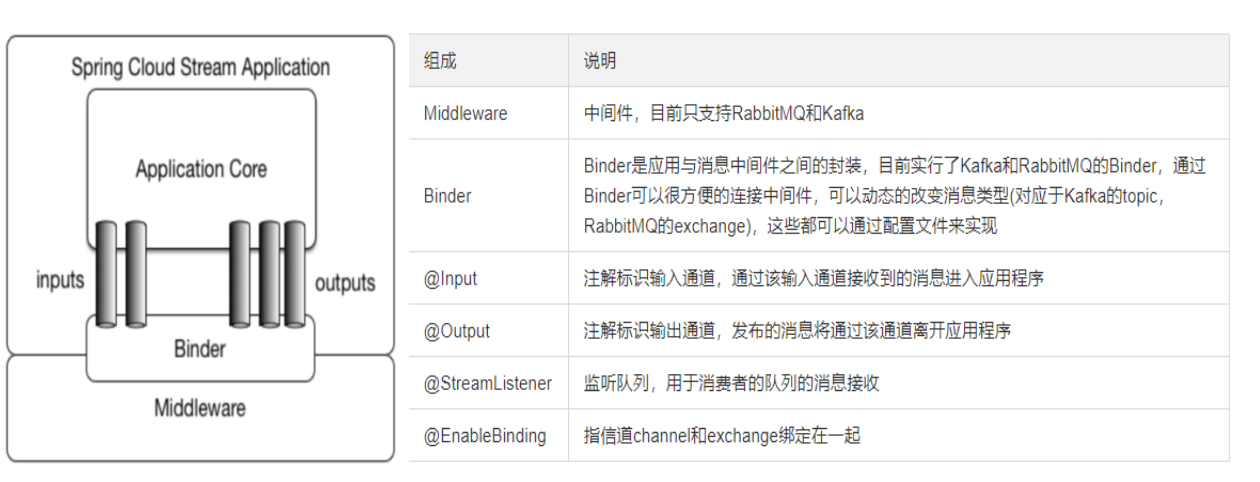
Officially, Spring Cloud Stream is a framework for building message driven microservices.
The application interacts with the binder object in Spring Cloud Stream through inputs or outputs.
We configure binding, and the binder object of Spring Cloud Stream is responsible for interacting with the message middleware. Therefore, we only need to figure out how to interact with Spring Cloud Stream to facilitate the use of message driven methods.
By using Spring Integration to connect the message broker middleware to realize message event driven.
Spring Cloud Stream provides personalized automatic configuration implementation for some vendors' message middleware products, citing the three core concepts of publish subscribe, consumption group and partition.
Currently, only RabbitMQ and Kafka are supported.
Why use stream
For example, we use RabbitMQ and Kafka. Due to the differences in the architecture of these two message middleware, such as RabbitMQ with exchange and Kafka with Topic and Partitions partitions, the differences of these middleware cause us some problems in our actual project development. If we use one of the two message queues, we will meet the business requirements later, I want to migrate to another message queue. At this time, it is undoubtedly disastrous. A lot of things have to be pushed down and redone because it is coupled with our system. At this time, springcloud Stream provides us with a way to decouple.
Annotations in stream
Our stream is based on RabbitMQ, so please ensure that RabbitMQ is installed before building.
2, Build message provider
Create a SpringBoot module to introduce the following dependencies:
<dependency>
    <groupId>org.springframework.boot</groupId>
    <artifactId>spring-boot-starter-web</artifactId>
</dependency>

<dependency>
    <groupId>org.springframework.boot</groupId>
    <artifactId>spring-boot-starter-actuator</artifactId>
</dependency>

<dependency>
    <groupId>org.springframework.cloud</groupId>
    <artifactId>spring-cloud-starter-stream-rabbit</artifactId>
</dependency>
Modification of configuration file:
server:
  port: 7071

spring:
  application:
    name: cloud-stream-provider
  cloud:
    stream:
      binders: # Configure the service information of rabbitmq to be bound here;
        defaultRabbit: # Represents the name of the definition, which is used for binding integration
          type: rabbit # Message component type
          environment: # Set the environment configuration related to rabbitmq
            spring:
              rabbitmq:
                host: 192.168.40.1
                port: 5672
                username: guest
                password: guest
      bindings: # Integration of services
        output: # This name is the name of a channel
          destination: msgExchange # Represents the Exchange name definition to use
          content-type: application/json # Set the message type, json this time, and "text/plain" for text
          binder: defaultRabbit # Set the specific settings of the message service to be bound
Create service provider service
Interface:
public interface IMessageProvider {
    public String send(String msg);
}
realization:
@EnableBinding(Source.class) //Defines the push pipeline for messages
public class MessageProviderImpl implements IMessageProvider {
    @Resource
    private MessageChannel output; // Message sending pipeline

    @Override
    public String send(String msg) {
        return output.send(MessageBuilder.withPayload(msg).build()) ? "Sent successfully" : "Sending failed!";
    }
}
Create test interface:
@RestController
public class SendMessageController
{
    @Resource
    private IMessageProvider messageProvider;

    @GetMapping("/sendMessage/{msg}")
    public ResponseTemplate sendMessage(@PathVariable String msg)
    {
        String result = messageProvider.send(msg);
        return ResSuccessTemplate.builder().data(result).build();
    }

}
Start the message provider service and view the RabbitMQ console:
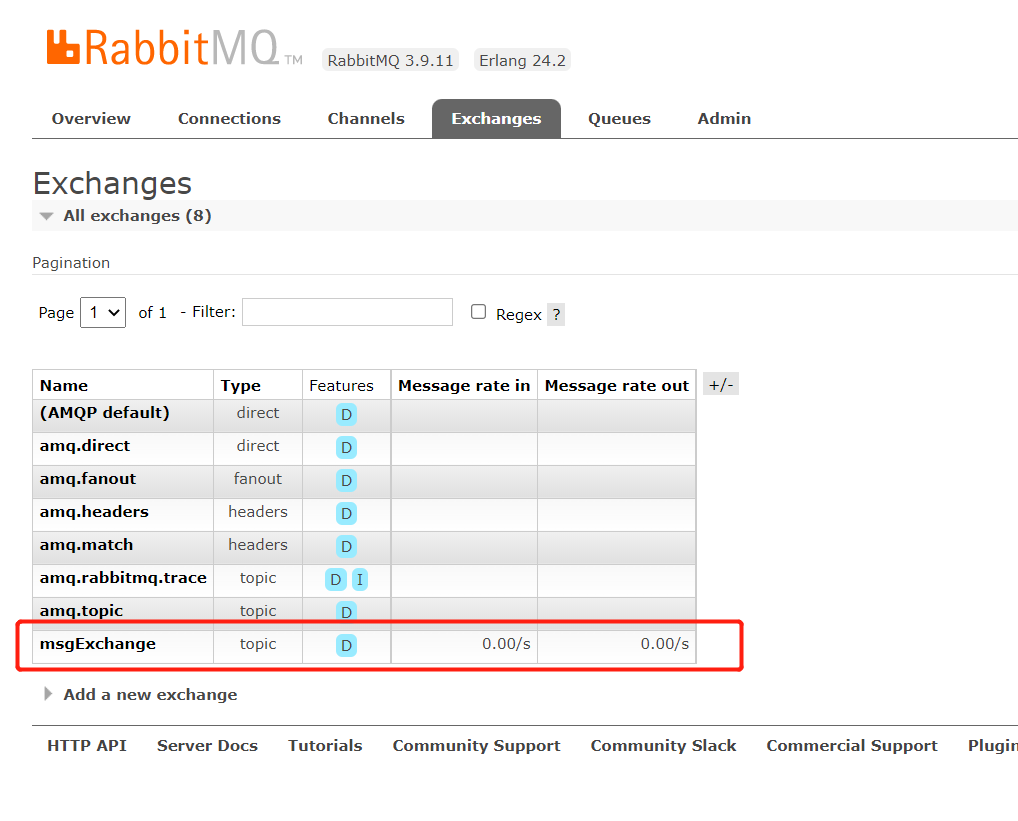
The switch we wrote has been registered in RabbitMQ.
Let's continue to build message consumers.
3, Build message consumers
Create another SpringBoot module, and also introduce the following dependencies:
<dependency>
    <groupId>org.springframework.boot</groupId>
    <artifactId>spring-boot-starter-web</artifactId>
</dependency>

<dependency>
    <groupId>org.springframework.cloud</groupId>
    <artifactId>spring-cloud-starter-stream-rabbit</artifactId>
</dependency>

<dependency>
    <groupId>org.springframework.boot</groupId>
    <artifactId>spring-boot-starter-actuator</artifactId>
</dependency>
Modify configuration file:
server:
  port: 6062

spring:
  application:
    name: cloud-stream-consumer
  cloud:
    stream:
      binders: # Configure the service information of rabbitmq to be bound here;
        defaultRabbit: # Represents the name of the definition, which is used for binding integration
          type: rabbit # Message component type
          environment: # Set the environment configuration related to rabbitmq
            spring:
              rabbitmq:
                host: www.bixc.net
                port: 5672
                username: guest
                password: guest
      bindings: # Integration of services
        input: # This name is the name of a channel
          destination: msgExchange # Represents the Exchange name definition to use
          content-type: application/json # Set the message type. This time, it is an object json. If it is text, set "text/plain"
          binder: defaultRabbit # Set the specific settings of the message service to be bound
Note: the destination here must be the same as that of the provider to indicate that it is linked to the same switch.
Write message listening:
@Slf4j
@Component
@EnableBinding(Sink.class)
public class ReceiveMessageListenerController {

    @Value("${server.port}")
    private String serverPort;


    @StreamListener(Sink.INPUT)
    public void input(Message<String> message) {
        log.info("Received message: {} , current port: {} ", message.getPayload(), serverPort);
    }
}
Start the service consumer and start the test below:
Browser access: http://localhost:7071/sendMessage/ Ha ha ha
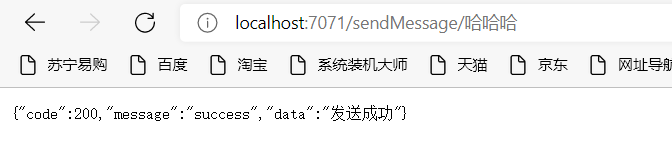
It has been sent successfully. Look at the print log on the consumer side:

Also received the message.
Now we modify the port of the lower consumer and start the same consumer again. The port is 6061.

Send the message again and see the consumer's request:


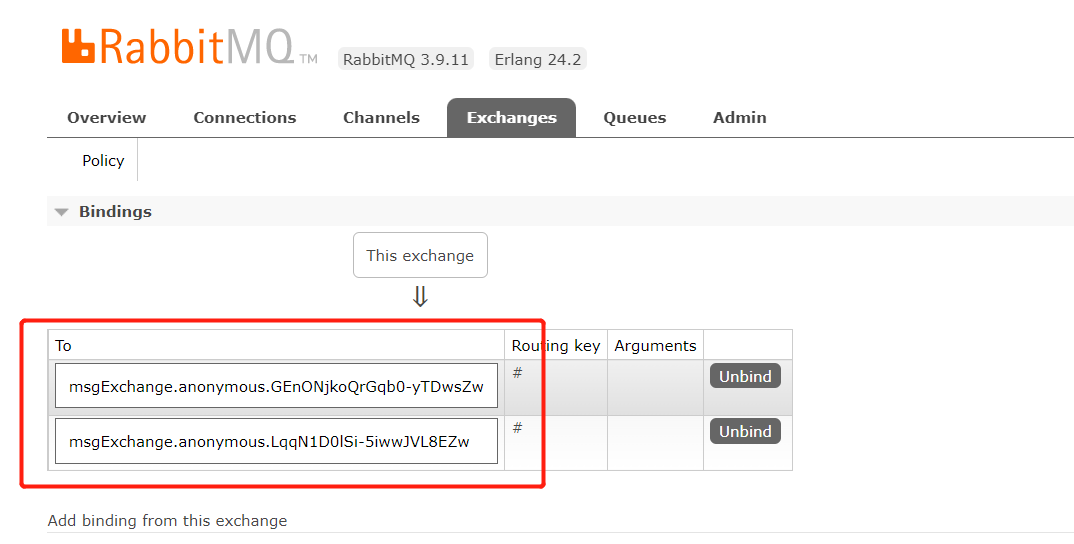
Both consumers have received the message. If only one consumer wants to receive the message, it only needs to be placed in the lower interface of the same group. If there is no group specified in the above configuration, a group will be automatically generated:
Now we add grouping and modify the configuration of the consumer side:
spring:
application:
name: cloud-stream-consumer
cloud:
stream:
binders: # Configure the service information of rabbitmq to be bound here;
defaultRabbit: # Represents the name of the definition, which is used for binding integration
type: rabbit # Message component type
environment: # Set the environment configuration related to rabbitmq
spring:
rabbitmq:
host: www.bixc.net
port: 5672
username: guest
password: guest
bindings: # Integration of services
input: # This name is the name of a channel
destination: msgExchange # Represents the Exchange name definition to use
content-type: application/json # Set the message type. This time, it is an object json. If it is text, set "text/plain"
binder: defaultRabbit # Set the specific settings of the message service to be bound
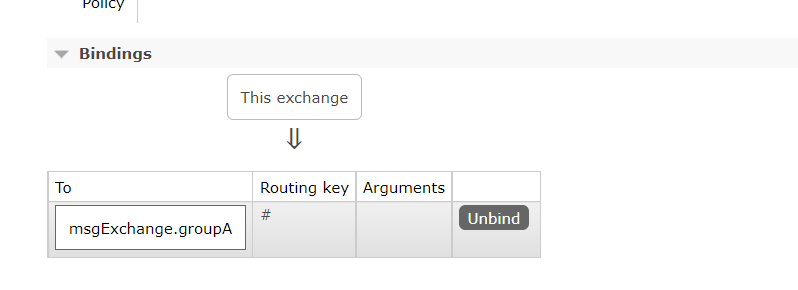
group: groupA
group: groupA specifies the group name. Let's look at the information in RabbitMQ:
Send the following message:


Only one consumer received the message.
Another note here is that if you do not configure a group, a group will be randomly assigned every time you start. If you suddenly interrupt the service after receiving a message, you will lose the message if you start it again, so you must specify the group information.
Love little buddy can pay attention to my personal WeChat official account and get more learning materials.