catalogue
3, Actual combat of configuration center
4, Dynamic service discovery practice
1, Introduction
Nacos is an open source project of Alibaba, which is used to realize dynamic service discovery and service configuration management (official website: https://nacos.io/zh-cn/docs/what-is-nacos.html ). At this point, the little partners who have done micro services should have a sense of familiarity (inner OS: isn't this the same function as Zookeeper!!!). In the spring cloud ecosystem, we can also find corresponding products. Eureka registry is used for dynamic service discovery and spring cloudconfig configuration center is used for service configuration management.
According to the CAP theory of distributed architecture, Nacos can be set to CP or AP} mode, Zookeeper is CP and Eureka is ap; At the same time, Nacos integrates the functions of Eureka and SpringCloudConfig products at the same time. Operation and maintenance only needs to maintain a set of Nacos cluster, and has a good-looking and easy-to-use management page balabala (self brain filling picture: Oh, oh, needless to say, can't I use it!)
2, Nacos service setup
Only the stand-alone version is built here. You can refer to the cluster version https://nacos.io/zh-cn/docs/cluster-mode-quick-start.html
Preparation environment: Linux ^ 64 bit system and ^ 64 bit JDK 1.8 +;
1. Download installation package
From the official website( https://github.com/alibaba/nacos/releases )Download version nacos-server-2.0.1 tar. GZ, upload to linux server;
2. Decompress
tar -xvf nacos-server-2.0.1.tar.gz
3. Start
cd nacos/bin

sh startup.sh -m standalone
4. Access the administration page
Enter on the browser, http://ip:8848/nacos The default account is nacos and the password is nacos

3, Actual combat of configuration center
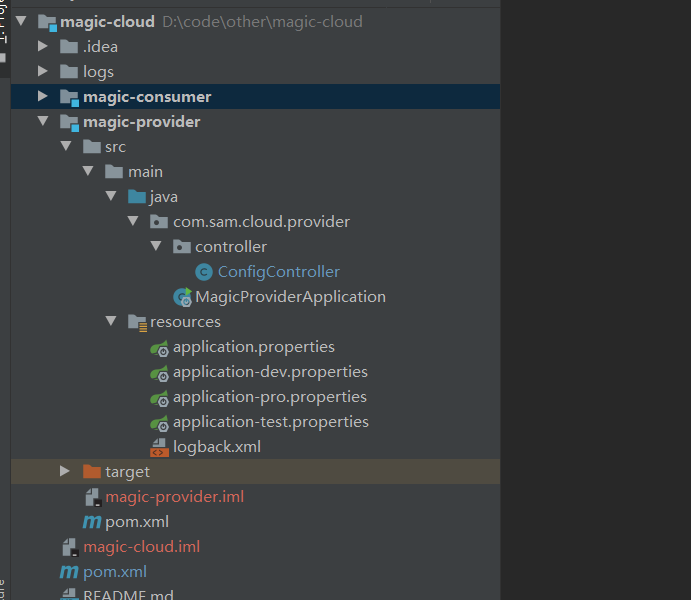
Project structure Preview:

The referenced version is:
| Spring Cloud Version | Spring Cloud Alibaba Version | Spring Boot Version |
| Spring Cloud Hoxton.SR8 | 2.2.3.RELEASE | 2.3.2.RELEASE |
1. Create POM of parent The XML file is as follows:
<?xml version="1.0" encoding="UTF-8"?>
<project xmlns="http://maven.apache.org/POM/4.0.0" xmlns:xsi="http://www.w3.org/2001/XMLSchema-instance"
         xsi:schemaLocation="http://maven.apache.org/POM/4.0.0 http://maven.apache.org/xsd/maven-4.0.0.xsd">
    <modelVersion>4.0.0</modelVersion>
    <packaging>pom</packaging>
    <parent>
        <groupId>org.springframework.boot</groupId>
        <artifactId>spring-boot-starter-parent</artifactId>
        <version>2.3.2.RELEASE</version>
        <relativePath/>
    </parent>

    <groupId>com.sam.cloud</groupId>
    <artifactId>magic-cloud</artifactId>
    <version>1.0-SNAPSHOT</version>
    <name>magic-cloud</name>

    <modules>
        <module>magic-provider</module>
        <module>magic-consumer</module>
    </modules>

    <properties>
        <project.version>0.0.1-SNAPSHOT</project.version>
        <java.version>1.8</java.version>
    </properties>

    <dependencyManagement>
        <dependencies>
            <dependency>
                <groupId>org.springframework.cloud</groupId>
                <artifactId>spring-cloud-dependencies</artifactId>
                <version>Hoxton.SR8</version>
                <type>pom</type>
                <scope>import</scope>
            </dependency>
            <dependency>
                <groupId>com.alibaba.cloud</groupId>
                <artifactId>spring-cloud-alibaba-dependencies</artifactId>
                <version>2.2.3.RELEASE</version>
                <type>pom</type>
                <scope>import</scope>
            </dependency>
        </dependencies>
    </dependencyManagement>

</project>
2. POM of sub project magic provider XML file
<?xml version="1.0" encoding="UTF-8"?>
<project xmlns="http://maven.apache.org/POM/4.0.0" xmlns:xsi="http://www.w3.org/2001/XMLSchema-instance"
         xsi:schemaLocation="http://maven.apache.org/POM/4.0.0 http://maven.apache.org/xsd/maven-4.0.0.xsd">
    <parent>
        <artifactId>magic-cloud</artifactId>
        <groupId>com.sam.cloud</groupId>
        <version>1.0-SNAPSHOT</version>
    </parent>
    <modelVersion>4.0.0</modelVersion>

    <artifactId>magic-provider</artifactId>
    <name>magic-provider</name>
    <version>${project.version}</version>

    <dependencies>
        <dependency>
            <groupId>org.springframework.boot</groupId>
            <artifactId>spring-boot-starter</artifactId>
        </dependency>

        <dependency>
            <groupId>org.springframework.boot</groupId>
            <artifactId>spring-boot-starter-web</artifactId>
        </dependency>

        <dependency>
            <groupId>com.alibaba.cloud</groupId>
            <artifactId>spring-cloud-starter-alibaba-nacos-config</artifactId>
        </dependency>

    </dependencies>

    <build>
        <plugins>
            <plugin>
                <groupId>org.springframework.boot</groupId>
                <artifactId>spring-boot-maven-plugin</artifactId>
            </plugin>
        </plugins>
        <finalName>magic-provider</finalName>
    </build>
</project>
The key here is to introduce maven package:
<dependency>
<groupId>com.alibaba.cloud</groupId>
<artifactId>spring-cloud-starter-alibaba-nacos-config</artifactId>
</dependency>
3,application.properties file
# Application startup port
server.port=8082
# Access path
server.servlet.context-path=/magic/provider
# Application name for registration of nacos
spring.application.name=magic-provider

# nacos configuration center address
spring.cloud.nacos.config.server-addr=127.0.0.1:8848
spring. cloud. nacos. config. Server addr = 127.0.0.1:8848 set the ip and port number of Nacos. After startup, the configuration will be automatically obtained from Nacos.
4. Create the startup class magicproviderapplication java
package com.sam.cloud.provider;

import org.springframework.boot.SpringApplication;
import org.springframework.boot.autoconfigure.SpringBootApplication;

@SpringBootApplication
public class MagicProviderApplication {

    public static void main(String[] args) {
        SpringApplication.run(MagicProviderApplication.class, args);
    }

}
5. Create configuration test Controller: configcontroller java
package com.sam.cloud.provider.controller;

import org.springframework.beans.factory.annotation.Value;
import org.springframework.cloud.context.config.annotation.RefreshScope;
import org.springframework.web.bind.annotation.RequestMapping;
import org.springframework.web.bind.annotation.RestController;

@RestController
@RequestMapping("/config")
@RefreshScope
public class ConfigController {

    @Value("${my.name:haha}")
    private String myName;

    @RequestMapping("/get")
    public String get(String msg) {
        return "hi, " + msg + ", my name is " + myName;
    }

}
Here, the magic provider configuration of nacos is automatically updated through the Spring Cloud native annotation @ RefreshScope Value of name;
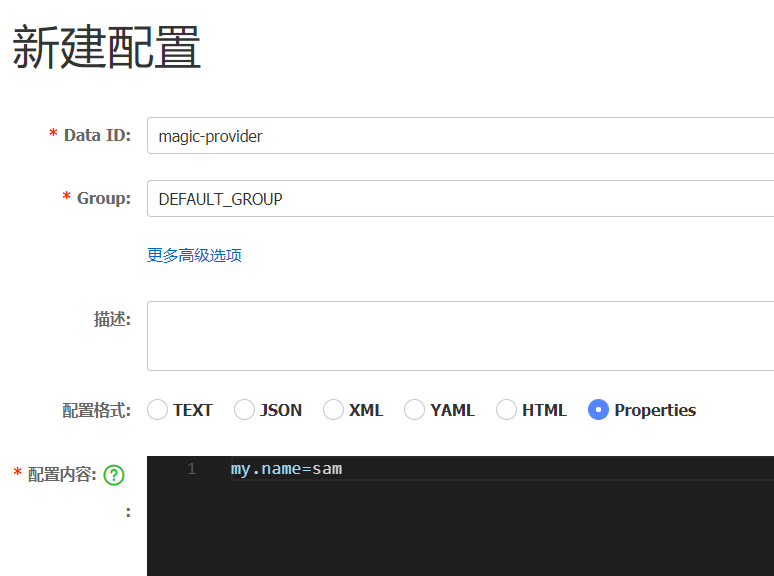
6. Add configuration on the Nacos management page

The value of the Data ID here should be consistent with the configuration file application of the project magic provider Spring. In properties application. The name value is consistent;
7. Verify
Start the application magic provider and enter the access address in the browser: http://localhost:8082/magic/provider/config/get?msg=Tom

Then modify the configuration value my on the nacos management page Name = jack, refresh the request and find that it has been dynamically updated

4, Dynamic service discovery practice
A. Magic provider project
Configure based on the project created in step 3 above:
1. Add maven package
        <dependency>
            <groupId>com.alibaba.cloud</groupId>
            <artifactId>spring-cloud-starter-alibaba-nacos-discovery</artifactId>
        </dependency>
2. Add content to application
# nacos registration discovery address
spring.cloud.nacos.discovery.server-addr=127.0.0.1:8848
3. Start class magicproviderapplication Add the annotation @ EnableDiscoveryClient in Java to enable the service registration discovery function
package com.sam.cloud.provider;

import org.springframework.boot.SpringApplication;
import org.springframework.boot.autoconfigure.SpringBootApplication;
import org.springframework.cloud.client.discovery.EnableDiscoveryClient;

@SpringBootApplication
@EnableDiscoveryClient
public class MagicProviderApplication {

    public static void main(String[] args) {
        SpringApplication.run(MagicProviderApplication.class, args);
    }

}
B. Magic consumer project
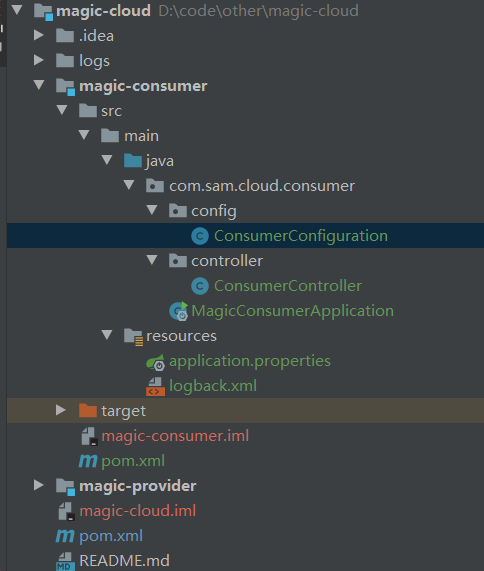
Project structure Preview:

1. Sub project POM The XML file is as follows:
<?xml version="1.0" encoding="UTF-8"?>
<project xmlns="http://maven.apache.org/POM/4.0.0" xmlns:xsi="http://www.w3.org/2001/XMLSchema-instance"
         xsi:schemaLocation="http://maven.apache.org/POM/4.0.0 http://maven.apache.org/xsd/maven-4.0.0.xsd">
    <parent>
        <artifactId>magic-cloud</artifactId>
        <groupId>com.sam.cloud</groupId>
        <version>1.0-SNAPSHOT</version>
    </parent>
    <modelVersion>4.0.0</modelVersion>

    <artifactId>magic-consumer</artifactId>
    <name>magic-consumer</name>
    <version>${project.version}</version>

    <dependencies>
        <dependency>
            <groupId>org.springframework.boot</groupId>
            <artifactId>spring-boot-starter</artifactId>
        </dependency>

        <dependency>
            <groupId>org.springframework.boot</groupId>
            <artifactId>spring-boot-starter-web</artifactId>
        </dependency>

        <dependency>
            <groupId>com.alibaba.cloud</groupId>
            <artifactId>spring-cloud-starter-alibaba-nacos-discovery</artifactId>
        </dependency>

    </dependencies>

    <build>
        <plugins>
            <plugin>
                <groupId>org.springframework.boot</groupId>
                <artifactId>spring-boot-maven-plugin</artifactId>
            </plugin>
        </plugins>
        <finalName>magic-consumer</finalName>
    </build>
</project>
2,application.properties file
# Application startup configuration
server.port=8083
server.servlet.context-path=/magic/consumer

spring.application.name=magic-consumer

# nacos registration discovery address
spring.cloud.nacos.discovery.server-addr=127.0.0.1:8848
3. Create configuration class consumerconfiguration java
package com.sam.cloud.consumer.config;

import org.springframework.cloud.client.loadbalancer.LoadBalanced;
import org.springframework.context.annotation.Bean;
import org.springframework.context.annotation.Configuration;
import org.springframework.web.client.RestTemplate;

@Configuration
public class ConsumerConfiguration {

    @LoadBalanced
    @Bean
    public RestTemplate restTemplate() {
        return new RestTemplate();
    }

}
Here, the @ LoadBalanced annotation is added to the RestTemplate instance to enable the integration of @ LoadBalanced and Ribbon;
4. Create test class consumercontroller java
package com.sam.cloud.consumer.controller;

import org.springframework.web.bind.annotation.PathVariable;
import org.springframework.web.bind.annotation.RequestMapping;
import org.springframework.web.bind.annotation.RequestMethod;
import org.springframework.web.bind.annotation.RestController;
import org.springframework.web.client.RestTemplate;

import javax.annotation.Resource;

@RestController
@RequestMapping("/test")
public class ConsumerController {

    @Resource
    private RestTemplate restTemplate;

    @RequestMapping(value = "/hello/{name}", method = RequestMethod.GET)
    public String testHello(@PathVariable String name) {
        String message = restTemplate.getForObject("http://magic-provider/magic/provider/config/get?msg=" + name, String.class);
        return "consumer : " + message;
    }

}
Here, the initialized RestTemplate is used to request the service provider magic provider;
4. Create the startup class magicproviderapplication java
package com.sam.cloud.consumer;

import org.springframework.boot.SpringApplication;
import org.springframework.boot.autoconfigure.SpringBootApplication;
import org.springframework.cloud.client.discovery.EnableDiscoveryClient;

@SpringBootApplication
@EnableDiscoveryClient
public class MagicConsumerApplication {

    public static void main(String[] args) {
        SpringApplication.run(MagicConsumerApplication.class, args);
    }

}
Similarly, the annotation @ EnableDiscoveryClient enables the service registration discovery function
C. Verify
1. Start the magic provider project
2. Start magic consumer project
3. View the list of services in the nacos administration page

4. The browser accesses the interface of magic consumer to obtain the interface data in magic provider
http://localhost:8083/magic/consumer/test/hello/Marry
