The two core contents of spring are ioc and aop.
This chapter introduces the concept, function and usage of ioc.
ioc brief introduction:
Concept: inversion of control, the creation of objects and the calling process between objects are handed over to Spring for management
The purpose is to reduce coupling
Underlying principles: xml parsing, factory schema, reflection
. process:
- 1. The full path of the class is obtained through XML parsing
 ApplicationContext applicationContext =new
                ClassPathXmlApplicationContext("bean.xml");
- 2 create objects by reflection
- 3. Return through factory class
User user =applicationContext.getBean("user",User .class);
The IOC idea is based on the IOC container, which is essentially an object factory.
spring provides two ways to implement ioc container: (two interfaces)
1.BeanFactory:
The basic implementation of Ioc container is the internal use interface of Spring, which is not provided for developers to use
ps: objects will not be created when the configuration file is loaded, but will be created only when the object is obtained and used
2.ApplicationContext:
There are two implementation classes: the difference is that FileSystemXmlApplicationContext is an absolute path, and ClassPathXmlApplicationContext is a relative path in the project.
ApplicationContext applicationContext =new
                ClassPathXmlApplicationContext("bean.xml");
        User user  =applicationContext.getBean("user",User .class);
ioc management object: (refers to creating objects and injecting attributes)
1. xml based configuration file
2. Annotation based method
xml based method:
1. Create objects based on xml
Use bean tag id: unique attribute class: full path of class
<bean id="user" class="com.wsl.spring.dao.UserDao" ></bean>
2. Inject attributes based on xml
DI: dependency injection, which is the concrete implementation of ioc injection attribute
2.1. set based injection: using property annotation
 <bean id="user" class="com.wsl.spring.pojo.User" >
        <property name="name" value="Xiao Hong"></property>
        <property name="age" value="11"></property>
    </bean>
2.2. Injection based on parametric constructor
<bean id="user" class="com.wsl.spring.pojo.User" >
        <constructor-arg index="0" value="Little green"></constructor-arg>
        <constructor-arg index="1" value="22"></constructor-arg>
    </bean>
If both set injection and constructor injection are written, execute the constructor first and then set
2.3.p namespace injection
xml based injection can be simplified
1. Add p namespace in configuration file
 <beans xmlns="http://www.springframework.org/schema/beans"
       xmlns:xsi="http://www.w3.org/2001/XMLSchema-instance"
        **xmlns:p="http://www.springframework.org/schema/p"**
       xsi:schemaLocation="http://www.springframework.org/schema/beans http://www.springframework.org/schema/beans/spring-beans.xsd">
2. Use p injection
 <bean id="user" class="com.wsl.spring.pojo.User"
    p:age="33" p:name="Xiaolan">
    </bean>
ps: special symbol processing
1. Escape
2.CDATA format
bean
In Spring, the subjects that make up the application and the objects managed by the Spring IoC container are called beans. Simply put, a bean is an object initialized, assembled and managed by the IoC container
There are two kinds of beans in spring, one is an ordinary bean and the other is a factory bean FactoryBean (not different from beaneactor)
Ordinary bean: the bean type defined in the configuration file is the return type
Factory bean: the bean type defined in the configuration file can be different from the return type
Step 1: create a class, make this class as a factory bean, and implement the interface FactoryBean
Step 2: the method that implements the interface. The returned type is defined in the implemented method.
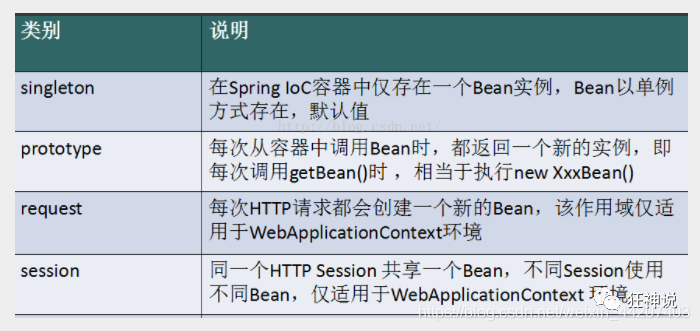
Scope of bean:
Spring is single instance by default. Single instance objects will be created when the spring configuration file is loaded.
When it is set to prototype, the multi instance object will be created when calling getBean.
bean life cycle:
The process from creation to destruction of bean objects.
1. Create bean instance through constructor
2. Set values for bean properties and references to other beans (call set)
3. Call bean initialization (initialization method needs to be configured) init method configuration
4. Use bean
5. When the container is closed, call the destroy method of the bean (the destruction method needs to be configured) destroy method configuration
 <bean id="user" class="com.wsl.spring.pojo.User"
    p:age="33" p:name="Xiaolan" init-method="init" destroy-method="destory">
    </bean>
External file configuration bean
1. Create the file JDBC properties
#============================#
#===== Database sttings =====#
#============================#

#oracle database settings
#jdbc.type=oracle
#jdbc.driver=oracle.jdbc.driver.OracleDriver
#jdbc.url=jdbc:oracle:thin:@127.0.0.1:1521:orcl
#jdbc.username=jeesite
#jdbc.password=123456
2. Import files and inject bean s
<!-- Load configuration properties file -->
	<context:property-placeholder ignore-unresolvable="true" location="classpath:jdbc.properties" />
<!-- bean set up -->
<bean id="dataSource" class="com.alibaba.druid.pool.DruidDataSource" init-method="init" destroy-method="close">
		<!-- The data source driver class cannot be written, Druid The default is automatically based on URL distinguish DriverClass -->
		<property name="driverClassName" value="${jdbc.driver}" />

		<!-- Basic properties url,user,password -->
		<property name="url" value="${jdbc.url}" />
		<property name="username" value="${jdbc.username}" />
		<property name="password" value="${jdbc.password}" />

		<!-- Configure initialization size, minimum and maximum -->
		<property name="initialSize" value="${jdbc.pool.init}" />
		<property name="minIdle" value="${jdbc.pool.minIdle}" />
		<property name="maxActive" value="${jdbc.pool.maxActive}" />

		<!-- Configure the timeout time for getting connections -->
		<property name="maxWait" value="60000" />
	</bean>
Annotation based method:
1. Turn on component scanning
component-scan Specify annotation scan package
<context:component-scan base-package="com.wsl"></context:component-scan>
Or use @ ComponentScan annotation directly
2. Annotate the class to be scanned
@Component
@Component("user")
// Equivalent to < bean id = "user" class = "currently annotated class" / > in the configuration file
@Three derived annotations of Component
For better layering, Spring can use the other three annotations with the same functions. At present, which function is used is the same.
@Controller: controller layer
@Service: service layer
@Repository: dao layer
Attribute injection based on annotation
1.@Autowired
2.@Qualifier
@Autowired It is automatically assembled according to the type, plus@Qualifier Can be based on byName Automatic assembly
@Qualifier Cannot be used alone.
3.@Resource
@Similarities and differences between Autowired and @ Resource:
1. Both @ Autowired and @ Resource can be used to assemble bean s. Can be written on fields or setter methods.
2. @ Autowired is assembled by type by default (belonging to the spring specification). By default, dependent objects must exist. If null value is allowed, its required attribute can be set to false, such as @ Autowired(required=false). If we want to use name assembly, it can be used in combination with @ Qualifier annotation
3. @ Resource (belonging to J2EE complex return), assembled by name by default, and the name can be specified through the name attribute. If the name attribute is not specified, when the annotation is written on the field, the default is to take the field name to search by name. If the annotation is written on the setter method, the default is to take the attribute name for assembly. Assemble by type when no bean matching the name is found. However, it should be noted that once the name attribute is specified, it will only be assembled according to the name.
Their functions are the same. They all inject objects by annotation, but the execution order is different@ Autowired byType first, @ Resource byName first.
Other notes:
@Value injection property
 @Value("Xiao Hong")
   // Equivalent to < property name = "name" value = "little red" / > in the configuration file
Automatic assembly is a way to use spring to meet bean dependencies
spring will find the bean that a bean depends on in the application context.
There are three assembly mechanisms for bean s in Spring:
Explicit configuration in xml;
Explicit configuration in java;
Implicit bean discovery mechanism and automatic assembly.
Automatic assembly: inject the matching attribute values according to the specified assembly rules (attribute name or attribute type).
Spring's automatic assembly needs to be implemented from two perspectives, or two operations:
Component scanning: spring will automatically discover the bean s created in the application context;
Autowiring: spring automatically satisfies the dependencies between bean s, which is what we call IoC/DI;
The combination of component scanning and automatic assembly exerts great power to minimize the configuration of display.