1, Basic overview
1.1 what is spring?
Spring is a lightweight java development framework rising in 2003. It is created to solve the complexity of enterprise application development. The core of spring is inversion of control (IoC) and aspect oriented programming (AOP). Spring is a lightweight open source framework that can be used in Java SE/EE. Its official website is: https://spring.io/
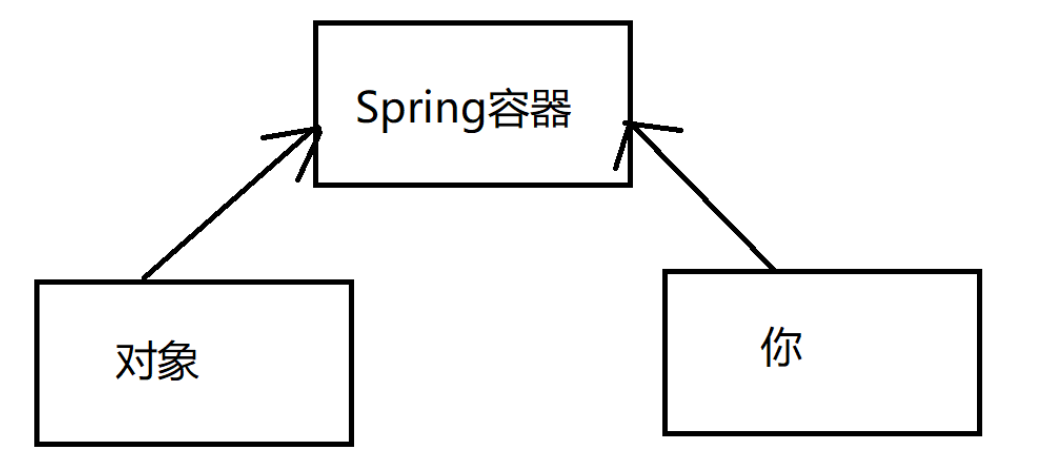
The above is a more official definition. In fact, spring is a container class, as shown in the following figure:

To put it bluntly, the Spring container is a "factory", a "container factory" that can create and manage objects for classes. In other words, we don't need to manually create new objects. We just need to write configuration files. The creation of objects and the addition, deletion and modification of objects are handed over to the Spring container. Its appearance greatly simplifies the difficulty of creating and managing objects, and can realize the decoupling between modules and between classes.
You might ask, do classes create objects? Don't we create objects directly through new? Why spend so much effort to introduce such a large and complex container to create objects? What the hell is decoupling? Why decoupling?
In fact, what you said is very reasonable. Don't worry first. Let me analyze it slowly.
1.2. What are the advantages of spring framework?
Spring is a framework and a semi-finished software. It consists of 20 modules. It is a container management object. The container contains things. The spring container does not contain text and numbers. It's an object. Spring is a container for storing objects.
(1) Light weight
The jars used by the Spring framework are relatively small, usually less than 1M or hundreds of kb. The total number of jars required for Spring core functions is about 3M. The Spring framework takes up less resources and has high efficiency. Do not rely on other jars.
(2) For interface programming, decoupling
Spring provides Ioc control inversion. The container manages objects and their dependencies. The original object creation method in the program code is now completed by the container. Dependency decoupling between objects.
(3) AOP programming support
Through the AOP function provided by Spring, it is convenient to carry out aspect oriented programming. Many functions that are not easy to be realized with traditional OOP can be easily handled through AOP. In Spring, developers can get rid of complicated transaction management code and flexibly manage transactions through declarative methods
Manage affairs and improve development efficiency and quality.
(4) Convenient integration of various excellent frameworks
Spring does not exclude various excellent open source frameworks. On the contrary, spring can reduce the difficulty of using various frameworks. Spring provides direct support for various excellent frameworks (such as Struts,Hibernate and MyBatis). Simplify the use of the framework. Spring is like a patch panel. Other frames are plugs, which can be easily combined together. Which frame you need to use, put the plug into the patch panel. No, it can be easily removed.
2, IOC
We have to clarify the two core technical concepts of spring, IOC (control inversion) and AOP (aspect oriented programming).
2.1. What is control reversal?
IOC (Inversion of Control): Inversion of Control, which represents a theory and a way of thinking: * * the creation, assignment and management of objects are handed over to containers outside the code. The container is created by the developer** This may be a little difficult to understand. Take a simple example:
Student student = new Student();
This is the way we created the object before. This object is directly new by you, which is called forward rotation. Reverse means that this object is no longer created by you, but by a spring container outside the code. You only need to enter some configuration parameters into spring, and the object can be created automatically. Control means the operator who completes the inversion operation, which is also the spring container here. Spring's identity is actually a little similar to the intermediary we encounter in our daily life.
2.2 why use IOC?
To answer this question, take a more intuitive example and look at the following code:
import lombok.Data;
@Data
public class Student {
    private Integer id;
    private String name;
    private String age;
}
This is an entity class defined by us. The @ Data annotation above actually uses a third-party lombok jar package to help you omit the writing of set and get methods, but it can still be used directly. OK, with the entity class, the next step is to create the object of the entity class
public class Test{
    public static void main(String[] args) {
        Student student = new Student();
        student.setName("Zhang San");
        student.setAge("25");
    }
}
At this time, we created the entity object of Student class in the main method. At first glance, there seems to be nothing wrong, which is really perfect. However, have you ever thought that the way you create objects is actually equivalent to writing the created objects to death. In other words, when you need to modify some attribute values of the object or add some settings of the object, you have to modify the source code, that is, you need to modify the source code file. Of course, it takes a lot of time to modify the source code of the second class. Of course, it is very easy for you to modify the source code of the second class. Of course, it takes a lot of time to maintain the source code of the second class** How to solve this problem?
Yes, the IOC solves this problem. It extracts the attribute value and some related settings into an XML configuration file separately. As a developer, you only need to complete the configuration of the XML file, and all the others are handed over to the Spring framework. The bottom layer of the Spring framework uses a large number of reflection mechanisms to create and assign objects. Here, we won't describe how the bottom layer is implemented. Interested students can chew the source code.
2.3. How to realize control reversal?
At present, the popular implementation of control inversion is Dependency Injection, also known as DI.
Dependency: the classA class contains instances of classB, which call function in classB in classA, that is, classA is dependent on ClassB.
Dependency injection means that when a program needs to call another object for assistance during operation, it does not need to create the callee in the code, but depends on the external container, which is created and passed to the program.
Spring's framework uses DI to implement IoC: Spring container is a super factory responsible for creating and managing all Java objects, which are called beans. Spring container manages the dependencies between beans in the container. Spring uses "dependency injection" to manage the dependencies between beans. Use IoC to realize decoupling and between objects.
2.3.1. Create objects using Spring container
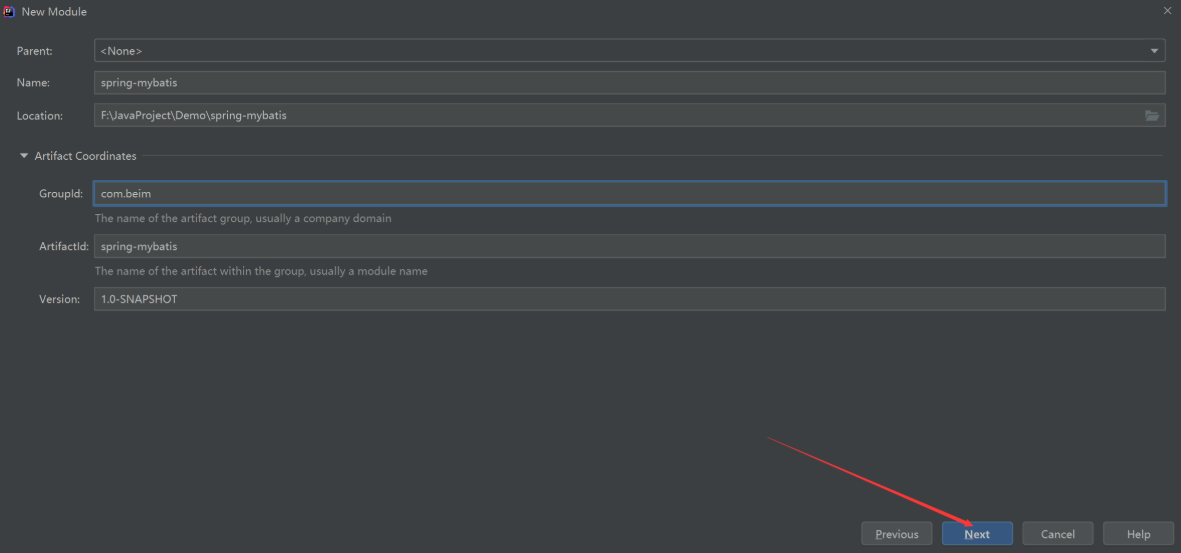
[1] : build a Maven project:
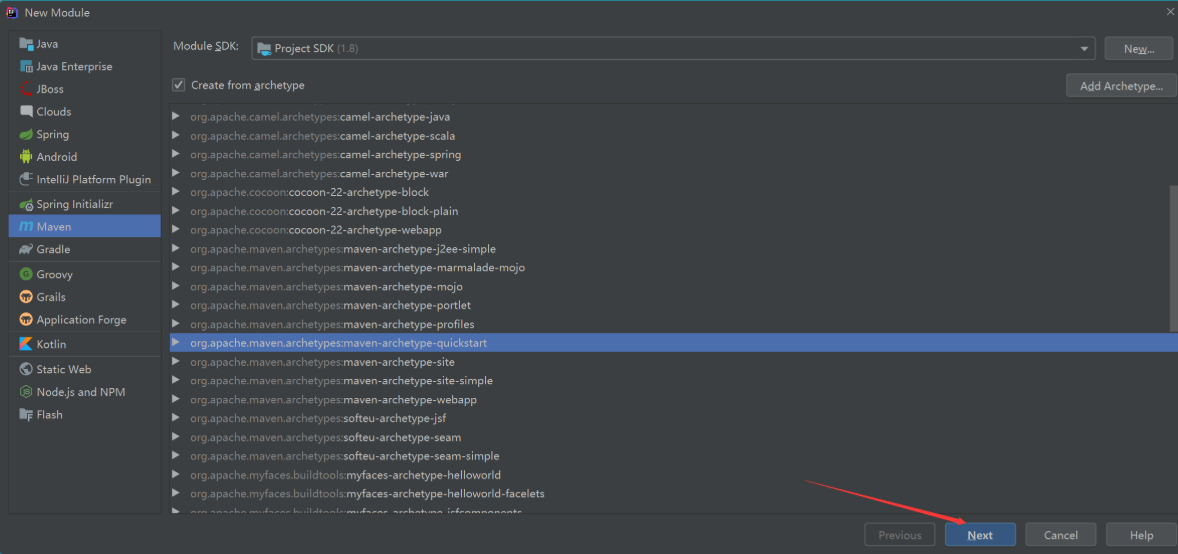
[2] : enter the project name and click next
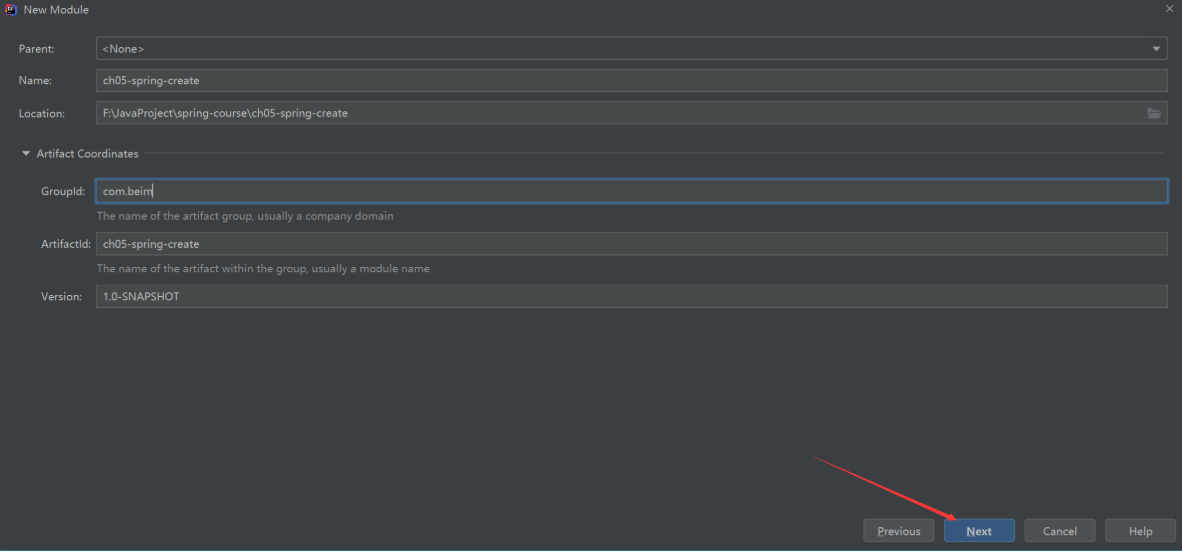
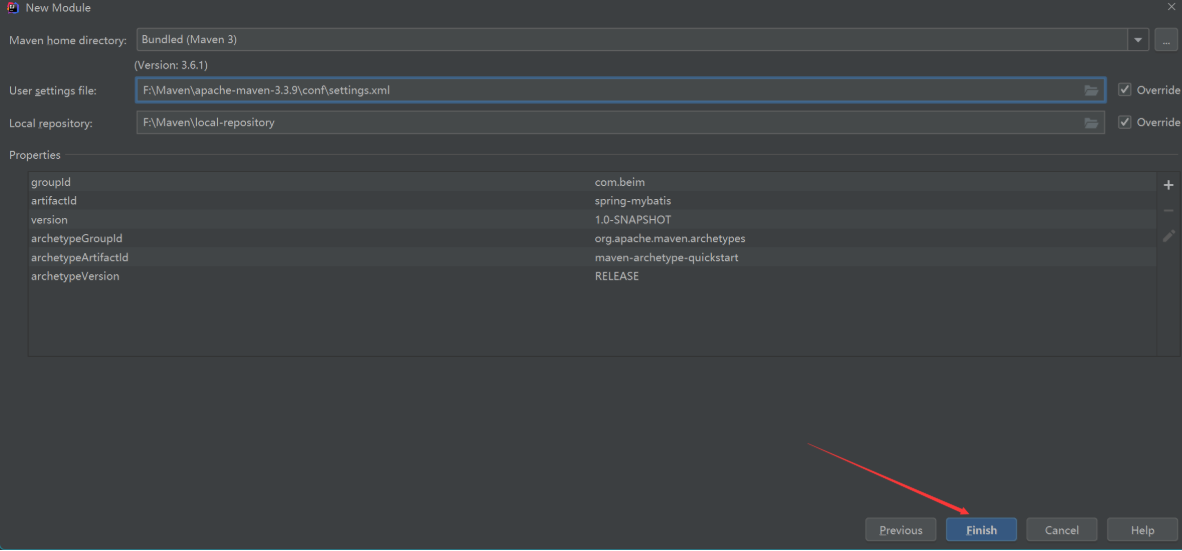
[3] : click finish
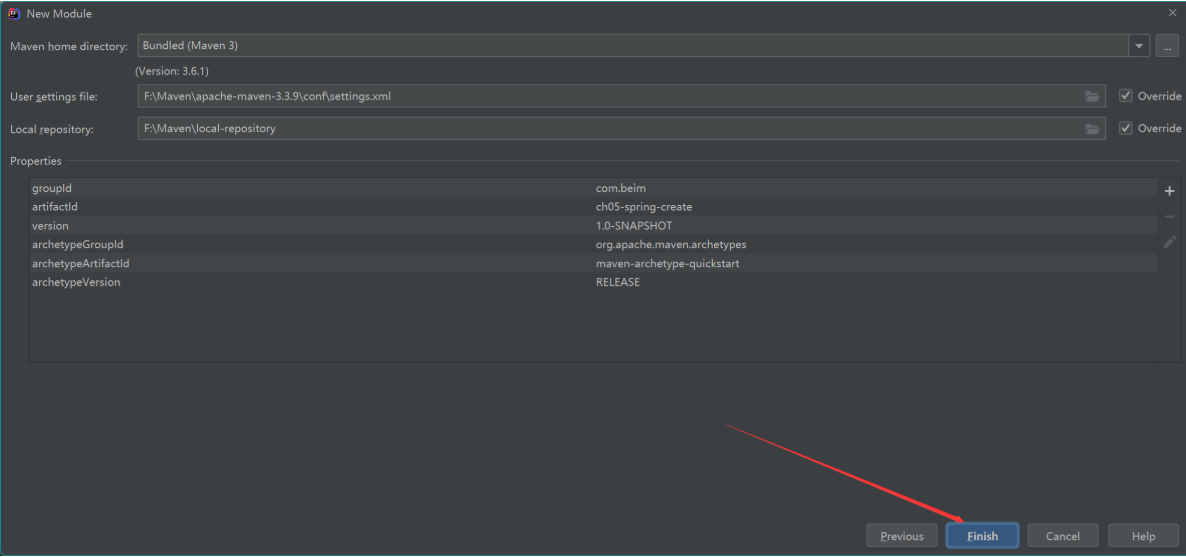
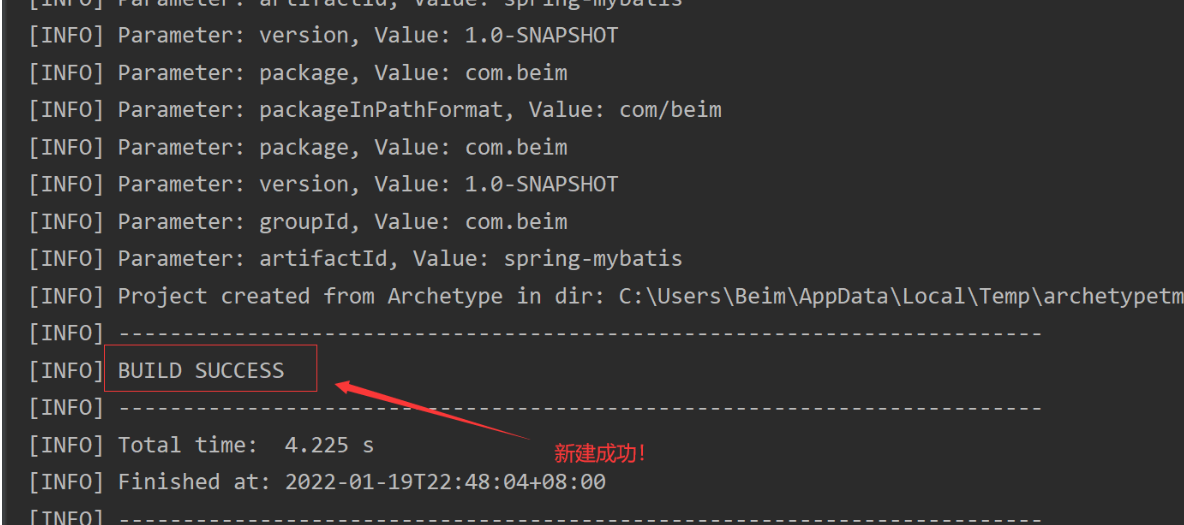
[4] : Maven project created successfully
[5] : add Spring dependency
[6] : define interface and entity classes
public interface SomeService {
    // Define test method
    void doSome();
}
========================================================
public class SomeServiceImpl implements SomeService {

    public SomeServiceImpl(){
        System.out.println("The constructor in the interface implementation class is executed");
    }

    @Override
    public void doSome() {
        System.out.println("The method in the interface is executed");
    }
}
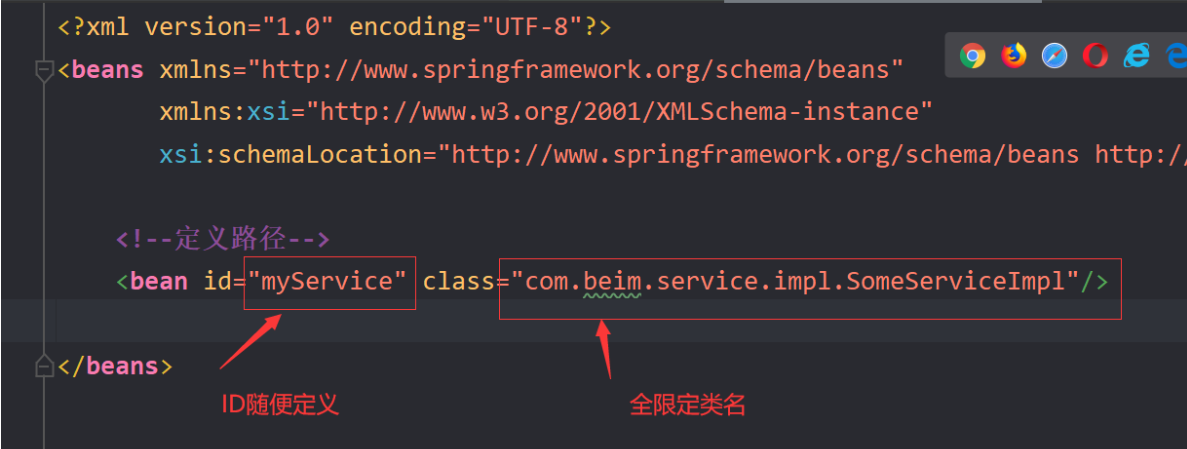
[7] : create a Spring configuration file with xml as suffix and custom name. It is recommended to use ApplicationContext xml, by the way, the function of Spring configuration file is to bind classes to Spring framework. Let Spring scan which class the object you want to create is. Moreover, a bean tag represents an object
[8] : Test
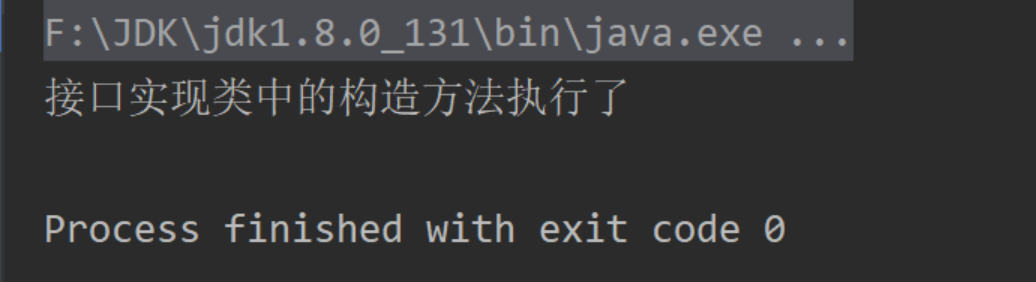
Um... At this stage, I believe there are still many small partners who will have questions. What if there is no interface, can you create objects? What if it's an abstract class? How? How does this code create the object** In fact, as long as it is an entity class and the bean tag, id and class attribute values are defined in the Spring configuration file, the object can be created** You can test it yourself.
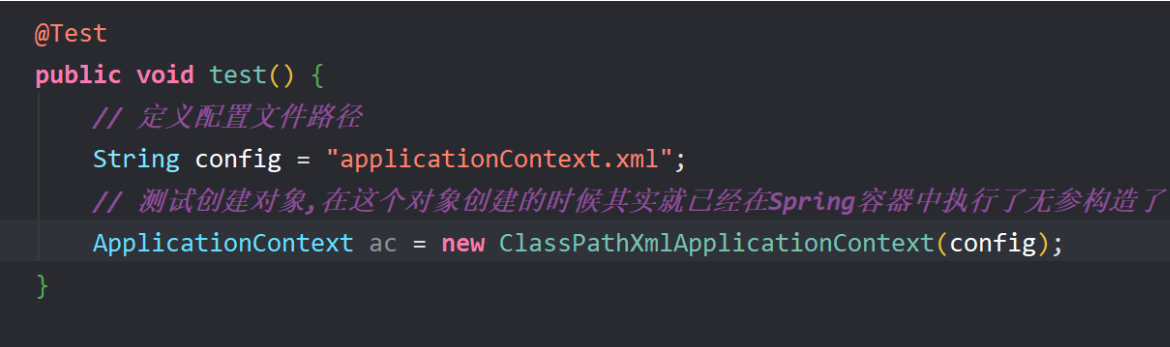
OK, let's talk about the execution process of Spring. Back to the test class test(), let's read down line by line. The first is to define a variable config of string type to save the path of the configuration file. It should be noted here that this path starts from your resources package, that is, if you are a sub package under the resource package, Then the path needs to be modified accordingly. For example:
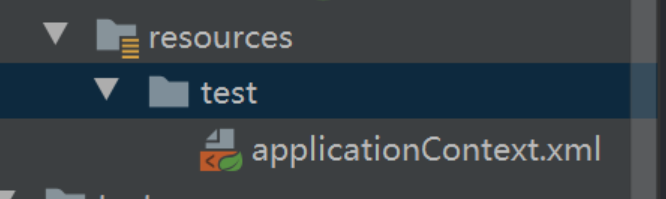
At this time, the value of your config should be modified to:

The execution process of the following code can be simply understood as: Spring creates a container object by loading the config configuration file and creates all objects in the configuration file at the same time. In other words, the large container has been stored in ApplicationContext The object of the entity class corresponding to the tag class attribute value in the XML file. The specific underlying implementation is very complex. Interested students can study the source code. (see, this is one of the advantages of the framework. It's all encapsulated for you. You don't need to understand how the bottom layer is implemented. You just need to learn to use these frameworks)
OK, after the object is created, how can I take this object out of the Spring container? Through the following method
/*
The parameter in it is the value of the ID attribute defined in the configuration file. In fact, the ID attribute value in the configuration file is similar to our ID number, so that the Spring container can quickly locate and locate the object of which entity class you want to extract.
*/
SomeServiceImpl myService = (SomeServiceImpl) ac.getBean("myService");
We have class objects, so the next step is to assign values to the properties of the object. It is impossible for us to create a class object without any data, isn't it? It must be necessary to encapsulate the data into the object while you create the class object. This is actually one of the advantages of our object-oriented programming. For Spring, the process of assigning the attributes of objects is also automatically completed by Spring. This process is called injection, also known as Dependency Injection, or DI for short. According to different injection methods, injection can be divided into two categories: DI based on XML configuration file and DI based on annotation
2.3.2. DI based on XML file
XML file injection can also be divided into two types: set injection and construction injection
(1) set injection
As the name suggests, this injection method is implemented through the set method. This method is simple and intuitive, so it is widely used in Spring dependency injection. For example:
// Entity class
public class Student {
    private Integer id;
    private String name;
    private Integer age;

    public void setId(Integer id) {
        this.id = id;
    }

    public void setName(String name) {
        this.name = name;
    }

    public void setAge(Integer age) {
        this.age = age;
    }

    @Override
    public String toString() {
        return "Student{" +
                "id=" + id +
                ", name='" + name + '\'' +
                ", age=" + age +
                '}';
    }
}
<!--XML configuration file-->
<bean id="myStudent" class="com.beim.entity.Student">
    <property name="id" value="1"/>         <!--setId(1)-->
    <property name="name" value="Zhang San"/>    <!--setName("Zhang San")-->
    <property name="age" value="20"/>       <!--setAge(20)-->
</bean>
// Test class
@Test
public void test() {
    // Define profile path
    String config = "test/applicationContext.xml";
    // The test creates an object. When this object is created, it has already executed the parameterless construction in the Spring container
    ApplicationContext ac = new ClassPathXmlApplicationContext(config);
    // Take out the object from the container, and the passed in parameter is the ID attribute value of the bean object in the XML file
    Student myStudent = (Student) ac.getBean("myStudent");
    System.out.println(myStudent);
}
Output result: Student{id=1, name = 'Zhang San', age=20}. For example, if it is a class defined by JDK:
<!--JDK Defined classes-->
<bean id="myDate" class="java.util.Date">
    <property name="time" value="1640736000000"/>
</bean>
@Test
public void test() {
    // Define profile path
    String config = "test/applicationContext.xml";
    // The test creates an object. When this object is created, it has already executed the parameterless construction in the Spring container
    ApplicationContext ac = new ClassPathXmlApplicationContext(config);
    // Take out the object from the container, and the passed in parameter is the ID attribute value of the bean object in the XML file
    Date date = (Date) ac.getBean("myDate");
    // format date
    String strDateFormat = "yyyy-MM-dd HH:mm:ss";
    SimpleDateFormat sdf = new SimpleDateFormat(strDateFormat);
    System.out.println(sdf.format(date));
}
The output result is: 2021-12-29 08:00:00
Another example is the injection of reference types:
// Define school classes
public class School {
    private String name;
    private String adress;
    public void setName(String name) {
        this.name = name;
    }
    public void setAdress(String adress) {
        this.adress = adress;
    }
    @Override
    public String toString() {
        return "Shcool{" +
                "name='" + name + '\'' +
                ", adress='" + adress + '\'' +
                '}';
    }
}
// Define student classes
public class Student {
    private Integer id;
    private String name;
    private Integer age;
    private School school;

    public void setId(Integer id) {
        this.id = id;
    }

    public void setName(String name) {
        this.name = name;
    }

    public void setAge(Integer age) {
        this.age = age;
    }

    public void setSchool(School school) {
        this.school = school;
    }

    @Override
    public String toString() {
        return "Student{" +
                "id=" + id +
                ", name='" + name + '\'' +
                ", age=" + age +
                ", school=" + school +
                '}';
    }
}
<!--XML There are two ways to write documents-->
<!--Student object-->
<bean id="myStudent" class="com.beim.entity.Student">
    <property name="id" value="1"/>         <!--setId(1)-->
    <property name="name" value="Zhang San"/>     <!--setName("Zhang San")-->
    <property name="age" value="20"/>       <!--setAge(20)-->
    <property name="school" ref="mySchool"/> <!--this rel The value of is actually School of ID value-->
</bean>

<!--definition School object-->
<bean id="mySchool" class="com.beim.entity.School">
    <property name="name" value="Tsinghua University"/>
    <property name="adress" value="Beijing"/>
</bean>
// test method
@Test
public void test() {
    // Define profile path
    String config = "test/applicationContext.xml";
    // The test creates an object. When this object is created, it has already executed the parameterless construction in the Spring container
    ApplicationContext ac = new ClassPathXmlApplicationContext(config);
    // Take out the object from the container, and the passed in parameter is the ID attribute value of the bean object in the XML file
    Student myStudent = (Student) ac.getBean("myStudent");
    // output
    System.out.println(myStudent);
}
It should be noted that:
- Before Spring completes the attribute injection, it must first create the object, that is, execute the construction method of the entity class first, and then inject the attribute value
- Whether it is a custom class or a non custom class, the program can execute normally as long as there is a set method and whether there is a corresponding attribute in the class. spring calls the set method directly to pass the value value as a parameter
(2) Structural injection
I believe that after reading the above set injection, the partners should also be able to guess what the general syntax format of construction injection is. As the name suggests, construction injection is to use the parametric construction method to complete the injection of attribute values while creating objects, The difference from set injection lies in the different configuration of XML files and the need to add a construction method with parameters on the entity class:
// Parametric construction method
public Student(Integer id, String name, Integer age) {
    this.id = id;
    this.name = name;
    this.age = age;
}
<!--XML Configuration of files-->
<bean id="myStudent" class="com.beim.entity.Student">
    <constructor-arg name="id" value="1"/>
    <constructor-arg name="name" value="Li Si"/>
    <constructor-arg name="age" value="22"/>
</bean>
In fact, the attributes used to specify parameters in the tag are as follows:
| Attribute name | effect |
|---|---|
| name | Attribute name of entity class |
| value | Entity class attribute value |
| index | Index value, which is used to mark the order of attributes in the entity class. From top to bottom, it is 0,1,2,3 |
2.3.3 annotation based DI
Dependency injection using annotations is often used in development because it is more concise and intuitive. It no longer needs to create an instance object in the XML configuration file, but only needs to declare a component scanner.
(1) To use annotations
1. Add Maven dependency and spring context. When you add spring context dependency, it will be added to spring AOP dependency indirectly. To use annotation for dependency injection, you must add spring AOP to pom file
2. Configuring spring annotations in classes
3. In the spring configuration file, add a tag of component scanner to indicate the position of annotation in your project
(2) Introduction to common notes
1.@Component: the function of creating an object, which is equivalent to, is to declare it as a class that can be scanned by the component scanner in the Spring configuration file.
 /*
	The parameter passed in parentheses is the ID value of the entity class. If it is not passed, it defaults to the uppercase entity class name
	@Component("myStudent")In fact, it is equivalent to < bean id = "mystudent" class = com beim. Student/>
*/
@Component("myStudent")
public class Student {
    // @Value: this annotation is actually used to assign values to attributes. Very easy to understand
    @Value("1")

    /*
    @Autowired: This annotation is actually the same as @ Value, but it is aimed at the attribute assignment of reference type. It has one
    required Property is a boolean type, and its value is true by default,
    	The value is true: if the reference type assignment fails, the program will report an error and terminate the execution,
    	The value is false: if the reference type assignment fails, the program executes normally, but the value of the reference type becomes null

	Note the following when using this annotation:
		For automatic injection of reference type, byType is used for automatic injection by default. If you want to modify the injection method of byName, you can add a @ Qualifier annotation after it, and the parameter passed in brackets is ID value
    */
    @Autowired
    @Qualifier(value = "mySchool")  // The value of the value attribute is used to specify the ID of the School object
    private School school;
}
The notes for creating objects consistent with the @ Component function include:
**@ Repository (used on the persistence layer): * * placed on the DAO implementation class indicates the creation of DAO objects, which can access the database.
**@ Service (used on the business layer): * * put it on the implementation class of service and create a service object. The service object is used for business processing and can have transaction processing and other functions.
**@ Controller (used on the controller): * * put it on the controller (processor) class to create the controller object, which can receive the parameters submitted by the user and display the processing results of the request.
In fact, the syntax of the above three annotations is the same as that of @ Component, which can create objects. However, these three annotations have additional functions. The relationship between them is a little similar. @ Component is the father. Like the other three sons, the father can do what the son can do (don't be serious, here's just a figurative metaphor). Although the father is also capable, But my son is still young after all. Some things make my son more efficient and targeted. I don't know whether this metaphor is appropriate. The official saying is that these three annotations are more targeted for some classes developed by MVC architecture, and their essence is derived from @ Component. To put it bluntly, these three annotations are non empty true subsets of @ Component.
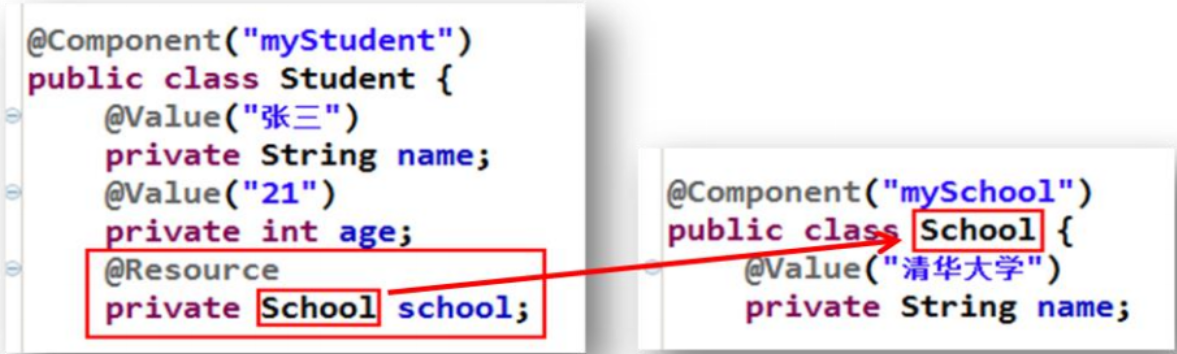
(3)@Resource
** Spring provides support for @ resource annotation in JDK@ Resource annotations can match beans by name or type. The default is to inject by name** Using this annotation requires that the JDK must be version 6 or above@ Resource can be on property or set method.
@ If the Resource annotation does not take any parameters, it is injected by name by default. If Bean cannot be injected by name, Bean matching injection will be carried out according to type. for example
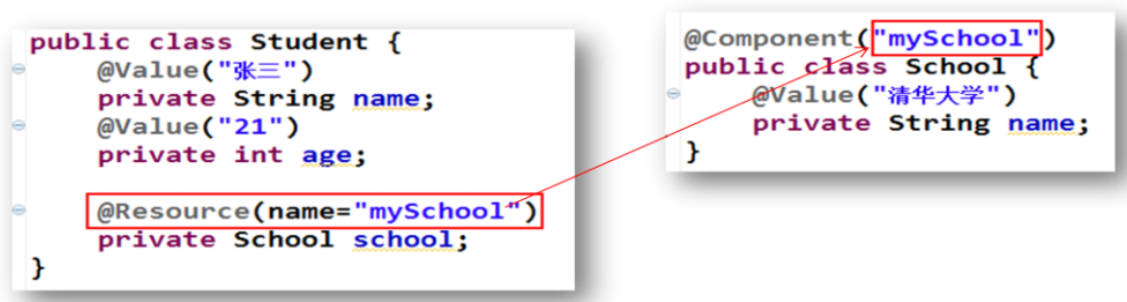
@ If the Resource annotation specifies its name attribute, the value of name is the id of the Bean matched by name. For example:
(4) The complete use case is as follows
<?xml version="1.0" encoding="UTF-8"?>
<beans xmlns="http://www.springframework.org/schema/beans"
       xmlns:xsi="http://www.w3.org/2001/XMLSchema-instance"
       xmlns:context="http://www.springframework.org/schema/context"
       xsi:schemaLocation="http://www.springframework.org/schema/beans http://www.springframework.org/schema/beans/spring-beans.xsd http://www.springframework.org/schema/context https://www.springframework.org/schema/context/spring-context.xsd">

    <!--To declare a component scanner, you only need to ensure that there are annotated entity classes under the package-->
    <context:component-scan base-package="com.beim.entity"/>
</beans>
Specify three ways to declare multiple packages:
<!--The first way: declare multiple component scanners-->
<context:component-scan base-package="com.beim.entity"/>
<context:component-scan base-package="com.beim.domain"/>
<!--The second way: use the separator, comma or semicolon, but note that it must be in English-->
<context:component-scan base-package="com.beim.entity,com.beim.domain"/>
<!--The third way: assign to the parent package name-->
<context:component-scan base-package="com.beim"/>
After the XMl configuration file declaration is completed, you can directly use annotations in the entity class:
@Component("myStudent")
public class Student {
    @Value("1")
    private Integer id;
    @Value("Zhang San")
    private String name;
    @Value("25")
    private Integer age;
    @Autowired
    @Qualifier(value = "mySchool")  // The value of the value attribute is used to specify the ID of the School object
    private School school;
    @Override
    public String toString() {
        return "Student{" +
                "id=" + id +
                ", name='" + name + '\'' +
                ", age=" + age +
                ", school=" + school +
                '}';
    }
}
// The parameter passed in parentheses is the ID value of the entity class. If it is not passed, it defaults to the uppercase entity class name
@Component("mySchool")
public class School {
    @Value("Peking University")
    private String name;
    @Value("Beijing")
    private String adress;
    @Override
    public String toString() {
        return "School{" +
                "name='" + name + '\'' +
                ", adress='" + adress + '\'' +
                '}';
    }
}
// test method
@Test
public void test() {
    // Define profile path
    String config = "test/applicationContext.xml";
    // The test creates an object. When this object is created, it has already executed the parameterless construction in the Spring container
    ApplicationContext ac = new ClassPathXmlApplicationContext(config);
    // Take out the object from the container, and the passed in parameter is the ID attribute value of the bean object in the XML file
    Student myStudent = (Student) ac.getBean("myStudent");
    // output
    System.out.println(myStudent);
}
Output: Student{id=1, name = 'Zhang San', age=25, school=School{name = 'Peking University', adress = 'Beijing'}}
2.3.4 automatic injection
What the hell is automatic injection? In fact, XML configuration files always inject attributes of reference types. We can inject them implicitly. So what kind of implicit injection? The tag has a property called autowire, which can be implicitly injected * * (not automatically injected by default) * *, by setting its value. According to the different judgment criteria of automatic injection, there are two values:
- byName: inject by name
- byType: inject according to the type
It should be noted that:
- Automatic injection only targets attributes of reference type
- Automatic injection can be either XML file injection or annotation injection
(1) byName mode injection
When using this method for injection, note: you must ensure that the ID attribute value of the tag must be consistent with the attribute name of the class
[the external chain picture transfer fails. The source station may have an anti-theft chain mechanism. It is recommended to save the picture and upload it directly (img-cyp278m9-1646825366504) (E: \ pictures \ typora pictures \ 1640790886829. PNG)]
(2) Inject using byType
Automatic injection in byType mode requires that the class specified by the class attribute of the caller bean in the configuration file should be the same as the reference type attribute type of the bean class in the code. That is, it is either the same or has an is-a relationship (subclass or implementation class). However, there can only be one such homologous called bean. If there is more than one, the Spring container doesn't know which one to match. For example:
[the external chain picture transfer fails, and the source station may have an anti-theft chain mechanism. It is recommended to save the picture and upload it directly (img-0gmgxhs2-1646825366505) (E: \ pictures \ typora pictures \ 1640791752628. PNG)]
2.3.5. Specify multiple Spring configuration files
Sometimes, when the project becomes extremely large, if we configure all the information of the configuration file into one file, the configuration file will appear very bloated. Therefore, it is necessary to set multiple configuration files in modules, so how to bind multiple configuration files together? This requires the use of labels, such as:
<!--applicationContext01.xml-->
<bean id="myStudent01" class="com.beim.entity.Student" >
    <property name="id" value="1"/>
    <property name="name" value="Zhang San"/>
    <property name="age" value="22"/>
    <property name="school" ref="myschool01"/>
</bean>
<bean id="myschool01" class="com.beim.entity.School">
    <property name="name" value="Tsinghua University"/>
    <property name="adress" value="Beijing"/>
</bean>
<!--Note: only the core code of the document, not all the code-->
<!--applicationContext02.xml-->
<bean id="myStudent01" class="com.beim.entity.Student" >
    <property name="id" value="2"/>
    <property name="name" value="Li Si"/>
    <property name="age" value="20"/>
    <property name="school" ref="myschool02"/>
</bean>
<bean id="myschool02" class="com.beim.entity.School">
    <property name="name" value="Peking University"/>
    <property name="adress" value="Beijing"/>
</bean>
<!--Note: only the core code of the document, not all the code-->
<!--total.xml-->
<import resource="classpath:applicationContext01.xml"/>
<import resource="classpath:applicationContext02.xml"/>
The code of the test program is:
@Test
public void test() {
    // Define profile path
    String config = "total.xml";
    ApplicationContext ac = new ClassPathXmlApplicationContext(config);
    Student myStudent01 = (Student) ac.getBean("myStudent01");
    Student myStudent02 = (Student) ac.getBean("myStudent02");
    // output
    System.out.println(myStudent01);
    System.out.println(myStudent02);
}
The output results are:
Student{id=1, name = 'Zhang San', age=22, school=School{name = 'Tsinghua University', adress = 'Beijing'}}
Student{id=2, name = 'Li Si', age=20, school=School{name = 'Peking University', adress = 'Beijing'}}
In addition, wildcards can also be used when filling in the addresses of other sub files in total. This method is rarely used. It will not be demonstrated one by one here. The syntax is consistent with that of the wildcards previously contacted. Interested friends can consult the official documents by themselves.
2.3.6 comparison between annotations and XML files
The advantages of annotations are:
- convenient
- visual
- Efficient (less code, no complicated writing configuration files)
Its disadvantages are also obvious. The annotation is embedded into the source code in the way of hard coding. Each modification needs to be recompiled, which greatly reduces the speed.
The advantages of XML files are:
- The coupling with the source code is low, and the XML file is separated from the source code
- Modify the code in the XML file without compiling. Just restart the server to load the new configuration file. Faster
Its disadvantages are: writing is troublesome, inefficient, and large-scale projects are too complex.
Generally speaking, the two methods have their own advantages and disadvantages. It depends on the specific application scenario. Generally, there will be more annotation. However, if you need to modify the source code frequently in your project, it is recommended to use XMl file.
3, AOP
3.1. What is AOP?
AOP (Aspect Oriented Programming) means Aspect Oriented Programming, so what is aspect? Why do we use section? A series of questions will come. Don't worry. Before that, let's review the concept of dynamic agent.
3.1.1 dynamic agent
The implementation of the underlying dynamic agent is very complex. Here we don't need to go deep into how the underlying agent is implemented. We just need to understand what the role of dynamic agent is. In other words, what are the unknown advantages of using dynamic agent versus not using dynamic agent? In order to understand the above problems, let's take a look at an example:
// Define an interface first
public interface SomeService {
    void doSome();
}
// Interface implementation class
public class SomeServiceImpl implements SomeService {
    @Override
    public void doSome() {
        System.out.println("The business method is realized!!!");
    }
}
// Test class
@Test
public void test() {
    SomeService someService = new SomeServiceImpl();
    someService.doSome();
}
Obviously, I don't need the screenshot of the output result on the. The output result must be the implementation of the business method. OK, now, we need to add functions to the doSome() method. For example, I need to output a time before the output business method is implemented. If we follow our previous practice, will we directly add a time output to the code, but have you ever thought about doing so:
Now it's just a simple example for easy understanding. If it's a large-scale project that has been launched in the future, can you directly modify the source code? (obviously, you can't directly take the project offline first, then add functions and then go online again. Obviously, you can't do this.) don't forget that our programming has an OCP principle. Moreover, if there are hundreds of target methods to add functions, you need to write hundreds of times, which will produce a lot of redundant code. So how can we add functionality without modifying the source code?
Yes, that's what the dynamic agent does. Its underlying implementation is relatively complex. Here, you only need to know what the dynamic agent can do. Let's start with the conclusion:
- Add functions without changing the source code of the target class.
- Reduce code duplication
- Focus on business logic code
- Decouple your business functions from non business functions such as logs and transactions.
At present, there are two mainstream implementation methods of dynamic agent, one is the dynamic agent provided by JDK, and the other is to use CGLIB to realize dynamic agent:
jdk dynamic Proxy: use Proxy, Method and invocaitonhandler in jdk to create Proxy objects. jdk dynamic Proxy requires that the target class must implement the interface.
cglib dynamic proxy: a third-party tool library that creates proxy objects. The principle is inheritance. Create subclasses by inheriting the target class. Subclasses are proxy objects. It is required that the target class cannot be final and the method cannot be final.
3.1.2 how to understand AOP?
OK, after understanding the above concepts, we look back at the previous questions, which are actually well understood.
Aspect: in fact, it is the additional function added to your target class. Note that it is on the basis of not changing the original code.
The feature of logic is that it is separated from the general business code.
In fact, the implementation of native JDK dynamic agent and CGLIB dynamic agent is also relatively complex, and aspect oriented programming solves this problem. It processes and frames the process of realizing dynamic agent, and introduces the concept of aspect, which makes it easier for us to realize dynamic agent. To put it bluntly, it is a high-level package that allows programmers to implement dynamic agents in a more elegant way.
For programmers themselves, we just need to do it,
-
It is necessary to find out the section when analyzing the project
-
Reasonably arrange the execution time of the aspect (before or after the target method)
-
Reasonable and safe execution position, in which class and after which method to add enhanced functions
When we need to add non business functions such as log, transaction processing and other codes to the business code, we only need to package the non business code into sections and weave it into the target method, which greatly simplifies the development and improves the efficiency.
Note: aspect oriented programming is only a supplement to object-oriented programming. It is just a programming idea. It is not unique to Spring, but the aspect oriented programming method is integrated in Spring.
3.2 AOP programming terms
While formally learning how to use this programming idea, we still need to understand some AOP programming terms.
(1) Aspect
Aspect generally refers to cross business logic. That is, you need to add functional modules in the main business logic. In the above example, after the method module you want to enhance is encapsulated into a class, this class is the facet class.
(2) Join point
Connection point refers to the specific method that can be woven into the section. That is, your target method. Usually, the methods in the business interface are connection points. In the above example, it refers to the doSome() method
(3) Pointcut
A pointcut is a collection of one or more declared join points. Specify a set of methods through pointcuts. Methods marked final cannot be used as join points and pointcuts. Because the final can not be modified, can not be enhanced.
(4) Target object
Target object refers to the object to be enhanced. That is, the object of the class containing the main business logic. If the object of SomeServiceImpl in the above example is enhanced, this class is called the target class, and this class of object is called the target object. Of course, it doesn't matter if it is not enhanced.
(5) Advice
The notification indicates the execution time of the aspect, and Advice is also called enhancement. The MyInvocationHandler in the above example can be understood as a notification. In other words, notification defines the time point when the enhanced code cuts into the target code, whether it is executed before or after the execution of the target method. Different notification types lead to different cut in times. The pointcut defines the position of the pointcut and notifies the time of the pointcut.
The definition of a section has three elements:
First: the function code of the section, that is, what does the section do?
Second: the execution position of the aspect, that is, where the aspect is executed, that is, where the entry point is?
Third: the execution time of the aspect, that is, when the aspect is executed, before, after or between the target methods
3.3. AspectJ framework
For the programming idea of AOP, many frameworks have been implemented. Spring is one of them. It can complete aspect oriented programming, but spring's implementation of AOP is cumbersome. AspectJ framework not only realizes the function of AOP, but also its implementation method is simpler and more convenient to use, but also supports annotation development. Therefore, spring also introduces AspectJ's implementation of AOP into its own framework (so spring has strong scalability). When using AOP development in spring, the implementation of AspectJ is generally used.
Here is a brief introduction to the AspectJ framework, which is an excellent open source framework. Its official website address is: http://www.eclipse.org/aspectj/ , is an open source project on eclipse. Before formally using these frameworks, let's first understand several terms in AspectJ framework:
3.3.1 type of notice
There are five types of notifications commonly used in AspectJ:
(1) Advance notice
(2) Post notification
(3) Surround notification
(4) Exception notification
(5) Final notice
3.3.2. Pointcut expression
AspectJ defines special expressions for specifying pointcuts. The prototype of the expression is:
execution(modifiers-pattern? ret-type-pattern declaring-type-pattern?name-pattern(param-pattern) throws-pattern?)
Explanation:
Modifiers pattern] access type
RET type pattern return value type
Declaring type pattern package name class name
Name pattern (param pattern) method name (parameter type and number of parameters)
Throws pattern throw exception type
? Represents an optional part
The above expression consists of four parts.
Execution (access permission method return value method declaration (parameter) exception type)
See here, I believe there are already small partners who can know what the meaning of this pointcut expression is? The object to be matched by the pointcut expression is the method name of the target method. Therefore, the execution expression is the signature of the method, which helps you locate the target method. Specifies the of the pointcut. Note that the black text in the expression indicates the parts that can be omitted, and the parts are separated by spaces. The following symbols can be used:
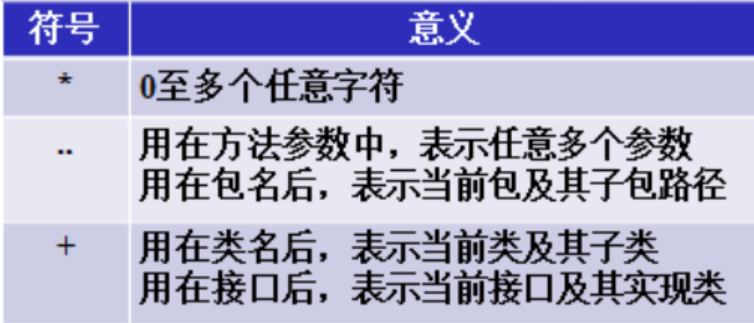
give an example:
// Specify the pointcut as: any public method
execution(public **(..))

// The specified pointcut is: any method starting with "set".
execution(* set*(..))

// The specified pointcut is: any method of any class defined in the service package. Parameters are also arbitrary
execution(* com.xyz.service.*.*(..))

/*
	The specified pointcut is: any method of any class defined in the service package or sub package. “..” When it appears in the class name, after
	The face must be followed by "*", indicating all classes under the package and sub package.
*/
execution(* com.xyz.service..*.*(..))

// Specify all methods in all classes (interfaces) under serivce sub packages under all packages as pointcuts
execution(* *..service.*.*(..))

// Specify that only all methods in all classes (interfaces) under the serivce sub package under the first level package are the pointcuts
execution(* *.service.*.*(..))

// Specify that only all methods in the isomeservice interface under the first level package are pointcuts
execution(* *.ISomeService.*(..))

// Specify all methods in the isomeservice interface under all packages as pointcuts
execution(* *..ISomeService.*(..))

// The specified pointcut is: any method in IAccountService interface.
execution(* com.xyz.service.IAccountService.*(..))

/*
	The specified entry point is: IAccountService. If it is an interface, it is any method in the interface and any method in all its implementation classes
	method; If it is a class, it is any method in the class and its subclasses.
*/
execution(* com.xyz.service.IAccountService+.*(..))

/*
	The specified pointcut is: all the joke(String,int) methods, and the first parameter of the joke() method is String and the second parameter is
	The number is int. If the parameter type in the method is Java For classes under Lang package, you can directly use the class name, otherwise you must use the fully qualified class name, 	 Such as joke (Java. Util. List, int).
*/
execution(* joke(String,int)))

/*
    The specified pointcut is: all joke() methods. The first parameter of this method is String, and the second parameter can be any class
    Type, such as joke(String s1,String s2) and joke(String s1,double d2), but joke(String s1,double d2,String s3) is not.
*/
execution(* joke(String,*)))


/*
	The specified entry point is: all joke() methods. The first parameter of this method is String, and there can be any parameter and
 There are no restrictions on parameter types, such as joke(String s1), joke(String s1,String s2) and joke(String s1,double d2,String s3)
Both.
*/
execution(* joke(String,..)))

/*
	The specified pointcut is: all joke() methods. The method has one parameter and the parameter is of object type. joke(Object ob)
	Yes, but neither joke(String s) nor joke(User u).
*/
execution(* joke(Object))

/*
	The specified pointcut is: all joke() methods. The method has one parameter, and the parameter is Object type or subclass of this class.
	Not only joke(Object ob) but also joke(String s) and joke(User u).
*/
execution(* joke(Object+)))
3.3.3. Implement AspectJ framework
[1] Join Maven dependency first
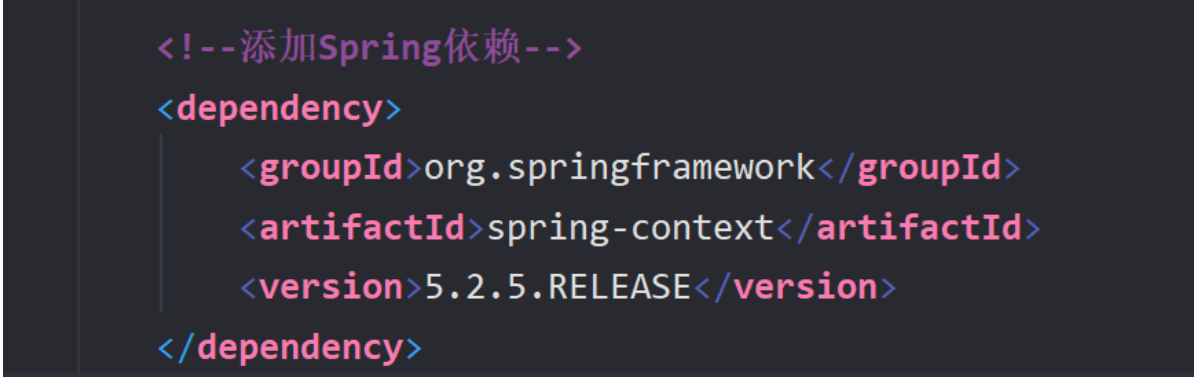
<!--add to Spring rely on-->
<dependency>
    <groupId>org.springframework</groupId>
    <artifactId>spring-context</artifactId>
    <version>5.2.5.RELEASE</version>
</dependency>

<!--add to aspectJ Dependence of-->
<dependency>
    <groupId>org.springframework</groupId>
    <artifactId>spring-aspects</artifactId>
    <version>5.2.5.RELEASE</version>
</dependency>
[2] Define a facet class
@Aspect
public class MyAspect {
    // Pre notification, indicating that the enhancement is added before the target method
    @Before(value = "execution(public void doSome(..))")
    public void doLog(){
        System.out.println("The post enhancement method is implemented!!! The output value is:");
    }
}
[3] Claim profile
<!--Statement of objectives JavaBean object-->
<bean id="myService" class="com.beim.service.SomeServiceImpl"/>

<!--Declare facet class objects-->
<bean id="myAspect" class="com.beim.service.MyAspect"/>

<!--
	Declare an automatic proxy generator that can be used to generate proxy objects
 Its working principle is: according to@Aspect The class defined by the annotation finds the aspect class, then the aspect class finds the target method in the target class through the pointcut, and then the notification type finds the pointcut time. (front or rear, or middle.)
-->
<aop:aspectj-autoproxy/>
[4] Output test
@Test
public void test() {
    String config = "applicationContext.xml";
    ApplicationContext ac = new ClassPathXmlApplicationContext(config);
    // Get proxy object
    SomeService myService = (SomeService) ac.getBean("myService");
    myService.doSome();
}
Output:
Enhanced method implemented!!!
The business method is realized!!!
3.4 demonstration of various notice notes
(1) @ before (advance notice)
Execute before the target method executes. Methods annotated as pre notification can contain a JoinPoint type parameter. An object of this type is itself a pointcut expression. With this parameter, you can obtain the pointcut expression, method signature, target object, etc. Not only the pre notification method, it can contain a JoinPoint type parameter, which can be included in all notification methods.
[1] Target method
public interface SomeService {
    void doSome(String name,Integer age);
}
public class SomeServiceImpl implements SomeService {
    @Override
    public void doSome(String name,Integer args) {
        System.out.println("The business method is realized!!!");
    }
}
[2] Definition of section class:
@Aspect
public class MyAspect {
    /*
        JoinPoint Parameter, which represents the target method object, can obtain the signature, parameters and other information of the target method, which must be used as
        The first parameter is passed into the collocation section method.
     */
    @Before(value = "execution(public void doSome(..))")
    public void doLog(JoinPoint jp){
        // Get method definition of connection point
        System.out.println("The method of connecting points is defined as:"  + jp.getSignature());
        // Gets the number of parameters returned by the method
        System.out.println("The number of return parameters of the connection point method is:" + jp.getArgs().length);
        // Output information of method parameters
        Object[] args = jp.getArgs();
        for (Object obj :
                args) {
            System.out.println(obj);
        }

        System.out.println("Enhanced method implemented!!!");
    }
}
[3] Test class
@Test
public void test() {
    String config = "applicationContext.xml";
    ApplicationContext ac = new ClassPathXmlApplicationContext(config);

    // Get the target class proxy object
    SomeService myService = (SomeService) ac.getBean("myService");
    myService.doSome("Zhang San",22);
}
[4] Output:
The method of connection point is defined as: void com beim. service. SomeService. doSome(String,Integer)
The number of return parameters of the join point method is: 2
Zhang San
22
Enhanced method implemented!!!
The business method is realized!!!
(2) @ afterreturning (post notification)
Execute after the target method is executed. Since it is executed after the target method, the return value of the target method can be obtained. The annotation return attribute is used to specify the variable name of the return value of the receiving method. Therefore, the method annotated as post notification can contain not only the JoinPoint parameter, but also the variable used to receive the return value. This variable is preferably of type Object, because the return value of the target method may be of any type.
public interface SomeService {
    String doSome(String name,Integer age);
}
public class SomeServiceImpl implements SomeService {
    @Override
    public String doSome(String name,Integer args) {
        System.out.println("The business method is realized!!!");
        return name;
    }
}
@Aspect
public class MyAspect {
    // Post notification
    @AfterReturning(value = "execution(String doSome(..))",returning = "ret")
    public void doLog(Object ret){
        System.out.println(ret);
        System.out.println("Enhanced method implemented!!!");
    }
}
@Test
public void test() {
    String config = "applicationContext.xml";

    ApplicationContext ac = new ClassPathXmlApplicationContext(config);
    SomeService myService = (SomeService) ac.getBean("myService");
    myService.doSome("Zhang San",22);
}
Output:
The business method is realized!!!
Zhang San
Enhanced method implemented!!!
It is actually equivalent to:
Object ret = doSome();
doLog(Object ret);
(3) @ around (surround notification)
Execute before and after the target method is executed. Methods annotated as surround enhancement should have return values and Object types. And the method can contain a parameter of type ProceedingJoinPoint (inheriting the JointPoint class). Interface ProceedingJoinPoint, which has a processed () method to execute the target method. If the target method has a return value, the return value of the method is the return value of the target method. Finally, the surround enhancement method returns its return value** The enhancement method actually intercepts the execution of the target method** For example (interface and interface implementation class are consistent with 3.4.2):
// Around Advice
@Around(value = "execution(String doSome(..))")
public void doLog(ProceedingJoinPoint pjp) throws Throwable {
    // Perform pre enhancement first
    System.out.println("Pre enhancement executed!!!");
    // Execution target method
    pjp.proceed();
    // Get the return value of the target method and output it
    String proceed = (String) pjp.proceed();
    System.out.println(proceed);
    // Perform post enhancements
    System.out.println("Post enhancement executed!!!");
}
@Test
    public void test() {
    String config = "applicationContext.xml";

    ApplicationContext ac = new ClassPathXmlApplicationContext(config);
    SomeService myService = (SomeService) ac.getBean("myService");
    myService.doSome("Zhang San",22);
}
Output:
Pre enhancement executed!!!
The business method is realized!!!
The business method is realized!!!
Zhang San
Post enhancement executed!!!
(4) @ afterthrowing (exception notification)
Execute after the target method throws an exception. The throwing attribute of this annotation is used to specify the exception class object that occurs. Of course, the method annotated as exception notification can contain a parameter Throwable. The parameter name is the name specified by throwing, indicating the exception object. This kind of notification is rarely used. It is generally used when the target method may throw an exception. It is somewhat similar to the output in the catch statement in the try... Catch statement, for example:
public interface SomeService {
    void doSome(Integer num);
}
public class SomeServiceImpl implements SomeService {
    @Override
    public void doSome(Integer num) {
        System.out.println("exception occurred" + num/0);
    }
}
@AfterThrowing(value = "execution(void doSome(..))",throwing = "th")
public void doLog(Throwable th) throws Throwable {
    // Print abnormal output
    System.out.println("Throw arithmetic exception" + th.getMessage());
}
@Test
public void test() {
    String config = "applicationContext.xml";

    ApplicationContext ac = new ClassPathXmlApplicationContext(config);
    SomeService myService = (SomeService) ac.getBean("myService");
    myService.doSome(10);
}
Output:
[the external chain picture transfer fails, and the source station may have an anti-theft chain mechanism. It is recommended to save the picture and upload it directly (img-vsv3ksf3-1646825366507) (E: \ pictures \ typora pictures \ 1641118425946. PNG)]
(5) @ after (final notification)
** This exception is actually similar to the finally clause in try... catch, which is executed at the end anyway** It is also very simple to use, for example:
public interface SomeService {
    void doSome();
}
public class SomeServiceImpl implements SomeService {
    @Override
    public void doSome() {
        System.out.println("The business method is executed!!!");
    }
}
@After(value = "execution(void doSome(..))")
public void doLog(){
    System.out.println("The final method output!!!");
}
@Test
public void test() {
    String config = "applicationContext.xml";

    ApplicationContext ac = new ClassPathXmlApplicationContext(config);
    SomeService myService = (SomeService) ac.getBean("myService");
    myService.doSome();
}
Output:
The business method is executed!!!
The final method output!!!
(6) Pointcut (define pointcut)
Sometimes, if our target methods are consistent, when multiple annotations are required for multiple target methods, we can use the method of defining pointcuts. This method is rarely used. It is mainly used to define an alias for pointcut expressions, for example:
@After(value = "myPointcut()")
public void doLog(){
    System.out.println("The final method output!!!");
}

@Pointcut(value = "execution(void doSome(..))")
public void myPointcut(){
    // There is no need to write code
}
The final output result is consistent with that in (5).
1. If there is an interface in the target class, it is the dynamic proxy mode of JDK.
2. The target class does not have an interface, but uses the dynamic proxy of CGLIB, and the Spring framework will automatically apply CGLIB
3. CGLIB only requires that the target class can inherit. If the target class does not have an interface, CGLIB dynamic proxy can also be used, but one needs to be added to the Spring configuration file:
[the external chain picture transfer fails, and the source station may have an anti-theft chain mechanism. It is recommended to save the picture and upload it directly (img-j24oswdy-1646825366507) (E: \ pictures \ typora pictures \ 16411996813. PNG)]
4. The dynamic proxy method of CGLIB will be more efficient in program execution
4, Integrating Mybatis in Spring
To realize the integration of Spring and mybatis, we need to introduce a new dependency that relies on the integration of Spring and mybatis:
<dependency>
    <groupId>org.mybatis</groupId>
    <artifactId>mybatis-spring</artifactId>
    <version>1.3.1</version>
</dependency>
With this dependency, you can bind the Spring configuration file to the Mybatis configuration file. After binding, the data source in the Mybatis configuration file does not need to be configured, and it is left to Spring to configure. Because the data source configuration is essentially creating a SqlSessionFactory object, this object can be created and managed by Spring** In addition, we use Alibaba's druid database connection pool to configure this data source** In this case, we only need to register the druid bean in the Spring configuration file.
We can use an image analogy to compare the integration process: spring is like a patch board, and the mybatis framework is a plug, which can be easily combined together. When the patch panel spring is plugged into mybatis, the two frames are a whole.
4.1 realization of specific integration
[1] Create a maven project:

[2] Add maven dependency:
<dependencies>
    <!--Test package dependency-->
    <dependency>
        <groupId>junit</groupId>
        <artifactId>junit</artifactId>
        <version>4.11</version>
        <scope>test</scope>
    </dependency>
    <!--Spring rely on-->
    <dependency>
        <groupId>org.springframework</groupId>
        <artifactId>spring-context</artifactId>
        <version>5.2.5.RELEASE</version>
    </dependency>
    <!--Mybatis Dependence of-->
    <dependency>
        <groupId>org.mybatis</groupId>
        <artifactId>mybatis</artifactId>
        <version>3.5.1</version>
    </dependency>
    <!--Mybatis And Spring Integrated dependencies-->
    <dependency>
        <groupId>org.mybatis</groupId>
        <artifactId>mybatis-spring</artifactId>
        <version>1.3.1</version>
    </dependency>
    <!--JDBC Dependence of-->
        <dependency>
            <groupId>org.springframework</groupId>
            <artifactId>spring-jdbc</artifactId>
            <version>5.2.5.RELEASE</version>
        </dependency>
    <!--MySQL Database driven-->
    <dependency>
        <groupId>mysql</groupId>
        <artifactId>mysql-connector-java</artifactId>
        <version>5.1.9</version>
    </dependency>
    <!--druid Database connection pool-->
    <dependency>
        <groupId>com.alibaba</groupId>
        <artifactId>druid</artifactId>
        <version>1.1.12</version>
    </dependency>
</dependencies>


<build>
    <resources>
        <resource>
            <directory>src/main/java</directory><!--Directory of-->
            <includes><!--Including the.properties,.xml The files will be scanned-->
                <include>**/*.properties</include>
                <include>**/*.xml</include>
            </includes>
            <filtering>false</filtering>
        </resource>
    </resources>
    <plugins>
        <!--Compiler plug-in-->
        <plugin>
            <artifactId>maven-compiler-plugin</artifactId>
            <version>3.1</version>
            <configuration>
                <source>1.8</source>
                <target>1.8</target>
            </configuration>
        </plugin>
    </plugins>
</build>
[3] Create entity class
public class Student {
    private String name;
    private Integer age;

    public Student(String name, Integer age) {
        this.name = name;
        this.age = age;
    }

    public void setName(String name) {
        this.name = name;
    }

    public void setAge(Integer age) {
        this.age = age;
    }

    @Override
    public String toString() {
        return "Student{" +
                "name='" + name + '\'' +
                ", age=" + age +
                '}';
    }
}
[4] Define interface
public interface StudentDao {
    // Add student
    int insertStudent(Student student);

    // Delete student
    int deleteStudent(Integer studentId);

    // Modify student information
    int updateStudent(Student student);

    // Query all student information
    List<Student> findAllStudent();

    // Query student information according to Id
    Student findStudentById(Integer id);
}
[5] Define interface mapping file
<mapper namespace="com.beim.dao.StudentDao">
    <!--Add student information-->
    <insert id="insertStudent">
        insert into student(name,age) values (#{name},#{age})
    </insert>
    <!--Delete student information-->
    <delete id="deleteStudent">
        delete from student where id = #{studentId}
    </delete>
    <!--Update student information-->
    <update id="updateStudent">
        update student set name = #{name},age = #{age}
    </update>
    <!--Query all student information-->
    <select id="findAllStudent" resultType="com.beim.entity.Student">
        select name,age from student
    </select>
    <!--according to ID Value query student information-->
    <select id="findStudentById" resultType="com.beim.entity.Student">
        select name,age from student  where id = #{studentId}
    </select>
</mapper>
[6] Define Service interface and implementation class
public interface StudentService {
    // Add student
    int insertStudent(Student student);

    // Delete student
    int deleteStudent(Integer studentId);

    // Modify student information
    int updateStudent(Student student);

    // Query all student information
    List<Student> findAllStudent();

    // Query student information according to Id
    Student findStudentById(Integer studentId);
}
public class StudentServiceImpl implements StudentService {
    private StudentDao studentDao;

    // To implement set injection to StudentDao
    public StudentServiceImpl(StudentDao studentDao) {
        this.studentDao = studentDao;
    }

    @Override
    public int insertStudent(Student student) {
        return studentDao.insertStudent(student);
    }
    @Override
    public int deleteStudent(Integer studentId) {
        return studentDao.deleteStudent(studentId);
    }

    @Override
    public int updateStudent(Student student) {
        return studentDao.updateStudent(student);
    }

    @Override
    public List<Student> findAllStudent() {
        return studentDao.findAllStudent();
    }

    @Override
    public Student findStudentById(Integer studentId) {
        return studentDao.findStudentById(studentId);
    }
}
[7] Define Mybatis profile
<configuration>
    <settings>
        <!--set up Mybatis Output log for-->
        <setting name="logImpl" value="STDOUT_LOGGING"/>
    </settings>
    <mappers>
        <mapper resource="com/beim/dao/StudentDao.xml"/>
    </mappers>
</configuration>
[8] Create Spring configuration file
<?xml version="1.0" encoding="UTF-8"?>
<beans xmlns="http://www.springframework.org/schema/beans"
       xmlns:xsi="http://www.w3.org/2001/XMLSchema-instance"
       xsi:schemaLocation="http://www.springframework.org/schema/beans http://www.springframework.org/schema/beans/spring-beans.xsd">

    <!--register Druid Instance object for,Using Ali's Druid Database connection pool to connect to database-->
    <bean id="myDataSource" class="com.alibaba.druid.pool.DruidDataSource" init-method="init" destroy-method="close">
        <!--URL address-->
        <property name="url" value="jdbc:mysql://localhost:8080/springdb"/>
        <!--user name-->
        <property name="username" value="root"/>
        <!--password-->
        <property name="password" value="333" />
    </bean>

    <!--establish SqlSessionFactory Object to create DAO object-->
    <bean id="sqlSessionFactory" class="org.mybatis.spring.SqlSessionFactoryBean">
        <!--set Injection, paying the database connection pool dataSource attribute-->
        <property name="dataSource" ref="myDataSource" />
        <!--mybatis Location of the master profile
           configLocation Attribute is Resource Type, read configuration file
           Its assignment, using value,Specify the path to the file, using classpath:Indicates the location of the configuration file
        -->
        <property name="configLocation" value="classpath:mybatis-config.xml" />
    </bean>

    <!--establish DAO Object is used to manipulate the database-->
    <bean class="org.mybatis.spring.mapper.MapperScannerConfigurer">
        <!--appoint SqlSessionFactory Object id-->
        <property name="sqlSessionFactoryBeanName" value="sqlSessionFactory" />
        <!--Specify the package name, which is dao The package name of the interface.
            MapperScannerConfigurer It will scan all interfaces in the package and execute each interface
            once getMapper()Method to get the of each interface dao Object.
            Created dao Object into spring In the container. dao The default name of an object is the initial lowercase of the interface name
        -->
        <property name="basePackage" value="com.beim.dao"/>
    </bean>

    <!--establish service object-->
    <bean id="studentService" class="com.beim.service.impl.StudentServiceImpl">
        <property name="studentDao" ref="studentDao" />
    </bean>
</beans>
One thing I need to explain here is that after we write the bean tag of creating DAO object, when we write the tag of service object and inject the dependency of studentdao in StudentServiceImpl implementation class, why is the value of ref not assigned with ID, but written as ref = "studentdao", that is to say:
<!--establish Dao object-->
<bean id = "myStudentDao"class="org.mybatis.spring.mapper.MapperScannerConfigurer">
    <property name="sqlSessionFactoryBeanName" value="sqlSessionFactory" />
    <property name="basePackage" value="com.beim.dao"/>
</bean>

<!--establish service object-->
<bean id="studentService" class="com.beim.service.impl.StudentServiceImpl">
    <property name="studentDao" ref="myStudentDao" />
</bean>
The writing method of this assignment is the same as that mentioned earlier. The dependency injection method for reference types is the same. In this way, the value of ref can be customized, and its value changes with the ID of DAO object. Isn't it more convenient? An exception was reported:
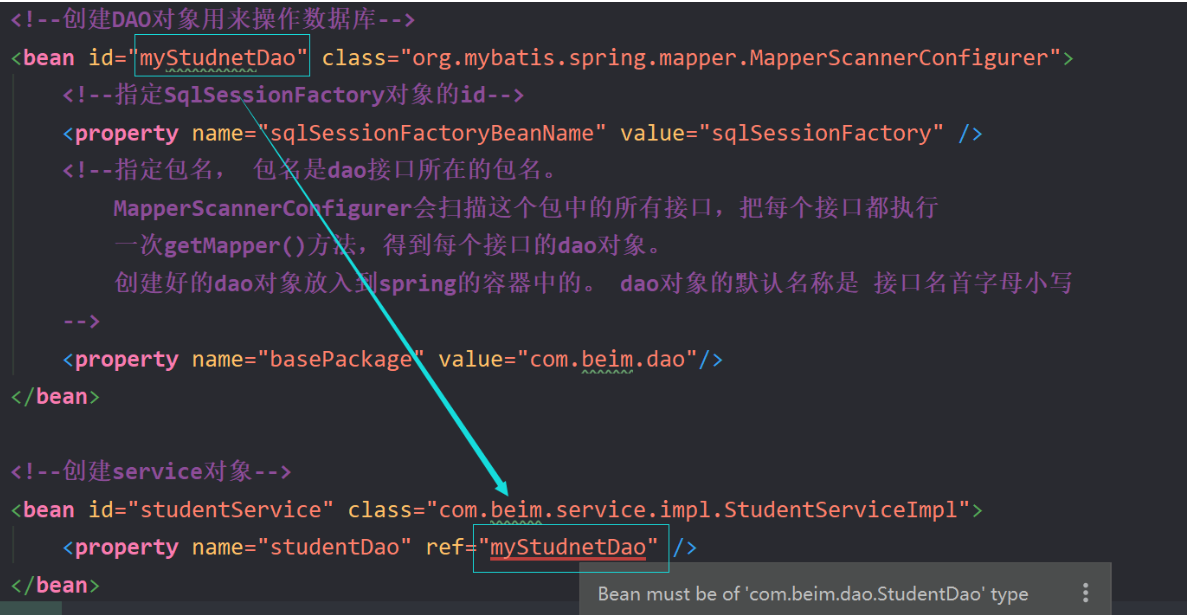
Bean must be of ‘com. beim. DAO. Student DAO 'type, why? To understand this problem, first take a look at how Spring creates DAO objects. In fact, Spring creates DAO objects with the help of mappercannerconfigurer class, which is translated into Chinese as mapping scan configurator. This class has a basePackage attribute, and its value is the package where the mapper mapping file is located.

The execution principle of this attribute is: scan all interfaces under the package, execute getMapper() method for each interface once, and get the Dao object of each interface. Then put the Dao object of each interface into the Spring container, and the name of the Dao object is the interface name with lowercase initial letters.
Therefore, when you set the basePackage tag, the DAO object has been created, so we can only use its default name, that is, the value of ref can only be the interface name with lowercase initial letters.
[9] Testing
public class MyTest {
    @Test
    public void MyTest(){
        String config = "spring-config.xml";
        ApplicationContext ac = new ClassPathXmlApplicationContext(config);
        StudentService studentService = (StudentService) ac.getBean("studentService");
        List<Student> allStudent = studentService.findAllStudent();
        System.out.println(allStudent);
    }
}
The output results will not be put here. You can test them yourself
[10] Upgrade
In fact, the URL and other configuration information of the data source can be written into a separate configuration file, as shown below:
<!--
	Write the configuration information of the database in an independent file, compile and modify the configuration content of the database
	spring know jdbc.properties File location
-->
<context:property-placeholder location="classpath:jdbc.properties" />

<!--Declare data source DataSource, The function is to connect to the database-->
<bean id="myDataSource" class="com.alibaba.druid.pool.DruidDataSource"
      init-method="init" destroy-method="close">
    <!--set Inject into DruidDataSource Provide connection database information -->
    <!--    Use the data in the property configuration file, syntax ${key} -->
    <property name="url" value="${jdbc.url}" /><!--setUrl()-->
    <property name="username" value="${jdbc.username}"/>
    <property name="password" value="${jdbc.password}" />
    <property name="maxActive" value="${jdbc.max}" />
</bean>
jdbc. Put the properties configuration file into the resources package:

The advantage of this configuration is to decouple the configuration information of the database from the XML file, so that the modification and maintenance cost is low. It should be noted that when Spring and mybatis are integrated together, transactions are automatically committed.
5, Transaction commit mechanism of Spring
To understand the transaction submission mechanism of Spring, let's first briefly review the transaction mechanism. In the study of MySQL, I believe everyone knows what the action mechanism of transactions is, how to implement specific native transactions, and what the underlying principle is. We won't do too much analysis here. Let's just briefly review what transactions can do?
To put it bluntly, for the sake of learning this, the role of affairs is that it can ensure the consistency of whether you can handle a group of things successfully or not. For example: * * I transfer 100 yuan to you, then the realization of this function should include two modules. The first module is to ensure that my account balance is reduced by 100 yuan, and the second module is to ensure that your account balance is increased by 100 yuan** OK, now if your banking system fails and my system is normal, my balance has been reduced by 100 yuan, but your account balance has not increased by 100 yuan due to system failure, isn't there a problem? Of course, we are only involved in a small amount of transfer? What if the amount is very high? That will cause very serious security consequences, so we introduced the transaction mechanism, * * which can ensure that both modules in my transfer operation succeed or fail** If either party has a problem, it will roll back to ensure security.
Understand the general role of transactions, there is still a problem? For example, if you are not used to the transaction mechanism of Oracle, you have to use the transaction mechanism of MySQL. If you are not used to the transaction mechanism, you have to use the transaction mechanism of Oracle. If you are not used to it, you have to use the transaction mechanism of MySQL, Because it is impossible for us to remember so many implementations, is there a unified implementation?
Therefore, the emergence of Spring framework solves this problem, * * it provides a unified model and standardizes the implementation mechanism of transactions. The implementation mechanisms of different databases can be summarized into this unified model** As shown in the figure below
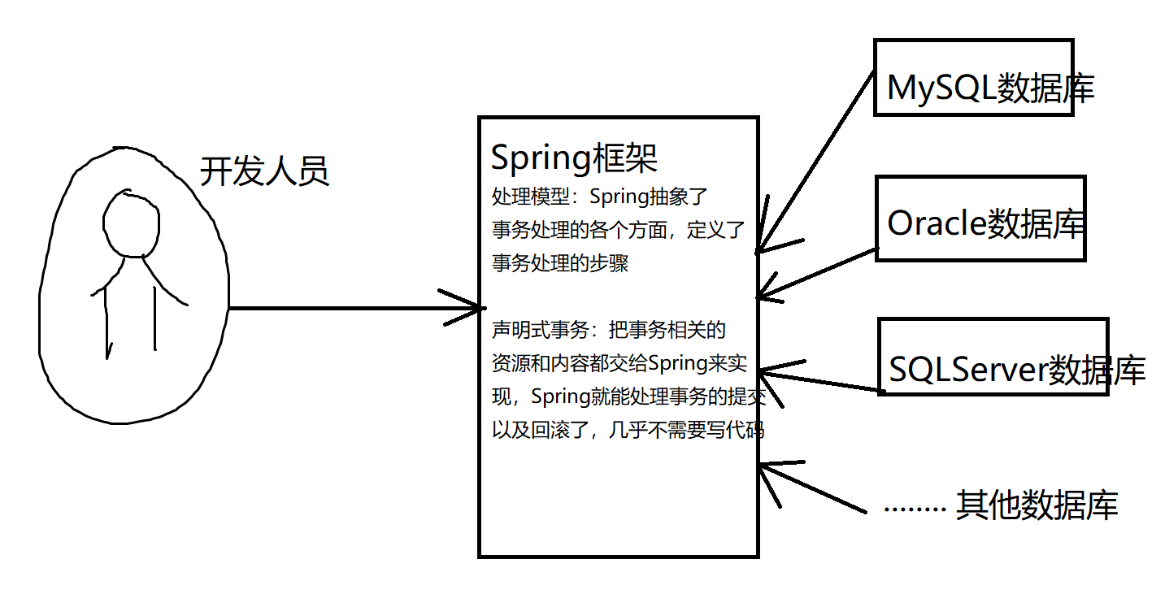
As developers, we only need to face spring. Spring mainly provides two methods to implement transactions.
5.1. API of Spring transaction management
The transaction manager is the PlatformTransactionManager interface object. It is mainly used to complete the submission and rollback of transactions and obtain the status information of transactions.
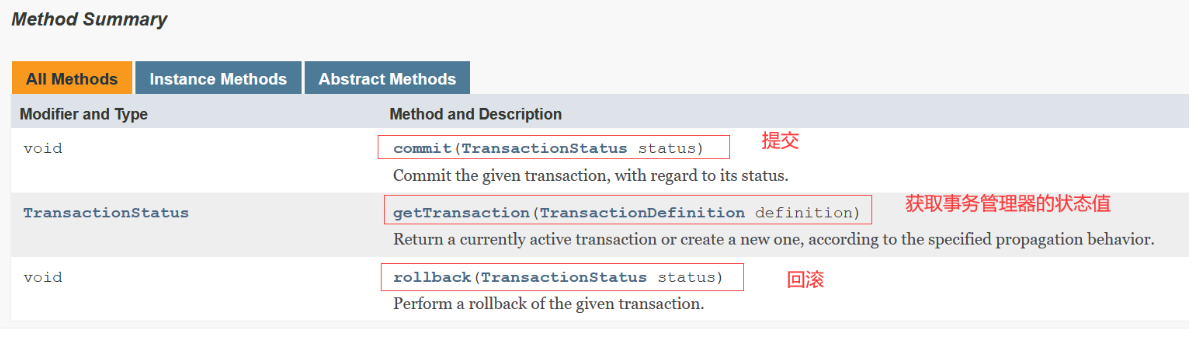
This interface has two common implementation classes:
- Data source transaction manager: used when using JDBC or MyBatis for database operations.
- Hibernate transaction manager: used when using hibernate to persist data.
Rollback method of Spring: the default rollback method of Spring transactions is: rollback when runtime exception and error occur, and submit when checked (compiled) exception occurs. However, for the checked exception, the programmer can also manually set its rollback mode.
It should be noted here that the rollback method of Spring: we all know that exceptions are divided into runtime exceptions and compile time exceptions. When the program has runtime exceptions and errors, Spring rolls back directly by default. If it is compile time exceptions, Spring commits the transaction directly by default.
5.2. Spring uses annotations to implement transactions
[1] We will create a maven project named ch spring transaction
[2] Add dependency of pom file
<!--Spring Two dependencies of supporting transaction mechanism in-->
<dependency>
    <groupId>org.springframework</groupId>
    <artifactId>spring-tx</artifactId>
    <version>5.2.5.RELEASE</version>
</dependency>
<dependency>
    <groupId>org.springframework</groupId>
    <artifactId>spring-jdbc</artifactId>
    <version>5.2.5.RELEASE</version>
</dependency>
2. Declarative transaction: by submitting the resources and contents related to the transaction to Spring, Spring can handle the transaction submission and rollback, and there is almost no need to write code.
3. Steps to use transactionak annotation:
- Step 1: you need to declare the transaction manager object
- Step 2: turn on the transaction annotation driver
- Step 3: add annotations to the target method
4. The annotation of the transaction must be placed on the public method. If it is a method of other types, it is meaningless because Spring will remove the permission modifier in front of the method, so it is meaningless.
5. Rollback for processing logic:
(1) The spring framework will first check whether the exception thrown by the method is in the attribute value of rollback for. If the exception is in the rollback for list, no matter what type of exception it is, it must be rolled back
(2) If the thrown exception is no longer in the rollbackFor list, Spring will judge whether the exception is a RuntimeException. If so, it must be rolled back
spring-jdbc
5.2.5.RELEASE
org.mybatis
mybatis
3.5.1
org.mybatis
mybatis-spring
1.3.1
mysql
mysql-connector-java
5.1.9
com.alibaba
druid
1.1.12
2,Declarative transaction: submit the resources and contents related to the transaction to Spring,Spring You can handle the commit and rollback of transactions, and you hardly need to write code. [External chain picture transfer...(img-xDACC6XF-1646825366512)] 3,use transactionak Steps for annotation: - Step 1: you need to declare the transaction manager object - Step 2: turn on the transaction annotation driver - Step 3: add annotations to the target method 4,The annotation of the transaction must be placed in the public Methods, if it is other types of methods, it makes no sense because it Spring The permission modifier in front of the method will be removed, so it is meaningless. 5,rollbackfor Processing logic: (1)spring The framework will first check whether the exception thrown by the method is in the rollbackfor If the exception is in rollbackfor In the list, no matter what type of exception it is, it must be rolled back (2)If the exception thrown is no longer rollbackFor In the list of, Spring Will judge whether the abnormality is RuntimeException,If so, be sure to roll back ## 5.2. Use AspectJ framework to realize transaction management mechanism 1,Declare transaction manager object 2,Declare the attributes of the business method: (isolation level, propagation behavior, timeout) [External chain picture transfer...(img-7E2zhXS3-1646825366512)] # 6, Spring and Web 1,Web The container object in the project only needs to be created once. Put the container object into the matching global scope ServletContext Medium