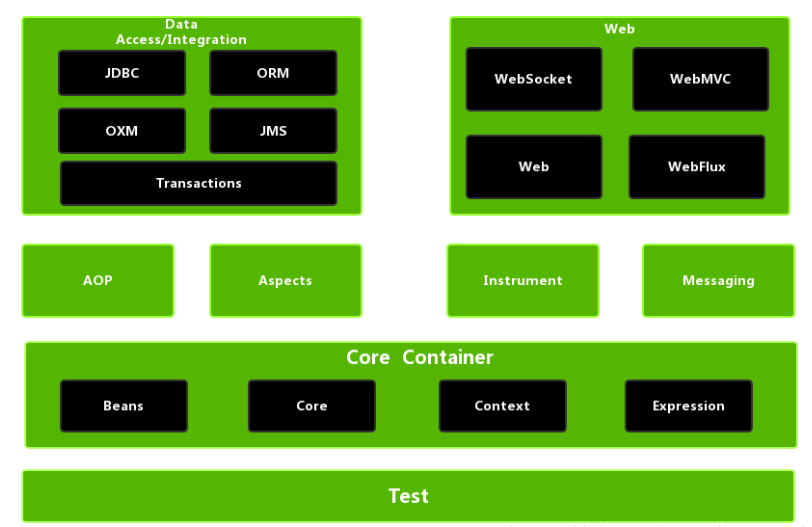
1. Spring framework overview
1. Spring is a lightweight open source Java EE framework
2. Spring can solve the complexity of enterprise application development
3. Spring has two core parts: IOC and Aop
(1) IOC: inversion of control, leaving the process of creating objects to Spring for management
(2) Aop: aspect oriented, without modifying the source code for function enhancement
4. Spring features
(1) Convenient decoupling and simplified development
(2) Aop programming support
(3) Convenient program testing
(4) Facilitate integration with other frameworks
(5) Facilitate transaction operations
(6) Reduce the difficulty of API development
2. IOC container
(1) IOC underlying principle
(2) IOC interface (BeanFactory)
(3) IOC operation Bean Management (based on xml)
(4) IOC operation Bean Management (annotation based)
1. What is IOC
(1) Control inversion, and leave the object creation and calling process between objects to Spring for management
(2) Purpose of using IOC: to reduce coupling
(3) An introductory case is IOC implementation
2. IOC underlying principle
(1) xml parsing, factory schema, reflection
3. Draw pictures to explain the underlying principle of IOC
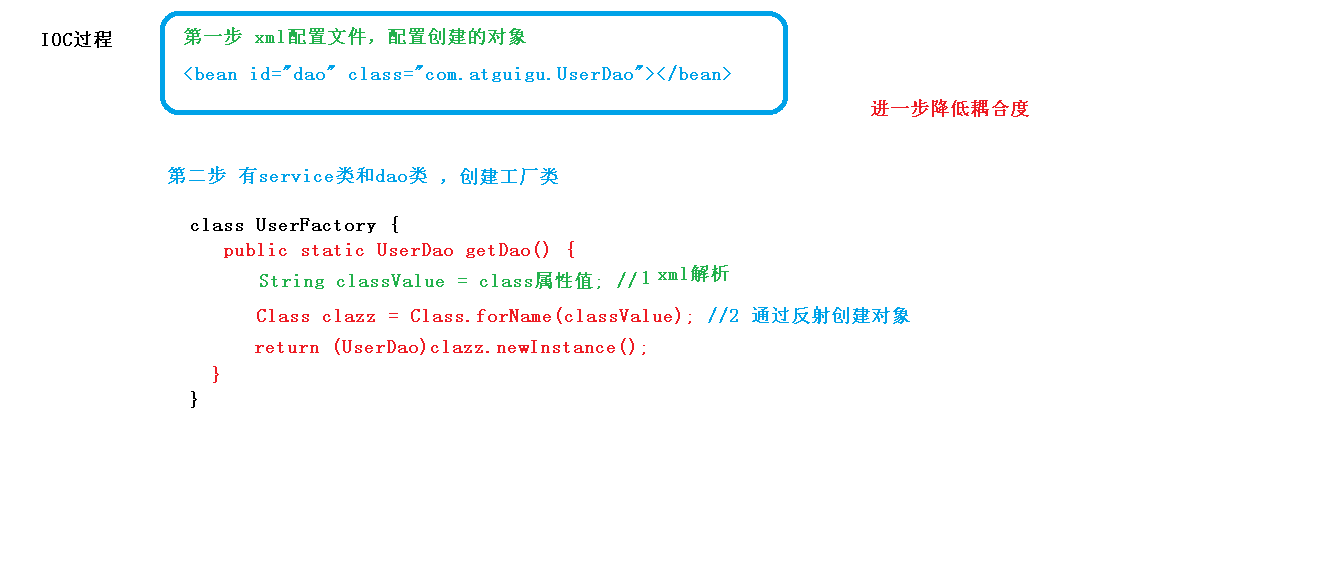
1. The IOC idea is based on the IOC container, and the bottom layer of the IOC container is the object factory
2. Spring provides two ways to implement IOC container: (two interfaces)
(1) BeanFactory: the basic implementation of IOC container is the internal use interface of Spring. It does not provide developers to use it. Objects will not be created when loading configuration files. Objects are created only after obtaining (using) objects
(2) ApplicationContext: the sub interface of BeanFactory interface, which provides more and more powerful functions. It is generally used by developers. When loading the configuration file, the configuration file object will be created
3. The ApplicationContext interface has implementation classes
IOC operation bean Management:
1. What is Bean management
(0) Bean management refers to two operations
(1) Spring create object
(2) Spirng injects attributes 2. There are two ways to manage Bean operations
(1) Implementation of configuration file based on xml
(2) Annotation based implementation
1. Creating objects based on xml
(1) In the spring configuration file, you can create objects by using bean tags and adding corresponding attributes to the tags
(2) There are many properties in the bean tag. Introduce the common properties
- id attribute: unique identification
- Class attribute: class full path (package class path)
(3) When creating an object, the default is to execute the parameterless construction method to complete the object creation
<bean id="Object name",class="Object path"></bean>
2. Attribute injection based on xml
(1) DI: dependency injection is the injection attribute
3. The first injection method: use the set method for injection
(1) Create a class, define properties and corresponding set methods
/**
* Demonstrates using the set method to inject attributes
*/
public class Book {
 //Create attribute
 private String bname;
 private String bauthor;
 //Create the set method corresponding to the property
 public void setBname(String bname) {
 this.bname = bname;
 }
 public void setBauthor(String bauthor) {
 this.bauthor = bauthor;
 }
}
(2) Create a configuration object in the spring configuration file and configure attribute injection
<!--2 set Method injection properties-->
<bean id="book" class="com.atguigu.spring5.Book">
 <!--use property Complete attribute injection
 name: Attribute name in class
 value: Values injected into attributes
 -->
 <property name="bname" value="Yi Jin Jing"></property>
 <property name="bauthor" value="Dharma ancestor"></property>
</bean>
xml injection other types of attributes
1.null value, special symbol:
<!--null value--> <property name="address"> <null/> </property> (2)Attribute values contain special symbols <!--Attribute values contain special symbols 1 hold<>Escape < > 2 Write content with special symbols to CDATA --> <property name="address"> <value><![CDATA[<<Nanjing>>]]></value> </property>
Inject internal bean s
<bean id="emp" class="com.atguigu.spring5.bean.Emp">
 <!--Set two common properties-->
 <property name="ename" value="lucy"></property>
 <property name="gender" value="female"></property>
 <!--Set object type properties-->
 <property name="dept">
 <bean id="dept" class="com.atguigu.spring5.bean.Dept">
 <property name="dname" value="Security Department"></property>
 </bean>
 </property>
</bean>
Cascade assignment
<bean id="emp" class="com.atguigu.spring5.bean.Emp">
 <!--Set two common properties-->
 <property name="ename" value="lucy"></property>
 <property name="gender" value="female"></property>
 <!--Cascade assignment-->
 <property name="dept" ref="dept"></property>
</bean>
<bean id="dept" class="com.atguigu.spring5.bean.Dept">
 <property name="dname" value="Finance Department"></property>
</bean>
The second method: (set method is required)
<!--Cascade assignment-->
<bean id="emp" class="com.atguigu.spring5.bean.Emp">
 <!--Set two common properties-->
 <property name="ename" value="lucy"></property> <property name="gender" value="female"></property>
 <!--Cascade assignment-->
 <property name="dept" ref="dept"></property>
 <property name="dept.dname" value="Technology Department"></property>
</bean>
<bean id="dept" class="com.atguigu.spring5.bean.Dept">
 <property name="dname" value="Finance Department"></property>
</bean>
Injecting collection attributes into xml
1. Inject array type properties
2. Inject List collection type properties
3. Inject Map collection type attribute
(1) Create classes, define array, list, map and set type attributes, and generate corresponding set methods
public class Stu {
 //1 array type properties
 private String[] courses;
 //2 list collection type attribute
 private List<String> list;
 //3 map collection type attribute
 private Map<String,String> maps;
 //4 set set type attribute
 private Set<String> sets;
 public void setSets(Set<String> sets) {
 this.sets = sets;
 }
 public void setCourses(String[] courses) {
 this.courses = courses;
 }
 public void setList(List<String> list) {
 this.list = list;
 }
 public void setMaps(Map<String, String> maps) {
 this.maps = maps;
 }
}
(2) Configure in the spring configuration file
<!--1 Collection type attribute injection-->
<bean id="stu" class="com.atguigu.spring5.collectiontype.Stu">
 <!--Array type attribute injection-->
 <property name="courses">
 <array>
 <value>java curriculum</value>
 <value>Database course</value>
 </array>
 </property>
 <!--list Type attribute injection-->
 <property name="list">
 <list> <value>Zhang San</value>
 <value>the other woman</value>
 </list>
 </property>
 <!--map Type attribute injection-->
 <property name="maps">
 <map>
 <entry key="JAVA" value="java"></entry>
 <entry key="PHP" value="php"></entry>
 </map>
 </property>
 <!--set Type attribute injection-->
 <property name="sets">
 <set>
 <value>MySQL</value>
 <value>Redis</value>
 </set>
 </property>
</bean>
4. Set the object type value in the collection
<!--Create multiple course object-->
<bean id="course1" class="com.atguigu.spring5.collectiontype.Course">
 <property name="cname" value="Spring5 frame"></property>
</bean>
<bean id="course2" class="com.atguigu.spring5.collectiontype.Course">
 <property name="cname" value="MyBatis frame"></property>
</bean>
<!--injection list Collection type, value is object-->
<property name="courseList">
 <list>
 <ref bean="course1"></ref>
 <ref bean="course2"></ref>
 </list>
</property>
5. Extract the set injection part
(1) Introducing the namespace util into the spring configuration file
<?xml version="1.0" encoding="UTF-8"?>
<beans xmlns="http://www.springframework.org/schema/beans"
 xmlns:xsi="http://www.w3.org/2001/XMLSchema-instance"
 xmlns:p="http://www.springframework.org/schema/p"
 xmlns:util="http://www.springframework.org/schema/util"
 xsi:schemaLocation="http://www.springframework.org/schema/beans
http://www.springframework.org/schema/beans/spring-beans.xsd
 http://www.springframework.org/schema/util
http://www.springframework.org/schema/util/spring-util.xsd">
(2)use util Label complete list Set injection extraction
<!--1 extract list Collection type attribute injection-->
<util:list id="bookList"> <value>Yi Jin Jing</value>
 <value>The nine Yin manual</value>
 <value>nine men's power</value>
</util:list>
<!--2 extract list Collection type attribute injection usage-->
<bean id="book" class="com.atguigu.spring5.collectiontype.Book">
 <property name="list" ref="bookList"></property>
</bean>
FactoryBean
1. Spring has two types of beans, a normal bean and a factory bean
2. Ordinary bean: the bean type defined in the configuration file is the return type
3. Factory bean: the bean type defined in the configuration file can be different from the return type
The first step is to create a class that acts as a factory bean and implements the interface FactoryBean
The second step is to implement the method in the interface and define the returned bean type in the implemented method
public class MyBean implements FactoryBean<Course> {
 //Define return bean
 @Override
 public Course getObject() throws Exception {
 Course course = new Course();
 course.setCname("abc");
 return course;
 }
 @Override
 public Class<?> getObjectType() {
 return null;
 }
 @Override
 public boolean isSingleton() {
 return false;
 }
}
4. Post processor of bean, bean life cycle
(1) Create bean instance through constructor (no parameter construction)
(2) Set values for bean properties and references to other beans (call the set method)
(3) Pass the bean instance to the bean post processor method 1postProcessBeforeInitialization
(4) Call the initialization method of the bean (the method requiring configuration initialization) (5) transfer the bean instance to the method postProcessAfterInitialization of the bean post processor
(6) The bean is ready to use (the object is obtained)
(7) When the container is closed, call the bean destruction method (the method that needs to be configured for destruction)
5. Demonstrate the effect of adding a post processor
(1) Create a class, implement the interface BeanPostProcessor, and create a post processor
public class MyBeanPost implements BeanPostProcessor {
 @Override
 public Object postProcessBeforeInitialization(Object bean, String beanName)
throws BeansException {
 System.out.println("Method executed before initialization");
 return bean;
 }
 @Override
 public Object postProcessAfterInitialization(Object bean, String beanName)
throws BeansException {
 System.out.println("Method executed after initialization");
 return bean;
 }
}
automatic assembly
1. What is automatic assembly
(1) According to the specified assembly rules (attribute name or attribute type), Spring automatically injects the matching attribute values
2. Demonstrate the automatic assembly process
(1) Auto injection based on attribute name
<!--Realize automatic assembly
 bean Label properties autowire,Configure auto assembly
 autowire Property has two common values:
 byName Inject value according to attribute name bean of id The value is the same as the class attribute name
 byType Inject according to attribute type
 -->
<bean id="emp" class="com.atguigu.spring5.autowire.Emp" autowire="byName">
 <!--<property name="dept" ref="dept"></property>--></bean>
<bean id="dept" class="com.atguigu.spring5.autowire.Dept"></bean>
(2) Auto injection based on attribute type
<!--Realize automatic assembly
 bean Label properties autowire,Configure auto assembly
 autowire Two values are commonly used for attributes:
 byName Inject value according to attribute name bean of id The value is the same as the class attribute name
 byType Injection according to attribute type
-->
<bean id="emp" class="com.atguigu.spring5.autowire.Emp" autowire="byType">
 <!--<property name="dept" ref="dept"></property>-->
</bean>
<bean id="dept" class="com.atguigu.spring5.autowire.Dept"></bean>
External properties file management
1. Configure database information directly
(1) Configure Druid connection pool
(2) Introducing Druid connection pool dependent jar package
<!--Configure connection pool directly-->
<bean id="dataSource" class="com.alibaba.druid.pool.DruidDataSource">
 <property name="driverClassName" value="com.mysql.jdbc.Driver"></property>
 <property name="url"
value="jdbc:mysql://localhost:3306/userDb"></property>
 <property name="username" value="root"></property>
 <property name="password" value="root"></property>
</bean>
2. Importing an external property file to configure the database connection pool
(1) Create external property files, properties format files, and write database information
(2) Import the external properties property file into the spring configuration file
- Introducing context namespace
<beans xmlns="http://www.springframework.org/schema/beans"  xmlns:xsi="http://www.w3.org/2001/XMLSchema-instance"
 xmlns:p="http://www.springframework.org/schema/p"
 xmlns:util="http://www.springframework.org/schema/util"
 xmlns:context="http://www.springframework.org/schema/context"
 xsi:schemaLocation="http://www.springframework.org/schema/beans
http://www.springframework.org/schema/beans/spring-beans.xsd
 http://www.springframework.org/schema/util
http://www.springframework.org/schema/util/spring-util.xsd
 http://www.springframework.org/schema/context
http://www.springframework.org/schema/context/spring-context.xsd">
 stay spring Profiles use tags to import external property files
<!--Import external properties file-->
<context:property-placeholder location="classpath:jdbc.properties"/>
<!--Configure connection pool-->
<bean id="dataSource" class="com.alibaba.druid.pool.DruidDataSource">
 <property name="driverClassName" value="${prop.driverClass}"></property>
 <property name="url" value="${prop.url}"></property>
 <property name="username" value="${prop.userName}"></property>
 <property name="password" value="${prop.password}"></property>
</bean>
Introducing dependency based on annotation
1. What is annotation
(1) Annotation is a code special tag, format: @ annotation name (attribute name = attribute value, attribute name = attribute value...)
(2) Using annotations, annotations act on classes, methods and properties
(3) Purpose of using annotations: to simplify xml configuration
2. Spring provides annotations for creating objects in Bean management
(1)@Component
(2)@Service
(3)@Controller
(4)@Repository
- The above four annotation functions are the same and can be used to create bean instances
3. Object creation based on annotation
Step 1: introduce dependency
(spring-aop-5.26.RELEASE)
Step 2 start component scanning
Step 2: start component scanning
<context:component-scan base-package="com.atguigu"></context:component-scan>
The third step is to create a class and add the creation object annotation on the class
//In the annotation, the value attribute value can be omitted,
//The default value is the class name, which is lowercase
//UserService -- userService@Component(value = "userService") //<bean id="userService" class=".."/>
public class UserService {
 public void add() {
 System.out.println("service add.......");
 }
}
4. Enable component scanning details configuration
<!--Example 1
 use-default-filters="false" Indicates that the default is not used now filter,Self configuration filter
 context:include-filter ,Set what to scan
-->
<context:component-scan base-package="com.atguigu" use-defaultfilters="false">
 <context:include-filter type="annotation"

expression="org.springframework.stereotype.Controller"/>
</context:component-scan>
<!--Example 2
 Next, configure all contents of the scanning package
 context:exclude-filter:  Set what is not scanned
-->
<context:component-scan base-package="com.atguigu">
 <context:exclude-filter type="annotation"

expression="org.springframework.stereotype.Controller"/>
</context:component-scan>
5. Attribute injection based on annotation
(1) @ Autowired: auto assemble according to attribute type
The first step is to create the service and dao objects, and add the creation object annotation in the service and dao classes
The second step is to inject dao objects into the service, add dao type attributes to the service class, and use annotations on the attributes
@Service
public class UserService {
 //Define dao type properties
 //There is no need to add a set method
 //Add injection attribute annotation
 @Autowired
 private UserDao userDao;
 public void add() {
 System.out.println("service add.......");
 userDao.add();
 }
}
(2)@Qualifier: Injection by name
 this@Qualifier Use of annotations, and above@Autowired Use together
//Define dao type properties
//There is no need to add a set method / / add an injection attribute annotation
@Autowired //Injection according to type
@Qualifier(value = "userDaoImpl1") //Injection by name
private UserDao userDao;
(3)@Resource: You can inject by type or by name
//@Resource / / inject according to type
@Resource(name = "userDaoImpl1") //Injection by name
private UserDao userDao;
(4)@Value: Inject common type attributes
@Value(value = "abc")
private String name;
6. Fully annotated development
(1)Create configuration class, override xml configuration file
@Configuration //As a configuration class, replace the xml configuration file
@ComponentScan(basePackages = {"com.atguigu"})
public class SpringConfig {
}
(2)Write test class
@Test
public void testService2() {
 //Load configuration class
 ApplicationContext context
 = new AnnotationConfigApplicationContext(SpringConfig.class);
 UserService userService = context.getBean("userService",
UserService.class);
 System.out.println(userService);
 userService.add();