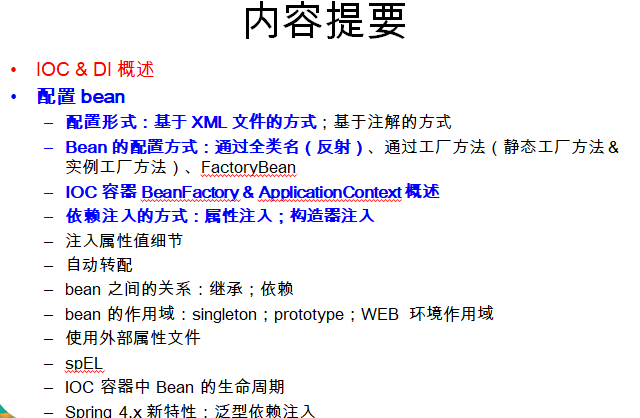
catalogue
4, Property configuration details
8, Use external properties file
11, Configure beans through factory methods
12, Configuring beans through factorybeans
13, Configure beans through annotations (1)
14, Configuring beans through annotations (2)
1, HelloWorld
Spring Framework official website: the stable version is spring5 three point six
maven is recommended for downloading many frameworks
What is Spring?
1. Spring is an open source framework. You can see the source code
2. Spring is designed to simplify enterprise application development. For example, it is very easy to use declarative transactions
3. Spring is an IOC (DI) and AOP container framework
IOC: inversion control DI: dependency injection
Describe Spring in detail
Lightweight: Spring is non intrusive - objects in Spring based applications can be independent of Spring API s
Spring is lightweight. It doesn't mean how big the jar package is. It mainly means that spring is non-invasive
When we use spring, we don't need to implement any interface provided by spring, and we don't need to inherit its
Any parent class, and then we can use the functions provided by spring. It feels a little like moistening things silently
Dependency injection (DI -- dependency injection, IOC)
Aspect oriented programming (AOP)
Container: Spring is a container because it contains and manages the life cycle of application objects
Framework: Spring implements the combination of simple component configurations into a complex application. In spring, these objects can be combined using XML and Java annotations
One stop: Based on IOC and AOP, it can integrate open source frameworks and excellent third-party class libraries of various enterprise applications (in fact, Spring itself also provides Spring MVC in the presentation layer and Spring JDBC in the persistence layer)
Spring module

The bottom layer is the core container
Spring module
The bottom layer is the core container
Beans: bean s can be configured in the core container
Context: Context
SpEL: Spring's EL expression
AOP, aspect: Aspect Oriented Programming
Declarative transactions, integrating mybatis
Integration: Imstruction
Messaging: messages
The web module can use Spring MVC provided by Spring and integrate other frameworks
==============================================
HelloWorld test
Step 1: create a new project and import maven dependencies
<?xml version="1.0" encoding="UTF-8"?>
<project xmlns="http://maven.apache.org/POM/4.0.0"
         xmlns:xsi="http://www.w3.org/2001/XMLSchema-instance"
         xsi:schemaLocation="http://maven.apache.org/POM/4.0.0 http://maven.apache.org/xsd/maven-4.0.0.xsd">
    <modelVersion>4.0.0</modelVersion>

    <groupId>com.nanjing</groupId>
    <artifactId>spring-1</artifactId>
    <version>1.0-SNAPSHOT</version>

    <dependencies>
        <!-- https://mvnrepository.com/artifact/commons-logging/commons-logging -->
        <dependency>
            <groupId>commons-logging</groupId>
            <artifactId>commons-logging</artifactId>
            <version>1.2</version>
        </dependency>

        <!-- https://mvnrepository.com/artifact/org.springframework/spring-beans -->
        <dependency>
            <groupId>org.springframework</groupId>
            <artifactId>spring-beans</artifactId>
            <version>4.0.0.RELEASE</version>
        </dependency>

        <!-- https://mvnrepository.com/artifact/org.springframework/spring-context -->
        <dependency>
            <groupId>org.springframework</groupId>
            <artifactId>spring-context</artifactId>
            <version>4.0.0.RELEASE</version>
        </dependency>

        <!-- https://mvnrepository.com/artifact/org.springframework/spring-core -->
        <dependency>
            <groupId>org.springframework</groupId>
            <artifactId>spring-core</artifactId>
            <version>4.0.0.RELEASE</version>
        </dependency>

        <!-- https://mvnrepository.com/artifact/org.springframework/spring-expression -->
        <dependency>
            <groupId>org.springframework</groupId>
            <artifactId>spring-expression</artifactId>
            <version>4.0.0.RELEASE</version>
        </dependency>

        <!-- https://mvnrepository.com/artifact/com.mchange/c3p0 -->
        <dependency>
            <groupId>com.mchange</groupId>
            <artifactId>c3p0</artifactId>
            <version>0.9.5.2</version>
        </dependency>

        <!-- https://mvnrepository.com/artifact/mysql/mysql-connector-java -->
        <dependency>
            <groupId>mysql</groupId>
            <artifactId>mysql-connector-java</artifactId>
            <version>5.1.6</version>
        </dependency>

    </dependencies>
</project>
Step 2: create a new HelloWorld Java file
public class HelloWorld {

    private String name;

    public void setName(String name) {
        System.out.println("setName: " + name);
        this.name = name;
    }

    public void hello(){
        System.out.println("hello: "+name);
    }

    public HelloWorld() {
        System.out.println("HelloWorld's Constructor...");
    }
}
Step 3: create an ApplicationContext XML file
<?xml version="1.0" encoding="UTF-8"?>
<beans xmlns="http://www.springframework.org/schema/beans"
       xmlns:xsi="http://www.w3.org/2001/XMLSchema-instance"
       xsi:schemaLocation="http://www.springframework.org/schema/beans http://www.springframework.org/schema/beans/spring-beans.xsd">

    <!-- to configure bean
         class: bean The full class name of, through reflection IOC Create in container bean,So ask Bean There must be a parameterless constructor in the
         id: Identifies the in the container bean,id only
    -->
    <bean id="helloWorld" class="com.nanjing.spring.bean.HelloWorld">
        <property name="name" value="Jiangsu Grand Theater"></property>
    </bean>
</beans>
Step 4: create a new main Java file
public class Main {
public static void main(String[] args) {
/**
// Create an object of HelloWorld
HelloWorld helloWorld = new HelloWorld();
//Assign a value to the name attribute
helloWorld.setName("nanjing");
*/
//1. Create spring's IOC container object
//When creating a container, it will call the constructor to initialize the bean I configured in the configuration file, and call the set method to assign a value to that attribute
ApplicationContext ctx=new ClassPathXmlApplicationContext("applicationContext.xml");
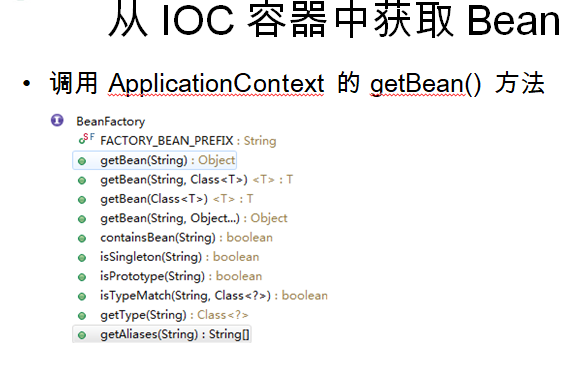
//2. Get Bean instance from IOC container
HelloWorld helloWorld=(HelloWorld) ctx.getBean("helloWorld");
//3. Call hello method
helloWorld.hello();
}
}
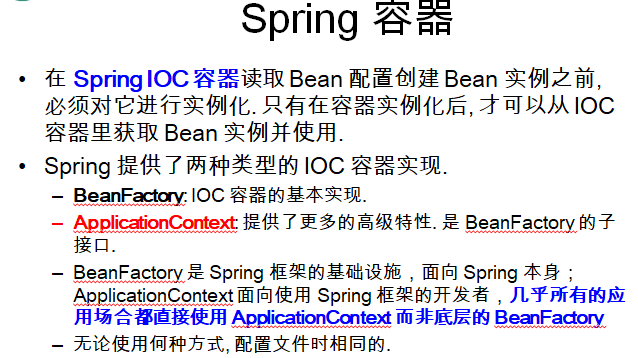
2, IOC & Di overview
IOC (Inversion of Control): its idea is to reverse the direction of resource acquisition. The traditional resource search method requires the component to send a request to the container to find resources. In response, the container returns resources in time.
After IOC is applied, the container actively pushes the resources to the components it manages. All the components have to do is choose an appropriate way to accept the resources. This behavior is also known as the passive form of search
DI (Dependency Injection) - another expression of IOC: that is, components accept resource injection from containers in some predefined ways (e.g. setter method), which is more direct than IOC
Generally speaking:
In the past, you need to go to the vegetable market to buy vegetables. Now just put a small box in the yard, and the vegetables will be automatically given to you, reversing the direction of resource acquisition
Example explanation
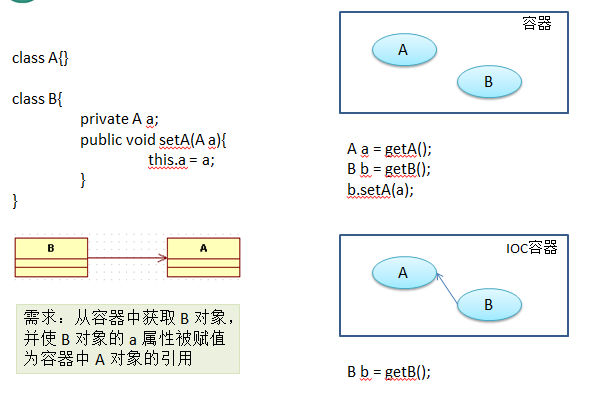
Traditional methods, such as the case at the top right
IOC container, such as the case in the lower right: an association relationship is established between B and A, and the container automatically establishes the association relationship
Previous IOC
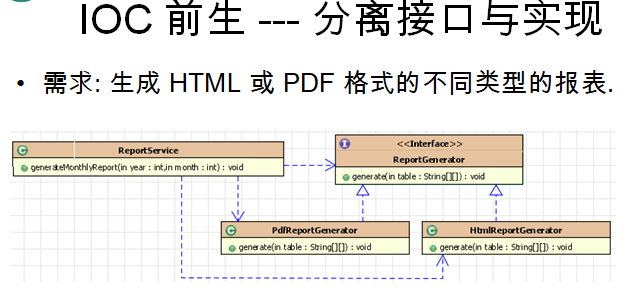
I have a requirement. The interface is ReportGenerator, which can generate two methods, one is pdf and the other is html. Now I have a report service class ReportService to use
The report generator may use pdf mode or html mode. The service needs to draw three lines. You need to know not only the interface type, but also the specific implementation classes you have
Maybe I also need to know how to create objects that implement classes, which is the most coupled way
We need to know the specific details of this interface and implementation class
In primitive times, we needed an axe. We not only need to know the shape of the axe, but also need to know how to beat an axe manually. This requirement is very high

In feudal society, I need an axe. I can go to the blacksmith's shop, give him money and make an axe. At this time, the coupling is reduced. The service layer only needs to draw two lines. One line is that I definitely need to know the interface type
At the same time, you need to point to this factory, which is responsible for helping me generate the implementation class of this interface. The code is complex, the division of labor is clearer, and the project is easy to expand and more flexible
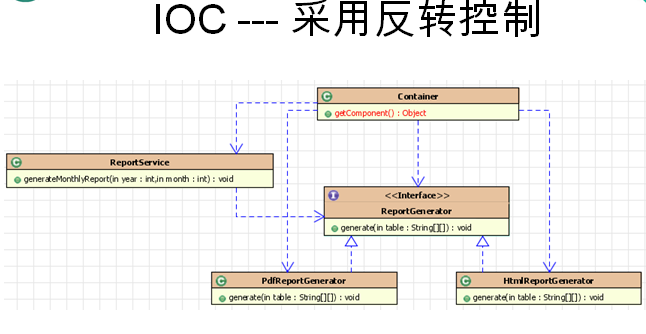
Distribute on demand. If I need anything, the government will give me the materials I need. The service only needs to draw a line, and the container will directly inject the implementation class of the interface I need into me
Reverses the control direction of the resource
3, Configure Bean
1. Step 1:
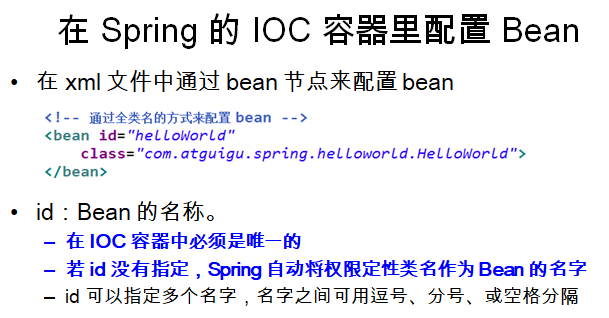
 <!-- to configure bean
         class: bean The full class name of, through reflection IOC Create in container bean,So ask Bean There must be a parameterless constructor in the
         id: Identifies the in the container bean,id only
    -->
    <!-- The full class name should be reflected by spring Help us create such an object id This object is identified. A parameterless constructor is required
    name The corresponding should be set Method, with setter To define javabean Attribute name of this style-->
    <bean id="helloWorld" class="com.nanjing.spring.bean.HelloWorld">
        <property name="name" value="Jiangsu Grand Theater"></property>
    </bean>
2. Step 2:
//1. Create spring's IOC container object
        //ApplicationContext represents the IOC container in spring, which is an interface
        //ClassPathXmlApplicationContext represents the configuration file. Under the classpath, it is an implementation class of ApplicationContext

        //When creating a container, it will call the constructor to initialize the bean I configured in the configuration file, and call the set method to assign a value to that attribute
        ApplicationContext ctx=new ClassPathXmlApplicationContext("applicationContext.xml");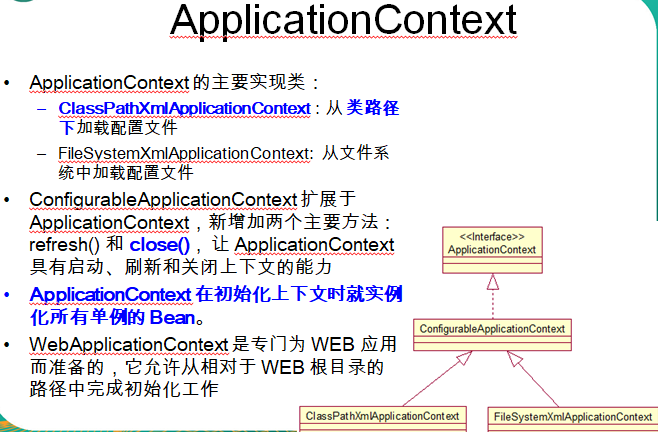
3. Step 3:
//2. Get Bean instance from IOC container
        //Use id to locate bean in IOC container
        HelloWorld helloWorld=(HelloWorld) ctx.getBean("helloWorld");
        //Use the type to return the Bean in the IOC container, but there must be only one Bean of this type in the IOC container
        //HelloWorld helloWorld=(HelloWorld) ctx.getBean("helloWorld");
        System.out.println(helloWorld);
4. Step 4:
<!-- to configure bean
         class: bean The full class name of, through reflection IOC Create in container bean,So ask Bean There must be a parameterless constructor in the
         id: Identifies the in the container bean,id only
    -->
    <!-- The full class name should be reflected by spring Help us create such an object id This object is identified. A parameterless constructor is required
    name The corresponding should be set Method, with setter To define javabean Attribute name of this style-->
    <bean id="helloWorld" class="com.nanjing.spring.bean.HelloWorld">
        <property name="name" value="Jiangsu Grand Theater"></property>
    </bean>

    <!--Configuration by construction method bean Properties of-->
    <!--How to distinguish overloaded methods-->
    <bean id="car" class="com.nanjing.spring.bean.Car">
        <constructor-arg value="Audi" index="0"></constructor-arg>
        <constructor-arg value="ShangHai" index="1"></constructor-arg>
        <constructor-arg value="300000" type="double"></constructor-arg>
    </bean>

    <!--Using constructor to inject attribute values, you can specify the location and type of parameters! To distinguish overloaded constructors!-->
    <bean id="car2" class="com.nanjing.spring.bean.Car">
        <constructor-arg value="Baoma" type="java.lang.String"></constructor-arg>
        <!--If the literal contains special characters, you can use<![CDATA[]]>Wrap up-->
        <!--Attribute values can also be used value Set up child nodes-->
        <constructor-arg type="java.lang.String">
            <value><![CDATA[<Shanghai^>]]></value>
        </constructor-arg>
        <constructor-arg type="int">
            <value>250</value>
        </constructor-arg>
    </bean>
4, Property configuration details
applicationContext.xml is very important.
<!--Using constructor to inject attribute values, you can specify the location and type of parameters! To distinguish overloaded constructors!-->
<bean id="car2" class="com.nanjing.spring.bean.Car">
<constructor-arg value="Baoma" type="java.lang.String"></constructor-arg>
<!--If the literal contains special characters, you can use<![CDATA[]]>Wrap up-->
<!--Attribute values can also be used value Set up child nodes-->
<constructor-arg type="java.lang.String">
<value><![CDATA[<Shanghai^>]]></value>
</constructor-arg>
<constructor-arg type="int">
<value>250</value>
</constructor-arg>
</bean>
<bean id="person" class="com.nanjing.spring.bean.Person">
<property name="name" value="Tom"></property>
<property name="age" value="24"></property>
<!--have access to property of ref Attribute establishment bean Reference relationship between-->
<!-- <property name="car" ref="car2"></property>-->
<!--inside bean,It cannot be referenced externally and can only be used internally-->
<property name="car">
<bean class="com.nanjing.spring.bean.Car">
<constructor-arg value="Ford"></constructor-arg>
<constructor-arg value="Changan"></constructor-arg>
<constructor-arg value="240" type="int"></constructor-arg>
</bean>
</property>
</bean>
<bean id="person2" class="com.nanjing.spring.bean.Person">
<constructor-arg value="Jerry"></constructor-arg>
<constructor-arg value="25"></constructor-arg>
<!-- <constructor-arg ref="car2"></constructor-arg>-->
<!--28707 12923 null-->
<!-- <constructor-arg><null/></constructor-arg>-->
<!--Assign values to cascading attributes. Note: attributes need to be initialized before assigning values to cascading attributes, otherwise there will be exceptions, and struts2 Different-->
<constructor-arg ref="car"></constructor-arg>
<property name="car.maxSpeed" value="240"></property>
</bean>
<!--Test how to configure collection properties-->
<bean id="person3" class="com.nanjing.spring.bean.collections.Person">
<property name="name" value="Mike"></property>
<property name="age" value="27"></property>
<property name="cars">
<!--use list Node is List Attribute assignment of type-->
<list>
<ref bean="car"/>
<ref bean="car2"/>
<bean class="com.nanjing.spring.bean.Car">
<constructor-arg value="Ford"></constructor-arg>
<constructor-arg value="Changan"></constructor-arg>
<constructor-arg value="240" type="int"></constructor-arg>
</bean>
</list>
</property>
</bean>
<!--to configure Map Attribute value-->
<bean id="newPerson" class="com.nanjing.spring.bean.collections.NewPerson">
<property name="name" value="Rose"></property>
<property name="age" value="28"></property>
<property name="cars">
<!--use map Node and map of entry Child node configuration Map Member variable of type-->
<map>
<entry key="AA" value-ref="car"></entry>
<entry key="BB" value-ref="car2"></entry>
</map>
</property>
</bean>
<!--to configure Properties Attribute value-->
<bean id="dataSource" class="com.nanjing.spring.bean.collections.DataSource">
<property name="properties">
<!--use props and prop Child nodes for Propertiess Attribute assignment-->
<props>
<prop key="user">root</prop>
<prop key="password">123456</prop>
<prop key="jdbcUrl">jdbc:mysql:///test</prop>
<prop key="driverClass">com.mysql.jdbc.Driver</prop>
</props>
</property>
</bean>
<!--Set of configuration singletons bean,For multiple bean For reference, import is required util Namespace-->
<util:list id="cars">
<ref bean="car"/>
<ref bean="car2"/>
</util:list>
<bean id="person4" class="com.nanjing.spring.bean.collections.Person">
<property name="name" value="Jack"></property>
<property name="age" value="28"></property>
<property name="cars" ref="cars"></property>
</bean>
<!--adopt p Namespace is bean The attribute assignment of needs to be imported first p Namespace is more concise than the traditional configuration method-->
<bean id="person5" class="com.nanjing.spring.bean.collections.Person" p:age="30"
p:name="Queen" p:cars-ref="cars">
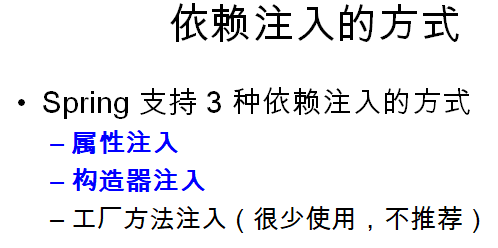
</bean>V. automatic assembly
beans-autowire.xml file
<!--    <bean id="address2" class="com.nanjing.spring.beans.autowire.Address"-->
    <!--        p:city="BeiJing" p:street="HuiLongGuan"></bean>-->

    <bean id="address2" class="com.nanjing.spring.bean.autowire.Address"
          p:city="NanJing" p:street="ZhongShan"></bean>

    <bean id="car" class="com.nanjing.spring.bean.autowire.Car"
          p:brand="Audi" p:price="300000"></bean>

    <!--have access to autowire Property to specify how to auto assemble,
    byName according to bean Your name and current bean of setter The attribute name of the style is automatically assembled. If there is a match, it will be automatically assembled. If there is no match, it will not be assembled
    byType according to bean Type and current bean If the type of attribute is automatically assembled IOC There are more than 1 matching types in the container bean,Throw anomaly
    -->
    <bean id="person" class="com.nanjing.spring.bean.autowire.Person"
          p:name="Tom" autowire="byType"></bean>

<!--        <bean id="person" class="com.nanjing.spring.bean.autowire.Person"-->
<!--            p:name="Tom" p:address-ref="address" p:car-ref="car"></bean>-->
6, Relationship between beans
Inheritance and dependency
beans-relation.xml file
<!--abstract bean:bean of abstract Attribute is true of bean,In this way bean Cannot be IOC Container instantiation is only used for inherited configuration
If one bean of class Property is not specified bean Must be an abstraction bean-->
<bean id="address" class="com.nanjing.spring.bean.autowire.Address"
p:city="BeiJing^" p:street="WuDaoKou" abstract="true"></bean>
<!--bean Inheritance of configuration: Using bean of parent Property specifies which to inherit bean Configuration of-->
<bean id="address2" class="com.nanjing.spring.bean.autowire.Address"
p:city="BeiJing" p:street="DaZhongSi" parent="address"></bean>
<bean id="car" class="com.nanjing.spring.bean.autowire.Car"
p:brand="Audi" p:price="300000"></bean>
<!--Required in configuration Person There must be an associated car! let me put it another way person this bean Depend on Car this bean-->
<bean id="person" class="com.nanjing.spring.bean.autowire.Person"
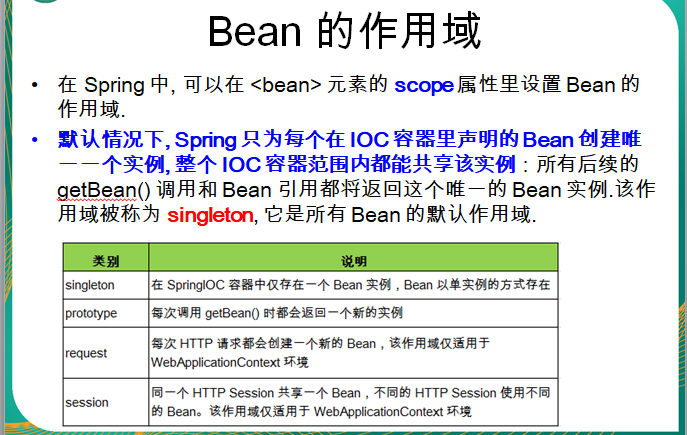
p:name="Tom" p:address-ref="address2" depends-on="car"></bean>7, Scope of Bean
beans-scope.xml file
<!--
    use bean of scope Property to configure bean Scope of
    singleton:Default, created when the container is initialized bean Instance, and only this one is created in the whole life cycle of the container bean,Single case
    prototype:The prototype is not created when the container is initialized bean And create a new one on each request bean Instance and return
    -->
    <bean id="car" class="com.nanjing.spring.bean.autowire.Car" scope="prototype">
        <property name="brand" value="Audi"></property>
        <property name="price" value="300000"></property>
    </bean>
Main.java file -- Test
package com.nanjing.spring.bean.scope;

import com.nanjing.spring.bean.autowire.Car;
import org.springframework.context.ApplicationContext;
import org.springframework.context.support.ClassPathXmlApplicationContext;

public class Main {
    public static void main(String[] args) {

        ApplicationContext ctx=new ClassPathXmlApplicationContext("beans-scope.xml");

        Car car=(Car) ctx.getBean("car");
        Car car2=(Car) ctx.getBean("car");

        System.out.println(car == car2);
    }
}
8, Use external properties file
beans-properties.xml file
 <!--Import properties file-->
    <context:property-placeholder location="classpath:db.properties"/>

    <bean id="dataSource" class="com.mchange.v2.c3p0.ComboPooledDataSource">
        <!--Use properties of externalized properties file-->
        <property name="user" value="${user}"></property>
        <property name="password" value="${password}"></property>
        <property name="driverClass" value="${driverClass}"></property>
        <property name="jdbcUrl" value="${jdbcUrl}"></property>
    </bean>
db.properties file
user=root
password=123456
driverClass=com.mysql.jdbc.Driver
jdbcUrl=jdbc:mysql://localhost:3306/test
Main.java file
public class Main {
    public static void main(String[] args) throws SQLException {
        ApplicationContext ctx=new ClassPathXmlApplicationContext("beans-properties.xml");

        DataSource dataSource=(DataSource) ctx.getBean("dataSource");
        System.out.println(dataSource.getConnection());
    }
}
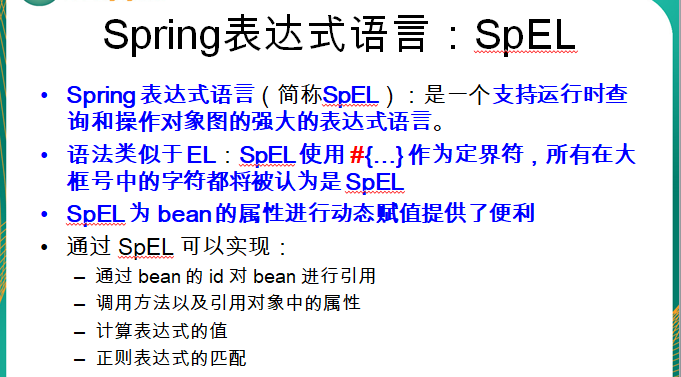
9, SpEL
10, Manage the Bean lifecycle
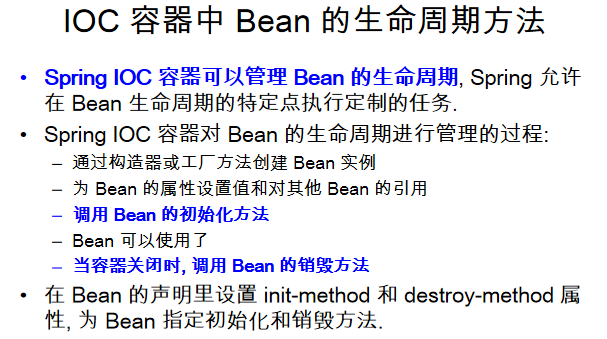
Step 1: car Java file
public class Car {

    public Car() {
        System.out.println("Car's Constructor...");
    }

    private String brand;

    public void setBrand(String brand) {
        System.out.println("setBrand...");
        this.brand = brand;
    }

    public void init(){
        System.out.println("init...");
    }

    public void destroy(){
        System.out.println("destroy...");
    }

    @Override
    public String toString() {
        return "Car{" +
                "brand='" + brand + '\'' +
                '}';
    }
}
Step 2: beans cycle XML file
  <bean id="car" class="com.nanjing.spring.bean.cycle.Car"
          init-method="init" destroy-method="destroy">
        <property name="brand" value="Audi"></property>
    </bean>
Step 3: main Java file
public class Main {
    public static void main(String[] args) {

        ClassPathXmlApplicationContext ctx=new ClassPathXmlApplicationContext("beans-cycle.xml");

        Car car=(Car) ctx.getBean("car");
        System.out.println(car);

        //Close IOC container
        ctx.close();
    }
}
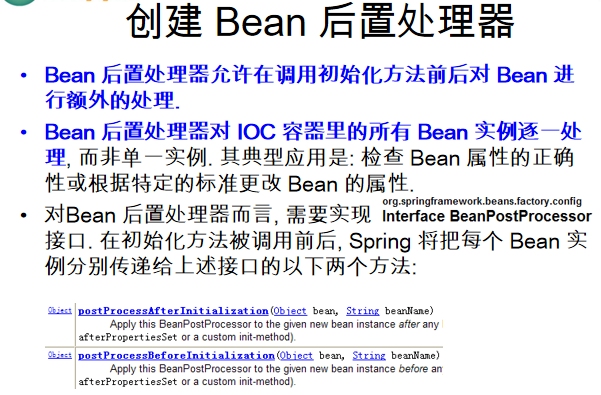
Step 4: mybeanpostprocessor Java file
public class MyBeanPostProcessor implements BeanPostProcessor {

    public Object postProcessBeforeInitialization(Object bean, String beanName) throws BeansException {
        System.out.println("postProcessBeforeInitialization: "+bean+", "+beanName);

        if("car".equals(beanName)){
            //...
        }
        return bean;
    }

    public Object postProcessAfterInitialization(Object bean, String beanName) throws BeansException {
        System.out.println("postProcessAfterInitialization: "+bean+", "+beanName);
        Car car=new Car();
        car.setBrand("Ford");
        return car;
    }
}
Step 5: beans cycle XML file
  <bean id="car" class="com.nanjing.spring.bean.cycle.Car"
          init-method="init" destroy-method="destroy">
        <property name="brand" value="Audi"></property>
    </bean>

    <!--
        realization BeanPostProcessor Interface and provide details
        Object postProcessBeforeInitialization(Object bean, String beanName): init-method Previously called
        Object postProcessAfterInitialization(Object bean, String beanName): init-method Later called
        Implementation of

        bean: bean Instance itself
        beanName: IOC Container configured bean Name of

       Return value: the one actually returned to the user Bean,Note: you can modify the returned in the above two methods bean,Even return a new one bean
        -->
    <!--to configure bean The post processor does not need to be configured id,IOC Automatic container identification is a BeanPostProcessor-->
    <bean class="com.nanjing.spring.bean.cycle.MyBeanPostProcessor"></bean>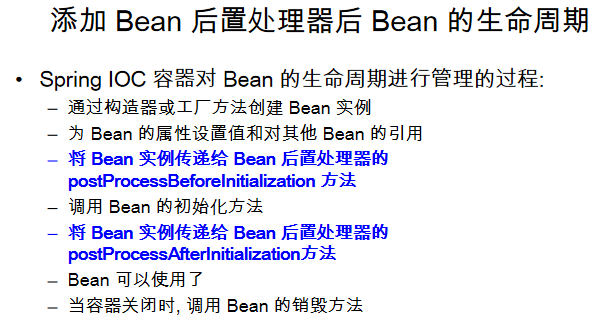
11, Configure beans through factory methods
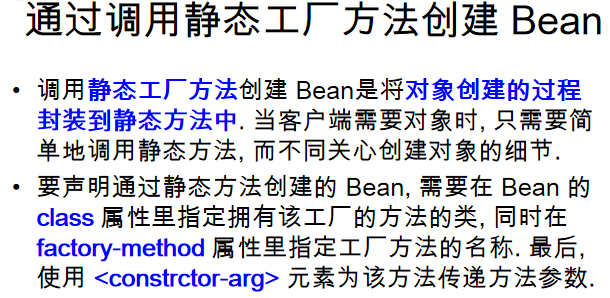
Step 1: instancecarfactory Java file
/**
 * Static factory method: directly call the static method of a class to return an instance of the Bean
 */
public class StaticCarFactory {

    //Static properties
    private static Map<String,Car> cars=new HashMap<String,Car>();

    static {
        cars.put("Audi",new Car("Audi",300000));
        cars.put("Ford",new Car("Ford",400000));
    }

    //Static factory method
    public static Car getCar(String name){
        return cars.get(name);
    }
}
Step 2: Beans Factory XML file
   <!--Configuration through static factory method bean,Note that factory configuration is not static configuration, but factory configuration bean example-->
    <!--class Property: refers to the full class name of the static factory method
    factory-method:Refers to the name of the static factory method
    constructor-arg: If the factory method needs to pass in parameters, use constructor-arg To configure parameters
    -->
    <bean id="car1"
          class="com.nanjing.spring.bean.factory.StaticCarFactory" factory-method="getCar">
        <constructor-arg value="Audi"></constructor-arg>
    </bean>
Step 3: test class main Java file
ApplicationContext ctx=new ClassPathXmlApplicationContext("beans-factory.xml");
Car car1=(Car) ctx.getBean("car1");
System.out.println(car1);

Car car2=(Car) ctx.getBean("car2");
System.out.println(car2);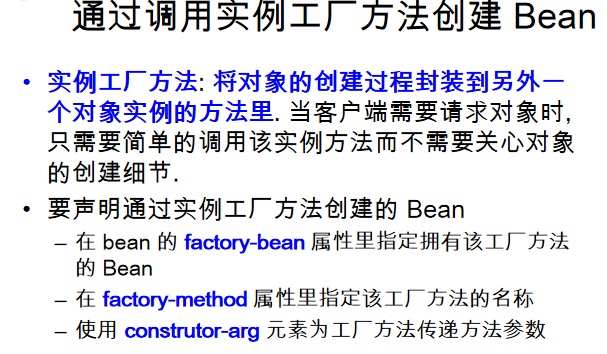
Step 4: instancecarfactory Java file
/**
 * Instance factory method: the method of the instance factory, that is, you need to create the factory itself, and then call the instance method of the factory to return the instance of the bean
 */
public class InstanceCarFactory {

    private Map<String,Car> cars=null;

    public InstanceCarFactory() {
        cars=new HashMap<String, Car>();
        cars.put("Audi",new Car("Audi",300000));
        cars.put("Ford",new Car("Ford",400000));
    }

    public Car getCar(String brand){
        return cars.get(brand);
    }
}
Step 5:
    <!--Configuration factory instance-->
    <bean id="carFactory" class="com.nanjing.spring.bean.factory.InstanceCarFactory"></bean>

    <!--Configure by instance factory method bean-->
    <!--
    factory-bean Property: points to the instance factory method bean
    factory-method: Refers to the name of the instance factory method
    constructor-arg: If the factory method needs to pass in parameters, use constructor-arg To configure parameters
    -->
    <bean id="car2" factory-bean="carFactory" factory-method="getCar">
        <constructor-arg value="Ford"></constructor-arg>
    </bean>
12, Configuring beans through factorybeans
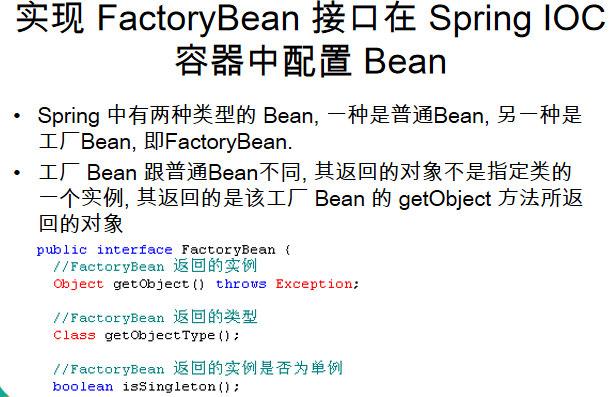
Step 1: carfactorybean Java file
//The customized FactoryBean needs to implement the FactoryBean interface
public class CarFactoryBean implements FactoryBean<Car> {

    private String brand;

    public void setBrand(String brand) {
        this.brand = brand;
    }

    //Returns the object of the bean
    public Car getObject() throws Exception {
        return new Car(brand,500000);
    }

    /**
     * Type of bean returned
     * @return
     */
    public Class<?> getObjectType() {
        return Car.class;
    }

    public boolean isSingleton() {
        return true;
    }
}
Step 2: Beans Factory XML file
<!--
       adopt FactoryBean To configure Bean Examples of
       class: point FactoryBean Full class name of
       property: to configure FactoryBean Properties of

       But the actual returned instance is FactoryBean of getObject()The instance returned by the method!
   -->
    <bean id="car" class="com.nanjing.spring.bean.factorybean.CarFactoryBean">
        <property name="brand" value="BMW"></property>
    </bean>
13, Configure beans through annotations (1)
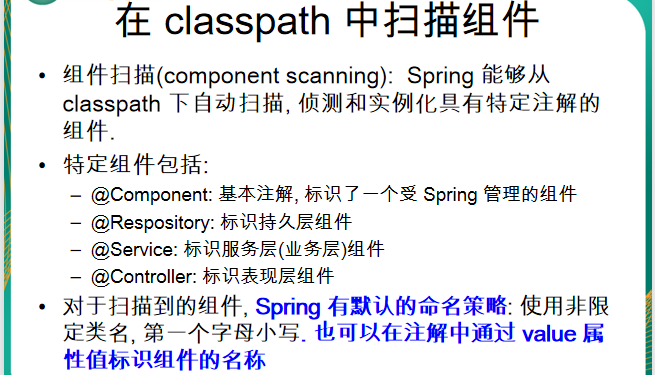
Step 1: testobject Java file
@Component
public class TestObject {

}
Step 2: usercontroller Java file
@Controller
public class UserController {

    public void execute(){
        System.out.println("UserController execute...");
    }
}
Step 3: userservice Java file
@Service
public class UserService {

    public void add(){
        System.out.println("UserService add...");
    }
}
Step 4: userrepository Java file
public interface UserRepository {

    void save();
}
Step 5: userrepositoryimpl Java file
@Repository("userRepository")
public class UserRepositoryImpl implements UserRepository{

    public void save() {
        System.out.println("UserRepository Save...");
    }
}
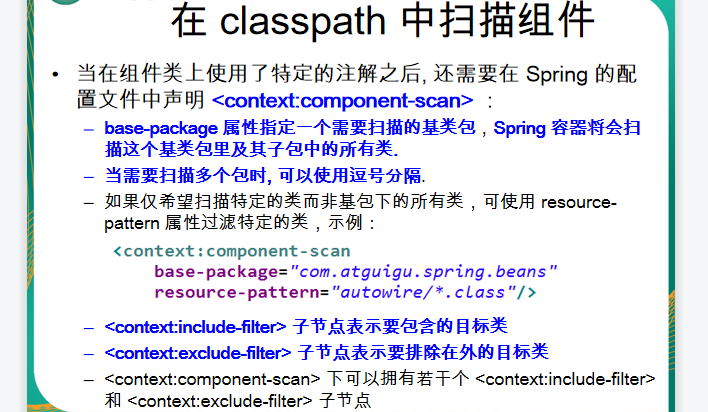
Step 6: beans annotation xml
<?xml version="1.0" encoding="UTF-8"?>
<beans xmlns="http://www.springframework.org/schema/beans"
       xmlns:xsi="http://www.w3.org/2001/XMLSchema-instance"
       xmlns:context="http://www.springframework.org/schema/context"
       xsi:schemaLocation="http://www.springframework.org/schema/beans http://www.springframework.org/schema/beans/spring-beans.xsd http://www.springframework.org/schema/context http://www.springframework.org/schema/context/spring-context.xsd">

    <!--appoint Spring IOC Package scanned by container-->
    <!--Can pass resource-pattern Specify the resources to scan-->
    <!--
    <context:component-scan
            base-package="com.nanjing.spring.bean.annotation"
            resource-pattern="repository/*.class"></context:component-scan>  -->

    <!-- context:exclude-filter Child nodes specify which components of the specified expression are excluded-->
    <!-- context:include-filter The child node specifies which expression components are included, and the child node needs use-default-filters Use together-->
    <context:component-scan
            base-package="com.nanjing.spring.bean.annotation">
        <!--
        <context:exclude-filter type="annotation"
                                expression="org.springframework.stereotype.Repository"/>
        -->
        <!--
        <context:include-filter type="annotation"
                                expression="org.springframework.stereotype.Repository"/>
        -->
        <!--
        <context:exclude-filter type="assignable"
                                expression="com.nanjing.spring.beans.annotation.repository.UserRepository"/>
        -->
        <!--        <context:include-filter type="assignable"-->
        <!--                                expression="com.nanjing.spring.beans.annotation.repository.UserRepository"/>-->
    </context:component-scan>

</beans>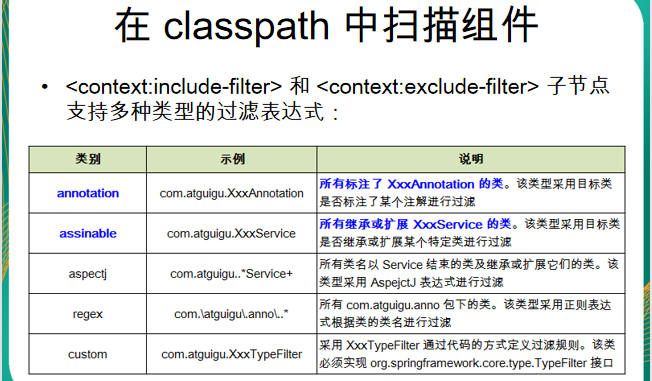
Step 7: main Java file
public class Main {
    public static void main(String[] args) {

        ApplicationContext ctx=new ClassPathXmlApplicationContext("beans-annotation.xml");

        TestObject to=(TestObject) ctx.getBean("testObject");
        System.out.println(to);

        UserController userController=(UserController) ctx.getBean("userController");
        System.out.println(userController);
        userController.execute();

        UserService userService=(UserService) ctx.getBean("userService");
        System.out.println(userService);

        UserRepository userRepository=(UserRepository) ctx.getBean("userRepository");
        System.out.println(userRepository);
    }
}
14, Configuring beans through annotations (2)
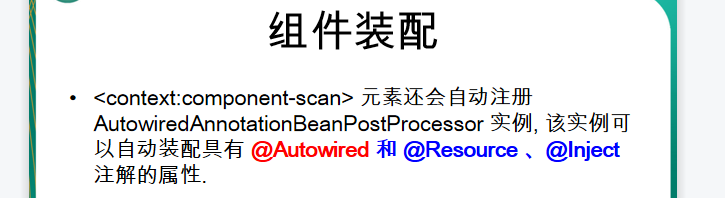
 @Autowired
    private UserService userService;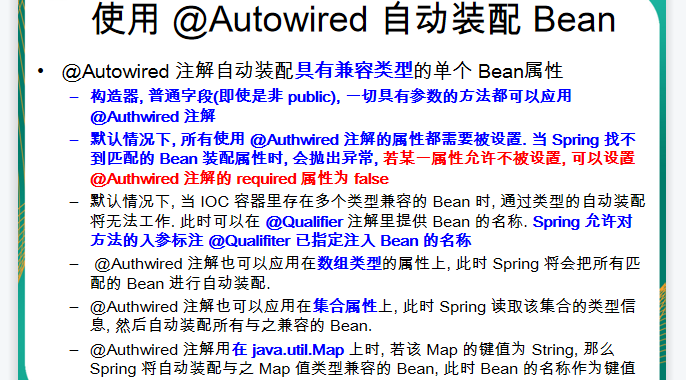
The first uses @ Qualifier
 @Autowired
    @Qualifier("userRepositoryImpl")
    private UserRepository userRepository;
Second
@Repository("userRepository")
public class UserRepositoryImpl implements UserRepository{