In the last section, we explained what spring MVC is and how it works!
SpringMVC learning notes 01 - Introduction to SpringMVC
Now let's take a look at how to quickly use spring MVC to write our program!
Method 1: configuration version
-
Step 1: create a maven project and introduce the required dependencies
<!-- springMVC Related dependency --> <dependency> <groupId>org.springframework</groupId> <artifactId>spring-webmvc</artifactId> <version>5.3.15</version> </dependency> <dependency> <groupId>javax.servlet</groupId> <artifactId>javax.servlet-api</artifactId> <version>4.0.1</version> </dependency> -
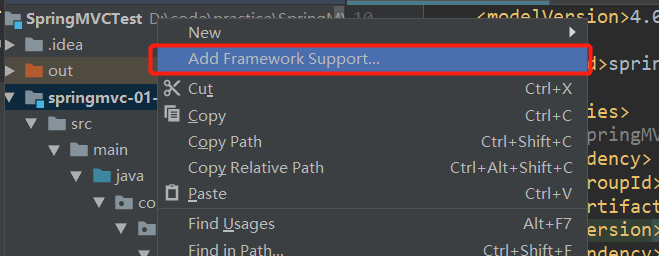
Step 2: right click the project to change it into a web project

-
Step 3: create spring MVC configuration file ApplicationContext xml
<?xml version="1.0" encoding="UTF-8"?> <beans xmlns="http://www.springframework.org/schema/beans" xmlns:xsi="http://www.w3.org/2001/XMLSchema-instance" xsi:schemaLocation="http://www.springframework.org/schema/beans https://www.springframework.org/schema/beans/spring-beans.xsd"> </beans> -
Step 4: in ApplicationContext The XML configuration file configures the processor mapper, the processor adapter, and the view parser
<!-- Add processor mapper --> <bean class="org.springframework.web.servlet.handler.BeanNameUrlHandlerMapping"/> <!-- Add processor adapter --> <bean class="org.springframework.web.servlet.mvc.SimpleControllerHandlerAdapter"/> <!-- Add view parser --> <bean class="org.springframework.web.servlet.view.InternalResourceViewResolver"> <!-- prefix --> <property name="prefix" value="/WEB-INF/jsp/"/> <!-- suffix --> <property name="suffix" value=".jsp"/> </bean> <!-- bean of id For what we later requested id --> <bean id="/hello" class="com.xdw.controller.HelloController"/> -
Step 5: the web under the web project Configure DispatcherServlet in XML file
<servlet> <servlet-name>dispatcherServlet</servlet-name> <servlet-class>org.springframework.web.servlet.DispatcherServlet</servlet-class> <init-param> <param-name>contextConfigLocation</param-name> <param-value>classpath:applicationContext.xml</param-value> </init-param> <load-on-startup>1</load-on-startup> </servlet> <servlet-mapping> <servlet-name>dispatcherServlet</servlet-name> <!-- 1. /Indicates that all requests are matched, excluding jsp request 2. /* Indicates that all requests are matched, including jsp request --> <url-pattern>/</url-pattern> </servlet-mapping> -
Step 6: write HelloController and implement the Spring Controller interface
package com.xdw.controller; import org.springframework.web.servlet.ModelAndView; import org.springframework.web.servlet.mvc.Controller; public class HelloController implements Controller { @Override public ModelAndView handleRequest(javax.servlet.http.HttpServletRequest request, javax.servlet.http.HttpServletResponse response) throws Exception { ModelAndView mv = new ModelAndView(); mv.addObject("msg", "Hello World!"); // Because the prefix and suffix are configured in the view parser, it will automatically look for the information in / WEB-INF/jsp directory jsp file mv.setViewName("hello"); return mv; } } -
Step 7: in ApplicationContext Register the HelloController we just created in the XML file
<!-- bean of id For the path we later requested --> <bean id="/hello" class="com.xdw.controller.HelloController"/> -
Create hello.jsp in the WEB-INF/jsp directory jsp
<%@ page contentType="text/html;charset=UTF-8" language="java" %> <html> <head> <title>Annotation jump page</title> </head> <body> ${msg} </body> </html> -
Step 8: configure tomcat, start the project and test!

Possible problems: visit 404, troubleshooting steps
- Check the console output to see if there is any missing jar package.
- If the jar package exists and the display cannot be output, add lib dependency in the project release of IDEA!
- Restart Tomcat to solve the problem!
From the above process, we can see that it is a little troublesome. In the actual development process, we usually use annotation!
Configuration Board
-
Create maven project and introduce corresponding dependencies
-
Turn the created project into a web project
-
Create the SpringMVC configuration file ApplicationContext xml
-
In the created ApplicationContext Configure the processor mapper, processor adapter and view parser in the XML configuration file
<beans xmlns="http://www.springframework.org/schema/beans" xmlns:xsi="http://www.w3.org/2001/XMLSchema-instance" xmlns:context="http://www.springframework.org/schema/context" xmlns:mvc="http://www.springframework.org/schema/mvc" xsi:schemaLocation="http://www.springframework.org/schema/beans http://www.springframework.org/schema/beans/spring-beans.xsd http://www.springframework.org/schema/context https://www.springframework.org/schema/context/spring-context.xsd http://www.springframework.org/schema/mvc https://www.springframework.org/schema/mvc/spring-mvc.xsd"> <!-- Configure the automatic scanning package to make the annotation under the specified container effective, which is determined by IOC Unified container management --> <context:component-scan base-package="com.xdw.controller"/> <!-- Give Way SpringMVC Do not process static resources, such as css And other related resources --> <mvc:default-servlet-handler/> <!-- Configure annotated processor mapper and processor adapter --> <!-- support mvc Annotation driven stay spring Generally used in@RequestMapping Annotation to complete the mapping relationship To make@RequestMapping Note effective Must register with context DefaultAnnotationHandlerMapping And one AnnotationMethodHandlerAdapter example These two instances are handled at the class level and method level respectively. and annotation-driven Configuration helps us automatically complete the injection of the above two instances. --> <mvc:annotation-driven/> <!-- Configure view parser --> <bean class="org.springframework.web.servlet.view.InternalResourceViewResolver" id="internalResourceViewResolver"> <property name="prefix" value="/WEB-INF/jsp/"/> <property name="suffix" value=".jsp"/> </bean> </beans> -
On the web Configure DispatcherServlet in XML file
<servlet> <servlet-name>dispatcherServlet</servlet-name> <servlet-class>org.springframework.web.servlet.DispatcherServlet</servlet-class> <init-param> <param-name>contextConfigLocation</param-name> <param-value>classpath:applicationContext.xml</param-value> </init-param> <load-on-startup>1</load-on-startup> </servlet> <servlet-mapping> <servlet-name>dispatcherServlet</servlet-name> <url-pattern>/</url-pattern> </servlet-mapping> -
Write HelloCOntroller
package com.xdw.controller; import org.springframework.stereotype.Controller; import org.springframework.ui.Model; import org.springframework.web.bind.annotation.RequestMapping; @Controller public class HelloController { @RequestMapping("/hello") public String hello(Model model) { model.addAttribute("msg", "Hello, annotation version!"); return "hello"; } }-
@The Controller is used to automatically scan the Spring IOC container during initialization;
-
@RequestMapping is used to map the request path. Here, because there is only mapping on the method, the access should be / hello;
-
The purpose of declaring Model type parameters in the method is to bring the data in the Action to the view;
-
The result returned by the method is the name of the view hello, and the prefix in the configuration file becomes WEB-INF / JSP / hello jsp.
-
-
Create hello.jsp in the WEB-INF/jsp directory jsp
<%@ page contentType="text/html;charset=UTF-8" language="java" %> <html> <head> <title>Annotation jump page</title> </head> <body> ${msg} </body> </html> -
Configure Tomcat and start the project test!

Summary
The implementation steps are actually very simple:
-
Create a new web project
-
Import related jar packages
-
Write web XML, register DispatcherServlet
-
Write spring MVC configuration file
-
The next step is to create the corresponding control class, controller
-
Finally, improve the correspondence between the front-end view and the controller
-
Test run and debugging
There are three major components that must be configured to use spring MVC: processor mapper, processor adapter and view parser
Generally, we only need to manually configure the view parser, while the processor mapper and processor adapter only need to turn on the annotation driver, eliminating a large section of xml configuration