SpringMVC
ssm:mybatis+spring+springmvc
mvc three-tier architecture: pattern (Dao, Service), view (Jsp..) Controller (Servlet)
1, Introduction
1. What is spring MVC
Spring MVC is a part of Spring FrameWork. It is a lightweight Web framework based on java to implement MVC
Spring MVC features:
- Lightweight and easy to learn
- Efficient, request response based MVC framework
- Good compatibility with Spring and seamless combination
- Agreement is better than configuration
- Powerful functions: RESTful, data validation, formatting, localization, theme, etc
- Flexible Introduction
2, Implementation principle
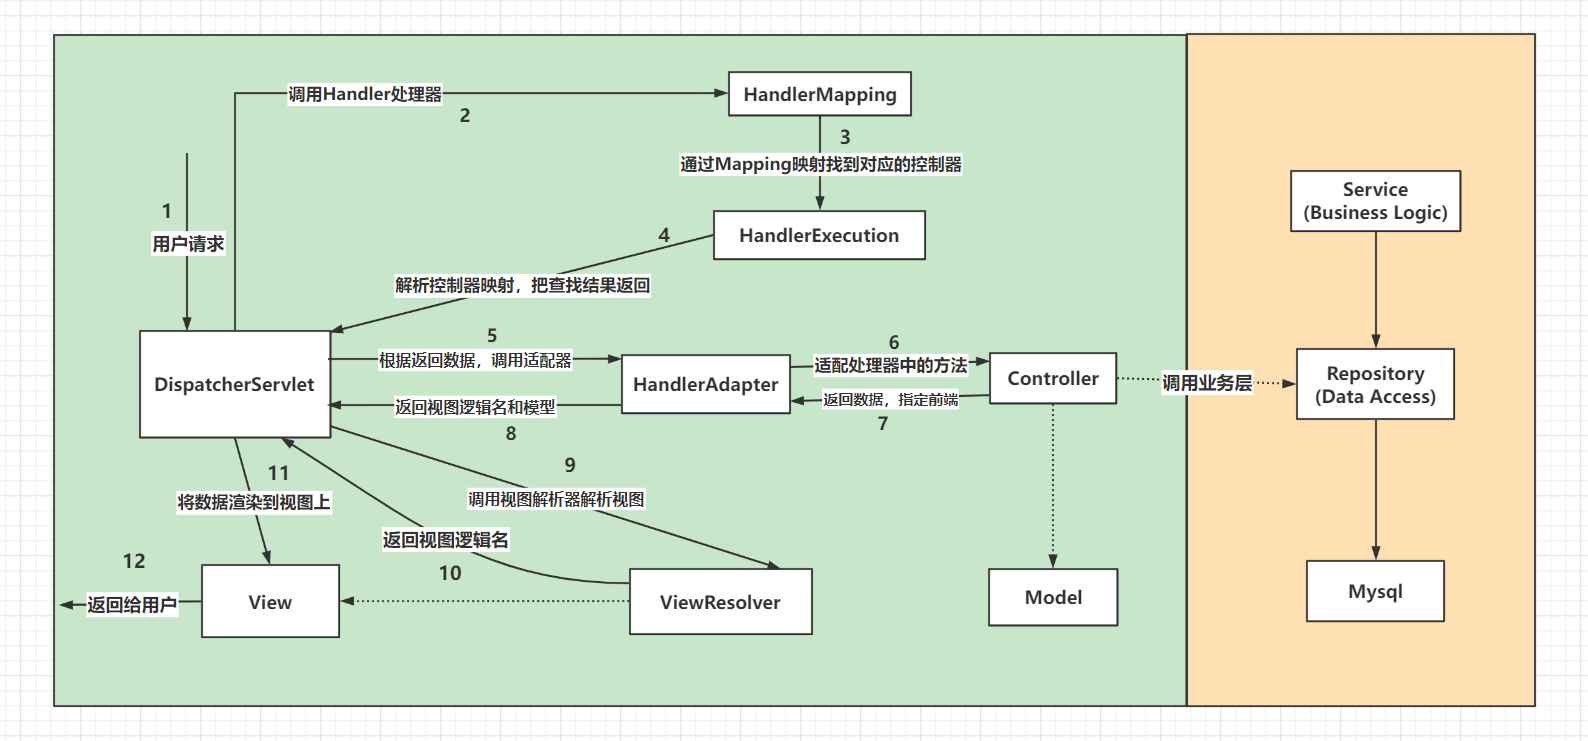
Spring MVC must be configured with three major components: processor mapper, processor adapter and view parser
Determine the dependencies of importing spring MVC
<dependency>
    <groupId>org.springframework</groupId>
    <artifactId>spring-webmvc</artifactId>
    <version>5.2.18.RELEASE</version>
</dependency>
1. First configure the web XML, register DispatcherServlet
<?xml version="1.0" encoding="UTF-8"?>
<web-app xmlns="http://xmlns.jcp.org/xml/ns/javaee"
         xmlns:xsi="http://www.w3.org/2001/XMLSchema-instance"
         xsi:schemaLocation="http://xmlns.jcp.org/xml/ns/javaee http://xmlns.jcp.org/xml/ns/javaee/web-app_4_0.xsd"
         version="4.0">
    <!--to configure DispatcherServlet:This is springmvc The core of is also called request distributor and front-end controller-->
    <servlet>
        <servlet-name>springmvc</servlet-name>
        <servlet-class>org.springframework.web.servlet.DispatcherServlet</servlet-class>
<!--   DispatcherServlet To bind spring Configuration file for     -->
        <init-param>
            <param-name>contextConfigLocation</param-name>
            <param-value>classpath:springmvc-servlet.xml</param-value>
        </init-param>
<!--        Startup level: 1-->
        <load-on-startup>1</load-on-startup>
    </servlet>
    <!--
      stay springMVC In,/ and /*Differences between:
      /: Only match all requests, not match jsp page
      /*: Match all requests, including jsp page-->
    <servlet-mapping>
        <servlet-name>springmvc</servlet-name>
        <url-pattern>/</url-pattern>
    </servlet-mapping>
</web-app>
2. Write the configuration file of spring MVC! springmvc-servlet.xml
<!--In fact spring Header file for-->
<?xml version="1.0" encoding="UTF-8"?><beans xmlns="http://www.springframework.org/schema/beans"      xmlns:xsi="http://www.w3.org/2001/XMLSchema-instance"      xsi:schemaLocation="http://www.springframework.org/schema/beans       http://www.springframework.org/schema/beans/spring-beans.xsd">
</beans>
3. Add processing mapper, processor adapter and view parser
<!-- Processor mapper   -->
<bean class="org.springframework.web.servlet.handler.BeanNameUrlHandlerMapping"/>
<!--  Processing adapter  -->
<bean class="org.springframework.web.servlet.mvc.SimpleControllerHandlerAdapter"/>
<!-- view resolver  :template engine Thymeleaf Freemarker  -->
<bean class="org.springframework.web.servlet.view.InternalResourceViewResolver" id="InternalResourceViewResolver">
    <!--prefix-->
    <property name="prefix" value="/WEB-INF/jsp/"/>
    <!--suffix-->
    <property name="suffix" value=".jsp"/>
</bean>
4. Write the operation business Controller and implement the Controller interface. Either add annotations or return a ModelAndView
public class HelloController implements Controller {
    public ModelAndView handleRequest(HttpServletRequest httpServletRequest, HttpServletResponse httpServletResponse) throws Exception {
        ModelAndView mv = new ModelAndView();
        //Business code
        String result="HelloSpringMVC";
        mv.addObject("msg",result);
        //Jump logic
        mv.setViewName("test");
        return mv;
    }
}
//perhaps
@Controller
public class HelloController {
    @RequestMapping("/hello")
    public String hello(Model model){
        //Encapsulate data
        model.addAttribute("msg","Hello,SpringMVCAnnotation");
        //Will be processed by the view parser
        return "hello";
    }
}
5. Register the class written by yourself into the springIOC container
<!--Handler--><bean id="/hello" class="com.kuang.controller.HelloController"/>
Final test!
3, Controller configuration summary
@Component		assembly
@Service		servic
@Controller		controller
@Repository		dao
1. When there are no three major components that MVC must configure, it can be completed by implementing class inheritance Controller interface, which also shows that this is a Controller
//As long as the class that implements the Controller interface is implemented, it means that this is a Controller
public class ControllerTest01 implements Controller {
    public ModelAndView handleRequest(HttpServletRequest httpServletRequest, HttpServletResponse httpServletResponse) throws Exception {
        ModelAndView mv = new ModelAndView();
        //Encapsulate data
        mv.addObject("msg","ControllerTest01");
        //Set view jump
        mv.setViewName("test");
        return mv;
    }
}
Way of annotation 2
To use annotations, you must let the spring IOC container scan the annotations under the package
At the same time, multiple requests can point to a view
/*Represents that this class will be taken over by spring. When adding the annotation Controller,
 If the return value of any method in this class is String,
 If there is a specific page that can jump, it will be parsed by the view parser*/
@Controller
public class ControllerTest02 {
    @RequestMapping("/t2")
    public String test1(Model model){
        model.addAttribute("msg","ControllerTest02");
        return "test";
    }
}
Req**uestMapping
@The RequestMapping annotation is used to map the url to the controller class or the method of a specific handler; Can be used on classes or methods. Used on the class, the method that represents all response requests in the class takes this address as the parent path.
4, RestFul style
concept
Restful is a style of resource location and resource operation. It's not a standard or agreement, it's just a style. The software designed based on this style can be more concise, more hierarchical, and easier to implement caching and other mechanisms.
function
Resources: all things on the Internet can be abstracted as resources
Resource operation: use POST, DELETE, PUT and GET to operate resources with different methods
Corresponding to: add, delete, modify and query
Operate resources in the traditional way: achieve different effects through different parameters! Single method, post and get
http: //127.0.0.1/item/queryItem.action?id=1, query, GET
http: //127.0.0.1/item/saveItem.action?id=1, new, POST
http: //127.0.0.1/item/updateItem.action?id=1 update, POST
http: //127.0.0.1/item/deleteItem.action?id=1 delete, GET and POST
Use RestFul to manipulate resources:
Different effects can be achieved through different request methods! As follows: the request address is the same, but the function can be different!
http: //127.0.0.1/item/1 Query, GET
http: //127.0.0.1/item New, POT
http: //127.0.0.1/item Update, PUT
http: //127.0.0.1/item/1 DELETE
URL address reuse can be achieved by using RestFul
test
1. Create a RestFulController
In Spring MVC, you can use the @ PathVariable annotation to bind the value of the method parameter to a URL template variable.
@Controller
public class RestFulController {
//    http://localhost:8080/add?a=1&b=2
//    RestFul style http://localhost:8080/add/a/b
//    @GetMapping(value = "/add/{a}/{b}")
    @RequestMapping(value = "/add/{a}/{b}",method = RequestMethod.GET)
    public String test1(@PathVariable int a, @PathVariable int b, Model model){
        int res = a + b;
        model.addAttribute("msg","The result is:"+res);
        return "test";
    }
}
Think: what are the benefits of using path variables?
- Yes, the path becomes more brief;
- It is more convenient to obtain parameters, and the framework will automatically carry out type conversion
- Access parameters can be constrained through path variables. If the types are different, the corresponding request method cannot be accessed. If the path accessed here is / commit/1/a, the path does not match the method, rather than parameter conversion failure
5, Redirection and forwarding
Forwarding and redirection via spring MVC - no view parser required
//forward
@Controller
public class ModelTest1 {
    @RequestMapping("/m1/t1")
    public String test1(Model model){
        model.addAttribute("msg","123456");
        return "forward:/WEB-INF/jsp/index.jsp";
    }
}
//redirect
@Controller
public class ModelTest1 {
    @RequestMapping("/m1/t1")
    public String test1(Model model){
        model.addAttribute("msg","123456");
        return "redirect:/index.jsp";
    }
}
View parser
//forward
@Controller
public class ControllerTest02 {
    @RequestMapping("/t1")
    public String test1(Model model){
        model.addAttribute("msg","ControllerTest02");
        return "test";
    }
}
//redirect
@Controller
public class ModelTest1 {
    @RequestMapping("/m1/t1")
    public String test1(Model model){
        model.addAttribute("msg","123456");
        return "redirect:/index.jsp";
    }
}
6, Receive request parameters and echo
LinkedHashMap
ModelMap: Inherited LinkedHashMap,Functions will be better than Model many
Model: Compact version (in most cases)
Receiving one or more parameters:
//localhost:8080/user/t1?name=xxx;
@GetMapping("/t1")
public String test1(@RequestParam("username") String name, Model model){
    //1. Receive front-end parameters
    System.out.println("The accepted front-end parameters are"+name);
    //2. Pass the returned result to the front end, model
    model.addAttribute("msg",name);
    //3. View jump
    return "test";
}
Receiving an object:
//The front end receives an object: id name sex
/*
1.Receive the parameters passed by the front-end user, judge the name of the parameter, and assume that the name is directly on the method and can be used directly
2.Suppose an object User is passed, matching the field name in the User object; If the names are the same, then OK; otherwise, no match is found and the value is null
* */
@GetMapping("/t2")
public String test2(User user){
    System.out.println(user);
    return "test";
}
Receiving garbled code
1. Customize filter class
public class EncodingFilter implements Filter {
    public void init(FilterConfig filterConfig) throws ServletException {

    }
    public void doFilter(ServletRequest request, ServletResponse response, FilterChain chain) throws IOException, ServletException {
        request.setCharacterEncoding("utf-8");
        response.setCharacterEncoding("utf-8");
        chain.doFilter(request,response);
    }
    public void destroy() {
    }
}
On the web Just register filter in XML!
2. Solve the problem of garbled code through the built-in filter of spring MVC
On the web XML middle note
<!--  SpringMVC Built in filter to solve the problem of garbled code  -->
    <filter>
        <filter-name>encoding</filter-name>
        <filter-class>org.springframework.web.filter.CharacterEncodingFilter</filter-class>
        <init-param>
            <param-name>encoding</param-name>
            <param-value>utf-8</param-value>
        </init-param>
    </filter>
    <filter-mapping>
        <filter-name>encoding</filter-name>
        <url-pattern>/*</url-pattern>
    </filter-mapping>
7, JSON
Front end and back end separation: back-end deployment, providing interface, providing data + JSON + front-end independent deployment, responsible for rendering back-end data
Conversion of JSON between Java objects and JavaScript in html
<script type="text/javascript">
    //Write a javaScript object
    var user = {
        name : "meteor",
        age:3,
        sex:"male"
    }
    //Convert js object into json object;
    var json = JSON.stringify(user);
    console.log(json);
    console.log("======================")
    //Convert JSON to JavaScript
    var obj = JSON.parse(json);
    console.log(obj);
</script>
Solve the problem of garbled code
By adding StringHttpMessageConverter transformation configuration in the spring MVC configuration file!
<!-- JSON Garbled code problem -->
<mvc:annotation-driven>
    <mvc:message-converters register-defaults="true">
        <bean class="org.springframework.http.converter.StringHttpMessageConverter">
            <constructor-arg value="UTF-8"/>
        </bean>
        <bean class="org.springframework.http.converter.json.MappingJackson2HttpMessageConverter">
            <property name="objectMapper">
                <bean class="org.springframework.http.converter.json.Jackson2ObjectMapperFactoryBean">
                    <property name="failOnEmptyBeans" value="false"/>
                </bean>
            </property>
        </bean>
    </mvc:message-converters>
</mvc:annotation-driven>
@Controller         //Walk view parser
@RestController     //Return string directly
public class UserController {
//    Returns an object
    @RequestMapping("/j1")
//    @ResponseBody / / this annotation enables the user to return a string without going to the view parser
    public String json1() throws JsonProcessingException {
        //jackon,ObjectMapper
        ObjectMapper mapper = new ObjectMapper();
        //Create an object
        User user = new User("Bingbing",3,"female");

        String str = mapper.writeValueAsString(user);
        return str;
    }
//    Return multiple objects
    @RequestMapping("/j2")
    //    @ResponseBody / / this annotation enables the user to return a string without going to the view parser
    public String json2() throws JsonProcessingException {
        //jackon,ObjectMapper
        ObjectMapper mapper = new ObjectMapper();
        List<User> userList = new ArrayList<User>();
        //Create an object
        User user1 = new User("Bingbing",18,"female");
        User user2 = new User("stars",18,"male");
        User user3 = new User("Lele",3,"female");
        userList.add(user1);
        userList.add(user2);
        userList.add(user3);

 		return JsonUtils.getJson(userList);
    }

//    Return a time object
    @RequestMapping("/j3")
    //    @ResponseBody / / this annotation enables the user to return a string without going to the view parser
    public String json3() throws JsonProcessingException {

        Date date = new Date();
        return JsonUtils.getJson(date);
	}
}
Create a new tool class to reduce the complexity of creating ObjectMapper objects
public class JsonUtils {
    public static String getJson(Object object){
        return getJson(object,"yyyy-MM-dd HH:mm:ss");
    }
    public static String getJson(Object object ,String dateFormat){
        ObjectMapper mapper = new ObjectMapper();
        //The time stamp method is not applicable. Change the use of time stamp to false
        mapper.configure(SerializationFeature.WRITE_DATES_AS_TIMESTAMPS,false);
        //Custom date format
        SimpleDateFormat sdf = new SimpleDateFormat(dateFormat);
        mapper.setDateFormat(sdf);

        try {
            return mapper.writeValueAsString(object);
        } catch (JsonProcessingException e) {
            e.printStackTrace();
        }
        return null;
    }
}
8, Integrate SSM
1. Integrate Mybatis layer
1. Database configuration file properties
jdbc.driver=com.mysql.jdbc.Driver
jdbc.url=jdbc:mysql://localhost:3306/ssmbuild?useSSL=true&useUnicode=true&characterEncoding=utf8
jdbc.username=root
jdbc.password=123456
2.IDEA associated database
3. Write the core configuration file of Mybatis
<?xml version="1.0" encoding="UTF-8" ?>
<!DOCTYPE configuration
       PUBLIC "-//mybatis.org//DTD Config 3.0//EN"
       "http://mybatis.org/dtd/mybatis-3-config.dtd">
<configuration>

   <typeAliases>
       <package name="com.kuang.pojo"/>
   </typeAliases>
   <mappers>
       <mapper resource="com/kuang/dao/BookMapper.xml"/>
   </mappers>

</configuration>
4. Write the entity class corresponding to the database com kuang. pojo. Books, use the lombok plug-in!
package com.kuang.pojo;

import lombok.AllArgsConstructor;
import lombok.Data;
import lombok.NoArgsConstructor;

@Data
@AllArgsConstructor
@NoArgsConstructor
public class Books {

   private int bookID;
   private String bookName;
   private int bookCounts;
   private String detail;

}
5. Write Mapper interface of dao layer
package com.kuang.dao;

import com.kuang.pojo.Books;
import java.util.List;

public interface BookMapper {

   //Add a Book
   int addBook(Books book);

   //Delete a Book by id
   int deleteBookById(int id);

   //Update Book
   int updateBook(Books books);

   //According to the id query, a Book is returned
   Books queryBookById(int id);

   //Book list, return all sets
   List<Books> queryAllBook();

}
6. Write mapper corresponding to the interface XML file, import the package of Mybatis
<?xml version="1.0" encoding="UTF-8" ?>
<!DOCTYPE mapper
       PUBLIC "-//mybatis.org//DTD Mapper 3.0//EN"
       "http://mybatis.org/dtd/mybatis-3-mapper.dtd">

<mapper namespace="com.kuang.dao.BookMapper">

   <!--Add one Book-->
   <insert id="addBook" parameterType="Books">
      insert into ssmbuild.books(bookName,bookCounts,detail)
      values (#{bookName}, #{bookCounts}, #{detail})
   </insert>

   <!--according to id Delete a Book-->
   <delete id="deleteBookById" parameterType="int">
      delete from ssmbuild.books where bookID=#{bookID}
   </delete>

   <!--to update Book-->
   <update id="updateBook" parameterType="Books">
      update ssmbuild.books
      set bookName = #{bookName},bookCounts = #{bookCounts},detail = #{detail}
      where bookID = #{bookID}
   </update>

   <!--according to id query,Return a Book-->
   <select id="queryBookById" resultType="Books">
      select * from ssmbuild.books
      where bookID = #{bookID}
   </select>

   <!--Query all Book-->
   <select id="queryAllBook" resultType="Books">
      SELECT * from ssmbuild.books
   </select>

</mapper>
7. Write the interface and implementation class of Service layer
Interface:
package com.kuang.service;

import com.kuang.pojo.Books;

import java.util.List;

//BookService: it needs to be implemented at the bottom and call the dao layer
public interface BookService {
   //Add a Book
   int addBook(Books book);
   //Delete a Book by id
   int deleteBookById(int id);
   //Update Book
   int updateBook(Books books);
   //According to the id query, a Book is returned
   Books queryBookById(int id);
   //Query all books and return the list set
   List<Books> queryAllBook();
}
Implementation class:
package com.kuang.service;

import com.kuang.dao.BookMapper;
import com.kuang.pojo.Books;
import java.util.List;

public class BookServiceImpl implements BookService {

   //Call the operation of dao layer and set a set interface to facilitate Spring management
   private BookMapper bookMapper;

   public void setBookMapper(BookMapper bookMapper) {
       this.bookMapper = bookMapper;
  }

   public int addBook(Books book) {
       return bookMapper.addBook(book);
  }

   public int deleteBookById(int id) {
       return bookMapper.deleteBookById(id);
  }

   public int updateBook(Books books) {
       return bookMapper.updateBook(books);
  }

   public Books queryBookById(int id) {
       return bookMapper.queryBookById(id);
  }

   public List<Books> queryAllBook() {
       return bookMapper.queryAllBook();
  }
}
The bottom requirement operation is written!
2. Integrate Spring layer
1. Configure Spring to integrate Mybatis. Here, the data source uses c3p0 connection pool;
2. Write configuration files related to Spring integration with Mybatis; spring-dao.xml
<?xml version="1.0" encoding="UTF-8"?>
<beans xmlns="http://www.springframework.org/schema/beans"
      xmlns:xsi="http://www.w3.org/2001/XMLSchema-instance"
      xmlns:context="http://www.springframework.org/schema/context"
      xsi:schemaLocation="http://www.springframework.org/schema/beans
       http://www.springframework.org/schema/beans/spring-beans.xsd
       http://www.springframework.org/schema/context
       https://www.springframework.org/schema/context/spring-context.xsd">

   <!-- Configuration integration mybatis -->
   <!-- 1.Associated database file -->
   <context:property-placeholder location="classpath:database.properties"/>

   <!-- 2.Database connection pool -->
   <!--Database connection pool
       dbcp Semi automatic operation cannot be connected automatically
       c3p0 Automatic operation (automatically load the configuration file and set it into the object)
   -->
   <bean id="dataSource" class="com.mchange.v2.c3p0.ComboPooledDataSource">
       <!-- Configure connection pool properties -->
       <property name="driverClass" value="${jdbc.driver}"/>
       <property name="jdbcUrl" value="${jdbc.url}"/>
       <property name="user" value="${jdbc.username}"/>
       <property name="password" value="${jdbc.password}"/>

       <!-- c3p0 Private properties of connection pool -->
       <property name="maxPoolSize" value="30"/>
       <property name="minPoolSize" value="10"/>
       <!-- Not automatically after closing the connection commit -->
       <property name="autoCommitOnClose" value="false"/>
       <!-- Get connection timeout -->
       <property name="checkoutTimeout" value="10000"/>
       <!-- Number of retries when getting connection failed -->
       <property name="acquireRetryAttempts" value="2"/>
   </bean>

   <!-- 3.to configure SqlSessionFactory object -->
   <bean id="sqlSessionFactory" class="org.mybatis.spring.SqlSessionFactoryBean">
       <!-- Inject database connection pool -->
       <property name="dataSource" ref="dataSource"/>
       <!-- to configure MyBaties Global profile:mybatis-config.xml -->
       <property name="configLocation" value="classpath:mybatis-config.xml"/>
   </bean>

   <!-- 4.Configure scan Dao Interface package, dynamic implementation Dao Interface injection into spring In container -->
   <!--Explanation: https://www.cnblogs.com/jpfss/p/7799806.html-->
   <bean class="org.mybatis.spring.mapper.MapperScannerConfigurer">
       <!-- injection sqlSessionFactory -->
       <property name="sqlSessionFactoryBeanName" value="sqlSessionFactory"/>
       <!-- Given the need to scan Dao Interface package -->
       <property name="basePackage" value="com.kuang.dao"/>
   </bean>

</beans>
3.Spring integration service layer
<?xml version="1.0" encoding="UTF-8"?>
<beans xmlns="http://www.springframework.org/schema/beans"
      xmlns:xsi="http://www.w3.org/2001/XMLSchema-instance"
      xmlns:context="http://www.springframework.org/schema/context"
      xsi:schemaLocation="http://www.springframework.org/schema/beans
   http://www.springframework.org/schema/beans/spring-beans.xsd
   http://www.springframework.org/schema/context
   http://www.springframework.org/schema/context/spring-context.xsd">

   <!-- scanning service dependent bean -->
   <context:component-scan base-package="com.kuang.service" />

   <!--BookServiceImpl Inject into IOC In container-->
   <bean id="BookServiceImpl" class="com.kuang.service.BookServiceImpl">
       <property name="bookMapper" ref="bookMapper"/>
   </bean>

   <!-- Configure transaction manager -->
   <bean id="transactionManager"class="org.springframework.jdbc.datasource.DataSourceTransactionManager">
       <!-- Inject database connection pool -->
       <property name="dataSource" ref="dataSource" />
   </bean>

</beans>
3. Integrate spring MVC layer
1.web.xml
<?xml version="1.0" encoding="UTF-8"?>
<web-app xmlns="http://xmlns.jcp.org/xml/ns/javaee"
        xmlns:xsi="http://www.w3.org/2001/XMLSchema-instance"
        xsi:schemaLocation="http://xmlns.jcp.org/xml/ns/javaee http://xmlns.jcp.org/xml/ns/javaee/web-app_4_0.xsd"
        version="4.0">

   <!--DispatcherServlet-->
   <servlet>
       <servlet-name>DispatcherServlet</servlet-name>
       <servlet-class>org.springframework.web.servlet.DispatcherServlet</servlet-class>
       <init-param>
           <param-name>contextConfigLocation</param-name>
           <!--Be careful:What we load here is the total configuration file, which was damaged here before!-->
           <param-value>classpath:applicationContext.xml</param-value>
       </init-param>
       <load-on-startup>1</load-on-startup>
   </servlet>
   <servlet-mapping>
       <servlet-name>DispatcherServlet</servlet-name>
       <url-pattern>/</url-pattern>
   </servlet-mapping>

   <!--encodingFilter-->
   <filter>
       <filter-name>encodingFilter</filter-name>
       <filter-class>
          org.springframework.web.filter.CharacterEncodingFilter
       </filter-class>
       <init-param>
           <param-name>encoding</param-name>
           <param-value>utf-8</param-value>
       </init-param>
   </filter>
   <filter-mapping>
       <filter-name>encodingFilter</filter-name>
       <url-pattern>/*</url-pattern>
   </filter-mapping>

   <!--Session Expiration time-->
   <session-config>
       <session-timeout>15</session-timeout>
   </session-config>

</web-app>
2.spring-mvc.xml
<?xml version="1.0" encoding="UTF-8"?>
<beans xmlns="http://www.springframework.org/schema/beans"
      xmlns:xsi="http://www.w3.org/2001/XMLSchema-instance"
      xmlns:context="http://www.springframework.org/schema/context"
      xmlns:mvc="http://www.springframework.org/schema/mvc"
      xsi:schemaLocation="http://www.springframework.org/schema/beans
   http://www.springframework.org/schema/beans/spring-beans.xsd
   http://www.springframework.org/schema/context
   http://www.springframework.org/schema/context/spring-context.xsd
   http://www.springframework.org/schema/mvc
   https://www.springframework.org/schema/mvc/spring-mvc.xsd">

   <!-- to configure SpringMVC -->
   <!-- 1.open SpringMVC Annotation driven -->
   <mvc:annotation-driven />
   <!-- 2.Static resource default servlet to configure-->
   <mvc:default-servlet-handler/>

   <!-- 3.to configure jsp display ViewResolver view resolver  -->
   <beanclass="org.springframework.web.servlet.view.InternalResourceViewResolver">
       <property name="viewClass"value="org.springframework.web.servlet.view.JstlView" />
       <property name="prefix" value="/WEB-INF/jsp/" />
       <property name="suffix" value=".jsp" />
   </bean>

   <!-- 4.scanning web dependent bean -->
   <context:component-scan base-package="com.kuang.controller" />

</beans>
3.Spring configuration integration file, ApplicationContext xml
<?xml version="1.0" encoding="UTF-8"?>
<beans xmlns="http://www.springframework.org/schema/beans"
      xmlns:xsi="http://www.w3.org/2001/XMLSchema-instance"
      xsi:schemaLocation="http://www.springframework.org/schema/beans
       http://www.springframework.org/schema/beans/spring-beans.xsd">

   <import resource="spring-dao.xml"/>
   <import resource="spring-service.xml"/>
   <import resource="spring-mvc.xml"/>

</beans>
Configuration complete
4. ssmbuild project
1. Create entity class -- Books
@Data
@AllArgsConstructor
@NoArgsConstructor
public class Books {
    private int bookID;
    private String bookName;
    private int bookCounts;
    private String detail;
}
2. Create mapper xml
public interface BookMapper {

    //Add a Book
    int addBook(Books books);
    //Delete a Book
    int deleteBookById(@Param("bookId") int id );
    //Update a Book
    int updateBook(Books books);
    //Inquire about a Book
    Books queryBookById(@Param("bookId") int id);
    //Query all books
    List<Books> queryAllBook();

    List<Books> queryBookByName(@Param("bookName") String bookName);
}
3. Create Mapper XML, register Mapper
<?xml version="1.0" encoding="UTF-8" ?>
<!DOCTYPE mapper
        PUBLIC "-//mybatis.org//DTD Config 3.0//EN"
        "http://mybatis.org/dtd/mybatis-3-mapper.dtd">

<mapper namespace="com.kuang.dao.BookMapper">
    <insert id="addBook" parameterType="Books">
        insert into ssmbuild.books (bookName, bookCounts, detail)
        values (#{bookName},#{bookCounts},#{detail});
    </insert>

    <delete id="deleteBookById" parameterType="int">
        delete from ssmbuild.books where bookID = #{bookId}
    </delete>

    <update id="updateBook" parameterType="Books">
        update ssmbuild.books
        set bookName=#{bookName},bookCounts=#{bookCounts},detail=#{detail}
        where bookID=#{bookID};
    </update>

    <select id="queryBookById" resultType="Books">
        select * from ssmbuild.books
        where bookID=#{bookId};
    </select>

    <select id="queryAllBook" resultType="Books">
        select * from ssmbuild.books;
    </select>

    <select id="queryBookByName" resultType="Books">
        select * from ssmbuild.books where bookName like concat('%',#{bookName},'%');
    </select>
</mapper>
4. Create service interface
public interface BookService {

    //Add a Book
    int addBook(Books books);
    //Delete a Book
    int deleteBookById(int id );
    //Update a Book
    int updateBook(Books books);
    //Inquire about a Book
    Books queryBookById(int id);
    //Query all books
    List<Books> queryAllBook();
    //Fuzzy query
    List<Books> queryBookByName(String bookName);
}
5. BookService implementation class
public class BookServiceImpl implements BookService {
    //service adjusting dao layer and combining dao layer
    private BookMapper bookMapper;

    public void setBookMapper(BookMapper bookMapper) {
        this.bookMapper = bookMapper;
    }

    public int addBook(Books books) {
        return bookMapper.addBook(books);
    }

    public int deleteBookById(int id) {
        return bookMapper.deleteBookById(id);
    }

    public int updateBook(Books books) {
        return bookMapper.updateBook(books);
    }

    public Books queryBookById(int id) {
        return bookMapper.queryBookById(id);
    }

    public List<Books> queryAllBook() {
        return bookMapper.queryAllBook();
    }

    public List<Books> queryBookByName(String bookName) {
        return bookMapper.queryBookByName(bookName);
    }


}
6. controller layer
@Controller
@RequestMapping("/book")
public class BooController {
    //The controller adjusts the service layer
    @Controller
    @RequestMapping("/book")
    public class BookController {

        @Autowired
        @Qualifier("BookServiceImpl")
        private BookService bookService;

        @RequestMapping("/allBook")
        public String list(Model model) {
            List<Books> list = bookService.queryAllBook();
            model.addAttribute("list", list);
            return "allbook";
        }

        //Jump to add page
        @RequestMapping("/toAddBook")
        public String toAddPaper(){
            return "addBook";
        }
        //Request to add books
        @RequestMapping("/addBook")
        public String addBook(Books books){
            System.out.println("addBook=>"+books);
            bookService.addBook(books);
            return "redirect:/book/allBook";//Redirect to the request @ RequestMapping("/allBook");
        }

        //Jump to the modification page
        @RequestMapping("/toUpdate")
        public String toUpdatePaper(int id,Model model){
            Books books = bookService.queryBookById(id);
            model.addAttribute("qBook",books);
            return "updateBook";
        }

        //Revise books
        @RequestMapping("/updateBook")
        public String updateBook(Books books){
            System.out.println("updateBook=>" + books);
            bookService.updateBook(books);

            return "redirect:/book/allBook";//Redirect to the request @ RequestMapping("/allBook");
        }

        //Delete books
        @RequestMapping("/deleteBook/{bookID}")
        public String deleteBook(@PathVariable("bookID") int id){
            bookService.deleteBookById(id);
            return "redirect:/book/allBook";//Redirect to the request @ RequestMapping("/allBook");
        }

        //Fuzzy query book
        @RequestMapping("/queryBook")
        public String queryBook(String queryBookName,Model model){
            List<Books> list = bookService.queryBookByName(queryBookName);

            if (list.size()==0) {
                model.addAttribute("error","No corresponding books found");

            }
            model.addAttribute("list", list);
            return "allbook";

        }
    }
}
9, Ajax
brief introduction
- Ajax = asynchronous JavaScript and XML
- AJAX is a technology that can update some web pages without reloading the whole web page.
- Ajax is not a new programming language, but the technology used in Yo to create better, faster and more interactive Web applications.
- It can be said that the application of Ajax technology is like Baidu's search box. It does not need to refresh and dynamically obtain data to make the page more vivid
Enter the verification effect in the login box
1.controller
@RequestMapping("/a3")
public String ajax3(String name,String pwd){
   String msg = "";
   //There is data in the simulation database
   if (name!=null){
       if ("admin".equals(name)){
           msg = "OK";
      }else {
           msg = "User name input error";
      }
  }
   if (pwd!=null){
       if ("123456".equals(pwd)){
           msg = "OK";
      }else {
           msg = "Incorrect password input";
      }
  }
   return msg; //Due to the @ RestController annotation, msg is converted into json format and returned
}
2. Front page login jsp
<%@ page contentType="text/html;charset=UTF-8" language="java" %>
<html>
<head>
   <title>ajax</title>
   <script src="${pageContext.request.contextPath}/statics/js/jquery-3.1.1.min.js"></script>
   <script>

       function a1(){
           $.post({
               url:"${pageContext.request.contextPath}/a3",
               data:{'name':$("#name").val()},
               success:function (data) {
                   if (data.toString()=='OK'){
                       $("#userInfo").css("color","green");
                  }else {
                       $("#userInfo").css("color","red");
                  }
                   $("#userInfo").html(data);
              }
          });
      }
       function a2(){
           $.post({
               url:"${pageContext.request.contextPath}/a3",
               data:{'pwd':$("#pwd").val()},
               success:function (data) {
                   if (data.toString()=='OK'){
                       $("#pwdInfo").css("color","green");
                  }else {
                       $("#pwdInfo").css("color","red");
                  }
                   $("#pwdInfo").html(data);
              }
          });
      }

   </script>
</head>
<body>
<p>
  user name:<input type="text" id="name" onblur="a1()"/>
   <span id="userInfo"></span>
</p>
<p>
  password:<input type="text" id="pwd" onblur="a2()"/>
   <span id="pwdInfo"></span>
</p>
</body>
</html>
10, Interceptor
Interceptor overview
The processor interceptor of spring MVC is similar to the Filter in Servlet development. It is used to preprocess and post process the processor. Developers can define some interceptors to realize specific functions.
The difference between filter and Interceptor: interceptor is the specific application of AOP idea.
filter
- Part of the servlet specification that can be used by any Java Web project
- After / * is configured in URL patt, all resources to be accessed can be intercepted
Interceptor
- The interceptor is owned by the spring MVC framework. It can only be used by projects that use the spring MVC framework
- The interceptor will only intercept the accessed controller methods. If the accessed is jsp/html/css/image/js, it will not intercept
Case: verify whether the user logs in
1. Write a login page login jsp
<%@ page contentType="text/html;charset=UTF-8" language="java" %>
<html>
<head>
   <title>Title</title>
</head>

<h1>Login page</h1>
<hr>

<body>
<form action="${pageContext.request.contextPath}/user/login">
  user name:<input type="text" name="username"> <br>
  password:<input type="password" name="pwd"> <br>
   <input type="submit" value="Submit">
</form>
</body>
</html>
2. Write a Controller to process the request
package com.kuang.controller;

import org.springframework.stereotype.Controller;
import org.springframework.web.bind.annotation.RequestMapping;

import javax.servlet.http.HttpSession;

@Controller
@RequestMapping("/user")
public class UserController {

   //Jump to landing page
   @RequestMapping("/jumplogin")
   public String jumpLogin() throws Exception {
       return "login";
  }

   //Jump to success page
   @RequestMapping("/jumpSuccess")
   public String jumpSuccess() throws Exception {
       return "success";
  }

   //Login submission
   @RequestMapping("/login")
   public String login(HttpSession session, String username, String pwd) throwsException {
       // Record user identity information to session
       System.out.println("Receiving front end==="+username);
       session.setAttribute("user", username);
       return "success";
  }

   //Exit login
   @RequestMapping("/logout")
   public String logout(HttpSession session) throws Exception {
       // session expired
       session.invalidate();
       return "login";
  }
}
3. Write a successful login page success jsp
<%@ page contentType="text/html;charset=UTF-8" language="java" %>
<html>
<head>
   <title>Title</title>
</head>
<body>

<h1>Login success page</h1>
<hr>

${user}
<a href="${pageContext.request.contextPath}/user/logout">cancellation</a>
</body>
</html>
4. Test jump on the index page! Start Tomcat test, and you can enter the home page without logging in!
<%@ page contentType="text/html;charset=UTF-8" language="java" %>
<html>
 <head>
   <title>$Title$</title>
 </head>
 <body>
 <h1>home page</h1>
 <hr>
<%--Sign in--%>
 <a href="${pageContext.request.contextPath}/user/jumplogin">Sign in</a>
 <a href="${pageContext.request.contextPath}/user/jumpSuccess">Success page</a>
 </body>
</html>
5. Write user login interceptor
package com.kuang.interceptor;

import org.springframework.web.servlet.HandlerInterceptor;
import org.springframework.web.servlet.ModelAndView;

import javax.servlet.ServletException;
import javax.servlet.http.HttpServletRequest;
import javax.servlet.http.HttpServletResponse;
import javax.servlet.http.HttpSession;
import java.io.IOException;

public class LoginInterceptor implements HandlerInterceptor {

   public boolean preHandle(HttpServletRequest request, HttpServletResponseresponse, Object handler) throws ServletException, IOException {
       // If it is a landing page, release it
       System.out.println("uri: " + request.getRequestURI());
       if (request.getRequestURI().contains("login")) {
           return true;
      }

       HttpSession session = request.getSession();

       // If the user has logged in
       if(session.getAttribute("user") != null) {
           return true;
      }

       // The user does not log in and jumps to the login page
       request.getRequestDispatcher("/WEB-INF/jsp/login.jsp").forward(request,response);
       return false;
  }

   public void postHandle(HttpServletRequest httpServletRequest,HttpServletResponse httpServletResponse, Object o, ModelAndView modelAndView)throws Exception {

  }

   public void afterCompletion(HttpServletRequest httpServletRequest,HttpServletResponse httpServletResponse, Object o, Exception e) throws Exception {

  }
}
6. Register the interceptor in the configuration file of spring MVC
<!--About interceptor configuration-->
<mvc:interceptors>
   <mvc:interceptor>
       <mvc:mapping path="/**"/>
       <bean id="loginInterceptor" class="com.kuang.interceptor.LoginInterceptor"/>
   </mvc:interceptor>
</mvc:interceptors>
11, File upload and download
Upload ideas
Spring MVC can well support file upload, but MultipartResolver is not installed by default in the context of spring MVC
Therefore, it cannot handle file upload by default. If you want to use Spring's file upload function, you need to configure MultipartResolver in the context.
In order to upload files, you must set the method of the form to POST and the enctype to multipart / form data. Only in this case, the browser will send the file selected by the user to the server as binary data;
Give a detailed description of the enctype attribute in the form:
- Application / x-www = form urlencoded: by default, only the value attribute value in the form field is processed. Forms with this encoding method will process the value in the form field into URL encoding method.
- Multipart / form data: this encoding method will process form data in the form of binary stream. This encoding method will also encapsulate the contents of the file specified in the file field into the request parameters, and will not encode characters.
- text/plain: except for converting spaces into "+" signs, other characters are not encoded. This method is applicable to sending mail directly through forms.
<form action="" enctype="multipart/form-data" method="post">
   <input type="file" name="file"/>
   <input type="submit">
</form>
Once the enctype is set to multipart / form data, the browser will process the form data in the form of binary stream, and the processing of file upload involves parsing the original HTTP response on the server side. In 2003, the Apache Software Foundation released the open source Commons FileUpload component, which soon became the best choice for Servlet/JSP programmers to upload files.
- Servlet3. The 0 specification has provided a method to handle file upload, but this upload needs to be completed in the servlet.
- Spring MVC provides a simpler encapsulation.
- Spring MVC provides direct support for file upload, which is implemented with the plug and play MultipartResolver.
- Spring MVC implements a MultipartResolver implementation class using Apache Commons FileUpload Technology:
- CommonsMultipartResolver. Therefore, the file upload of spring MVC also needs to rely on the component of Apache Commons FileUpload.
Implementation steps:
1. Import the jar package uploaded by the file, commons fileUpload, Maven will automatically help us import his dependent package commons IO package;
<!--File upload-->
<dependency>
   <groupId>commons-fileupload</groupId>
   <artifactId>commons-fileupload</artifactId>
   <version>1.3.3</version>
</dependency>
<!--servlet-api Import a higher version of-->
<dependency>
   <groupId>javax.servlet</groupId>
   <artifactId>javax.servlet-api</artifactId>
   <version>4.0.1</version>
</dependency>
2. Configuration bean: multipartResolver
[note!!! The id of this bena must be: multipartResolver, or 400 error will be reported when uploading the file! I've planted a pit here, and I'll teach you a lesson!]
<!--File upload configuration-->
<bean id="multipartResolver" class="org.springframework.web.multipart.commons.CommonsMultipartResolver">
   <!-- The encoding format of the request must be the same as jSP of pageEncoding Properties are consistent so that the contents of the form can be read correctly. The default is ISO-8859-1 -->
   <property name="defaultEncoding" value="utf-8"/>
   <!-- Upper limit of uploaded file size, in bytes (10485760)=10M) -->
   <property name="maxUploadSize" value="10485760"/>
   <property name="maxInMemorySize" value="40960"/>
</bean>
Common methods of CommonsMultipartFile:
- String getOriginalFilename(): get the original name of the uploaded file
- InputStream getInputStream(): get file stream
- void transferTo(File dest): save the uploaded file to a directory file
Let's actually test it
3. Write front page
<form action="/upload" enctype="multipart/form-data" method="post">
 <input type="file" name="file"/>
 <input type="submit" value="upload">
</form>
4,Controller
package com.kuang.controller;

import org.springframework.stereotype.Controller;
import org.springframework.web.bind.annotation.RequestMapping;
import org.springframework.web.bind.annotation.RequestParam;
import org.springframework.web.multipart.commons.CommonsMultipartFile;

import javax.servlet.http.HttpServletRequest;
import java.io.*;

@Controller
public class FileController {
   //@RequestParam("file") encapsulates the file obtained by the name=file control into a CommonsMultipartFile object
   //If you upload CommonsMultipartFile in batch, it can be an array
   @RequestMapping("/upload")
   public String fileUpload(@RequestParam("file") CommonsMultipartFile file ,HttpServletRequest request) throws IOException {

       //Get file name: file getOriginalFilename();
       String uploadFileName = file.getOriginalFilename();

       //If the file name is empty, go back to the home page directly!
       if ("".equals(uploadFileName)){
           return "redirect:/index.jsp";
      }
       System.out.println("Upload file name : "+uploadFileName);

       //Upload path save settings
       String path = request.getServletContext().getRealPath("/upload");
       //If the path does not exist, create one
       File realPath = new File(path);
       if (!realPath.exists()){
           realPath.mkdir();
      }
       System.out.println("Upload file storage address:"+realPath);

       InputStream is = file.getInputStream(); //File input stream
       OutputStream os = new FileOutputStream(new File(realPath,uploadFileName));//File output stream

       //Read write
       int len=0;
       byte[] buffer = new byte[1024];
       while ((len=is.read(buffer))!=-1){
           os.write(buffer,0,len);
           os.flush();
      }
       os.close();
       is.close();
       return "redirect:/index.jsp";
  }
}
5. Test upload file, OK!
Use file To save the uploaded file
1. Write Controller
/*
* Use file To save the uploaded file
*/
@RequestMapping("/upload2")
public String  fileUpload2(@RequestParam("file") CommonsMultipartFile file,HttpServletRequest request) throws IOException {

   //Upload path save settings
   String path = request.getServletContext().getRealPath("/upload");
   File realPath = new File(path);
   if (!realPath.exists()){
       realPath.mkdir();
  }
   //Upload file address
   System.out.println("Upload file storage address:"+realPath);

   //Write the file directly through the CommonsMultipartFile method (note this time)
   file.transferTo(new File(realPath +"/"+ file.getOriginalFilename()));

   return "redirect:/index.jsp";
}
2. Front end form submission address modification
3. Visit submit test, OK!
File download
File download steps:
1. Set response header
2. Read file -- InputStream
3. Write out file -- OutputStream
4. Perform operations
5. Close flow (first on then off)
Code implementation:
@RequestMapping(value="/download")
public String downloads(HttpServletResponse response ,HttpServletRequest request)throws Exception{
   //Address of the picture to download
   String  path = request.getServletContext().getRealPath("/upload");
   String  fileName = "Basic grammar.jpg";

   //1. Set response header
   response.reset(); //Set the page not to be cached, and clear the buffer
   response.setCharacterEncoding("UTF-8"); //Character encoding
   response.setContentType("multipart/form-data"); //Binary transmission data
   //Set response header
   response.setHeader("Content-Disposition",
           "attachment;fileName="+URLEncoder.encode(fileName, "UTF-8"));

   File file = new File(path,fileName);
   //2. Read file -- input stream
   InputStream input=new FileInputStream(file);
   //3. Write out file -- output stream
   OutputStream out = response.getOutputStream();

   byte[] buff =new byte[1024];
   int index=0;
   //4. Perform write out operation
   while((index= input.read(buff))!= -1){
       out.write(buff, 0, index);
       out.flush();
  }
   out.close();
   input.close();
   return null;
}
front end
<a href="/download">Click download</a>