Configuration version
1. Create a new Moudle, springmvc-02-hello, and add web support!
2. Make sure the dependency of spring MVC is imported!
3. Configure web XML, register DispatcherServlet
<?xml version="1.0" encoding="UTF-8"?>
<web-app xmlns="http://xmlns.jcp.org/xml/ns/javaee"
        xmlns:xsi="http://www.w3.org/2001/XMLSchema-instance"
        xsi:schemaLocation="http://xmlns.jcp.org/xml/ns/javaee http://xmlns.jcp.org/xml/ns/javaee/web-app_4_0.xsd"
        version="4.0">

   <!--1.register DispatcherServlet-->
   <servlet>
       <servlet-name>springmvc</servlet-name>
       <servlet-class>org.springframework.web.servlet.DispatcherServlet</servlet-class>
       <!--Associate a springmvc Configuration file for:[servlet-name]-servlet.xml-->
       <init-param>
           <param-name>contextConfigLocation</param-name>
           <param-value>classpath:springmvc-servlet.xml</param-value>
       </init-param>
       <!--Startup level-1-->
       <load-on-startup>1</load-on-startup>
   </servlet>

   <!--/ Match all requests; (excluding.jsp)-->
   <!--/* Match all requests; (including.jsp)-->
   <servlet-mapping>
       <servlet-name>springmvc</servlet-name>
       <url-pattern>/</url-pattern>
   </servlet-mapping>

</web-app>
4. Write the configuration file of spring MVC! Name: SpringMVC servlet xml : [servletname]-servlet.xml
Note that the name requirements here are in accordance with the official
<?xml version="1.0" encoding="UTF-8"?>
<beans xmlns="http://www.springframework.org/schema/beans"
      xmlns:xsi="http://www.w3.org/2001/XMLSchema-instance"
      xsi:schemaLocation="http://www.springframework.org/schema/beans
       http://www.springframework.org/schema/beans/spring-beans.xsd">

</beans>
5. Add process mapper
<bean class="org.springframework.web.servlet.handler.BeanNameUrlHandlerMapping"/>
6. Add processor adapter
<bean class="org.springframework.web.servlet.mvc.SimpleControllerHandlerAdapter"/>
7. Add view parser
<!--view resolver :DispatcherServlet Give it to him ModelAndView-->
<bean class="org.springframework.web.servlet.view.InternalResourceViewResolver" id="InternalResourceViewResolver">
   <!--prefix-->
   <property name="prefix" value="/WEB-INF/jsp/"/>
   <!--suffix-->
   <property name="suffix" value=".jsp"/>
</bean>
8. Write the business Controller that we want to operate, either implement the Controller interface or add annotations; You need to return a ModelAndView to load data and seal the view;
package com.kuang.controller;

import org.springframework.web.servlet.ModelAndView;
import org.springframework.web.servlet.mvc.Controller;

import javax.servlet.http.HttpServletRequest;
import javax.servlet.http.HttpServletResponse;

//Note: Here we import the Controller interface first
public class HelloController implements Controller {

   public ModelAndView handleRequest(HttpServletRequest request, HttpServletResponse response) throws Exception {
       //ModelAndView models and views
       ModelAndView mv = new ModelAndView();

       //Encapsulate the object and put it in ModelAndView. Model
       mv.addObject("msg","HelloSpringMVC!");
       //Encapsulate the view to jump to and put it in ModelAndView
       mv.setViewName("hello"); //: /WEB-INF/jsp/hello.jsp
       return mv;
  }

}
9. Give your class to the spring IOC container and register the bean
<!--Handler-->
<bean id="/hello" class="com.kuang.controller.HelloController"/>
10. Write the jsp page to jump to, display the data stored in ModelandView and our normal page;
<%@ page contentType="text/html;charset=UTF-8" language="java" %>
<html>
<head>
   <title>Kuangshen</title>
</head>
<body>
${msg}
</body>
</html>
11. Configure Tomcat to start the test!
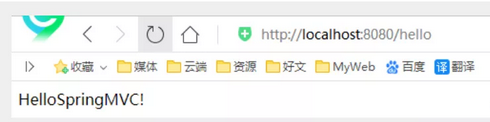
Possible problems: visit 404, troubleshooting steps:
-
Check the console output to see if there is any missing jar package.
-
If the jar package exists and the display cannot be output, add lib dependency in the project release of IDEA!
-
Restart Tomcat to solve the problem!
Annotated version
1. Create a new Moudle, spring mvc-03-hello-annotation. Add web support!
2. As Maven may have the problem of resource filtering, we will improve the configuration
<build>
   <resources>
       <resource>
           <directory>src/main/java</directory>
           <includes>
               <include>**/*.properties</include>
               <include>**/*.xml</include>
           </includes>
           <filtering>false</filtering>
       </resource>
       <resource>
           <directory>src/main/resources</directory>
           <includes>
               <include>**/*.properties</include>
               <include>**/*.xml</include>
           </includes>
           <filtering>false</filtering>
       </resource>
   </resources>
</build>
3. In POM XML file introduces related dependencies: mainly Spring framework core library, Spring MVC, servlet, JSTL, etc. We have already introduced in parent dependency!
4. Configure web xml
Note:
<?xml version="1.0" encoding="UTF-8"?>
<web-app xmlns="http://xmlns.jcp.org/xml/ns/javaee"
        xmlns:xsi="http://www.w3.org/2001/XMLSchema-instance"
        xsi:schemaLocation="http://xmlns.jcp.org/xml/ns/javaee http://xmlns.jcp.org/xml/ns/javaee/web-app_4_0.xsd"
        version="4.0">

   <!--1.register servlet-->
   <servlet>
       <servlet-name>SpringMVC</servlet-name>
       <servlet-class>org.springframework.web.servlet.DispatcherServlet</servlet-class>
       <!--Specified by initialization parameters SpringMVC The location of the configuration file is associated-->
       <init-param>
           <param-name>contextConfigLocation</param-name>
           <param-value>classpath:springmvc-servlet.xml</param-value>
       </init-param>
       <!-- Start sequence: the smaller the number, the earlier the start -->
       <load-on-startup>1</load-on-startup>
   </servlet>

   <!--All requests will be rejected springmvc intercept -->
   <servlet-mapping>
       <servlet-name>SpringMVC</servlet-name>
       <url-pattern>/</url-pattern>
   </servlet-mapping>

</web-app>
/Difference between and / *: < URL pattern > / < / url pattern > will not match jsp, only for the requests we write; Namely: jsp will not enter the DispatcherServlet class of spring< URL pattern > / * < / url pattern > will match * jsp, when returning to the jsp view, it will enter the DispatcherServlet class of spring again, resulting in a 404 error because the corresponding controller cannot be found.
5. Add Spring MVC configuration file
Add springmvc servlet. In the resource directory XML configuration file. The configuration form is basically similar to the Spring container configuration. In order to support annotation based IOC, the function of automatic package scanning is set. The specific configuration information is as follows:
<?xml version="1.0" encoding="UTF-8"?>
<beans xmlns="http://www.springframework.org/schema/beans"
      xmlns:xsi="http://www.w3.org/2001/XMLSchema-instance"
      xmlns:context="http://www.springframework.org/schema/context"
      xmlns:mvc="http://www.springframework.org/schema/mvc"
      xsi:schemaLocation="http://www.springframework.org/schema/beans
       http://www.springframework.org/schema/beans/spring-beans.xsd
       http://www.springframework.org/schema/context
       https://www.springframework.org/schema/context/spring-context.xsd
       http://www.springframework.org/schema/mvc
       https://www.springframework.org/schema/mvc/spring-mvc.xsd">

   <!-- Automatically scan the package to make the comments under the specified package effective,from IOC Unified container management -->
   <context:component-scan base-package="com.kuang.controller"/>
   <!-- Give Way Spring MVC Do not process static resources -->
   <mvc:default-servlet-handler />
   <!--
   support mvc Annotation driven
       stay spring Generally used in@RequestMapping Annotation to complete the mapping relationship
       To make@RequestMapping Note effective
       Must register with context DefaultAnnotationHandlerMapping
       And one AnnotationMethodHandlerAdapter example
       These two instances are handled at the class level and method level respectively.
       and annotation-driven Configuration helps us automatically complete the injection of the above two instances.
    -->
   <mvc:annotation-driven />

   <!-- view resolver  -->
   <bean class="org.springframework.web.servlet.view.InternalResourceViewResolver"
         id="internalResourceViewResolver">
       <!-- prefix -->
       <property name="prefix" value="/WEB-INF/jsp/" />
       <!-- suffix -->
       <property name="suffix" value=".jsp" />
   </bean>

</beans>
In the view parser, we store all views in the / WEB-INF / directory, which can ensure the security of the view, because the files in this directory cannot be accessed directly by the client.
-
Make IOC comments effective
-
Static resource filtering: HTML JS . CSS . Pictures, videos
-
Annotation driven MVC
-
Configure view parser
6. Create Controller
Write a Java control class: com kuang. controller. Hellocontroller specification
package com.kuang.controller;
import org.springframework.stereotype.Controller;
import org.springframework.ui.Model;
import org.springframework.web.bind.annotation.RequestMapping;
@Controller
@RequestMapping("/HelloController")
public class HelloController {
//Real access address: project name / HelloController/hello
@RequestMapping("/hello")
public String sayHello(Model model){
//Add attributes msg and values to the model, which can be taken out and rendered in the JSP page
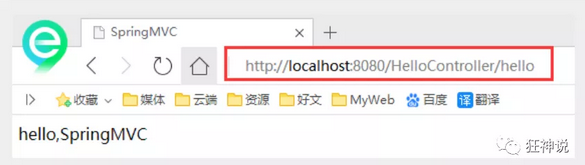
model.addAttribute("msg","hello,SpringMVC");
//web-inf/jsp/hello.jsp
return "hello";
}
}-
@The Controller is used to automatically scan the Spring IOC container during initialization;
-
@RequestMapping is to map the request path. Here, because there are mappings on classes and methods, the access should be / HelloController/hello;
-
The purpose of declaring Model type parameters in the method is to bring the data in the Action to the view;
-
The result returned by the method is the name of the view hello, and the prefix in the configuration file becomes WEB-INF / JSP / hello jsp.
7. Create view layer
Create hello.jsp in the WEB-INF/ jsp directory JSP, the view can directly take out and display the information brought back from the Controller;
You can get the value or object stored in the Model through EL representation;
<%@ page contentType="text/html;charset=UTF-8" language="java" %>
<html>
<head>
   <title>SpringMVC</title>
</head>
<body>
${msg}
</body>
</html>
8. Configure Tomcat to run
Configure Tomcat, start the server and access the corresponding request path!
Summary
The implementation steps are actually very simple:
-
Create a new web project
-
Import related jar packages
-
Write web XML, register DispatcherServlet
-
Write spring MVC configuration file
-
The next step is to create the corresponding control class, controller
-
Finally, improve the correspondence between the front-end view and the controller
-
Test run and debugging
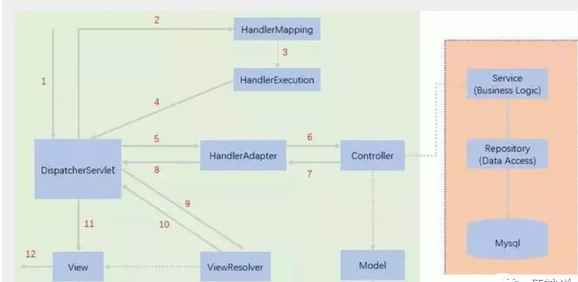
Three major components that must be configured to use spring MVC:
Processor mapper, processor adapter, view parser
Generally, we only need to manually configure the view parser, while the processor mapper and processor adapter only need to turn on the annotation driver, eliminating a large section of xml configuration
Let's review the principle again~