Spring security and Shiro learning notes
Suitable for beginners with spring security and Shiro.
1, Safety profile
- Security has always been a very important aspect in Web development. Although security is a non functional requirement of an application, it should be considered at the early stage of application development. If the security problem is only considered in the later stage of application development, it may fall into a dilemma: on the one hand, there are serious security vulnerabilities in the application, which can not meet the requirements of users, and may cause users' private data to be stolen by attackers; On the other hand, the basic architecture of the application has been determined. To repair security vulnerabilities, it may be necessary to make major adjustments to the system architecture, so it requires more development time and affects the release process of the application. Therefore, security related factors should be taken into account from the first day of application development, and in the whole application development process.
- There is a well-known security framework on the market: Shiro, Spring Security!
2, Spring security
1. Introduction to spring security
- Each framework appears to solve a certain problem. What problem does the Spring Security framework appear to solve?
- Spring Security is a powerful and highly customizable authentication and access control framework. It is actually a standard for protecting spring based applications.
- Spring Security is a framework that focuses on providing authentication and authorization for Java applications. Like all spring projects, the real strength of Spring Security is that it can be easily extended to meet customization requirements.
- I think we didn't use the framework in our previous projects. How do we control permissions? Permissions are generally subdivided into function permissions, access permissions, and menu permissions. The code will be very cumbersome and redundant.
- How to solve the cumbersome and redundant problem of writing permission code before, some mainstream frameworks came into being, and spring security is one of them.
- Spring is a very popular and successful Java application development framework. Based on the spring framework, Spring Security provides a complete solution for Web application security. Generally speaking, the security of Web applications includes two parts: user Authentication and user Authorization.
- User authentication refers to verifying whether a user is a legal subject in the system, that is, whether the user can access the system. User authentication generally requires users to provide user name and password. The system completes the authentication process by verifying the user name and password.
- User authorization refers to verifying whether a user has permission to perform an operation. In a system, different users have different permissions. For example, for a file, some users can only read it, while others can modify it. Generally speaking, the system assigns different roles to different users, and each role corresponds to a series of permissions.
- For the two application scenarios mentioned above, the Spring Security framework has good support. In terms of user authentication, the Spring Security framework supports mainstream authentication methods, including HTTP basic authentication, HTTP form authentication, http digest authentication, OpenID and LDAP. In terms of user authorization, Spring Security provides role-based access control and Access Control List (ACL), which can fine-grained control domain objects in applications.
2. Meet spring security
- Spring Security is the security framework for the spring project and the default technology selection of the Spring Boot underlying security module. It can realize powerful Web security control. For security control, we only need to introduce the Spring Boot starter security module and configure a small amount to realize powerful security management!
- Remember several classes:
- WebSecurityConfigurerAdapter: inherit this class and customize the Security policy
- AuthenticationManagerBuilder: custom authentication policy
- @EnableWebSecurity: annotate the configuration class, that is, enable the WebSecurity mode
- The two main goals of Spring Security are "authentication" and "authorization" (access control).
-
Authentication: authentication is about verifying your credentials, such as user name / user ID and password, to verify your identity. Authentication is usually done by user name and password, sometimes in combination with authentication factors.
-
"Authorization": authorization occurs after the system successfully verifies your identity, and will eventually grant you full access to resources (such as information, files, databases, funds, locations, almost anything). This concept is universal, not just in Spring Security.
-
3. Actual test
3.1 establishment of experimental environment
-
Create an initial springboot project web module, thymeleaf module
<!--thymeleaf rely on--> <dependency> <groupId>org.springframework.boot</groupId> <artifactId>spring-boot-starter-thymeleaf</artifactId> </dependency> <!--web Module dependency--> <dependency> <groupId>org.springframework.boot</groupId> <artifactId>spring-boot-starter-web</artifactId> </dependency> -
Writing static resources
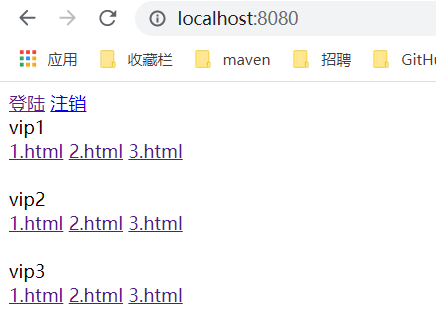
- 1,index.html
<!DOCTYPE html> <html lang="en" xmlns:th="http://www.thymeleaf.org" xmlns:sec="http://www.thymeleaf.org/thymeleaf-extras-springsecurity3"> <head> <meta charset="UTF-8"> <title>index</title> </head> <body> <div> <a th:href="@{/toLogin}">land</a> </div> <div> <div>vip1</div> <a th:href="@{/vip1/1}">1.html</a> <a th:href="@{/vip1/2}">2.html</a> <a th:href="@{/vip1/3}">3.html</a> </div> <br/> <div> <div>vip2</div> <a th:href="@{/vip2/1}">1.html</a> <a th:href="@{/vip2/2}">2.html</a> <a th:href="@{/vip2/3}">3.html</a> </div> <br/> <div> <div>vip3</div> <a th:href="@{/vip3/1}">1.html</a> <a th:href="@{/vip3/2}">2.html</a> <a th:href="@{/vip3/3}">3.html</a> </div> </body> </html> - 2. login.html page
<!DOCTYPE html> <html lang="en" xmlns:th="http://www.thymeleaf.org" xmlns:sec="http://www.thymeleaf.org/thymeleaf-extras-springsecurity3"> <head> <meta charset="UTF-8"> <title>login</title> </head> <body> <h1>Own login page</h1> <form th:action="@{/login}"> user name:<input type="text" name="username"><br/> password:<input type="password" name="password"><br/> <input type="checkbox" name="remeberme">Remember me<br/> <input type="submit" value="land"> </form> </body> </html> - 3. Pages under each vip file (just write one, others are similar, as long as different contents are displayed to distinguish different pages)
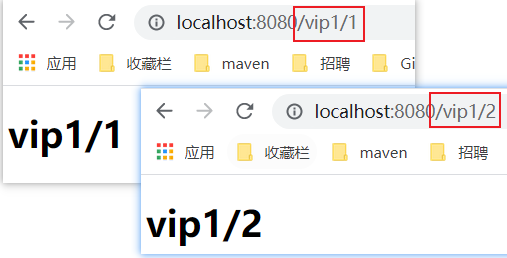
<!DOCTYPE html> <html lang="en" xmlns:th="http://www.thymeleaf.org" xmlns:sec="http://www.thymeleaf.org/thymeleaf-extras-springsecurity3"> <head> <meta charset="UTF-8"> <title>vip1/1</title> </head> <body> <h1>vip1/1</h1> </body> </html> - 4. Directory structure
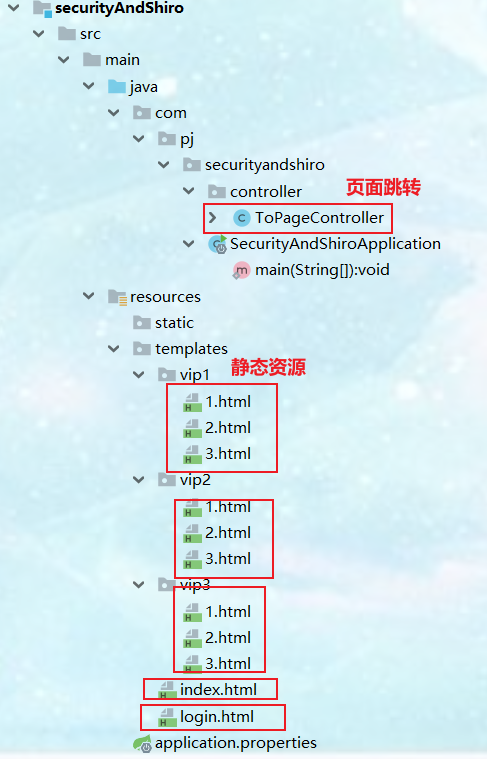
- 1,index.html
-
controller jumps to each page!
/** * Go to each page */ @Controller public class ToPageController { @GetMapping({"/","index"}) public String index(){ return "index"; } @GetMapping("toLogin") public String toLogin(){ return "login"; } /* Through the id parameter, go to different pages under different vip1 */ @GetMapping("/vip1/{id}") public String goVip1(@PathVariable("id") String id){ return "/vip1/"+id; } @GetMapping("/vip2/{id}") public String goVip2(@PathVariable("id") String id){ return "/vip2/"+id; } @GetMapping("/vip3/{id}") public String goVip3(@PathVariable("id") String id){ return "/vip3/"+id; } } -
Test whether each page jumps successfully!
3.2 certification and authorization
- The above test environment can be accessed by anyone, and each module can be accessed without login. We use Spring Security to add authentication and authorization capabilities on.
- Introduce the Spring Security module. Version has been automatically arbitrated.
<!--security Security module dependency--> <dependency> <groupId>org.springframework.boot</groupId> <artifactId>spring-boot-starter-security</artifactId> </dependency> - Writing Spring Security configuration classes
- Configuration class of the official website.
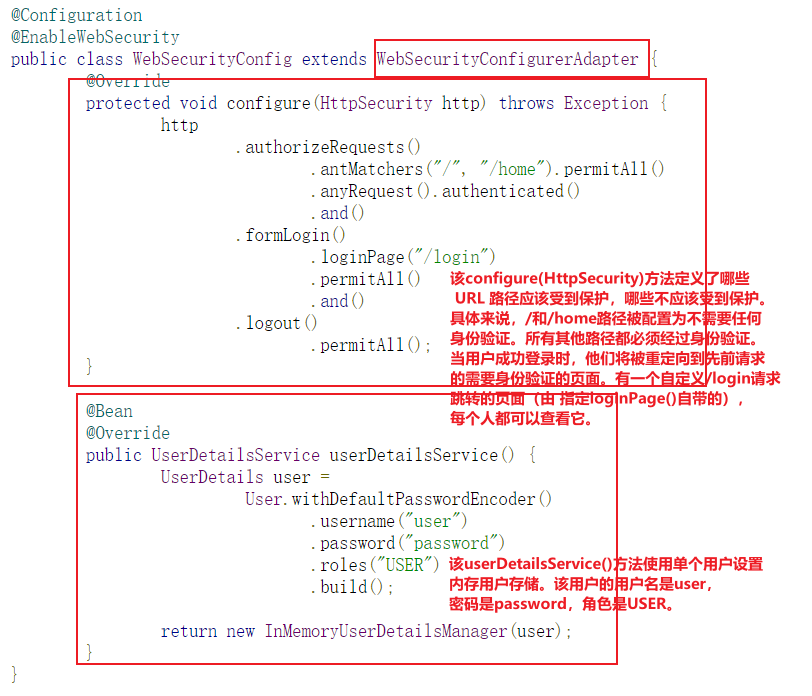
package com.example.securingweb; import org.springframework.context.annotation.Bean; import org.springframework.context.annotation.Configuration; import org.springframework.security.config.annotation.web.builders.HttpSecurity; import org.springframework.security.config.annotation.web.configuration.EnableWebSecurity; import org.springframework.security.config.annotation.web.configuration.WebSecurityConfigurerAdapter; import org.springframework.security.core.userdetails.User; import org.springframework.security.core.userdetails.UserDetails; import org.springframework.security.core.userdetails.UserDetailsService; import org.springframework.security.provisioning.InMemoryUserDetailsManager; @Configuration @EnableWebSecurity public class WebSecurityConfig extends WebSecurityConfigurerAdapter { @Override protected void configure(HttpSecurity http) throws Exception { http .authorizeRequests() .antMatchers("/", "/home").permitAll() .anyRequest().authenticated() .and() .formLogin() .loginPage("/login") .permitAll() .and() .logout() .permitAll(); } @Bean @Override public UserDetailsService userDetailsService() { UserDetails user = User.withDefaultPasswordEncoder() .username("user") .password("password") .roles("USER") .build(); return new InMemoryUserDetailsManager(user); } } - Custom configuration class
/** * Security configuration class * WebSecurityConfigurerAdapter adapter class */ @EnableWebSecurity // Enable WebSecurity mode public class WebSecurityConfig extends WebSecurityConfigurerAdapter { @Override protected void configure(HttpSecurity http) throws Exception { // Authorization rules for custom requests // The home page can be accessed by everyone. Other pages cannot be accessed without logging in http.authorizeRequests().antMatchers("/","index").permitAll()//Discharge / index requests are accessible to all // . antMatchers("/**").hasAnyRole() //hasAnyRole is accessible to everyone // . anyRequest().authenticated() / / all other paths must be authenticated. .antMatchers("/vip1/**").hasRole("vip1") //The authorization rule that marks the request under vip1 as vip1d. Only users with vip1 permission can access the following requests .antMatchers("/vip2/**").hasRole("vip2") .antMatchers("/vip3/**").hasRole("vip3"); } } - Test: I found that I can't get in except the home page! Because we don't have a login role at present, because the request requires that the login role has the corresponding permission!
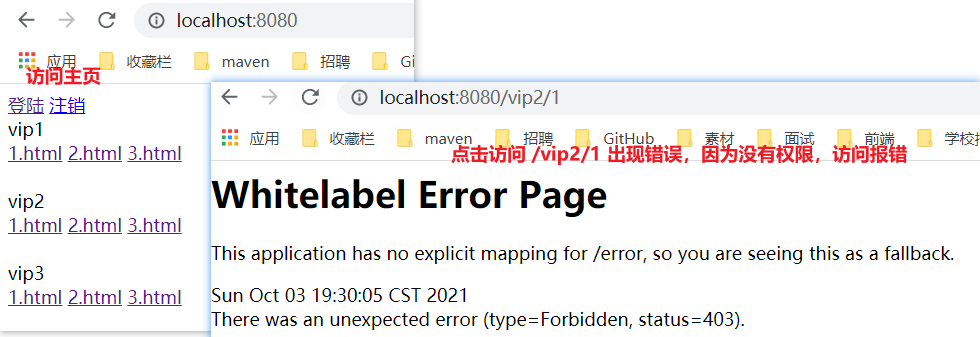
- Configuration class of the official website.
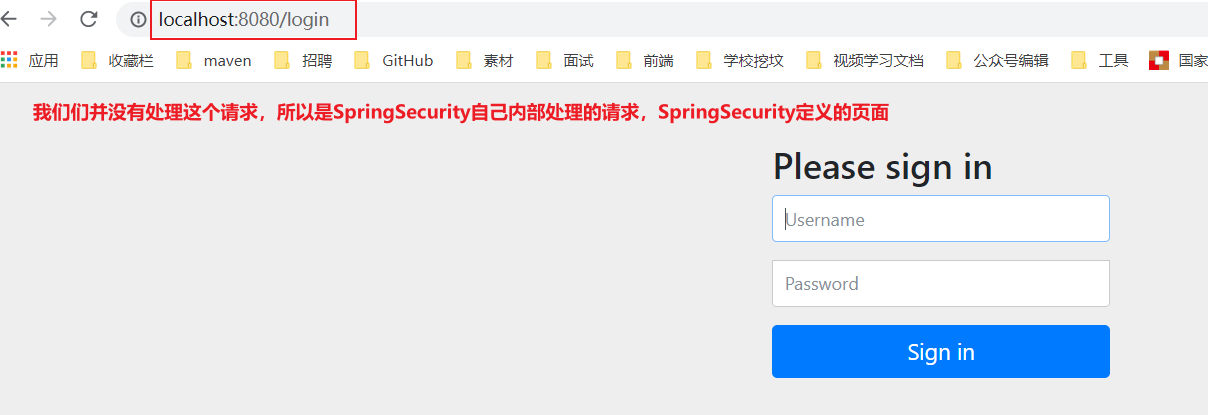
- Add the following configuration in the configure() method to enable the login function of automatic configuration! If you don't have permission to access, you will automatically send a / login request and jump to his customized login interface.
 // Turn on the auto configured login function
 // Will send a login request and jump to its custom login page
 // /login?error redirection here indicates login failure
 http.formLogin();
- Test: when you don't have permission, you will jump to the login page!
- View http.formLogin(); Annotation information of source code;
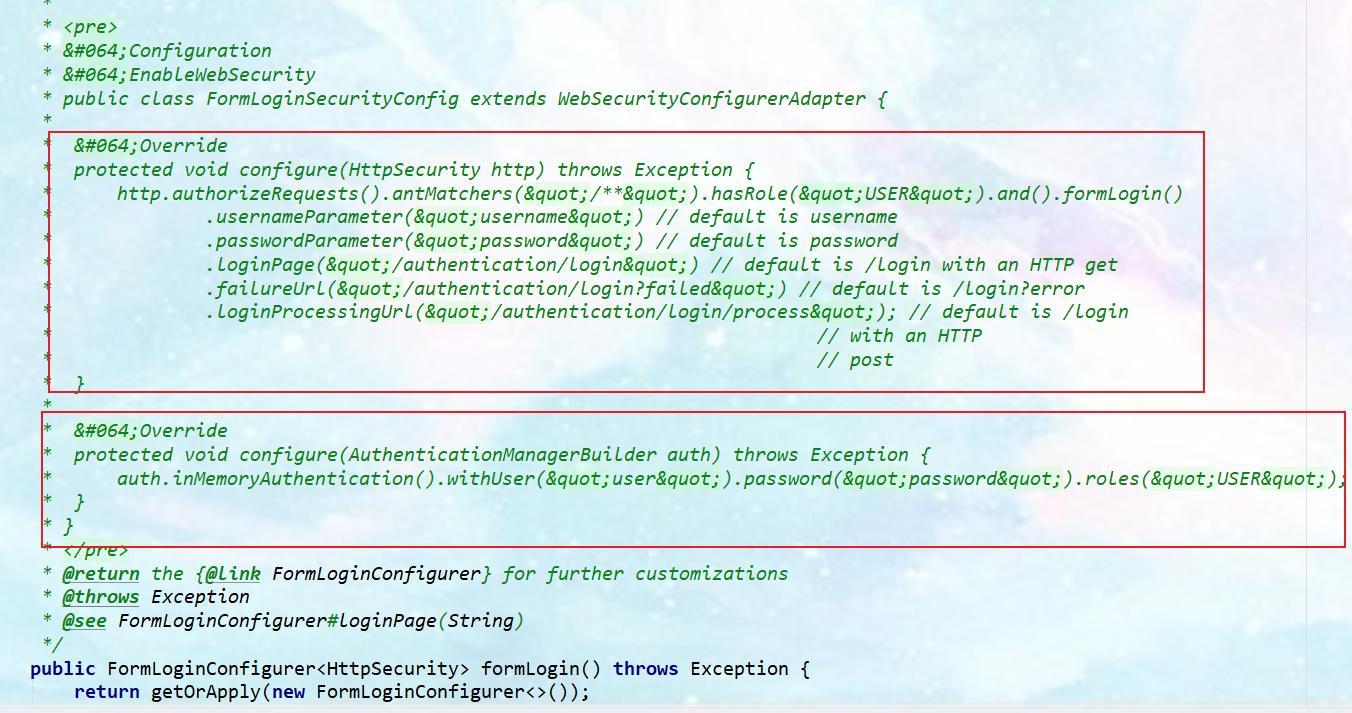
- You can define authentication rules and override the configure(AuthenticationManagerBuilder auth) method in the configuration class. (define authentication rules: a simple jdbc implementation case)
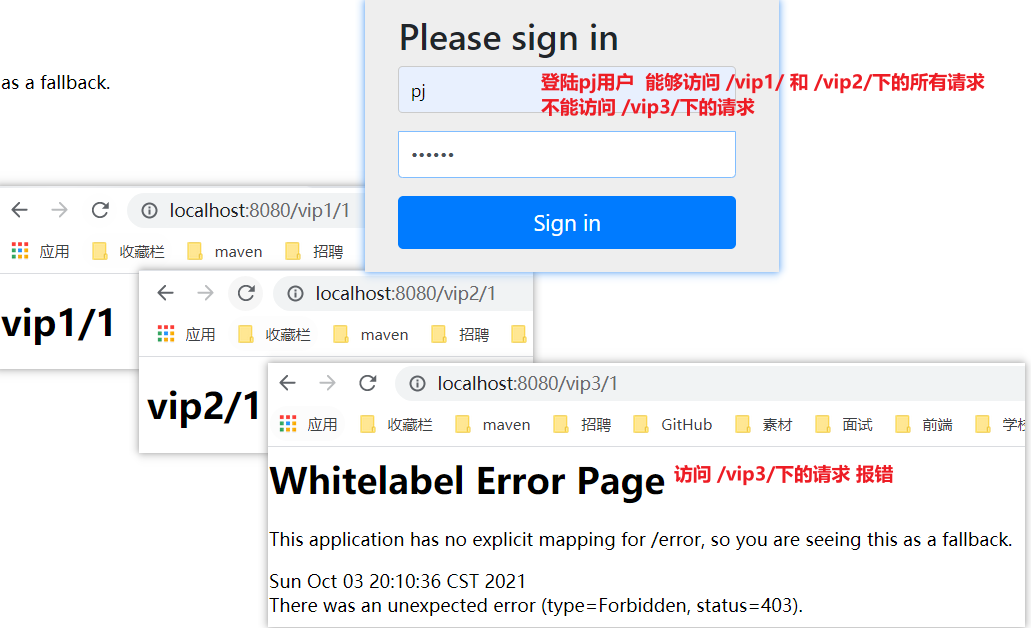
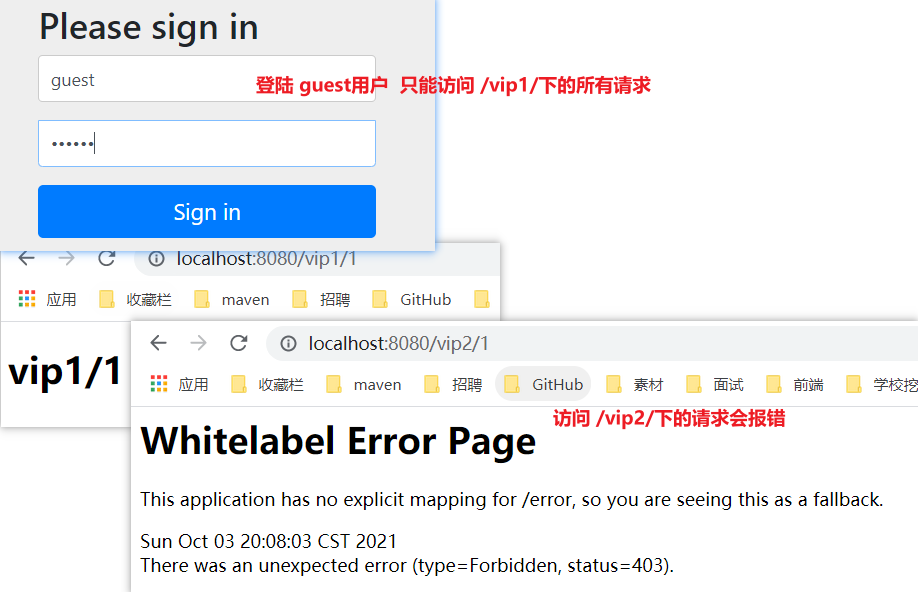
/** * Define authentication rules: which users can access which requests * @param auth * @throws Exception */ @Override protected void configure(AuthenticationManagerBuilder auth) throws Exception { //Users are defined in memory, but they are actually fetched from jdbc auth.inMemoryAuthentication() .withUser("pj").password("123456").roles("vip1","vip2")//Add a user, set the password, and add a request that can access the authorization rules vip1 and vip2 .and() .withUser("root").password("123456").roles("vip1","vip2","vip3") .and() .withUser("guest").password("123456").roles("vip1"); } - Test, you can use these accounts to log in for test! If you find it, you will report an error!
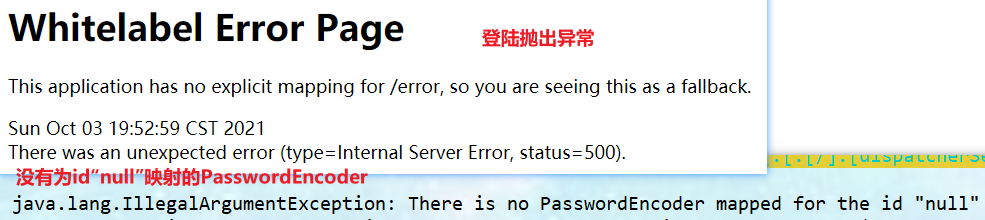
- The reason is that we need to encrypt the password transmitted from the front end in some way, otherwise we can't log in (because we don't encrypt the password, spring security will think it's unsafe to log in through the plaintext password, so an error is reported), so we need to encrypt the password.
/** * Define authentication rules: which users can access which requests * @param auth * @throws Exception */ @Override protected void configure(AuthenticationManagerBuilder auth) throws Exception { //Define users in memory, but actually go to jdbc to get /* Spring security 5.0 A variety of encryption methods have been added to the password, and the format of the password has also been changed. If we want our project to log in normally, we need to modify the code in configure. We need to encrypt the password transmitted from the front end in some way spring security The official recommendation is to use bcrypt encryption. */ BCryptPasswordEncoder bCryptPasswordEncoder = new BCryptPasswordEncoder(); auth.inMemoryAuthentication().passwordEncoder(bCryptPasswordEncoder) .withUser("pj").password(bCryptPasswordEncoder.encode("123456")).roles("vip1","vip2")//Add a user, set the password, and add a request that can access the authorization rules vip1 and vip2 .and() .withUser("root").password(bCryptPasswordEncoder.encode("123456")).roles("vip1","vip2","vip3") .and() .withUser("guest").password(bCryptPasswordEncoder.encode("123456")).roles("vip1"); } - After testing, it is found that the login can be successful, and each role can only access the authorization rules under its own authentication!
3.3 authority control and cancellation
1. Write off
-
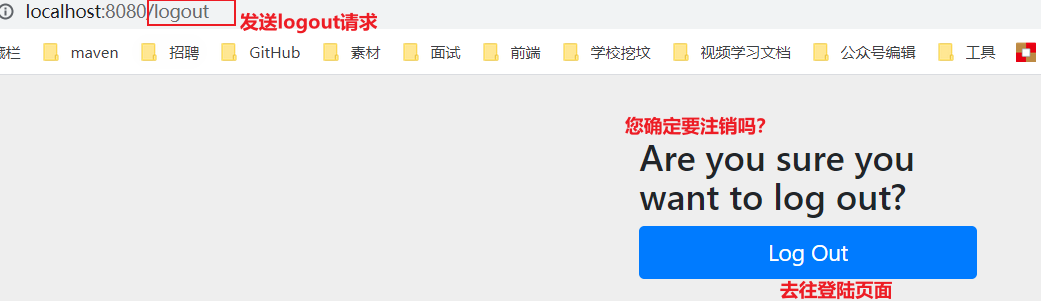
Enable auto configured logoff
//Define authorization rules for requests: those requests require authentication @Override protected void configure(HttpSecurity http) throws Exception { //.... //Enable auto configured logoff // When you log out, a / logout logout request is sent http.logout(); } -
Click the logout button in index.html to send a / logout request.
<a th:href="@{/logout}">cancellation</a> -
We can test it. After the login is successful, click logout. If we find that the logout is completed, we will jump to the login page!
-
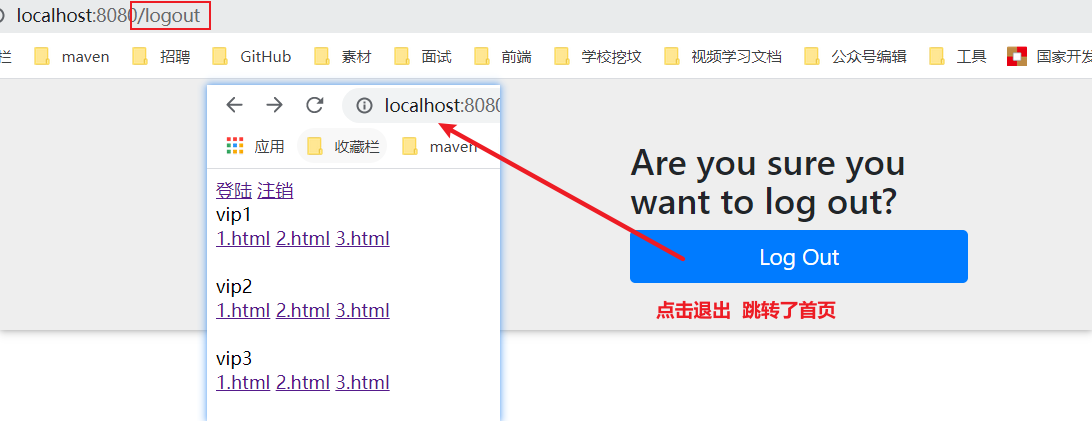
If you want him to log off successfully, you can still jump to the home page. What should I do. Add the following code to the configuration class.
//Define authorization rules for requests: those requests require authentication @Override protected void configure(HttpSecurity http) throws Exception { //.... // During logout, a logout logout request will be sent. logoutSuccessUrl("/"); Log off successfully and go to the send / request home page http.logout().logoutSuccessUrl("/"); } -
Test. After logging out, find that you can jump to the home page OK.
2. Permission control
-
Requirements: we need to combine some functions in thymeleaf.
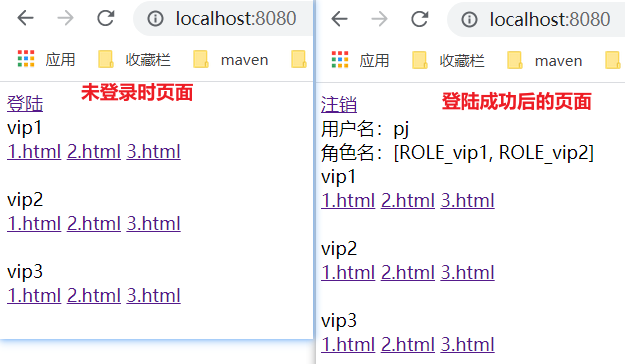
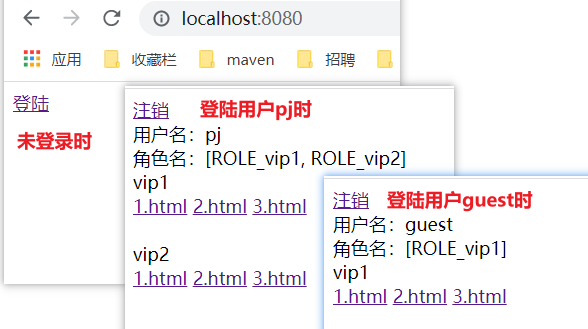
- 1. When the user does not log in, only the login button is displayed on the navigation bar. After the user logs in, the navigation bar can display the login user information and logout button.
- 2. pj has only vip2 and vip3 functions, so only these two functions are displayed when logging in, but the function menu of vip1 is not displayed! This is the real website!
-
Implementation of requirement function 1: use sec:authorize="isAuthenticated(): authenticate login! To display different pages.
- maven needs to introduce thymeleaf to integrate the dependency of spring security.
 <!--thymeleaf and springsecurity Integration dependency-->
<dependency>
	   <groupId>org.thymeleaf.extras</groupId>
	   <artifactId>thymeleaf-extras-springsecurity5</artifactId>
</dependency>
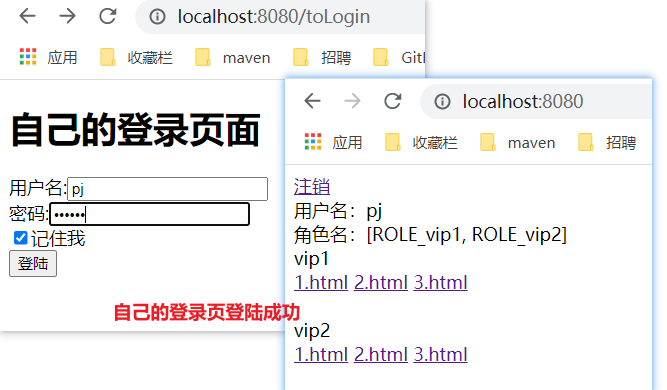
- Modify the index.html page. (remember to introduce the command space: xmlns:sec)=“ http://www.thymeleaf.org/thymeleaf-extras-springsecurity3 ”)
<!DOCTYPE html> <!--Introduce namespace--> <html lang="en" xmlns:th="http://www.thymeleaf.org" xmlns:sec="http://www.thymeleaf.org/thymeleaf-extras-springsecurity3"> <head> <meta charset="UTF-8"> <title>index</title> </head> <body> <!--The following code needs to be modified--> <div> <div sec:authorize="!isAuthenticated()"> <!--When not logged in, the login button is displayed--> <a th:href="@{/toLogin}">land</a> </div> <div sec:authorize="isAuthenticated()"> <!--After successful login, the logout button and user name will be displayed--> <a th:href="@{/logout}">cancellation</a> user name:<span sec:authentication="principal.username"></span> Role name:<span sec:authentication="principal.authorities"></span> </div> </div> <!--The following code has not been modified--> <div> <div>vip1</div> <a th:href="@{/vip1/1}">1.html</a> <a th:href="@{/vip1/2}">2.html</a> <a th:href="@{/vip1/3}">3.html</a> </div> <br/> <div> <div>vip2</div> <a th:href="@{/vip2/1}">1.html</a> <a th:href="@{/vip2/2}">2.html</a> <a th:href="@{/vip2/3}">3.html</a> </div> <br/> <div> <div>vip3</div> <a th:href="@{/vip3/1}">1.html</a> <a th:href="@{/vip3/2}">2.html</a> <a th:href="@{/vip3/3}">3.html</a> </div> </body> </html> - Test the page when you do not log in and the page after you log in successfully.
- If you click log off, 404 appears because it prevents csrf Cross Site Request Forgery by default, because it will cause security problems. We can change the request to post form submission, or turn off the csrf function in spring security; add http.csrf().disable() in the configuration; and turn off the scrf function.
http.csrf().disable();//Turn off csrf function: Cross Site Request Forgery. By default, logout requests can only be submitted through post
- maven needs to introduce thymeleaf to integrate the dependency of spring security.
-
Requirement function 2 implementation. Display the visible modules of each user.
- Modify the index.html page. Modify that each module can be accessed by people with different permissions.
<!--hasRole('vip1') Judge if a user has vip1 You can see this module with the permission of--> <div sec:authorize="hasRole('vip1')"> <div>vip1</div> <a th:href="@{/vip1/1}">1.html</a> <a th:href="@{/vip1/2}">2.html</a> <a th:href="@{/vip1/3}">3.html</a> </div> <br/> <div sec:authorize="hasRole('vip2')"> <div>vip2</div> <a th:href="@{/vip2/1}">1.html</a> <a th:href="@{/vip2/2}">2.html</a> <a th:href="@{/vip2/3}">3.html</a> </div> <br/> <div sec:authorize="hasRole('vip3')"> <div>vip3</div> <a th:href="@{/vip3/1}">1.html</a> <a th:href="@{/vip3/2}">2.html</a> <a th:href="@{/vip3/3}">3.html</a> </div> - Test it.
- Modify the index.html page. Modify that each module can be accessed by people with different permissions.
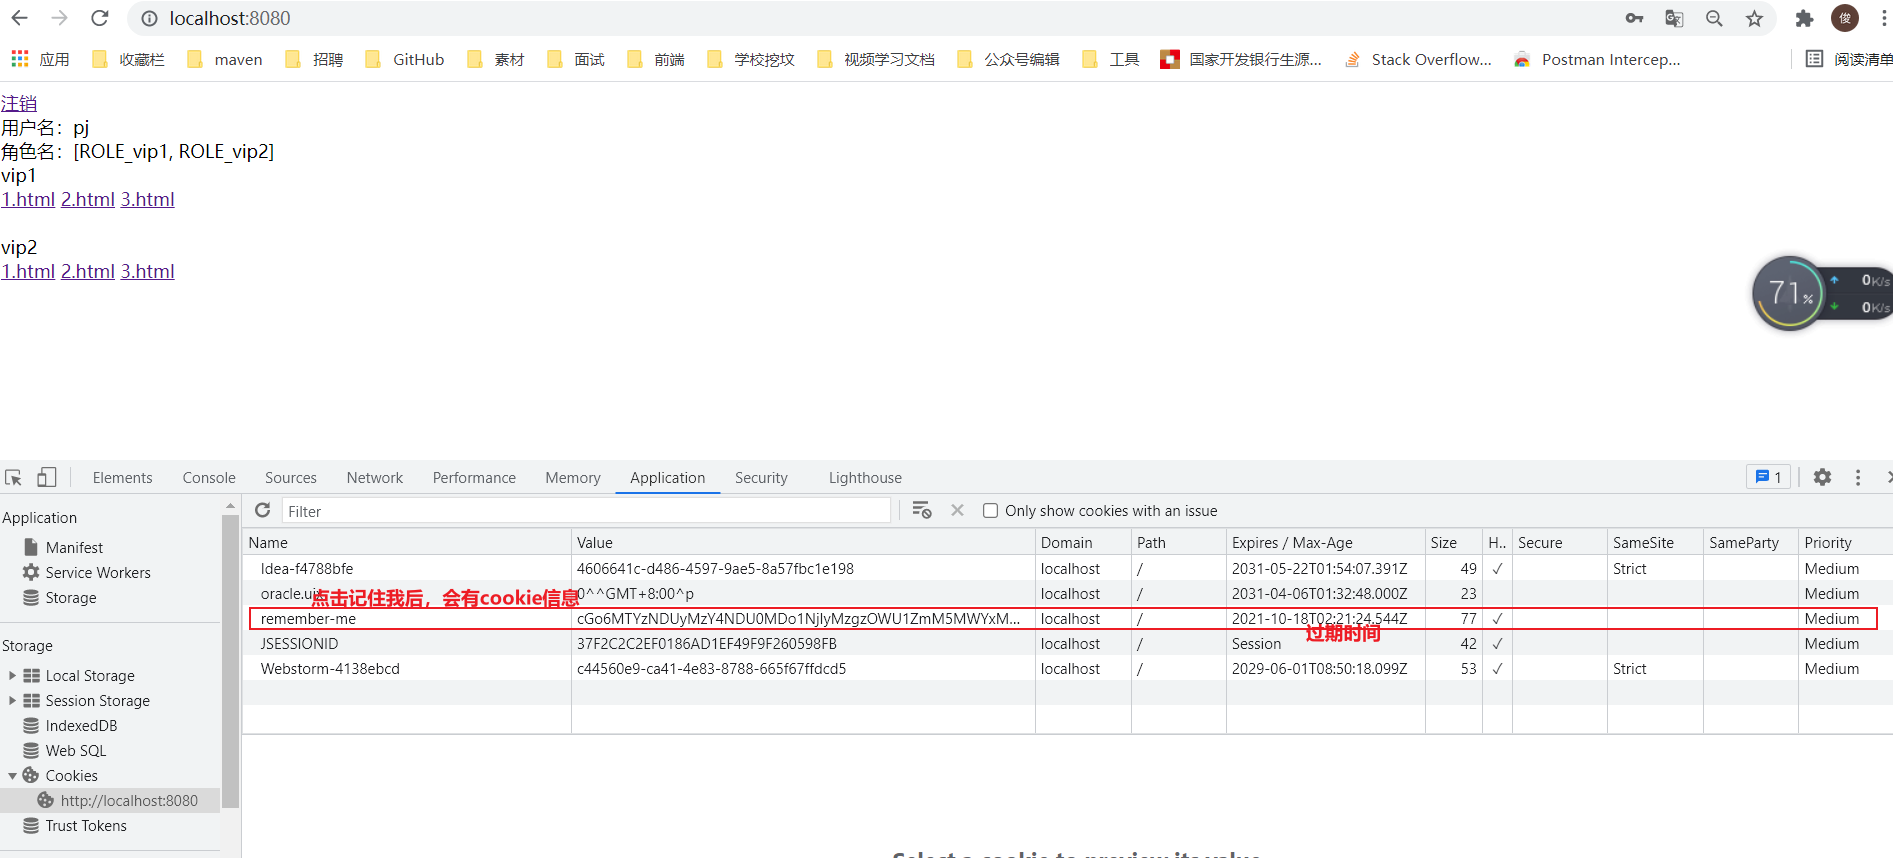
3.4 "remember me" function
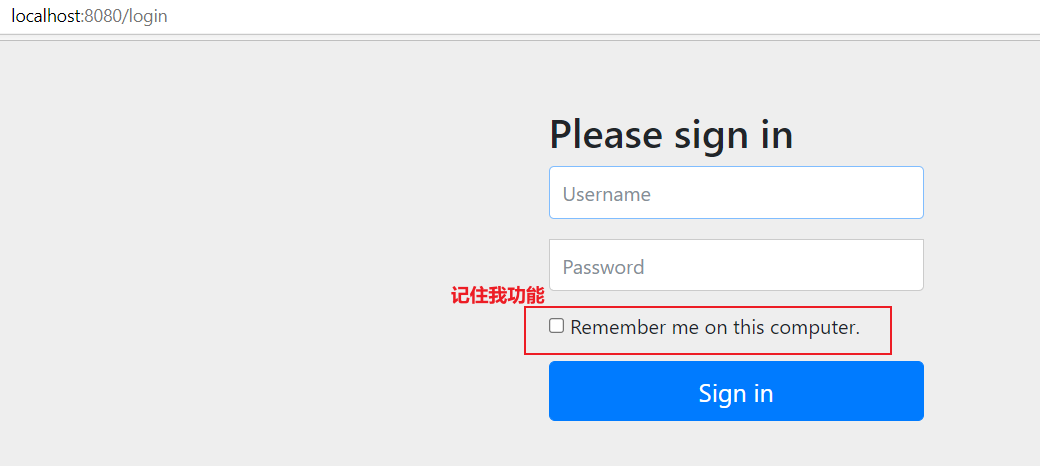
- In the current situation, as long as we log in, close the browser and log in again, we will log in again, but many websites have a function of remembering passwords.
- realization
- Enable the remember me function in the configuration class.
//Authorization rules for custom requests @Override protected void configure(HttpSecurity http) throws Exception { ...... //Remember my function http.rememberMe(); } - We started the project again and found that the login page had an additional remember me function. After we logged in, we closed the browser, and then reopened the browser for access. We found that the user was still logged in.
- When we click log off, we can find that spring security helps us automatically delete this cookie.
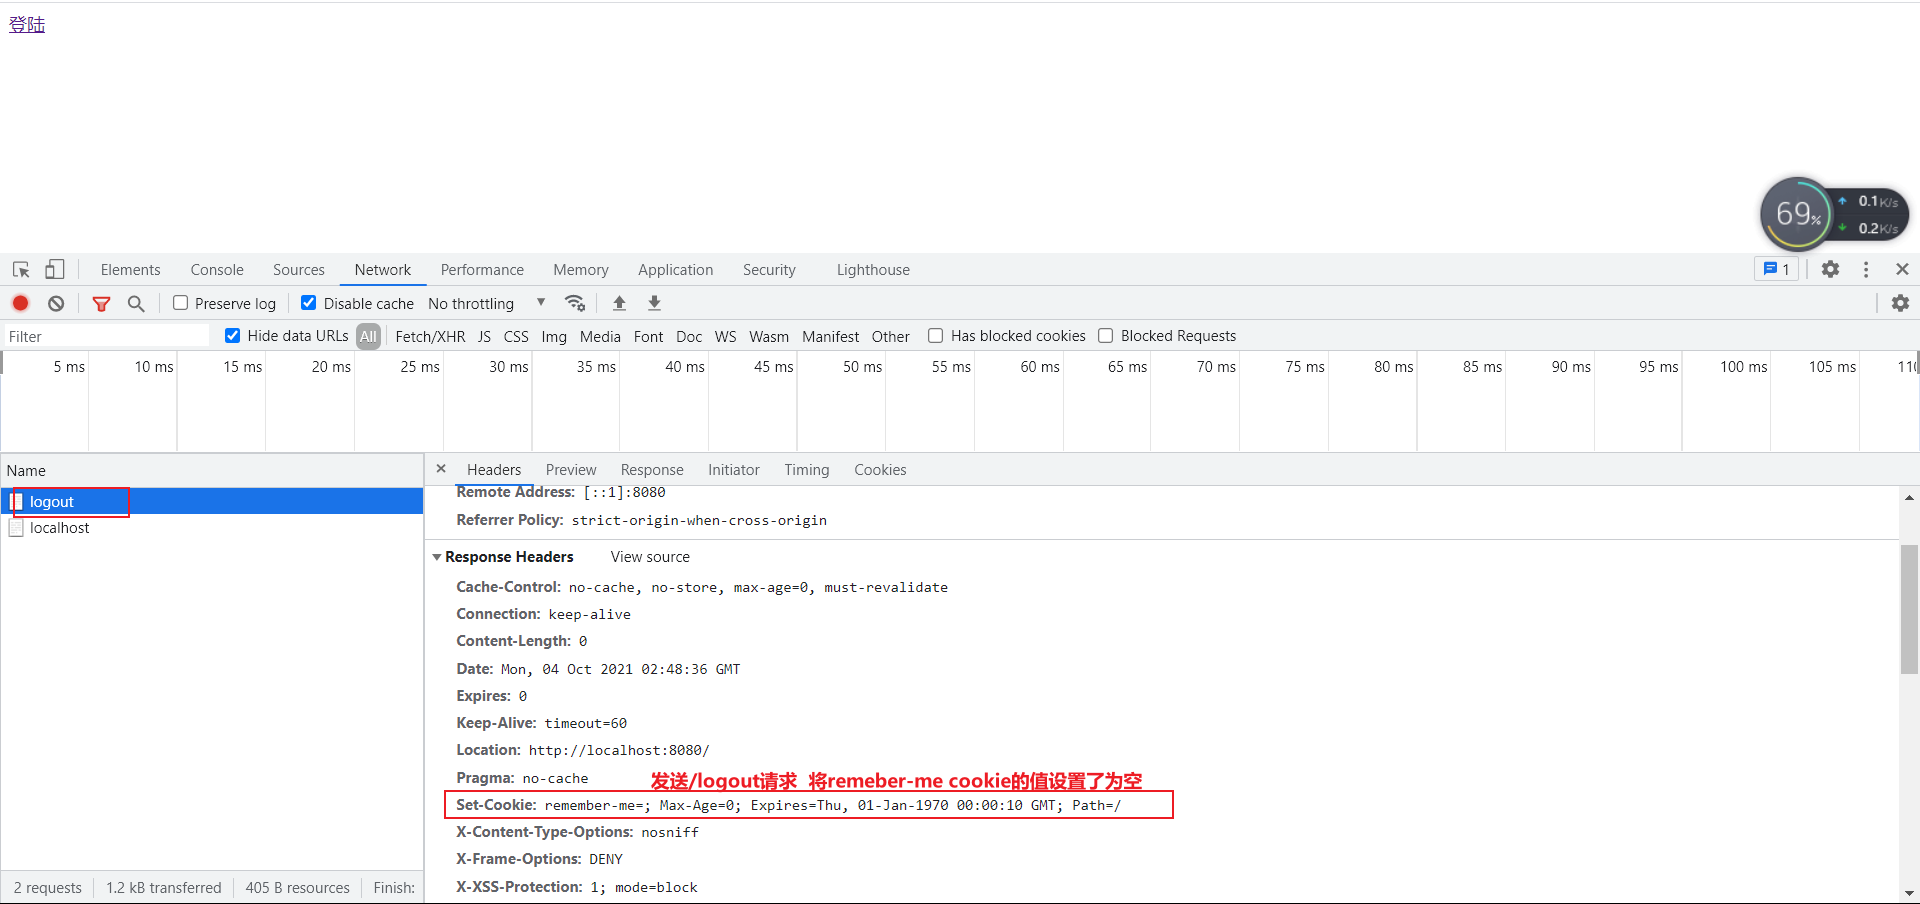
- Implementation principle: after clicking the remember me function, after successful login, the cookie will be sent to the browser for saving. After login, take this cookie with you. You can avoid login as long as you pass the check. If you click log off, the cookie will be deleted.
- Enable the remember me function in the configuration class.
3.5. Customize your own login page
1. Question
- Now this Login page is the default of spring security. How can we use the Login interface written by ourselves.
2. Realize
-
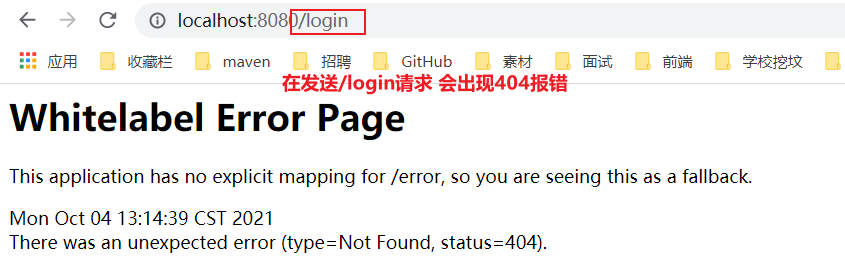
In the configuration class, specify loginpage after the login page configuration just now.
/** * Define authorization rules for requests: those requests require authentication * @param http * @throws Exception */ @Override protected void configure(HttpSecurity http) throws Exception { ..... // Turn on the auto configured login function // Will send a login request and jump to its custom login page // /login?error redirection here indicates login failure //loginPage("/toLogin"); customize the url of the login page, and the default is / login //Therefore, a 404 error will be reported when sending a / login request to the login page http.formLogin().loginPage("/toLogin"); .... } -
The front-end index.html page also needs to point to the toLogin request defined by ourselves
<div sec:authorize="!isAuthenticated()"> <!--When not logged in, the login button is displayed--> <a th:href="@{/toLogin}">land</a> </div> -
Send the login request again. 404 error will appear and we must go to the login page written by ourselves.
-
login.html must configure the submission request method, which must be post submission.
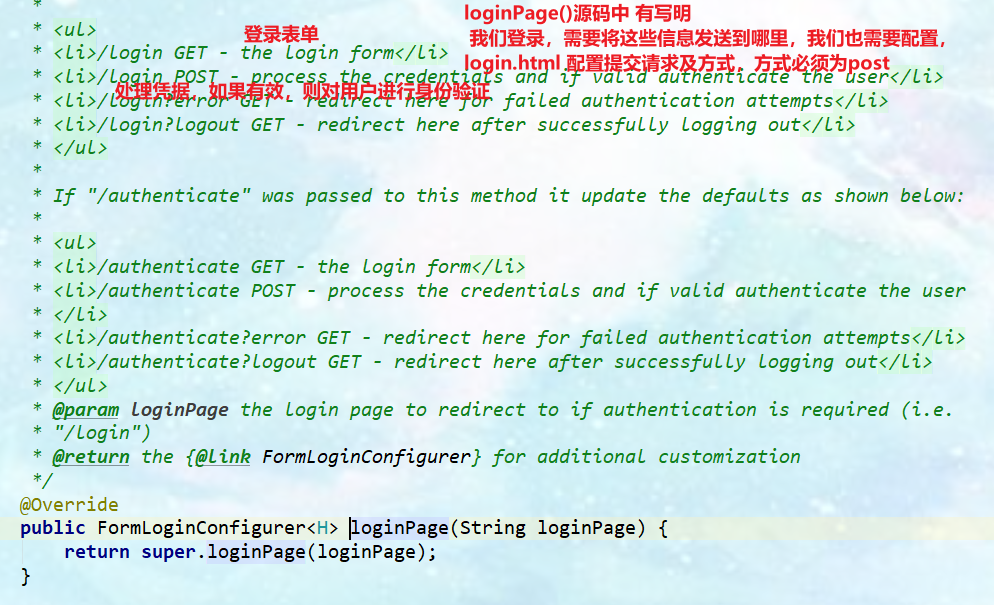
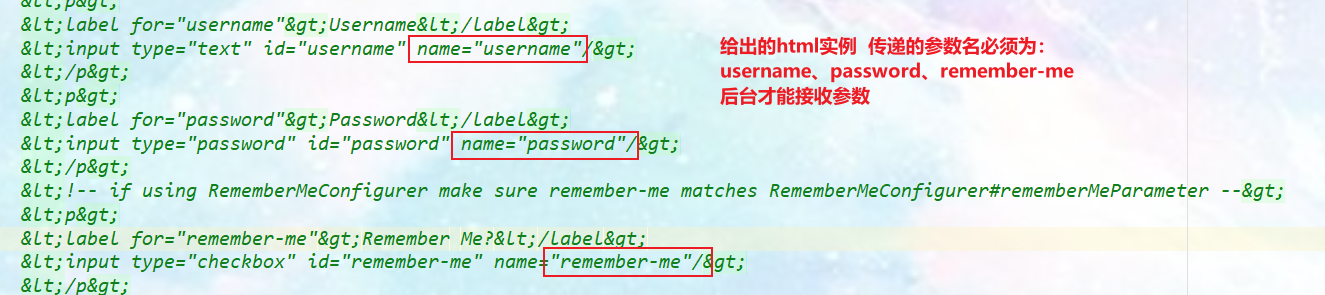
Modify the login.html page to post submission<h1>Own login page</h1> <!--If you change the login/login Default login request must be sent/login request--> <form th:action="@{/toLogin}" method="post"> user name:<input type="text" name="username"><br/> password:<input type="password" name="password"><br/> <input type="checkbox" name="remember-me">Remember me<br/> <input type="submit" value="land"> </form> -
When this request is submitted, it still needs to be verified. How to do it? We can check the source code of formLogin() method! If it is the default parameter name: username, password and remember me, you don't need to configure it. If the parameter name is not, you need to configure the user name, password and other parameters to receive login.
-
If the parameters are different and need to be configured, add code in the configuration class.
 /**
     * Define authorization rules for requests: those requests require authentication
     * @param http
     * @throws Exception
     */
@Override
protected void configure(HttpSecurity http) throws Exception {
   	....
   // Turn on the auto configured login function
   // Will send a login request and jump to its custom login page
   // /login?error redirection here indicates login failure
   //loginPage("/toLogin");  Specify the url of the custom login page. The default is / login
   http.formLogin()
           .usernameParameter("user") //Specifies the parameter name for the user name
           .passwordParameter("paw") //Specifies the parameter name for the password
           .loginPage("/toLogin")
           .loginProcessingUrl("/login"); // Change the login request when submitting the login form. The login request submitted by the changed form must be specified as this
	........
   http.rememberMe()//Turn on the remember me function
           .rememberMeParameter("remember"); //Specifies the name of the remember me parameter
}
<!--If you change the login form/login Default login request must be sent/login request--> <form th:action="@{/login}" method="post"> user name:<input type="text" name="user"><br/> password:<input type="password" name="paw"><br/> <input type="checkbox" name="remember">Remember me<br/> <input type="submit" value="land"> </form> -
Testing.
4. Sum up all codes
-
WebSecurityConfig configuration class code.
/** * Security configuration class * WebSecurityConfigurerAdapter adapter class */ @EnableWebSecurity // Enable WebSecurity mode public class WebSecurityConfig extends WebSecurityConfigurerAdapter { /** * Define authorization rules for requests: those requests require authentication * @param http * @throws Exception */ @Override protected void configure(HttpSecurity http) throws Exception { // The home page can be accessed by everyone. Other pages cannot be accessed without logging in http.authorizeRequests().antMatchers("/","index").permitAll()//Discharge / index requests are accessible to all // . antMatchers("/**").hasAnyRole() //hasAnyRole is accessible to everyone //.anyRequest().authenticated(); // All paths except those listed above must be authenticated. .antMatchers("/vip1/**").hasRole("vip1") //The authorization rule that marks the request under vip1 as vip1. Only users with vip1 permission can access the following requests .antMatchers("/vip2/**").hasRole("vip2") .antMatchers("/vip3/**").hasRole("vip3"); // Turn on the auto configured login function // Will send a login request and jump to its custom login page // /login?error Redirection here indicates login failure //loginPage("/toLogin"); Customize the url of the login page. The default is / login http.formLogin() .usernameParameter("user") //Specifies the parameter name for the user name .passwordParameter("paw") //Specifies the parameter name for the password .loginPage("/toLogin") .loginProcessingUrl("/login"); // Change the login form and submit the login request. This must be specified for the login request after change http.csrf().disable();//Turn off csrf function: Cross Site Request Forgery. By default, logout requests can only be submitted through post //Enable auto configured logoff // During logout, a logout logout request will be sent. logoutSuccessUrl("/"); Log out successfully and come to the home page http.logout().logoutSuccessUrl("/"); http.rememberMe()//Turn on the remember me function .rememberMeParameter("remember"); //Specifies the name of the remember me parameter } /** * Define authentication rules: which users can access which requests * @param auth * @throws Exception */ @Override protected void configure(AuthenticationManagerBuilder auth) throws Exception { /* //Define users in memory, but actually go to jdbc to get auth.inMemoryAuthentication() .withUser("pj").password("123456").roles("vip1","vip2")//Add a user, set the password, and add a request that can access the authorization rules vip1 and vip2 .and() .withUser("root").password("123456").roles("vip1","vip2","vip3") .and() .withUser("guest").password("123456").roles("vip1");*/ //Define users in memory, but actually go to jdbc to get /* Spring security 5.0 A variety of encryption methods have been added to the password, and the format of the password has also been changed. If we want our project to log in normally, we need to modify the code in configure. We need to encrypt the password transmitted from the front end in some way spring security The official recommendation is to use bcrypt encryption. */ BCryptPasswordEncoder bCryptPasswordEncoder = new BCryptPasswordEncoder(); auth.inMemoryAuthentication().passwordEncoder(bCryptPasswordEncoder) .withUser("pj").password(bCryptPasswordEncoder.encode("123456")).roles("vip1","vip2")//Add a user, set the password, and add a request that can access the authorization rules vip1 and vip2 .and() .withUser("root").password(bCryptPasswordEncoder.encode("123456")).roles("vip1","vip2","vip3") .and() .withUser("guest").password(bCryptPasswordEncoder.encode("123456")).roles("vip1"); } } -
ToPageController code.
/** * Go to each page */ @Controller public class ToPageController { @GetMapping({"/","index"}) public String index(){ return "index"; } @GetMapping("/toLogin") public String toLogin(){ return "login"; } @GetMapping("/vip1/{id}") public String goVip1(@PathVariable("id") String id){ return "/vip1/"+id; } @GetMapping("/vip2/{id}") public String goVip2(@PathVariable("id") String id){ return "/vip2/"+id; } @GetMapping("/vip3/{id}") public String goVip3(@PathVariable("id") String id){ return "/vip3/"+id; } } -
login.html page.
<!DOCTYPE html> <html lang="en" xmlns:th="http://www.thymeleaf.org"> <head> <meta charset="UTF-8"> <title>login</title> </head> <body> <h1>Own login page</h1> <!--If you change the login/login Default login request must be sent/login request--> <form th:action="@{/login}" method="post"> user name:<input type="text" name="user"><br/> password:<input type="password" name="paw"><br/> <input type="checkbox" name="remember">Remember me<br/> <input type="submit" value="land"> </form> </body> </html> -
index.html page.
<!DOCTYPE html>
<html lang="en" xmlns:th="http://www.thymeleaf.org"
      xmlns:sec="http://www.thymeleaf.org/thymeleaf-extras-springsecurity3">
<head>
    <meta charset="UTF-8">
    <title>index</title>
</head>
<body>
<div>
    <div sec:authorize="!isAuthenticated()">
        <!--When not logged in, the login button is displayed-->
        <a th:href="@{/toLogin}">land</a>
    </div>
    <div sec:authorize="isAuthenticated()">
        <!--After successful login, the logout button and user name will be displayed-->
        <a th:href="@{/logout}">cancellation</a>
        <br/>
        user name:<span sec:authentication="principal.username"></span>
        <br/>
        Role name:<span sec:authentication="principal.authorities"></span>
    </div>

</div>
<!--hasRole('vip1') Judge if a user has vip1 You can see this module with the permission of-->
<div sec:authorize="hasRole('vip1')">
    <div>vip1</div>
    <a th:href="@{/vip1/1}">1.html</a>
    <a th:href="@{/vip1/2}">2.html</a>
    <a th:href="@{/vip1/3}">3.html</a>
</div>
<br/>
<div sec:authorize="hasRole('vip2')">
    <div>vip2</div>
    <a th:href="@{/vip2/1}">1.html</a>
    <a th:href="@{/vip2/2}">2.html</a>
    <a th:href="@{/vip2/3}">3.html</a>
</div>
<br/>
<div sec:authorize="hasRole('vip3')">
    <div>vip3</div>
    <a th:href="@{/vip3/1}">1.html</a>
    <a th:href="@{/vip3/2}">2.html</a>
    <a th:href="@{/vip3/3}">3.html</a>
</div>
</body>
</html>
3, Shiro
1. Introduction
1.1 what is Shiro
- Apache Shiro is - a Java Security (permission) framework.
- Shiro can easily develop good enough applications, which can be used not only in Java se environment (but also in small environment), but also in Java EE environment.
- Shiro can complete, authentication, authorization, encryption, session management, Web integration, caching, etc.
- Download address: http://shiro.apache.org/
1.2 what can shiro do
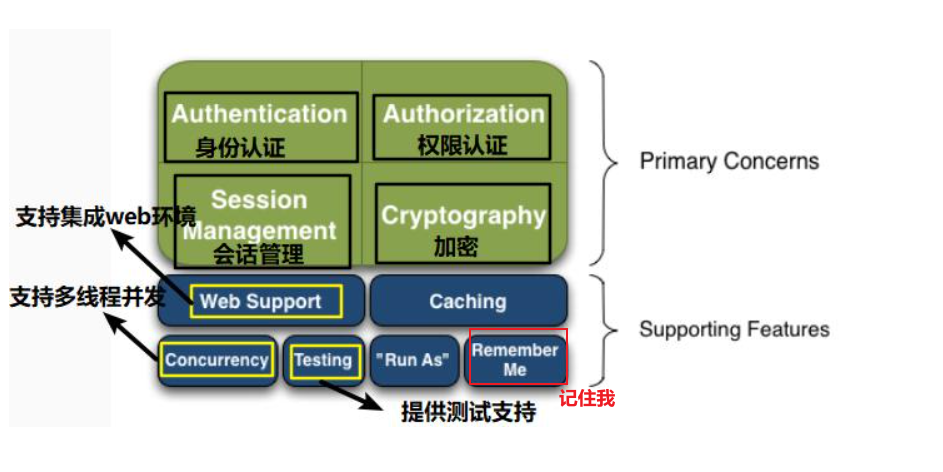
- Authentication: identity authentication, login, and verify whether the user has the corresponding identity;
- Authorization: authorization, i.e. permission verification, verifies whether an authenticated user has a certain permission, that is, determines whether the user can perform any operations, such as verifying whether a user has a certain role, or fine-grained verifying whether a user has a certain permission on a resource!
- Session Manager: session management, that is, after a user logs in, it is the first session. Before exiting, all its information is in the session; The session can be an ordinary avaSE environment or a Web environment;
- Cryptography: encryption to protect the security of data, such as password encryption and storage in the database instead of plaintext storage;
- Web Support: Web support, which can be easily integrated into the web environment;
- Caching: caching, for example, after a user logs in, the user information, roles and permissions do not need to be checked every time, which can improve efficiency
- Concurrency: Shiro supports concurrent verification of multithreaded applications, that is, if you start another thread in one thread, you can automatically propagate permissions to the past
- Testing: provide test support;
- Run As: allow one user to access as another user (if they allow it);
- Remember Me: Remember Me, this is a very common function, that is, after logging in once, you don't need to log in next time;
1.3 shiro architecture (external)
- Looking at Shiro from the outside, that is, from the perspective of application, how to use Shiro to complete work:
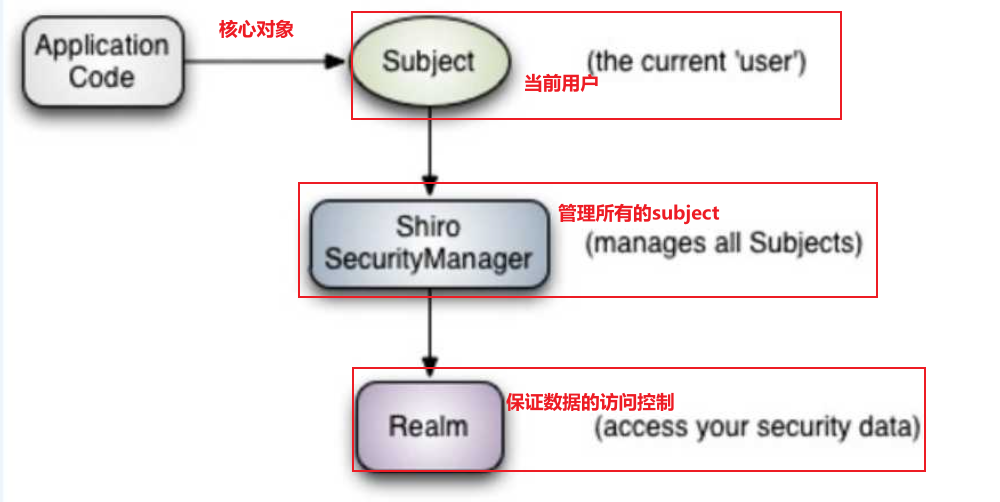
- Subject: the object that the application code directly interacts with is subject, that is, the core of Shiro's external API is subject. Subject represents the current user. This user is not necessarily a specific person. Anything interacting with the current application is a subject, such as web crawler, robot, etc. all interactions with the subject will be delegated to the SecurityManager; Subject is actually a facade, and the securitymanager is the actual executor.
- SecurityManager: Security Manager, that is, all security related operations will interact with SercurityManager, and it manages all subjects. It can be seen that it is the core of Shiro. It is responsible for interacting with other components of Shiro. It is equivalent to the role of dispatcher servlet of spring MVC.
- Real: Shiro obtains security data (such as user, role and permission) from real, that is, if SecurityManager wants to verify user identity, it needs to obtain corresponding users from real for comparison to determine whether the user's identity is legal; You also need to get the user's corresponding roles and permissions from the Realm to verify whether the user's operations can be carried out. You can regard the Realm as a DataSource.
1.4 shiro structure (internal)
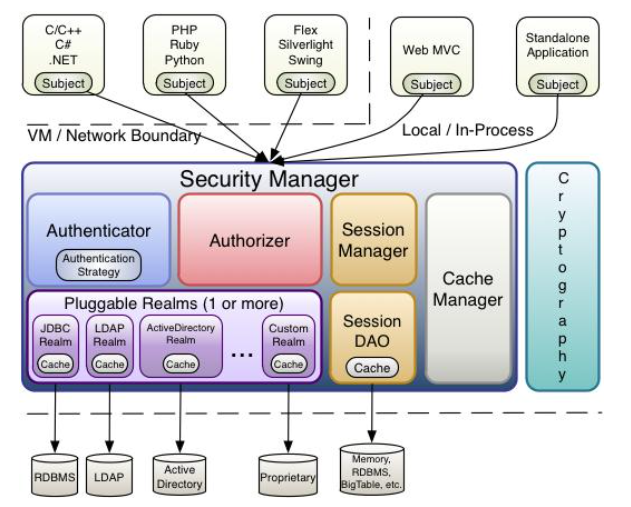
- Subject: any user who can interact with the application;
- Security Manager: equivalent to dispatcher servlet in spring MVC; It is Shiro's heart, and all specific interactions pass through;
- The Security Manager controls all subjects, and is responsible for authentication, authorization, session and cache management;
- Authenticator: responsible for Subject authentication. It is an extension point and can be customized; Authentication strategy can be used, that is, when the user has passed the authentication;
- Authorizer: the authorizer, that is, the access controller, is used to determine whether the subject has permission to perform corresponding operations; That is, it controls the functions that users can access in the application;
- Realm: there can be one or more realms, which can be considered as security entity data sources, that is, those used to obtain security entities can be implemented in JDBC or in memory, etc., which are provided by the user; Therefore, you generally need to implement your own realm in the application;
- Session manager: a component that manages the session life cycle. Shiro can be used not only in the Web environment, but also in the ordinary Java se environment;
- CacheManager: cache controller to manage the cache of users, roles, permissions, etc; Because these data are rarely changed, putting them in the cache can improve the access performance;
- Cryptography: password module. Shiro improves some common encryption components for password encryption, decryption, etc;
2,HelloWord
2.1 quick start
-
Create a springboot to quickly start the project and delete unnecessary things.
-
According to the official documents, we import Shiro's dependencies.
<!--shiro--> <dependency> <groupId>org.apache.shiro</groupId> <artifactId>shiro-core</artifactId> <version>1.8.0</version> </dependency> <!-- Log facade --> <dependency> <groupId>org.slf4j</groupId> <artifactId>jcl-over-slf4j</artifactId> <version>1.7.21</version> </dependency> <dependency> <groupId>org.slf4j</groupId> <artifactId>slf4j-log4j12</artifactId> <version>1.7.21</version> <!--<scope>test</scope> Specify an environment in which dependencies take effect--> </dependency> <dependency> <groupId>log4j</groupId> <artifactId>log4j</artifactId> <version>1.2.17</version> </dependency> -
Import the log configuration file and shiro.ini of the official quickstart project.
log4j.properties:log4j.rootLogger=INFO, stdout log4j.appender.stdout=org.apache.log4j.ConsoleAppender log4j.appender.stdout.layout=org.apache.log4j.PatternLayout log4j.appender.stdout.layout.ConversionPattern=%d %p [%c] - %m %n # General Apache libraries log4j.logger.org.apache=WARN # Spring log4j.logger.org.springframework=WARN # Default Shiro logging log4j.logger.org.apache.shiro=INFO # Disable verbose logging log4j.logger.org.apache.shiro.util.ThreadContext=WARN log4j.logger.org.apache.shiro.cache.ehcache.EhCache=WARN
shiro.ini:
[users] # user 'root' with password 'secret' and the 'admin' role root = secret, admin # user 'guest' with the password 'guest' and the 'guest' role guest = guest, guest # user 'presidentskroob' with password '12345' ("That's the same combination on # my luggage!!!" ;)), and role 'president' presidentskroob = 12345, president # user 'darkhelmet' with password 'ludicrousspeed' and roles 'darklord' and 'schwartz' darkhelmet = ludicrousspeed, darklord, schwartz # user 'lonestarr' with password 'vespa' and roles 'goodguy' and 'schwartz' lonestarr = vespa, goodguy, schwartz # ----------------------------------------------------------------------------- # Roles with assigned permissions # # Each line conforms to the format defined in the # org.apache.shiro.realm.text.TextConfigurationRealm#setRoleDefinitions JavaDoc # ----------------------------------------------------------------------------- [roles] # 'admin' role has all permissions, indicated by the wildcard '*' admin = * # The 'schwartz' role can do anything (*) with any lightsaber: schwartz = lightsaber:* # The 'goodguy' role is allowed to 'drive' (action) the winnebago (type) with # license plate 'eagle5' (instance specific id) goodguy = winnebago:drive:eagle5 -
Import Quickstart.java of the official QuickStart project.
package com.pj.securityandshiro.quickstart;
import org.apache.shiro.SecurityUtils;
import org.apache.shiro.authc.*;
import org.apache.shiro.config.IniSecurityManagerFactory;
import org.apache.shiro.mgt.SecurityManager;
import org.apache.shiro.session.Session;
import org.apache.shiro.subject.Subject;
import org.apache.shiro.util.Factory;
import org.slf4j.Logger;
import org.slf4j.LoggerFactory;


/**
 * A simple quick start application that demonstrates how to use the Shiro API.
 */
public class Quickstart {

    //Define log classes for output
    private static final transient Logger log = LoggerFactory.getLogger(Quickstart.class);
    public static void main(String[] args) {
        //The easiest way to create Shiro SecurityManager with configuration
        //Simple ini configuration will be used for domains, users, roles and permissions. We will return the SecurityManager instance by using a file that can receive. ini and the shiro.ini file in the root directory of the classpath (the file and url: prefix are loaded from the file and url respectively):
        Factory<SecurityManager> factory = new IniSecurityManagerFactory("classpath:shiro.ini");
        SecurityManager securityManager = factory.getInstance();
        //Settings can be accessed as JVM singleton objects.
        SecurityUtils.setSecurityManager(securityManager);


        // Get the currently executing user (one of the three objects), which has nothing to do with the above code and can be obtained directly
        Subject currentUser = SecurityUtils.getSubject();

        // Get the session in shiro and use the session to do something (no web or EJB container is required!!!)
        Session session = currentUser.getSession();
        //Set the value in the session
        session.setAttribute("someKey", "aValue");
        //Gets the value of the session
        String value = (String) session.getAttribute("someKey");
        if (value.equals("aValue")) {
            log.info("Subject==>session Medium==>aValue ! [" + value + "]");
        }

        // Let's log in to the current user to check roles and permissions:
        if (!currentUser.isAuthenticated()) {//Determine whether our current user is authenticated
            //Token token. Here is the verification of random settings without configuration file
            UsernamePasswordToken token = new UsernamePasswordToken("lonestarr", "vespa");
            //Set remember me
            token.setRememberMe(true);
            try {
                currentUser.login(token);//The login operation will be compared according to the objects in the Realm
            } catch (UnknownAccountException uae) {//This exception is thrown if the user does not exist
                log.info("There is no user with username of " + token.getPrincipal());
            } catch (IncorrectCredentialsException ice) {//The password is incorrect. This exception is thrown
                log.info("Password for account " + token.getPrincipal() + " was incorrect!");
            } catch (LockedAccountException lae) {//This exception is thrown when the user is locked
                log.info("The account for username " + token.getPrincipal() + " is locked.  " +
                        "Please contact your administrator to unlock it.");
            }
            // ... catch there are more exceptions (possibly custom exceptions specific to your application), and the AuthenticationException includes the above exceptions
            catch (AuthenticationException ae) {
                //unexpected condition?  error?
            }
        }

        //Print its identification body (in this case, the user name) to obtain the current user
        log.info("User [" + currentUser.getPrincipal() + "] logged in successfully.");

        //Test whether the current role has schwartz permission
        if (currentUser.hasRole("schwartz")) {
            log.info("May the Schwartz be with you!");
        } else {
            log.info("Hello, mere mortal.");
        }

        //Test typed permissions: simple permissions
        if (currentUser.isPermitted("lightsaber:wield")) {
            log.info("You may use a lightsaber ring.  Use it wisely.");
        } else {
            log.info("Sorry, lightsaber rings are for schwartz masters only.");
        }

        //(very powerful) instance level permissions:
        if (currentUser.isPermitted("winnebago:drive:eagle5")) {
            log.info("You are permitted to 'drive' the winnebago with license plate (id) 'eagle5'.  " +
                    "Here are the keys - have fun!");
        } else {
            log.info("Sorry, you aren't allowed to drive the 'eagle5' winnebago!");
        }

        //All done - sign out!
        currentUser.logout();

        //end
        System.exit(0);
    }
}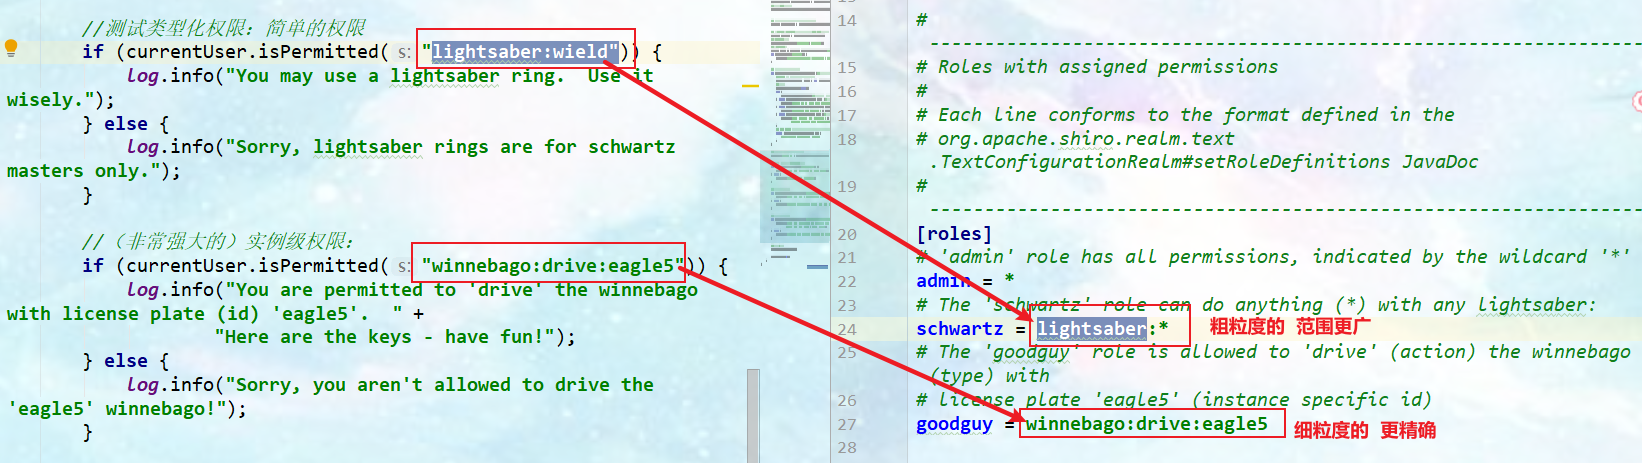
-
Summary: main methods and their functions.
    // Get the currently executing user (one of the three objects), which has nothing to do with the above code and can be obtained directly
    Subject currentUser = SecurityUtils.getSubject();
    // Get the session in shiro and use the session to do something (no web or EJB container is required!!!)
    Session session = currentUser.getSession();
    //Determine whether our current user is authenticated
    currentUser.isAuthenticated();
    //The login operation will be compared according to the objects in the Realm
    currentUser.login(token);
    //Get current user
    currentUser.getPrincipal();
     //Test whether the current role has the permission ID of schwartz
    currentUser.hasRole("schwartz");
    //Does the current role have the permission lightsaber: wire
	currentUser.isPermitted("lightsaber:wield");
	 //cancellation!
    currentUser.logout();
3. Integrate SpringBoot
3.1 preparation of basic environment
- Import the integration dependency of spring and shiro.
<!--spring and shiro Integration dependency--> <dependency> <groupId>org.apache.shiro</groupId> <artifactId>shiro-spring</artifactId> <version>1.4.0</version> </dependency> - Write two configuration classes.
ShiroConfig: configure interception rules, security manager factory, security data, etc.
UserRealm: configure authentication and authorization./** * shiro Configuration class */ @Configuration public class ShiroConfig { //shiroFilterFactoryBean: configure interception rules @Bean public ShiroFilterFactoryBean getShiroFilterFactoryBean(@Qualifier("defaultWebSecurityManager") DefaultWebSecurityManager defaultWebSecurityManager){ ShiroFilterFactoryBean bean = new ShiroFilterFactoryBean(); //Set up security manager bean.setSecurityManager(defaultWebSecurityManager); return bean; } //DefaultWebSecurityManager Security Manager Factory //@Qualifier ("userrealm") userrealm will be found in the container for injection @Bean(name = "defaultWebSecurityManager") public DefaultWebSecurityManager getDefaultWebSecurityManager(@Qualifier("userRealm") UserRealm userRealm){ DefaultWebSecurityManager defaultWebSecurityManager = new DefaultWebSecurityManager(); //Associate UserRealm defaultWebSecurityManager.setRealm(userRealm); return defaultWebSecurityManager; } //Create a realm object (a dependency of the Security Manager Factory) @Bean(name = "userRealm") public UserRealm getUserRealm(){ return new UserRealm(); } }/** * Shiro Obtain security data (such as users, roles and permissions) from Realm, * That is, the SecurityManager needs to verify the user's identity, * Then it needs to obtain the corresponding users from Realm for comparison, * To determine whether the user's identity is legal; * You also need to get the user's corresponding roles and permissions from Realm to verify whether the user's operations can be carried out, * You can think of Realm as a DataSource. */ //Custom UserRealm public class UserRealm extends AuthorizingRealm { //Authorization: access control, which controls whether a user has permission to do something in the application //This method is used every time permission judgment is required @Override protected AuthorizationInfo doGetAuthorizationInfo(PrincipalCollection principalCollection) { System.out.println("Yes===>to grant authorization doGetAuthorizationInfo"); return null; } //Verify: verify that the object exists @Override protected AuthenticationInfo doGetAuthenticationInfo(AuthenticationToken authenticationToken) throws AuthenticationException { System.out.println("Yes===>verification doGetAuthorizationInfo"); return null; } } - Write a test page. update.html, add.html and index.html pages are used for testing.
index.html:
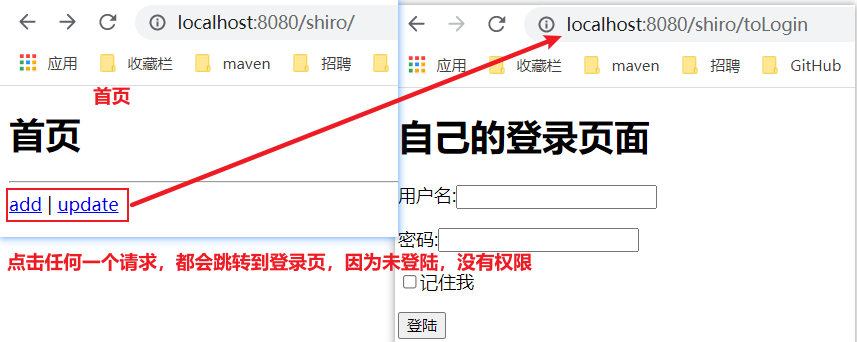
update.html:<!DOCTYPE html> <html lang="en" xmlns:th="http://www.thymeleaf.org"> <head> <meta charset="UTF-8"> <title>Title</title> </head> <body> <h1>home page</h1> <hr/> <a th:href="@{/shiro/add/}">add</a> | <a th:href="@{/shiro/add/}">update</a> </body> </html>
add.html:<!DOCTYPE html> <html lang="en"> <head> <meta charset="UTF-8"> <title>Title</title> </head> <body> <h1>update</h1> </body> </html><!DOCTYPE html> <html lang="en"> <head> <meta charset="UTF-8"> <title>Title</title> </head> <body> <h1>add</h1> </body> </html> - Test the jump of each page (you can jump if permission verification and other functions have not been set).
3.2. Add verification request
-
Requirements: anyone can access the above basic environment. We use shiro to add the authentication function so that it cannot be accessed before logging in. If the authentication fails, jump to the login interface.
-
Write a login.html page.
<!DOCTYPE html> <html lang="en" xmlns:th="http://www.thymeleaf.org"> <head> <meta charset="UTF-8"> <title>login</title> </head> <body> <h1>Own login page</h1> <!--Display error message--> <p th:text="${msg}" style="color: red;"></p> <div th:if="${param.error}" style="color: red;"> Wrong user name or password! </div> <div th:if="${param.logout}" style="color: darkgreen;"> Logout succeeded! </div> <form th:action="@{/shiro/login}" method="post"> <p>user name:<input type="text" name="username"></p> <p>password:<input type="password" name="password"></p> <p><input type="checkbox" name="remember">Remember me</p> <input type="submit" value="land"> </form> </body> </html> -
Write code to the getShiroFilterFactoryBean() method of the ShiroConfig configuration class.
//shiroFilterFactoryBean: configure interception rules @Bean public ShiroFilterFactoryBean getShiroFilterFactoryBean(@Qualifier("defaultWebSecurityManager") DefaultWebSecurityManager defaultWebSecurityManager){ ShiroFilterFactoryBean bean = new ShiroFilterFactoryBean(); //Set up security manager bean.setSecurityManager(defaultWebSecurityManager); //The following is a new code: /* Add shiro's built-in filter The rules for setting interception are as follows: anon:Access without authentication authc:Authentication is required to access user:You must have the ability to remember me to access perms:You must have permission on a resource to access it role:You must have a role permission to access */ Map<String ,String > filterMap = new LinkedHashMap<>(); //Setting request/ shrio/add and / shrio/update can only be accessed after authentication and login filterMap.put("/shiro/user/add", "authc"); filterMap.put("/shiro/user/update", "authc"); //Set request: / all requests under shrio/user / * can only be accessed after authentication login //filterMap.put("/shrio/user/*", "authc"); bean.setFilterChainDefinitionMap(filterMap); //After the authentication fails, go to the login page and set the login page request bean.setLoginUrl("/shiro/toLogin"); return bean; } -
Test: I found that I can't get in except the home page. Because we don't have a login role at present, because the request requires that the login role has the corresponding permission!
3.3. Add login function
1. Impersonate users with in memory data
- Write the login request in the controller.
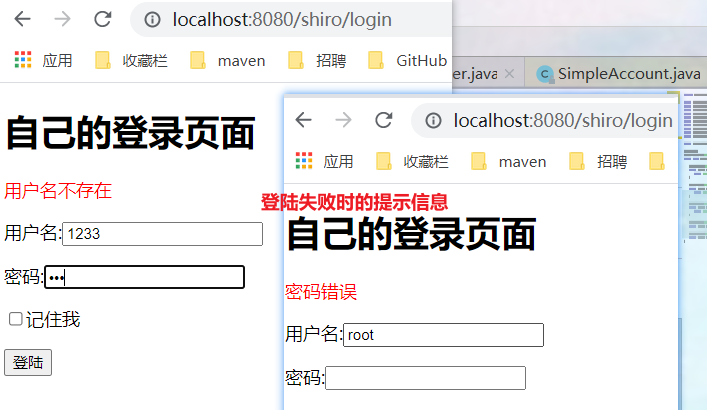
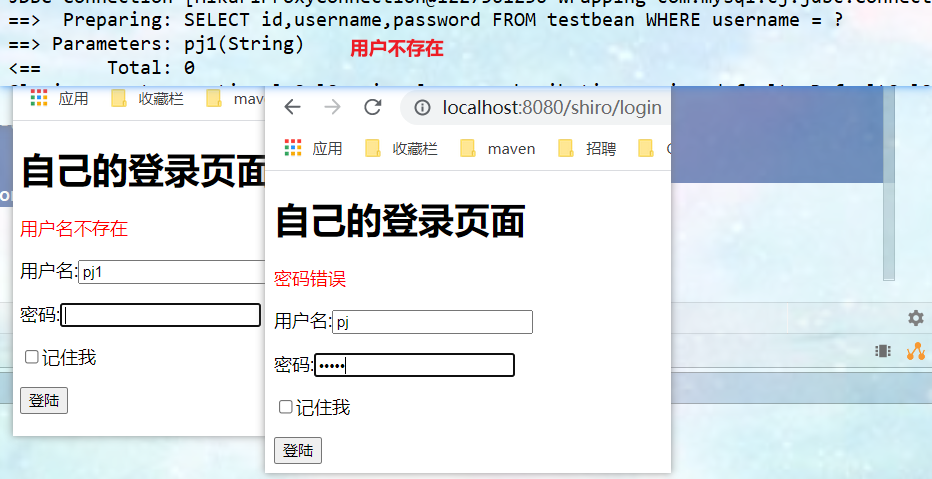
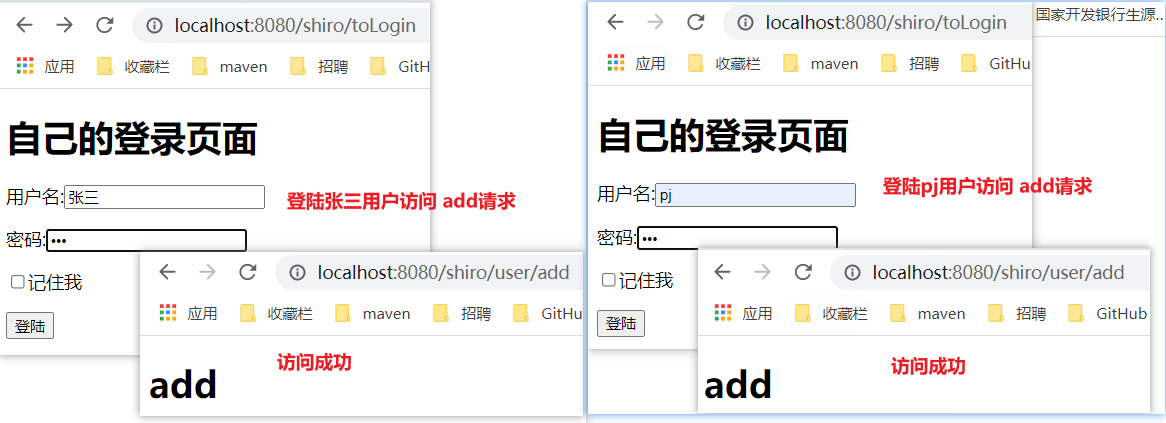
@PostMapping("/login") public String login(String username, String password, Map<String,Object> map){ //Get current user Subject subject = SecurityUtils.getSubject(); //Encapsulate the passed data into a Token token UsernamePasswordToken token = new UsernamePasswordToken(username, password); try { //The login request is defined by shiro himself subject.login(token); return "/shiro/index"; } catch (UnknownAccountException uae) {//This exception is thrown if the user does not exist map.put("msg", "user name does not exist"); return "/shiro/login"; } catch (IncorrectCredentialsException ice) {//The password is incorrect. This exception is thrown map.put("msg", "Password error"); return "/shiro/login"; } } - Add code to the doGetAuthenticationInfo(AuthenticationToken authenticationToken) authentication method in the custom UserRealm class.
//Verify: verify that the object exists @Override protected AuthenticationInfo doGetAuthenticationInfo(AuthenticationToken authenticationToken) throws AuthenticationException { System.out.println("Yes===>verification doGetAuthorizationInfo"); //Simulate data that can be logged in String username = "root"; String password = "123"; //Strong conversion to UsernamePasswordToken object, which can directly obtain the user name and password to log in UsernamePasswordToken token = (UsernamePasswordToken)authenticationToken; //If the logged in user name is not equal to root and returns null, an UnknownAccountException will be thrown. There is no exception for the user if (!(token.getUsername().equals(username))){ return null; } //The AuthenticationInfo interface needs to create an implementation class SimpleAccount object //Password verification shiro does not need to be verified /* Constructs a SimpleAccount instance for the specified realm using the given principal and credentials. Principal - the "primary" identity attribute of the account, for example, user ID or user name. Credentials - credentials (password) to authenticate the account Realm name - the name of the realm that accesses this account data */ return new SimpleAccount("", password, ""); } - Testing. Log in with a nonexistent user name and test with the data of an existing user but with an incorrect password, and the corresponding error message will be prompted.
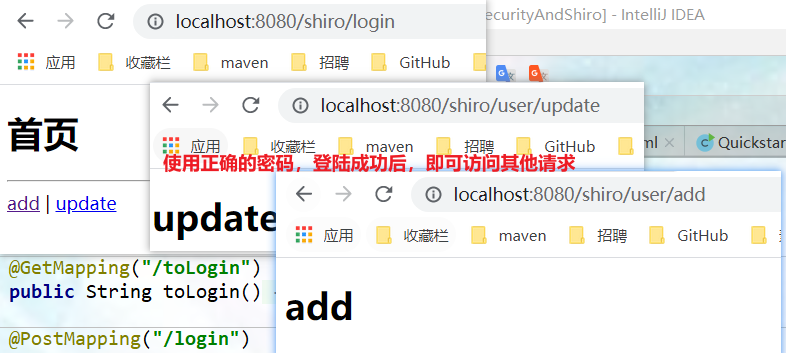
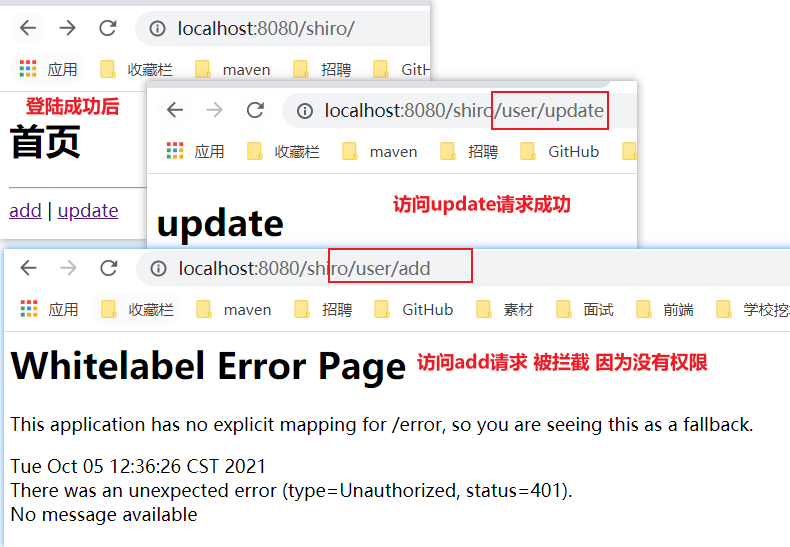
- Use the correct user name and password to access (root 123). After successful login, you can access various requests.
- Extension: implementation class of AuthenticationInfo interface.

2. Validation using data in the database
I use mybatis plus.
-
Import mybati plus dependencies and database driven dependencies.
<!--mybatis-plus integration springboot rely on--> <dependency> <groupId>com.baomidou</groupId> <artifactId>mybatis-plus-boot-starter</artifactId> <version>3.0.5</version> </dependency> <!--Database driven--> <dependency> <groupId>mysql</groupId> <artifactId>mysql-connector-java</artifactId> </dependency> <!--lombok rely on--> <dependency> <groupId>org.projectlombok</groupId> <artifactId>lombok</artifactId> </dependency> -
Write the application.properties configuration file to configure the data source.
spring.datasource.url=jdbc:mysql://localhost:3306/test?useUnicode=true&characterEncoding=utf8
spring.datasource.username=root
spring.datasource.password=123
spring.datasource.driver-class-name=com.mysql.jdbc.Driver

#Print mybatis log
mybatis-plus.configuration.log-impl=org.apache.ibatis.logging.stdout.StdOutImpl
-
Write mapper, service and pojo layers.
- mapper layer
TestbeanMapper:@Mapper public interface TestbeanMapper extends BaseMapper<Testbean> { } - service layer
//Interface class public interface TestbeanService extends IService<Testbean> { } //Implementation layer @Service public class TestbeanServiceImpl extends ServiceImpl<TestbeanMapper, Testbean> implements TestbeanService{ } - pojo layer
Testbean:@Data public class Testbean { private Long id; private String username; private String password; }
- mapper layer
-
Write the modification code of doGetAuthenticationInfo(AuthenticationToken authenticationToken) authentication method in the custom UserRealm class.
//Authentication: access control, which controls whether a user has permission to do something in the application //This method is used every time permission judgment is required @Override protected AuthenticationInfo doGetAuthenticationInfo(AuthenticationToken authenticationToken) throws AuthenticationException { System.out.println("Yes===>verification doGetAuthorizationInfo"); //Use the data in the database for validation //Strong conversion to UsernamePasswordToken object, which can directly obtain the user name and password to log in UsernamePasswordToken token = (UsernamePasswordToken)authenticationToken; QueryWrapper<Testbean> queryWrapper = new QueryWrapper<>(); queryWrapper.eq("username", token.getUsername()); Testbean testbean = testbeanService.getOne(queryWrapper); //If the user name does not exist in the database, null will be returned, and UnknownAccountException will be thrown. There is no exception for the user if (testbean == null){ return null; } //The AuthenticationInfo interface needs to create an implementation class simpleAccount object //Password verification shiro does not need to be verified /* Constructs a SimpleAccount instance for the specified realm using the given principal and credentials. Principal - the "primary" identity attribute of the account, for example, user ID or user name. Credentials - credentials (password) to authenticate the account Realm name - the name of the realm that accesses this account data */ return new SimpleAccount("", testbean.getPassword(), ""); } -
Testing.

3.4. Request users to increase access rights
1. Add access to the request
- Write the getShiroFilterFactoryBean() method under ShiroConfig configuration class, and add the following code.
//To access the "/ shiro/user/add" request, you must have user:add permission to access it filterMap.put("/shiro/user/add", "perms[user:add]"); - To test access, you need to log in first and make a request when accessing / shiro/user/add.
- Adding a page that jumps when unauthorized cannot show the default to the user. You need to add the following code in the getShiroFilterFactoryBean() method under the ShiroConfig configuration class.
//Set the request to jump without permission bean.setUnauthorizedUrl("/shiro/unauthorized"); - Process the request in the controller.
@GetMapping("/unauthorized") @ResponseBody public String unauthorized(){ return "Unauthorized access~"; } - Test access add requests without permission.
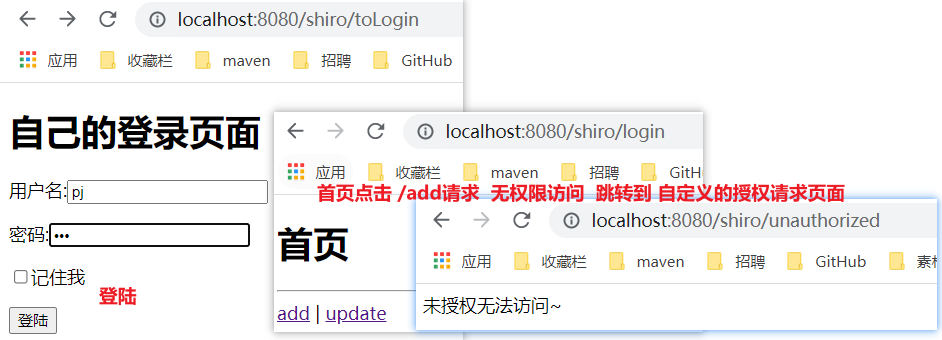
2. Use to add permissions that can be accessed
-
Write the authorization method of doGetAuthorizationInfo(PrincipalCollection principalCollection) under the user-defined UserRealm class. The code is as follows.
//Authorization: access control, which controls whether a user has permission to do something in the application @Override protected AuthorizationInfo doGetAuthorizationInfo(PrincipalCollection principalCollection) { System.out.println("Yes===>to grant authorization doGetAuthorizationInfo"); //Authorization class for user SimpleAuthorizationInfo info = new SimpleAuthorizationInfo(); //All users are authorized. No matter which user is involved, the permission authentication will be passed. If it is written dead, each user has the user:add permission, // Generally, you need to find the corresponding permissions from the database info.addStringPermission("user:add"); return info; } -
Log in again to access the test add request.
-
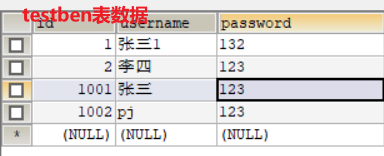
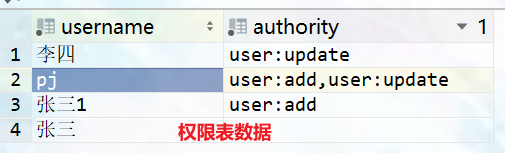
Judge whether there are corresponding permissions through the database. Add a database permission table to store the corresponding permissions of users.
Table fields:

Table data: multiple permissions are separated by commas
-
Create corresponding pojo, mapper and service layers.
pojo:@Data public class Authorities { private String username; private String authority; }mapper:
@Mapper
public interface AuthoritiesMapper extends BaseMapper<Authorities> {
}
service:
//Interface public interface AuthoritiesService extends IService<Authorities> { } //Implementation layer @Service public class AuthoritiesServiceImpl extends ServiceImpl<AuthoritiesMapper, Authorities> implements AuthoritiesService { } -
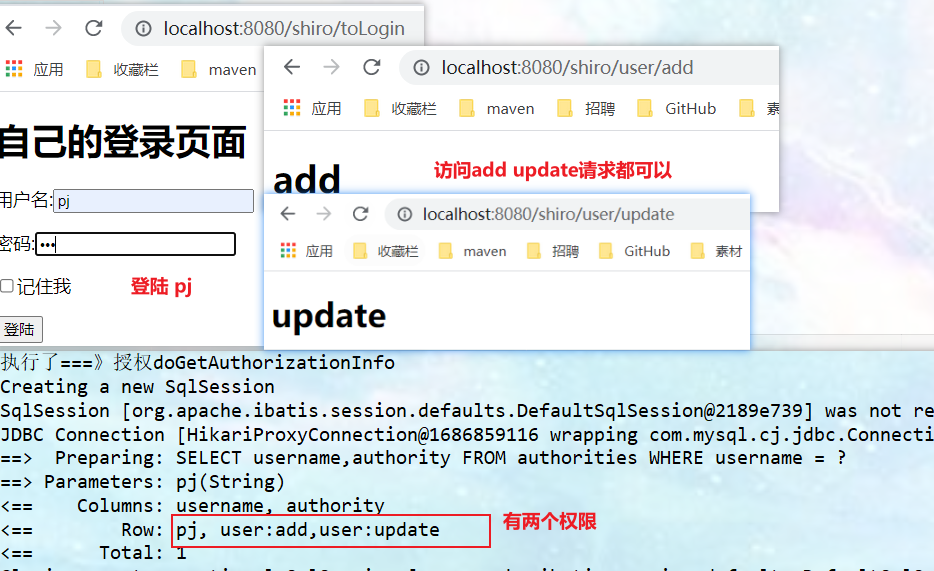
Increase the required permissions for the update request. Modify the getShiroFilterFactoryBean() method under the ShiroConfig configuration class and add the following code.
//To access "/ user/update", you must have user:update permission filterMap.put("/shiro/user/update", "perms[user:update]"); -
During authorization, find the corresponding permission through the user name, and then grant the current object the permission it should have. This involves how the user's data enters the authorization method. You can store the user's data during authentication (shiro helped us). You need to modify the doGetAuthenticationInfo(AuthenticationToken authenticationToken) authentication method under the custom UserRealm class.
/* Constructs a SimpleAccount instance for the specified realm using the given principal and credentials. Principal - the "primary" identity attribute of the account, for example, user ID or user name. Credentials - credentials (password) to authenticate the account Realm name - the name of the realm that accesses this account data */ //When verifying the password, shiro will store the user's data in the subject object for us, //This object can be obtained during authorization return new SimpleAccount(testbean, testbean.getPassword(), ""); -
Modify the dogetauthorizationinfo (principalcollection) authorization method under the custom UserRealm class to obtain the current user and find the corresponding permission from the database.
@Autowired private TestbeanService testbeanService; @Autowired private AuthoritiesService authoritiesService; //Authorization: access control, which controls whether a user has permission to do something in the application. This method is used every time permission judgment is required @Override protected AuthorizationInfo doGetAuthorizationInfo(PrincipalCollection principalCollection) { System.out.println("Yes===>to grant authorization doGetAuthorizationInfo"); //Authorization class for user SimpleAuthorizationInfo info = new SimpleAuthorizationInfo(); //Get current user Subject subject = SecurityUtils.getSubject(); //Get user information Testbean testbean = (Testbean) subject.getPrincipal(); //Create conditional query QueryWrapper<Authorities> queryWrapper = new QueryWrapper<>(); queryWrapper.eq("username", testbean.getUsername()); //Find the corresponding permissions by user name Authorities authorities = authoritiesService.getOne(queryWrapper); //By splitting the string, the user's permissions can be obtained String[] authoritie = authorities.getAuthority().split(","); //Judge whether you have permission. If you don't have permission, skip directly if (authoritie !=null && authoritie.length>0){ //Loop through all permissions for (String s : authoritie) { //Add corresponding permission info.addStringPermission(s); } } return info; } -
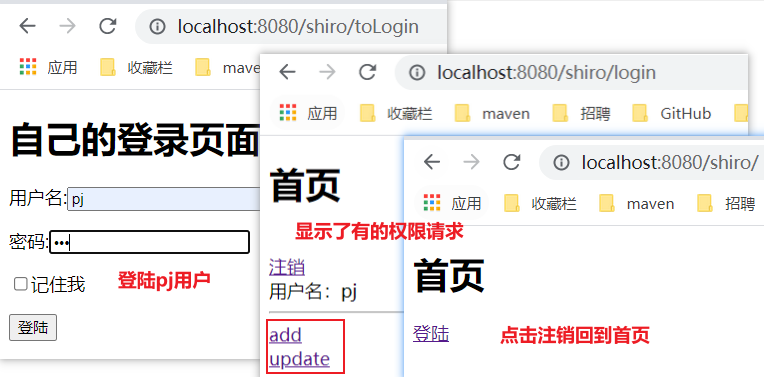
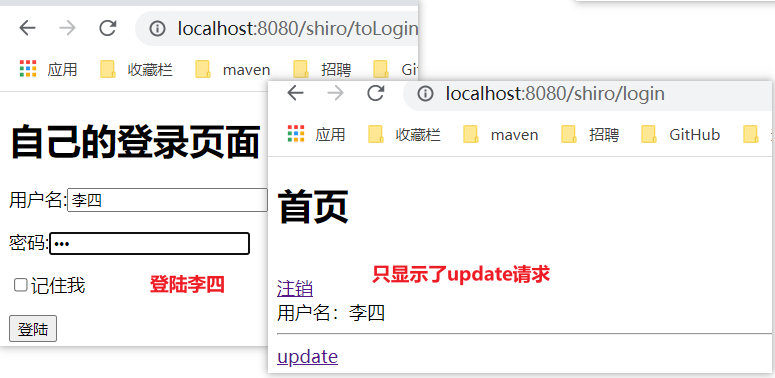
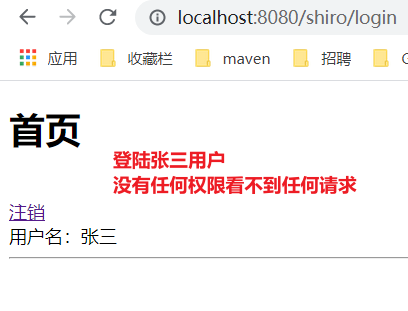
Test different users to access add and update requests.
Li Si user:

pj user:
3.5 integration of thymeleaf and shiro
-
Import the integration dependency of thymeleaf and shiro.
<!--thymeleaf and shiro Integration dependency--> <dependency> <groupId>com.github.theborakompanioni</groupId> <artifactId>thymeleaf-extras-shiro</artifactId> <version>2.0.0</version> </dependency> -
Add a method in Shiro's configuration class to create a ShiroDialect object and put it in the container.
//Classes required for the integration of thymeleaf and shiro @Bean public ShiroDialect getShiroDialect(){ return new ShiroDialect(); } -
Write the front page. Display different requests according to different permissions (remember to introduce command space), display user names, etc.
<!DOCTYPE html> <html lang="en" xmlns:th="http://www.thymeleaf.org" xmlns:shiro="http://www.thymeleaf.org/thymeleaf-extras-shiro"> <head> <meta charset="UTF-8"> <title>Title</title> </head> <body> <h1>home page</h1> <!--shiro:guest and shiro:user You can judge whether to log in!!!!--> <div shiro:guest> <p><a th:href="@{/shiro/toLogin}">land</a></p> </div> <br/> <div shiro:user> <!--After successful login, the logout button and user name will be displayed--> <a th:href="@{/shiro/logout}">cancellation</a> <br/> <!-- And verification UserRealm Class is related to the return value of the validation method, new SimpleAccount(testbean, testbean.getPassword(), ""); If the first parameter is an entity class, the values in the object are as follows: name For each attribute in the entity class <span shiro:principal property="name"/></span> If the first parameter is the user name string of the previous login, the value of the object is as follows: <span shiro:principal/> --> user name:<span shiro:principal property="username"/></span> <br/> </div> <hr/> <!--If the current user exists user:add Permissions are displayed--> <div shiro:hasPermission="user:add"> <a th:href="@{/shiro/user/add}">add</a> </div> <div shiro:hasPermission="user:update"> <a th:href="@{/shiro/user/update}">update</a> </div> </body> </html> -
Handle the logout request and write the controller.
@GetMapping("/logout") public String logout(){ //Get current user Subject currentUser = SecurityUtils.getSubject(); //cancellation currentUser.logout(); return "redirect:/shiro/"; } -
Test the page effect of different users.
User pj:
User Li Si:
User Zhang San:
4, Code summary link.
Link: https://pan.baidu.com/s/1z7c6zCv4RmLtGk0ciws8jA Extraction code: p48a
Note: if you have any questions, you can speak in the comment area. Thank you for your advice.