Analyze problems
The following is the flow chart of user name / password authentication built in Spring Security. We can start here:
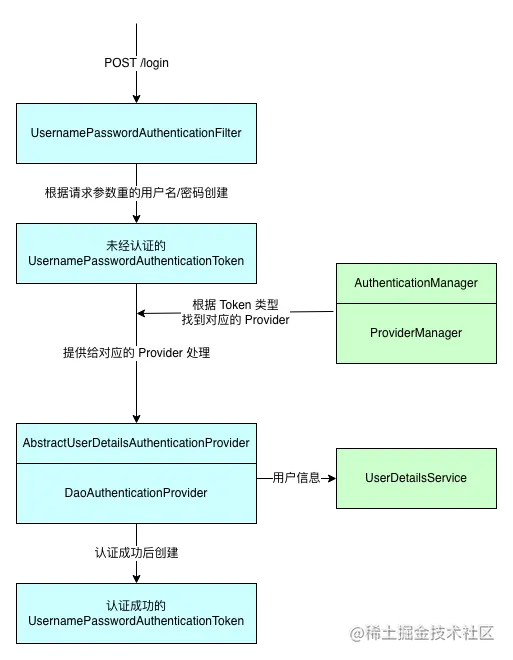
According to the above figure, we can follow suit and customize an authentication process, such as SMS code authentication. In the figure, I have marked the main links involved in the process with different colors. The part of the blue block is the part corresponding to the user name / password authentication, and the part marked by the green block is the logic independent of the specific authentication method.
Therefore, we can develop our customized logic according to the classes in the blue part, mainly including the following contents:
- A user-defined Authentication implementation class, similar to UsernamePasswordAuthenticationToken, is used to save Authentication information.
- A user-defined filter, similar to UsernamePasswordAuthenticationFilter, encapsulates authentication information and invokes authentication logic for specific requests.
- An implementation class of DaoAuthenticationProvider, which provides authentication logic, similar to DaoAuthenticationProvider.
Next, take the mobile phone verification code authentication as an example to complete one by one.
Custom Authentication
Give the code first and explain later:
public class SmsCodeAuthenticationToken extends AbstractAuthenticationToken {

    private final Object principal;

    private Object credentials;

    public SmsCodeAuthenticationToken(Object principal, Object credentials) {
        super(null);
        this.principal = principal;
        this.credentials = credentials;
        setAuthenticated(false);
    }
    public SmsCodeAuthenticationToken(Object principal, Object credentials,
                                      Collection<? extends GrantedAuthority> authorities) {
        super(authorities);
        this.principal = principal;
        this.credentials = credentials;
        super.setAuthenticated(true);
    }

    @Override
    public Object getCredentials() {
        return this.credentials;
    }

    @Override
    public Object getPrincipal() {
        return this.principal;
    }

    @Override
    public void setAuthenticated(boolean isAuthenticated) throws IllegalArgumentException {
        Assert.isTrue(!isAuthenticated,
                "Cannot set this token to trusted - use constructor which takes a GrantedAuthority list instead");
        super.setAuthenticated(false);
    }

    @Override
    public void eraseCredentials() {
        super.eraseCredentials();
        this.credentials = null;
    }
}
Copy code
Like UsernamePasswordAuthenticationToken, it inherits the AbstractAuthenticationToken abstract class and needs to implement getPrincipal and getCredentials methods. In user name / password authentication, principal represents user name and credentials represents password. Here, we can let them refer to mobile phone number and verification code. Therefore, we add these two attributes and then implement the method.
In addition, we need to write two construction methods to create unauthenticated and successfully authenticated authentication information respectively.
Custom Filter
This part can be written with reference to UsernamePasswordAuthenticationFilter. Or online code:
public class SmsCodeAuthenticationProcessingFilter extends AbstractAuthenticationProcessingFilter {

    public static final String FORM_MOBILE_KEY = "mobile";
    public static final String FORM_SMS_CODE_KEY = "smsCode";

    private static final AntPathRequestMatcher DEFAULT_ANT_PATH_REQUEST_MATCHER = new AntPathRequestMatcher("/sms/login",
            "POST");

    private boolean postOnly = true;

    protected SmsCodeAuthenticationProcessingFilter() {
        super(DEFAULT_ANT_PATH_REQUEST_MATCHER);
    }

    @Override
    public Authentication attemptAuthentication(HttpServletRequest request, HttpServletResponse response) throws AuthenticationException, IOException, ServletException {
        if (this.postOnly && !request.getMethod().equals("POST")) {
            throw new AuthenticationServiceException("Authentication method not supported: " + request.getMethod());
        }
        String mobile = obtainMobile(request);
        mobile = (mobile != null) ? mobile : "";
        mobile = mobile.trim();
        String smsCode = obtainSmsCode(request);
        smsCode = (smsCode != null) ? smsCode : "";
        SmsCodeAuthenticationToken authRequest = new SmsCodeAuthenticationToken(mobile, smsCode);
        // Allow subclasses to set the "details" property
        setDetails(request, authRequest);
        return this.getAuthenticationManager().authenticate(authRequest);
    }

    private String obtainMobile(HttpServletRequest request) {
        return request.getParameter(FORM_MOBILE_KEY);
    }

    private String obtainSmsCode(HttpServletRequest request) {
        return request.getParameter(FORM_SMS_CODE_KEY);
    }

    protected void setDetails(HttpServletRequest request, SmsCodeAuthenticationToken authRequest) {
        authRequest.setDetails(this.authenticationDetailsSource.buildDetails(request));
    }
}
Copy code
This part is relatively simple, and the key points are as follows:
- First, the default construction method specifies a filter to match those requests. Here, the POST request of / sms/login ; is matched.
- In the {attemptAuthentication} method, first obtain the mobile phone number and verification code entered in the form from {request}, and create unauthenticated Token information.
- Give the Token information to this getAuthenticationManager(). Authenticate (authrequest) method.
Custom Provider
Here is the main logic for completing authentication. The code here only has the most basic verification logic and does not write more rigorous verification, such as verifying whether the user is disabled, because this part is cumbersome but simple.
public class SmsCodeAuthenticationProvider implements AuthenticationProvider {

    public static final String SESSION_MOBILE_KEY = "mobile";
    public static final String SESSION_SMS_CODE_KEY = "smsCode";
    public static final String FORM_MOBILE_KEY = "mobile";
    public static final String FORM_SMS_CODE_KEY = "smsCode";

    private UserDetailsService userDetailsService;

    @Override
    public Authentication authenticate(Authentication authentication) throws AuthenticationException {
        authenticationChecks(authentication);
        String mobile = authentication.getName();
        UserDetails userDetails = userDetailsService.loadUserByUsername(mobile);
        SmsCodeAuthenticationToken authResult = new SmsCodeAuthenticationToken(userDetails, userDetails.getAuthorities());
        return authResult;
    }

    /**
     * Authentication information verification
     * @param authentication
     */
    private void authenticationChecks(Authentication authentication) {
        HttpServletRequest request = ((ServletRequestAttributes) RequestContextHolder.getRequestAttributes()).getRequest();
        // Mobile phone number and verification code submitted by the form
        String formMobile = request.getParameter(FORM_MOBILE_KEY);
        String formSmsCode = request.getParameter(FORM_SMS_CODE_KEY);
        // Phone number and verification code saved in the session
        String sessionMobile = (String) request.getSession().getAttribute(SESSION_MOBILE_KEY);
        String sessionSmsCode = (String) request.getSession().getAttribute(SESSION_SMS_CODE_KEY);

        if (StringUtils.isEmpty(sessionMobile) || StringUtils.isEmpty(sessionSmsCode)) {
            throw new BadCredentialsException("Send mobile verification code for");
        }

        if (!formMobile.equals(sessionMobile)) {
            throw new BadCredentialsException("Inconsistent mobile phone number");
        }

        if (!formSmsCode.equals(sessionSmsCode)) {
            throw new BadCredentialsException("Inconsistent verification code");
        }
    }

    @Override
    public boolean supports(Class<?> authentication) {
        return (SmsCodeAuthenticationToken.class.isAssignableFrom(authentication));
    }

    public void setUserDetailsService(UserDetailsService userDetailsService) {
        this.userDetailsService = userDetailsService;
    }
}
Copy code
The key points of this code are as follows:
- The supports , method is used to determine the type of AuthenticationToken supported by this Provider, which corresponds to the , SmsCodeAuthenticationToken we created earlier.
- In the "authenticate" method, we compare the mobile phone number and verification code in the Token with the mobile phone number and verification code saved in the Session. (the part of saving the mobile phone number and verification code to the Session is implemented below) after the comparison is correct, obtain the corresponding user from UserDetailsService, create an authenticated Token based on this, return it, and finally reach the Filter.
Custom Handler after authentication success / failure
Previously, we knew through analyzing the source code that the doFilter method in Filter is actually in its parent class
The attemptAuthentication method in AbstractAuthenticationProcessingFilter is also called in doFilter.
When we finish the previous custom logic, whether the authentication is successful or not, the attemptAuthentication method will return the result of successful authentication or throw an exception of failed authentication. The doFilter method will call different processing logic according to the authentication result (success / failure). We can also customize these two processing logic.
I post the code directly below:
public class SmsCodeAuthenticationSuccessHandler implements AuthenticationSuccessHandler {
    @Override
    public void onAuthenticationSuccess(HttpServletRequest request, HttpServletResponse response, Authentication authentication) throws IOException, ServletException {
        response.setContentType("text/plain;charset=UTF-8");
        response.getWriter().write(authentication.getName());
    }
}
Copy code
public class SmsCodeAuthenticationFailureHandler implements AuthenticationFailureHandler {
@Override
public void onAuthenticationFailure(HttpServletRequest request, HttpServletResponse response, AuthenticationException exception) throws IOException, ServletException {
response.setContentType("text/plain;charset=UTF-8");
response.getWriter().write("Authentication failed");
}
}
Copy codeThe above is the processing logic after success and failure. You need to implement the corresponding interfaces and methods respectively. Note that this is just for testing. The simplest logic is written so that the two situations can be distinguished during testing. In a real project, the corresponding logic should be implemented according to the specific business, such as saving the information of the currently logged in user.
Configure logic for custom authentication
In order for our custom authentication to take effect, we need to add Filter and Provider to the configuration of Spring Security. We can put this part of the configuration into a configuration class separately first:
@Component
@RequiredArgsConstructor
public class SmsCodeAuthenticationSecurityConfig extends SecurityConfigurerAdapter<DefaultSecurityFilterChain, HttpSecurity> {
    private final UserDetailsService userDetailsService;

    @Override
    public void configure(HttpSecurity http) {

        SmsCodeAuthenticationProcessingFilter smsCodeAuthenticationFilter = new SmsCodeAuthenticationProcessingFilter();
        smsCodeAuthenticationFilter.setAuthenticationManager(http.getSharedObject(AuthenticationManager.class));
        smsCodeAuthenticationFilter.setAuthenticationSuccessHandler(new SmsCodeAuthenticationSuccessHandler());
        smsCodeAuthenticationFilter.setAuthenticationFailureHandler(new SmsCodeAuthenticationFailureHandler());

        SmsCodeAuthenticationProvider smsCodeAuthenticationProvider = new SmsCodeAuthenticationProvider();
        smsCodeAuthenticationProvider.setUserDetailsService(userDetailsService);

        http.authenticationProvider(smsCodeAuthenticationProvider)
                .addFilterAfter(smsCodeAuthenticationFilter, UsernamePasswordAuthenticationFilter.class);
    }
}
Copy code
Among them, there are the following points to pay attention to:
- Remember to provide the AuthenticationManager to the Filter and review the authentication logic mentioned earlier. Without this step, after the authentication information is encapsulated in the Filter, there is no way to find the corresponding Provider.
- Two classes of processing logic after success / failure should be provided to Filter. Otherwise, it will not enter these two logics, but the default processing logic.
- If UserDetailsService is used in the Provider, remember to provide it.
- Finally, add both to the HttpSecurity object.
Next, you need to add the following content to the main configuration of Spring Security.
- First, inject the SmsCodeAuthenticationSecurityConfig configuration.
- Then, in the "configure" (httpsecurity HTTP) method, introduce the configuration: http apply`` ( ``smsCodeAuthenticationSecurityConfig`` ) ``;.
- Finally, since the verification code needs to be requested and verified before authentication, the / sms / * * path is released.
test
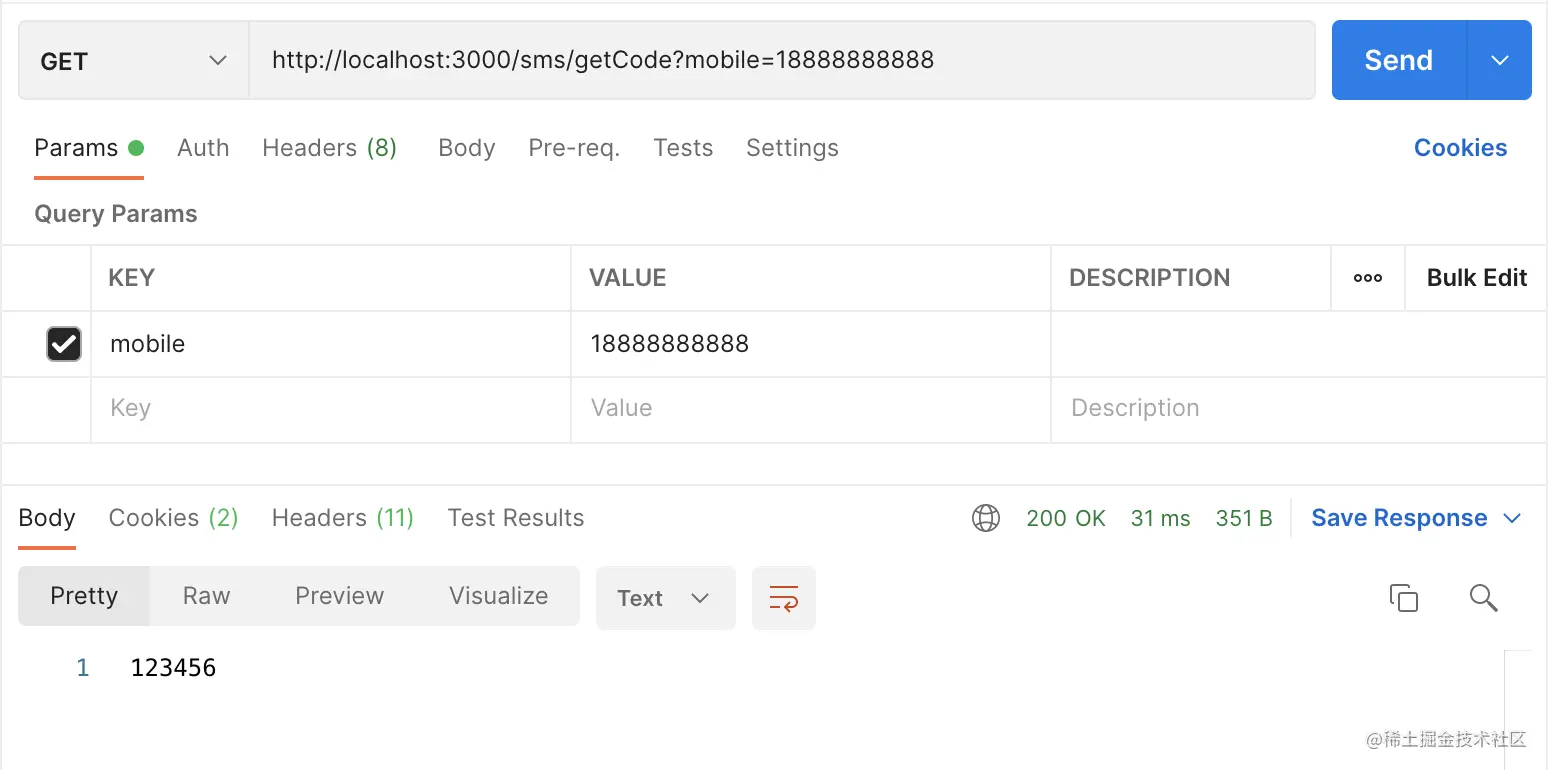
When it's done, let's test it. First, we need to provide an interface to send the verification code. Because it's a test, we directly return the verification code. The interface code is as follows:
@GetMapping("/getCode")
public String getCode(@RequestParam("mobile") String mobile,
                      HttpSession session) {
    String code = "123456";
    session.setAttribute("mobile", mobile);
    session.setAttribute("smsCode", code);
    return code;
}
Copy code
In order to obtain corresponding users, if you have not implemented your own UserDetailsService, write a simple logic to complete the test. The loadUserByUsername method is as follows:
@Override
public UserDetails loadUserByUsername(String username) throws UsernameNotFoundException {
// TODO: temporary logic, and then connect with user management related services
return new User(username, "123456",
AuthorityUtils.createAuthorityList("admin"));
}
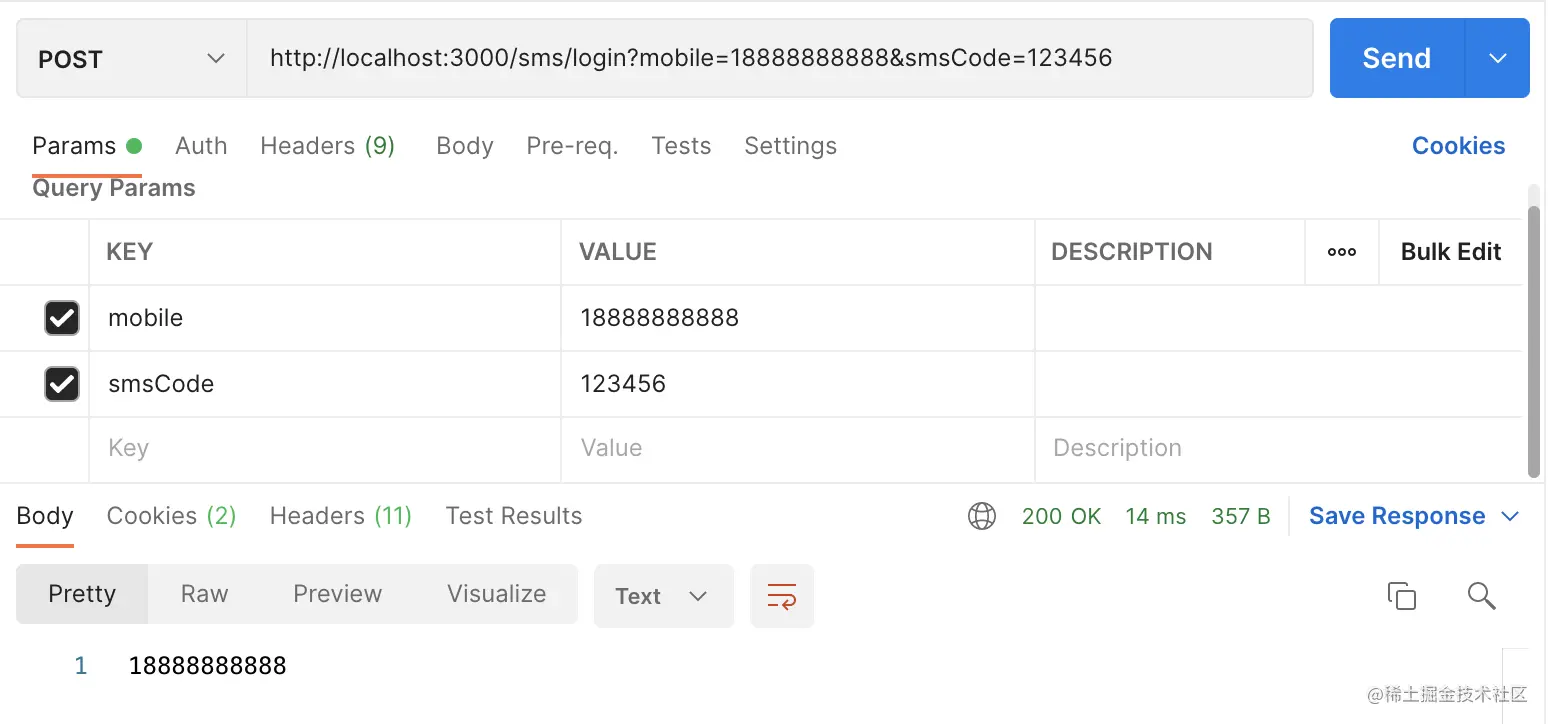
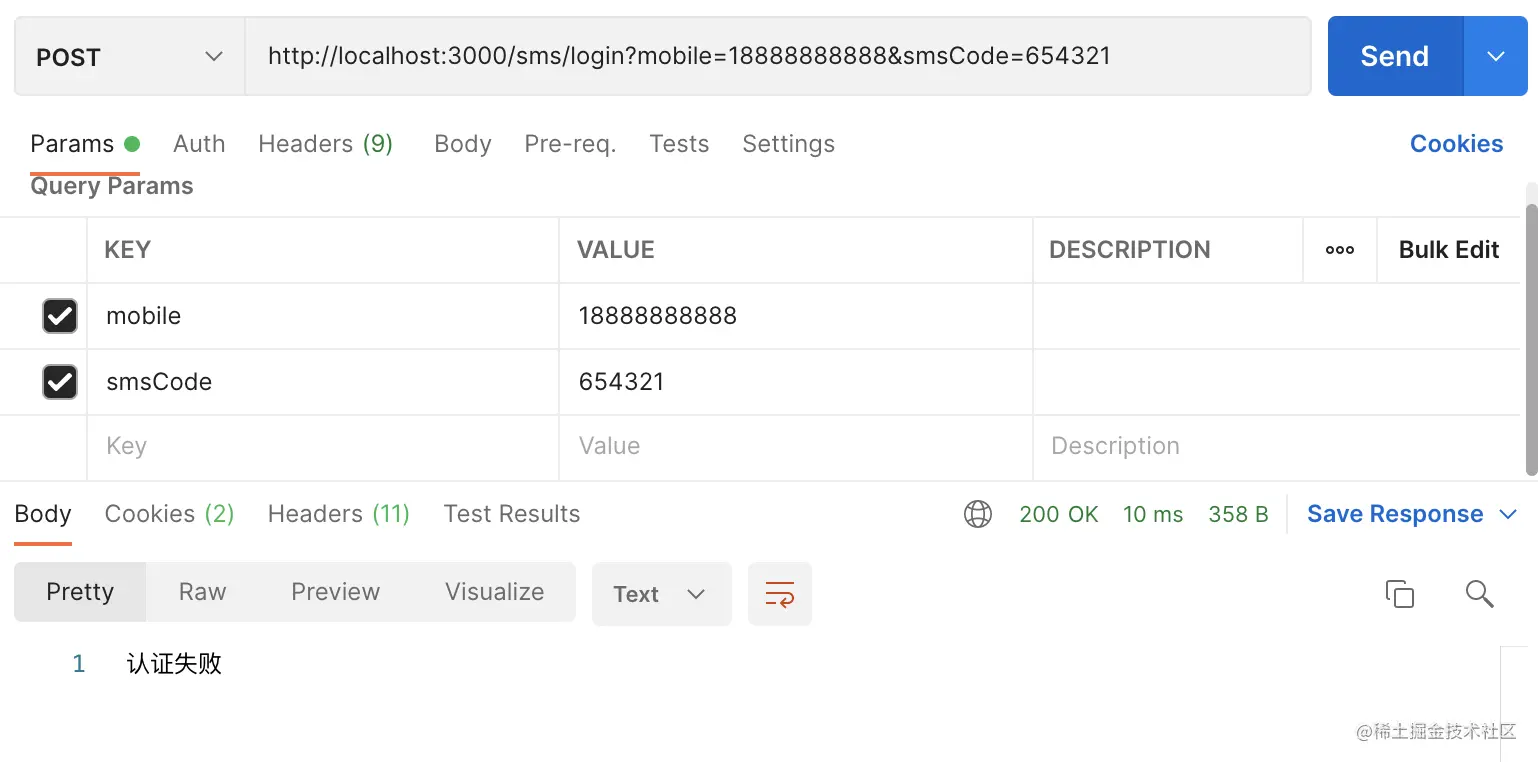
Copy codeOK, here are the test results:
Original link: https://juejin.cn/post/7054844113882972191