The article will not talk about the source code of spring security, but simply record the problems encountered when quickly building spring security to realize login and permission verification.
spring security is built quickly, which is divided into two parts: configuration part and request part. The configuration part will be read when the project is started; The request part is to perform login verification and permission verification through a series of security filters.
First, the directory structure of the demo:

1, Configuration part:
1. Add spring security dependency
        <dependency>
			<groupId>org.springframework.boot</groupId>
			<artifactId>spring-boot-starter-security</artifactId>
		</dependency>
2. Interception rule configuration and login authentication configuration
@Configuration
@EnableWebSecurity
public class WebSecurityConfig extends WebSecurityConfigurerAdapter {

    //User defined verification user class
    @Autowired
    private UserServiceDao userServiceDao;

    //User defined post login processing class
    @Autowired
    private LoginSuccessHandler loginSuccessHandler;

    protected void configure(HttpSecurity http) throws Exception {
        http
                .authorizeRequests()
                .antMatchers("/","/loginError").permitAll()
                .antMatchers("/user/**").hasRole("USER")
                .antMatchers("/admin/**").hasRole("ADMIN")
                .antMatchers("/home").hasAnyRole("ADMIN", "USER")
                .anyRequest().authenticated()
                .and()
                .formLogin()
                .loginPage("/login")
                .loginProcessingUrl("/login")
                .successHandler(loginSuccessHandler)
                .failureForwardUrl("/loginError")
                .and()
                .csrf().disable();
    }

    /**
     * Define how permission sources are obtained (memory or database)
     * In the authentication process, the concepts of authentication and UserDetails should be clear. Authentication is the data to be verified transmitted from the foreground
     * UserDetails Is the permission source data stored in the database (or memory). The verification process is to compare the two data. If the verification conditions are met, the verification passes
     * @param auth
     * @throws Exception
     */
    @Autowired
    public void configGlobal(AuthenticationManagerBuilder auth) throws Exception {
        auth.userDetailsService(userServiceDao).passwordEncoder(new             BCryptPasswordEncoder());
    }
}
The source code of UserServiceDao is as follows:
@Component
public class UserServiceDao implements UserDetailsService {
    @Override
    public UserDetails loadUserByUsername(String userName) throws UsernameNotFoundException {

        if("admin".equals(userName)) {
            Set roleSet = new HashSet();
            roleSet.add(new SimpleGrantedAuthority("ROLE_ADMIN"));
            return new User(userName, new BCryptPasswordEncoder().encode("111111"), roleSet);
        }
        if("user".equals(userName)) {
            Set roleSet = new HashSet();
            roleSet.add(new SimpleGrantedAuthority("ROLE_USER"));
            return new User(userName, new BCryptPasswordEncoder().encode("000000"), roleSet);
        }
        return null;
    }
}
The query database operation is omitted here, and the permission source is written directly in the code.
Note:
The password must be encrypted;
ROLE is required when the permission name is passed in to User_ Prefix. When configuring permission information (the above hasRole() and hasAnyRole(), the prefix ROLE)
The source code of LoginSuccessHandler is as follows:
@Component
public class LoginSuccessHandler extends SavedRequestAwareAuthenticationSuccessHandler {

    @Override
    public void onAuthenticationSuccess(HttpServletRequest request, HttpServletResponse response, Authentication authentication) throws ServletException, IOException {
        request.getRequestDispatcher("/home").forward(request, response);
        super.onAuthenticationSuccess(request, response, authentication);
    }
}
The actions after successful login can be handled here, because spring security defaults that after successful login, it will jump to the previous access interface, such as / home, which has just been accessed. Because it fails to pass the verification, it will jump to the login interface. At this time, if you log in, after the verification is successful, it will jump to the / home interface, which is no problem. However, if the / login interface is accessed at the beginning, if nothing is done, after successful login, I will continue to return / login (in this case, I will report 302 when running the project locally), so there is a problem. In fact, it has been verified successfully, but I still can't access any resources.
During configuration, pay attention to the inherited classes, implemented interfaces, and overridden methods of these custom classes.
2, Request part:
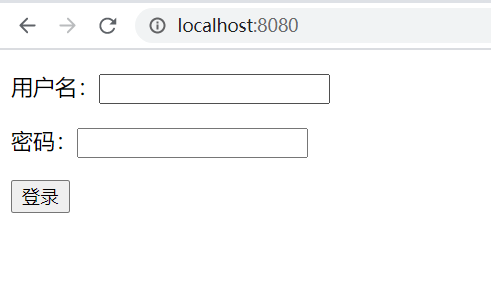
The request part starts with html. First look at the login interface:
<body>
    <form th:action="@{/login}" method="post">
        <p><span>user name:</span><input name="username" id="username" type="text"/></p>
        <p><span>password:</span><input name="password" id="password" type="password"/></p>
        <button type="submit">Sign in</button>
    </form>
</body>
The action of the form here is suggested to be written in thymeleaf. The problem I encountered during debugging is that the common action="/login" makes it impossible to enter the security verification. And the key values corresponding to the user name and password should be username and password, which are taken according to these two key values in the security filter. By the way, remember to submit the form with post.
After finishing the login interface, it's time to talk about the login controller:
@Controller
public class SecurityController {

    @RequestMapping(value = {"/login", "/"}, method = RequestMethod.GET)
    public String login() {
        return "login";
    }

    @RequestMapping(value = "/login", method = RequestMethod.POST)
    public String doLogin() {
        return "";
    }

    @RequestMapping("/home")
    public String home(Model model) {
        model.addAttribute("userName", "HaiKou");
        return "home";
    }

    @RequestMapping("/loginError")
    public String error() {
        return "error";
    }
}
It can be seen that the doLogin() method that actually handles login returns null, which is not important because we have configured the event handling class after successful login. According to the writing method in LoginSuccessHandler, after successful login, you need to jump to / home. Next, look at the home interface:
<body>
<p th:text="'Welcome To ' + ${userName} ">Blank</p>
<hr>
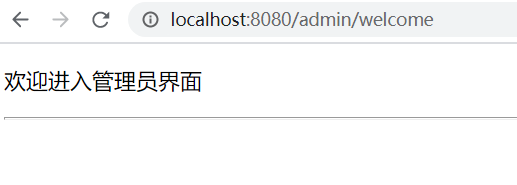
<P><a th:href="@{/admin/welcome}">Go to the administrator interface</a></P>
<P><a th:href="@{/user/welcome}">Go to the user interface</a></P>
</body>In the home interface, two links are simply written to jump to the administrator interface and the ordinary user interface respectively (this is only used for demonstration, so administrators are not allowed to enter the ordinary user interface according to the configuration)
The administrator controller is as follows:
@Controller
@RequestMapping("/admin")
public class AdminController {

    @RequestMapping("/welcome")
    public String admin() {
        return "/admin/welcome";
    }
}
The interface is as follows:
<body>
    <p>Welcome to the administrator interface</p>
    <hr>
</body>
The controller and interface of ordinary users are similar to that of administrators, and no code is pasted
Finally, run the following project:
Login interface:
Login with administrator account

Click "go to administrator interface"
Click "go to user interface"
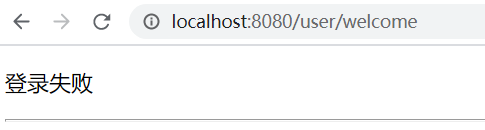
Here is the verification failure. Jump to the failure interface.
OK, the demo is over.