preface
This paper uses springsecurity oauth2 + redis to realize single sign on. Now, if you want to use springsecurity to realize single sign on, the more popular method is to use jwt. Although jwt has many advantages and can carry a lot of information, it is stateless, and the server does not need to save its information, so there is a problem, Once the jwt token is sent to the user, the user can always access the system as long as the token does not expire, and there is no exit function. If the exit function is to be realized, the jwt information must be stored on the server, which is contrary to the idea of jwt. This problem does not exist when redis implements single sign on. After the user logs in successfully, the user information will be stored in redis, Normal exit can be realized.
1, Selection of four modes of OAuth 2 authentication
Before writing the authentication server, first determine which oauth2 authentication mode to use. They are authorization code mode, password mode, simplified mode and client mode. Here, I use password mode to realize single sign on. The reason is that compared with authorization code mode, password mode does not need to obtain authorization code to obtain access token, Moreover, the authentication server and resource server are self-developed projects, which is very suitable for using the password mode. The authorization code mode has a high security level and can also be used.
2, Writing of authentication server
The writing of authentication server is the most important part. It is responsible for user authentication and authorization. There can be multiple resource servers, but there is only one authentication server.
Architecture after writing
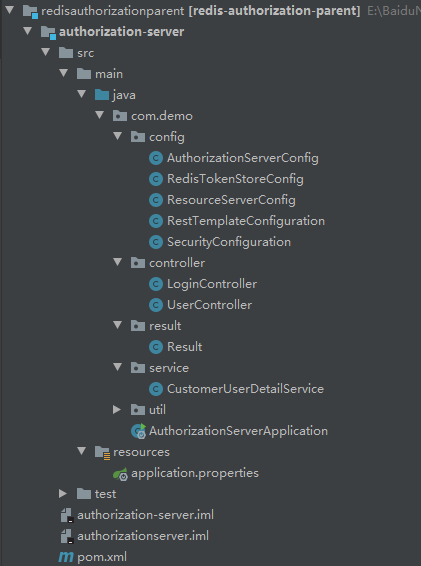
- Create a web security configuration class
This class is often used in individual projects, but now login follows the process of Oauth2, so it only needs to create some objects and configure release and authentication rules. All methods under loginController are released because login does not need to be intercepted.
/**
 * Security Configuration class
 */
@Configuration
@EnableWebSecurity
public class SecurityConfiguration extends WebSecurityConfigurerAdapter {


    // Initialize the password encoder and encrypt the password with BCryptPasswordEncoder
    @Bean
    public PasswordEncoder passwordEncoder() {
        return new BCryptPasswordEncoder();
    }

    // Initialize the authentication management object. The password mode requires
    @Bean
    @Override
    public AuthenticationManager authenticationManagerBean() throws Exception {
        return super.authenticationManagerBean();
    }

    // Release and Certification Rules
    @Override
    protected void configure(HttpSecurity http) throws Exception {
        http.csrf().disable()
                .authorizeRequests()
                // Request for release
                .antMatchers("/loginController/**").permitAll()
                .and()
                .authorizeRequests()
                // Other requests must be authenticated to access
                .anyRequest().authenticated();
    }

}
- Create redis warehouse configuration class
Because token information and user information need to be stored in redis, configure the redis warehouse
@Configuration
public class RedisTokenStoreConfig {

    // Inject Redis connection factory
    @Autowired
    private RedisConnectionFactory redisConnectionFactory;

    // Initialize RedisTokenStore to store tokens in Redis
    @Bean
    public RedisTokenStore redisTokenStore() {
        RedisTokenStore redisTokenStore = new RedisTokenStore(redisConnectionFactory);
        redisTokenStore.setPrefix("TOKEN:"); // Set the hierarchical prefix of key to facilitate query
        return redisTokenStore;
    }

}
- Create UserDetailsService class
In order to pay more attention to the preparation of single sign on, you don't connect to the database and write the data. The user name is yuki and the password is 123456. His role is TEACHER. You should fill in the correct user name and password when logging in.
@Component
public class CustomerUserDetailService implements UserDetailsService {

    @Autowired
    private PasswordEncoder passwordEncoder;

    @Override
    public UserDetails loadUserByUsername(String username) throws UsernameNotFoundException {

        return User.withUsername("yuki").password(passwordEncoder.encode("123456")).roles("TEACHER").build();

    }

}
- Create authentication server configuration class
With these three files, you can create the configuration file of the authentication server. The code has detailed comments. The more important thing is that the client actually only needs one, which can be obtained in the database in memory. The authorization type is not only the password type, but also the refresh token type. The refresh token can re obtain the access token after the access token expires. It will be used below, The default expiration time is 30 days, which can also be configured in the client information.
The authenticationManager must be configured at the endpoints when using the password mode, and the UserDetailsService object must be configured when using the refresh token. This is determined by the source code of the / oauth/token controller method of the TokenEndpoint class. However, there is no need to worry about using it, because an error will be reported if it is not written, and then configure redisTokenStore.
At security, you need to enable the permission of checkTokenAccess, which is forbidden by default. Instead, you need to change permitAll() to allow everyone to access, so that the resource server can access the authentication server with a token, verify whether the user logs in and obtain the user's permissions. tokenKeyAccess needs to be turned on if jwt is used to realize single sign on. Its function is to obtain the public key to decrypt jwt's token information. Now redis is used to realize it, and it can not be turned on.
@Configuration
//Turn on the authorization server
@EnableAuthorizationServer
public class AuthorizationServerConfig extends AuthorizationServerConfigurerAdapter {


    @Autowired
    private PasswordEncoder passwordEncoder;

    @Autowired
    private AuthenticationManager authenticationManager;

    @Autowired
    private RedisTokenStore redisTokenStore;

    @Autowired
    private UserDetailsService CustomerUserDetailService;

    /**
     * Configure client information that is allowed to access this authentication server
     * 1.Memory mode
     * 2. Database mode
     * @param clients
     * @throws Exception
     */
    @Override
    public void configure(ClientDetailsServiceConfigurer clients) throws Exception {
        //Put it in memory for the time being
        clients.inMemory()
                //Configure client id
                .withClient("WebClient")
                //Configure client key
                .secret(passwordEncoder.encode("123456"))
                //Configure authorization scope
                .scopes("all")
                //Configure access token expiration time
                .accessTokenValiditySeconds(60*100)
                //Configure authorization type
                .authorizedGrantTypes("password","refresh_token");
    }

    //The parameter name is called authorization server endpoint configurator
    @Override
    public void configure(AuthorizationServerEndpointsConfigurer endpoints) throws Exception {
        // password to this AuthenticationManager instance
        endpoints.authenticationManager(authenticationManager)
                //Manage tokens in redis mode
                .tokenStore(redisTokenStore)
                //UserDetailsService needs to be specified here to start the refresh token
                .userDetailsService(CustomerUserDetailService);
    }


    @Override
    public void configure(AuthorizationServerSecurityConfigurer security) throws Exception {
        // Open / oauth/check_token: the resource server will bring the token to the authorization server to check whether the token is correct, and then if it is correct, the authorization server will return the user's information to the resource server
        security.checkTokenAccess("permitAll()");
        // After authentication, / OAuth / token can be accessed_ Key, access is denied by default. It is used to obtain the jwt public key for resolving jwt
//        security.tokenKeyAccess("isAuthenticated()");
    }

}
Here, in fact, the authentication server has been configured. In order to test its function, you can create a controller class for testing.
2, Test the function of the authentication server
The following operations are still carried out in the authentication server. Before doing so, configure the redis information in the configuration file, because redis is used for login
server.port=9050

#Configure a single node redis service
spring.redis.host=127.0.0.1
spring.redis.database=0
spring.redis.port=6379
- Create LoginController class
Here, GETTOKENURL is a method provided by springsecurity. When we access it with specific parameters, we can obtain the access token and refresh the token.
@RestController
@RequestMapping("/loginController")
@Slf4j
public class LoginController {

    @Autowired
    private RestTemplate restTemplate;

    @Autowired
    private RedisOperator redisOperator;

    private static final String REDIS_USER_CODEKEY = "verifyCode";

    private static final String GETTOKENURL = "http://localhost:9050/oauth/token";


    //User login interface
    @PostMapping("/login")
    public Result login(String username,String password,String codeKey,String codeKeyIndex){

        //Check whether the verification code is correct through redis
        String verifyCode = redisOperator.get(REDIS_USER_CODEKEY + ":" + codeKeyIndex);
        log.info("Verification code received: "+codeKey);
        log.info("verifyCode: "+verifyCode);
        if (!codeKey.equals(verifyCode)){
            return new Result(HttpServletResponse.SC_FORBIDDEN,null,"Incorrect verification code");
        }

        // Build request header
        HttpHeaders headers = new HttpHeaders();
        headers.setContentType(MediaType.APPLICATION_FORM_URLENCODED);
        // Build request body (request parameters)
        MultiValueMap<String,Object> paramsMap=new LinkedMultiValueMap<>();
        paramsMap.add("username", username);
        paramsMap.add("password", password);
        paramsMap.add("grant_type", "password");

        //Use password mode to get access from sso authorization server_ Token and refresh_token, because it is a module of the same project, the password mode can be used
        //Bring the account and password of the client in the request header
        HttpEntity<MultiValueMap<String, Object>> entity = new HttpEntity<>(paramsMap, headers);
        // Set Authorization
        restTemplate.getInterceptors().add(
                new BasicAuthenticationInterceptor("WebClient","123456"));

        ResponseEntity<OAuth2AccessToken> result;

        try {
            //After sending the request, you can see from the TokenEndpoint class that the return value is OAuth2AccessToken
            result = restTemplate.postForEntity(GETTOKENURL, entity, OAuth2AccessToken.class);
        }catch (HttpClientErrorException e){
            return new Result(HttpServletResponse.SC_FORBIDDEN,null,e.getMessage());
        }


        //Processing returned results
        if (result.getStatusCode()!= HttpStatus.OK){
            return new Result(HttpServletResponse.SC_UNAUTHORIZED,null,"Login failed");
        }

        //Here, you can also use vo objects to encapsulate the data return required by the front end. This token can also be obtained here if the token enhancement information has been set previously
        return new Result(HttpServletResponse.SC_OK,result.getBody(),"Login succeeded");
    }


    //The method to obtain the verification code and store the verification code in redis
    @GetMapping("/getVerifyCode")
    public Result getVerifyCode() throws IOException {

        //1. Generate verification code
        String codeKey = VerifyCodeUtils.generateVerifyCode(4);
        log.info("Verification Code:" + codeKey);
        //2. Store the verification code redis
        String codeKeyIndex = UUID.randomUUID().toString();
        //stringRedisTemplate.opsForValue().set(codeKey, code, 60, TimeUnit.SECONDS);
        redisOperator.set(REDIS_USER_CODEKEY+":"+codeKeyIndex,codeKey,500);
        //3.base64 conversion verification code
        ByteArrayOutputStream byteArrayOutputStream = new ByteArrayOutputStream();
        VerifyCodeUtils.outputImage(120, 60, byteArrayOutputStream, codeKey);
        String data = "data:image/png;base64," + Base64Utils.encodeToString(byteArrayOutputStream.toByteArray());
        //4. Response data
        Map<String, String> map = new HashMap<>();
        map.put("data",data);
        map.put("codeKeyIndex",codeKeyIndex);

        return new Result(200,map,"Successfully obtained verification code");
    }


    //Log in again, refresh the use of the token, and also use the client id and password to find a new token. spare
    @GetMapping("/refresh")
    public Result refresh(@RequestParam("refreshToken") String refreshToken){

        //Parse the refresh from the request header_ token
        System.out.println(refreshToken);

        // Build request header
        HttpHeaders headers = new HttpHeaders();
        headers.setContentType(MediaType.APPLICATION_FORM_URLENCODED);

        MultiValueMap<String,Object> paramsMap=new LinkedMultiValueMap<>();
        paramsMap.add("grant_type", "refresh_token");
        paramsMap.add("refresh_token",refreshToken);

        //Bring the account and password of the client in the request header
        HttpEntity<MultiValueMap<String, Object>> entity = new HttpEntity<>(paramsMap, headers);

        //refresh_token gets a new access_token
        restTemplate.getInterceptors().add(new BasicAuthenticationInterceptor("WebClient","123456"));

        OAuth2AccessToken token;
        try{
            token = restTemplate.postForObject(GETTOKENURL,entity,OAuth2AccessToken.class);
        }catch (HttpClientErrorException e){
            return new Result(HttpServletResponse.SC_FORBIDDEN,null,e.getMessage());
        }

        return new Result(200,token,"Login succeeded");
    }

}
For the sake of authenticity, the function of verification code is also added. The login process is to first access getVerifyCode to obtain the verification code and the key of the verification code in redis. You can access it in the browser or postman to obtain the base64 picture of the verification code. The above is the information of the verification code. You can also view it in redis or console.

The second step is to log in using postman and access the login method with the account password and the key of the verification code and verification code. The account passwords are yuki and 123456
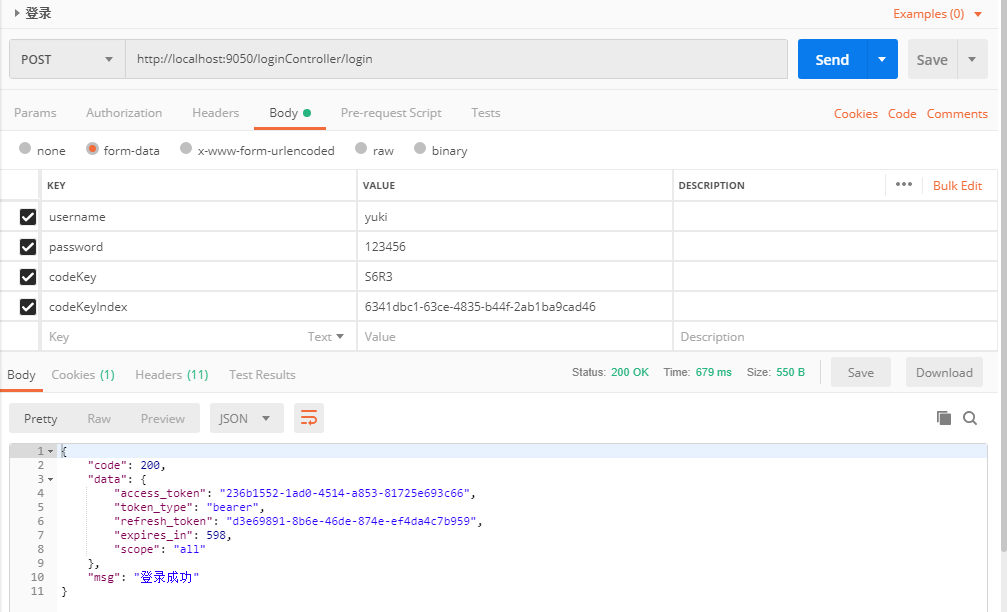
In this way, the login is successful and the most important access token access is obtained_ Token. Its expiration time is 600 seconds. Normally, it can be set a little longer. The refresh token should also be saved to prevent the access token from expiring. If you don't save it, you will log in again next time. With the refresh token, you can realize the function of remembering me.
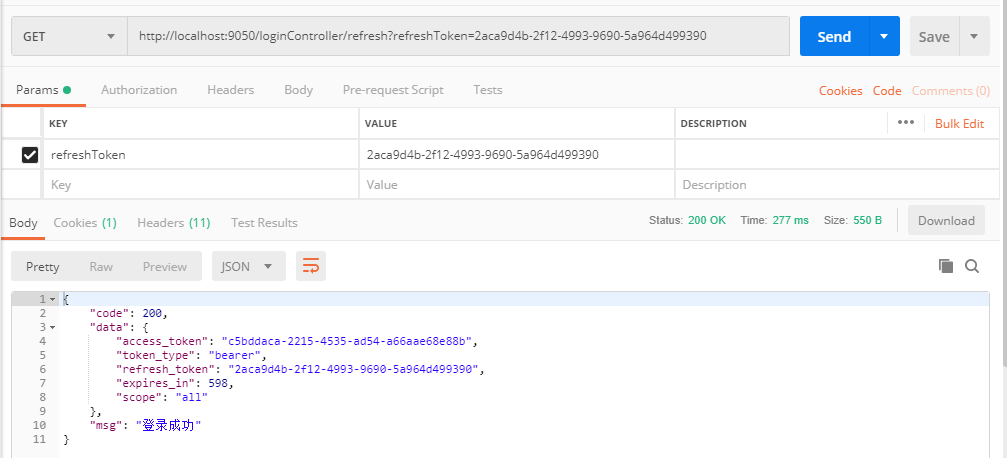
If the access token expires, access the refresh method to obtain the access token again
In this way, the test of LoginController method is completed, and then the user exit function will be realized. The user can exit only after logging in. Therefore, the authentication server can also be regarded as a resource server to verify whether the user logs in. Only after logging in can he exit.
3, The authentication server can also be a resource server
The code here is still written in the authentication server
- Write UserController
UserController is responsible for obtaining user information and user exit. To obtain user information, the user also needs to log in first, otherwise it cannot be obtained, because the redis warehouse has realized the logic of user exit, so it can be called directly. The access resource server needs to put the access token in the request header, because the resource server needs to check whether the user logs in to the authentication server first. If the user has logged in, the user can exit by directly obtaining the token in the request header.
@RestController
@RequestMapping("/user")
public class UserController {


    @Autowired
    private RedisTokenStore redisTokenStore;


    //Get user information interface
    @RequestMapping("getUserInfo")
    public Result getUserInfo(Authentication authentication){

        return new Result(200,authentication,"User information obtained successfully");

    }


    //User exit login interface
    @RequestMapping("/logout")
    public Result logout(@RequestHeader("authorization") String authorization){


        if (!StringUtils.isEmpty(authorization)){

            String access_token = authorization.toLowerCase().replace("bearer ", "");
            //Obtain the token information according to the access token
            OAuth2AccessToken token = redisTokenStore.readAccessToken(access_token);


            if (token!=null){
                //Delete the data in redis according to the token information
                redisTokenStore.removeAccessToken(token);
                OAuth2RefreshToken refreshToken = token.getRefreshToken();
                redisTokenStore.removeRefreshToken(refreshToken);
            }

        }
        return new Result(200,null,"Exit successful");

    }

}
Create a configuration file for the resource server before exiting
- Writing a resource server configuration file
/**
 * Resource services
 */
@Configuration
@EnableResourceServer
public class ResourceServerConfig extends ResourceServerConfigurerAdapter {

    @Override
    public void configure(HttpSecurity http) throws Exception {
        // Configure released resources
        http.authorizeRequests()
                .anyRequest()
                .authenticated()
                .and()
                .requestMatchers()
                //Resource path that can only be accessed after login
                .antMatchers("/user/**");
    }

}
- Test exit
redis initial data

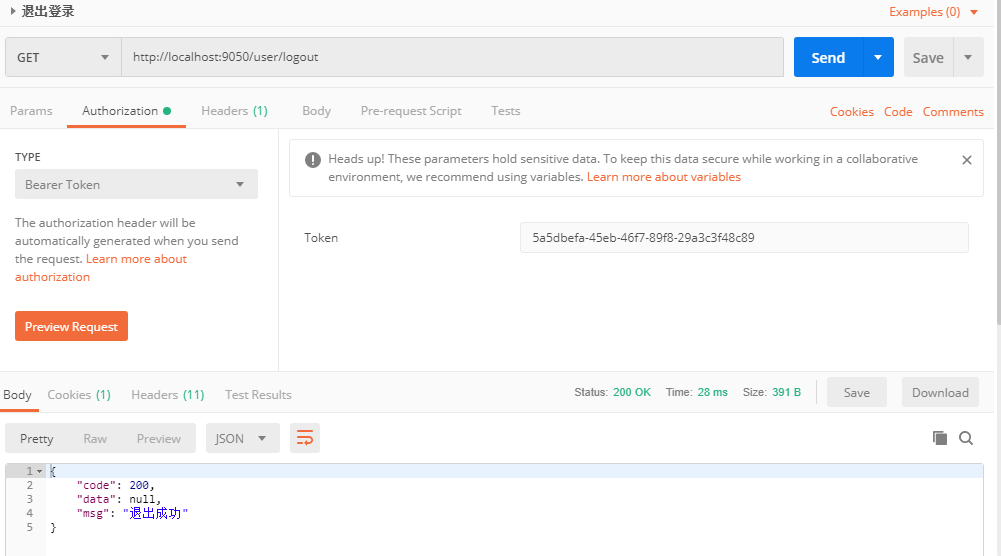
After exiting successfully, you will find that the user's data in redis has been deleted, so the function of the authentication server is completed. Next, you will go to the resource server. Here, you will write two resource servers, namely the resource servers of students and teachers.
4, Write student resource server
When creating two subprojects, namely student client and teacher client, the added code can be the same as the code just added by the authentication server, but two more classes can be added, namely, the exception class of insufficient permissions of AccessDeniedHandler and the handling class of authentication failure of AccessDeniedHandler, which can be added without adding. Take the student resource server as an example below.
Architecture after writing
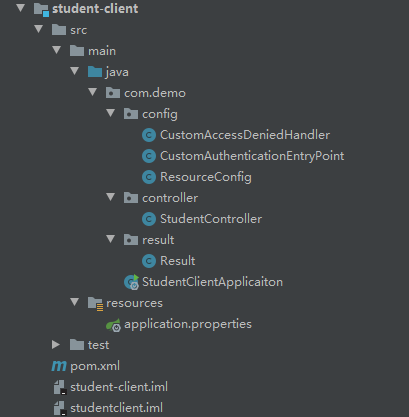
- Exception class of insufficient permission to write AccessDeniedHandler
@Component//Insufficient custom permission exception class
public class CustomAccessDeniedHandler implements AccessDeniedHandler {

    @Resource
    private ObjectMapper objectMapper;

    @Override
    public void handle(HttpServletRequest request, HttpServletResponse response, AccessDeniedException authException) throws IOException, ServletException {
        // Return JSON
        response.setContentType("application/json;charset=utf-8");
        // Status code 403
        response.setStatus(HttpServletResponse.SC_FORBIDDEN);
        // Write
        PrintWriter out = response.getWriter();
        String errorMessage = authException.getMessage();
        if (StringUtils.isBlank(errorMessage)) {
            errorMessage = "Insufficient permissions!";
        }

        Result result = new Result(HttpServletResponse.SC_FORBIDDEN, "Insufficient permissions to access the resource", errorMessage);

        out.write(objectMapper.writeValueAsString(result));
        out.flush();
        out.close();
    }
}
- Write the AccessDeniedHandler authentication failure handling class
/**
 * Authentication failure handling
 */
@Component
public class CustomAuthenticationEntryPoint implements AuthenticationEntryPoint {

    @Resource
    private ObjectMapper objectMapper;

    @Override
    public void commence(HttpServletRequest request, HttpServletResponse response,
                         AuthenticationException authException) throws IOException {
        // Return JSON
        response.setContentType("application/json;charset=utf-8");
        // Status code 401
        response.setStatus(HttpServletResponse.SC_UNAUTHORIZED);
        // Write
        PrintWriter out = response.getWriter();
        String errorMessage = authException.getMessage();
        if (StringUtils.isBlank(errorMessage)) {
            errorMessage = "Login failure!";
        }

        Result result = new Result(HttpServletResponse.SC_UNAUTHORIZED, "token invalid", errorMessage);

        out.write(objectMapper.writeValueAsString(result));
        out.flush();
        out.close();
    }

}
- Writing a resource server configuration file
We didn't need to configure ResourceServerTokenServices for the authentication server just now because the default DefaultTokenServices is used, so we can't use the default here.
@Configuration
@EnableResourceServer // It is identified as a resource server. When requesting resources in the service, it will come with a token. If the token is not found or the token is invalid, the resource cannot be accessed
@EnableGlobalMethodSecurity(prePostEnabled = true) // Enable method level permission control
public class ResourceConfig extends ResourceServerConfigurerAdapter {

    @Autowired
    private CustomAuthenticationEntryPoint myAuthenticationEntryPoint;

    @Autowired
    private CustomAccessDeniedHandler customAccessDeniedHandler;

    @Override
    public void configure(ResourceServerSecurityConfigurer resources) throws Exception {
        //Because redis is used to store tokens, you need to verify the token information in the authorization server
        resources.tokenServices(tokenService())
        //When the user passes in an invalid token, the comment method of myAuthenticationEntryPoint will be triggered for processing
                .authenticationEntryPoint(myAuthenticationEntryPoint)
                //When the user's permission is insufficient, the handle method of customAccessDeniedHandler will handle it
                .accessDeniedHandler(customAccessDeniedHandler);
    }


    @Override
    public void configure(HttpSecurity http) throws Exception {
        http
                .authorizeRequests(request -> {
                    request
                            .antMatchers("/student/**").hasRole("STUDENT")
                            .anyRequest().permitAll(); })
                //Turn off the csrf option
                .csrf().disable()
                //Close the session based on token authentication
                .sessionManagement().sessionCreationPolicy(SessionCreationPolicy.STATELESS);


    }


    /**
       * Configure how the resource server verifies the validity of the token
       * 1. DefaultTokenServices
       *  If the authentication server and the resource server share the same service, you can directly use this default service for authentication
       * 2. RemoteTokenServices ((currently used)
       *  When the authentication server and the resource server are not the same service, use this service to authenticate with the remote authentication server
       */
        @Bean
        public ResourceServerTokenServices tokenService() {
            // The resource server goes to the remote authentication server to verify whether the token is valid
            RemoteTokenServices service = new RemoteTokenServices();
            // Request the authentication server to verify the URL. Note: by default, this endpoint is denied access. It can be accessed after setting authentication
            service.setCheckTokenEndpointUrl("http://localhost:9050/oauth/check_token");
            // The client id configured on the authentication server
            service.setClientId("WebClient");
            // The client password configured on the authentication server
            service.setClientSecret("123456");
            return service;
        }


}
- Write StudentController
@RestController
@RequestMapping("/student")
public class StudentController {

    @RequestMapping("/hello")
    public String auth(){
        return "Hello World!";
    }

    @RequestMapping("/auth")
    public Object auth(Authentication authentication){
        return authentication;
    }

    @RequestMapping("/auth2")
    public Object auth2(Authentication authentication){
        OAuth2Authentication auth2Authentication = (OAuth2Authentication)authentication;
        Authentication userAuthentication = auth2Authentication.getUserAuthentication();
        return userAuthentication;
    }


    @RequestMapping("/auth3")
    public Object auth3(Authentication authentication){
        Object principal = authentication.getPrincipal();
        return principal;
    }

}
- Start the project for testing
First test the method of directly accessing StudentController without token
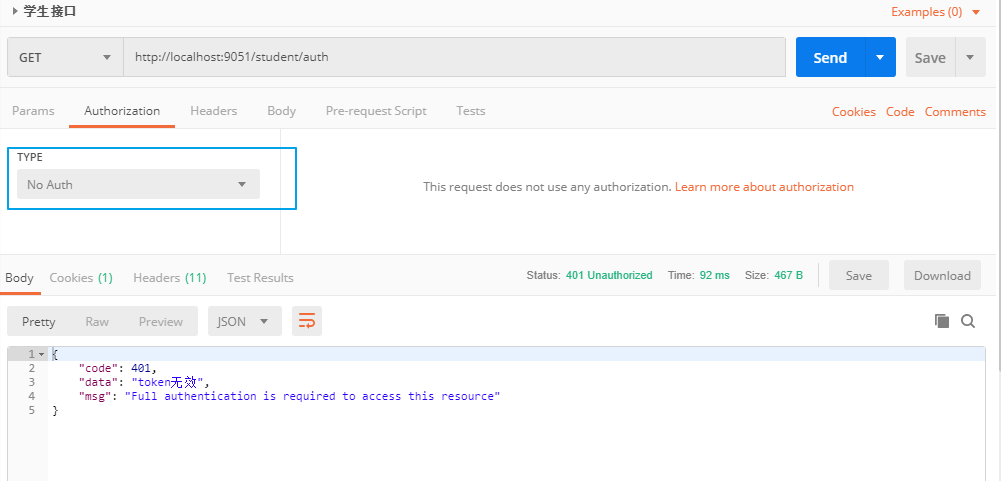
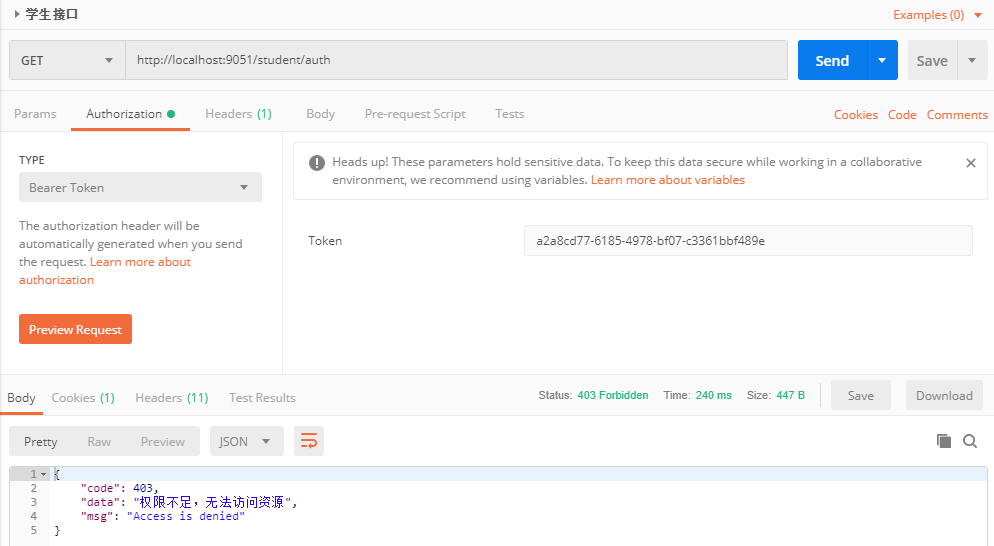
The token is invalid, so is the wrong token. Next, bring the correct token access method, because the yuki user's role is TEACHER, so it cannot access the STUDENT's method
5, Write teacher resource server
The code is the same, but the controller and resource service configuration are slightly different
//Resource service configuration change
http
        .authorizeRequests(request -> {
            request
                    .antMatchers("/teacher/**").hasRole("TEACHER")
                    .anyRequest().permitAll(); })
TeacherController
@RestController
@RequestMapping("/teacher")
public class TeacherController {

    @RequestMapping("/hello")
    public String auth(){
        return "Hello World!";
    }

//    @PreAuthorize("hasAnyRole('TEACHER')")
    @RequestMapping("/auth")
    public Object auth(Authentication authentication){
        return authentication;
    }

}
Because the user's role is TEACHER at this time, you can access the methods in TeacherController and start the project for testing
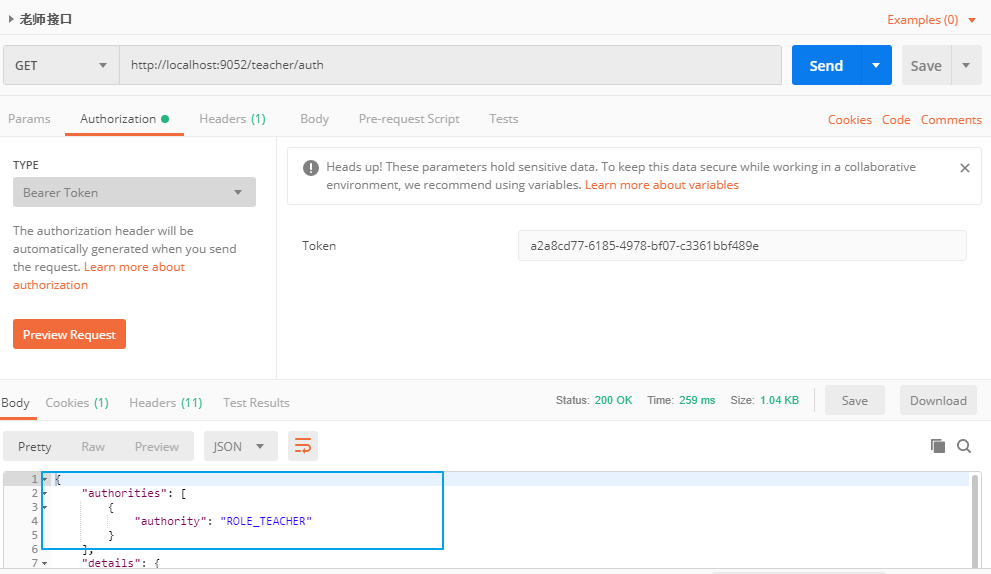
In this way, you only need to log in once to obtain the redis token. Then you can access any resource server by carrying this token all the time, so as to realize the function of single sign on.
summary
This is the single sign on implemented with springsecurity oauth2+redis. As long as you understand the idea of the microservice architecture, it is the same method. I will put the project into Baidu cloud. To start the project, you only need to start the redis service, and then modify the redis configuration in the configuration file of the authentication server. Try it if necessary.
Link: https://pan.baidu.com/s/1od-WjsrL_BTSJvaDhNpuXg
Extraction code: leon