1. Overview
Spring framework is an open source, loosely coupled, layered and configurable one-stop enterprise Java development framework. Its core is IoC (inversion of control) and AOP (aspect oriented programming). In spring, the objects that form the backbone of the application and are managed by the Spring IoC container are called bean s. Beans are objects instantiated, assembled, and otherwise managed by IoC containers.
IoC is an idea. The core is to transfer control. In fact, it means that the work of manually creating beans by programmers is entrusted to Spring, and the IoC container is used to place and manage these beans. Programmers can write the creation of objects and their dependencies in the configuration file, that is, beans and their dependencies are reflected in the configuration metadata used by the container, so as to achieve the effect of loose coupling.
DI is dependency injection, which means that the component accepts resource injection from the container in some predefined ways (such as Setter method). IoC is also called DI.
IoC is also known as dependency injection (DI). — Spring5.1.3.RELEASE document
AOP can encapsulate the logic that has nothing to do with the business but is called by the business, make unified or specific function enhancement for the application business, and realize the decoupling between the application business and the enhanced logic. For example, the functions such as log and transaction are realized through AOP.
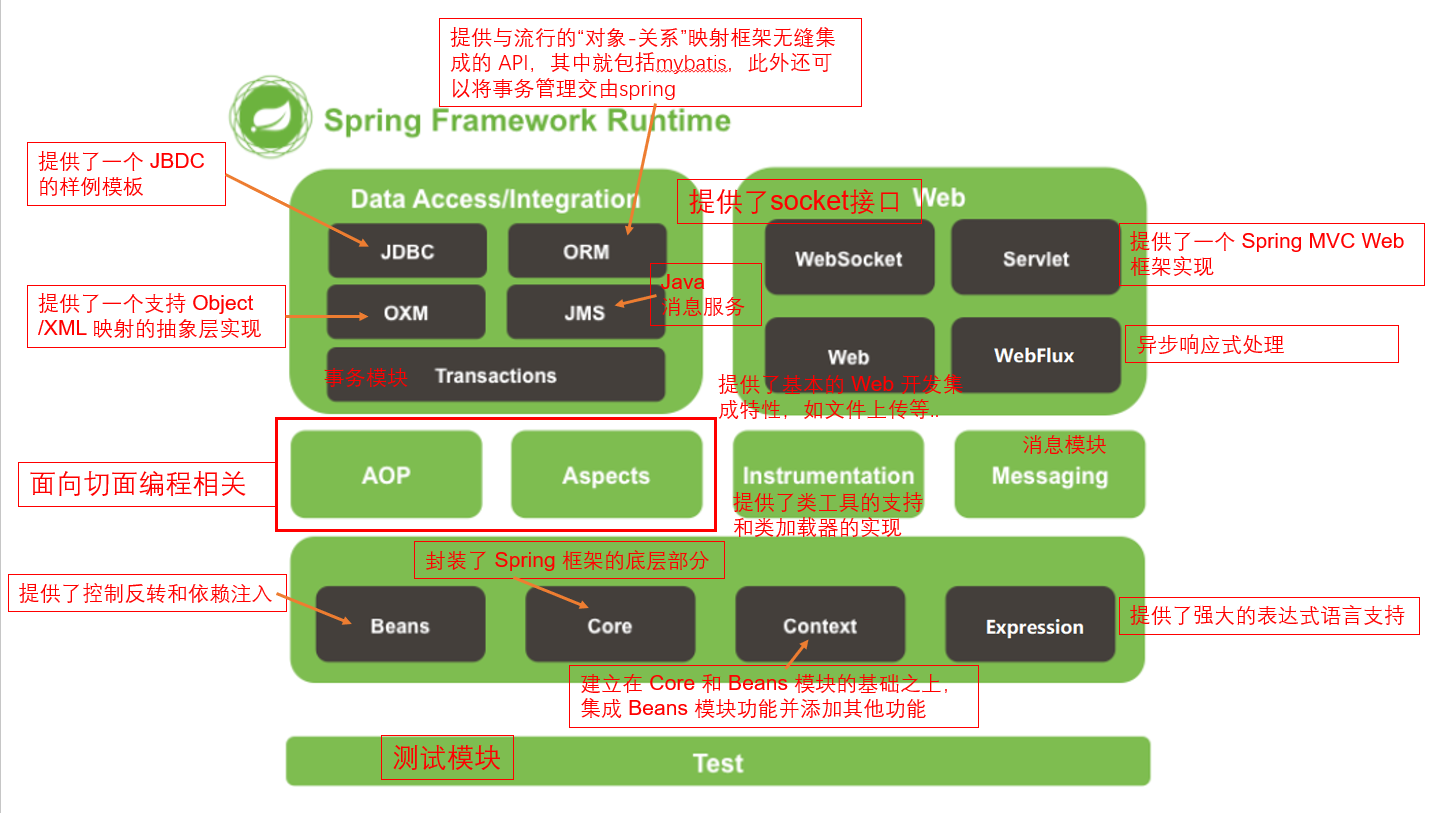
Core modules of Spring framework:
2. Spring quick start
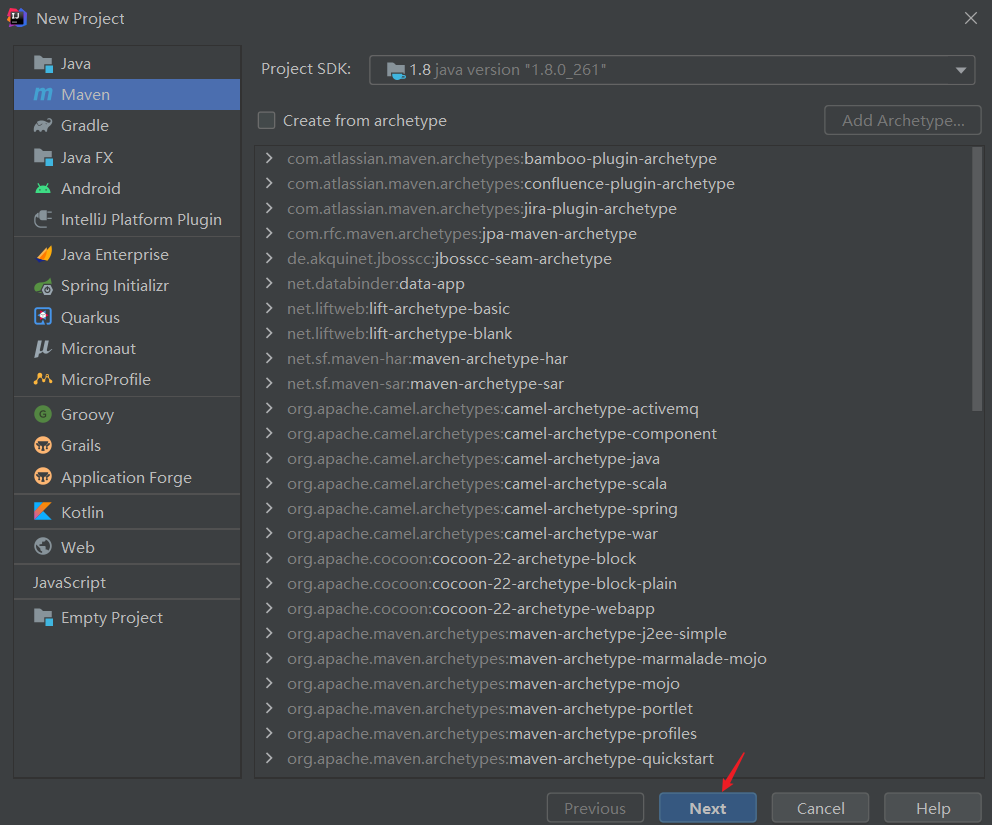
2.1 create project
Environment: jdk1 8,maven 3.6.3,idea2021. one
Create a maven project

2.2 add project dependency information
In project POM Add spring dependency information to XML. For a quick start project, you only need to import the context package. Here, spring 5.1.3.0 is used RELEASE:
<project ...>
...
    <dependencies>
        <dependency>
            <groupId>org.springframework</groupId>
            <artifactId>spring-context</artifactId>
            <version>5.1.3.RELEASE</version>
        </dependency>
    </dependencies>
</project>
Click the load maven changes button in the upper right corner to install dependencies
2.3 creating a profile
Create the spring configuration file under the project src/main/resources
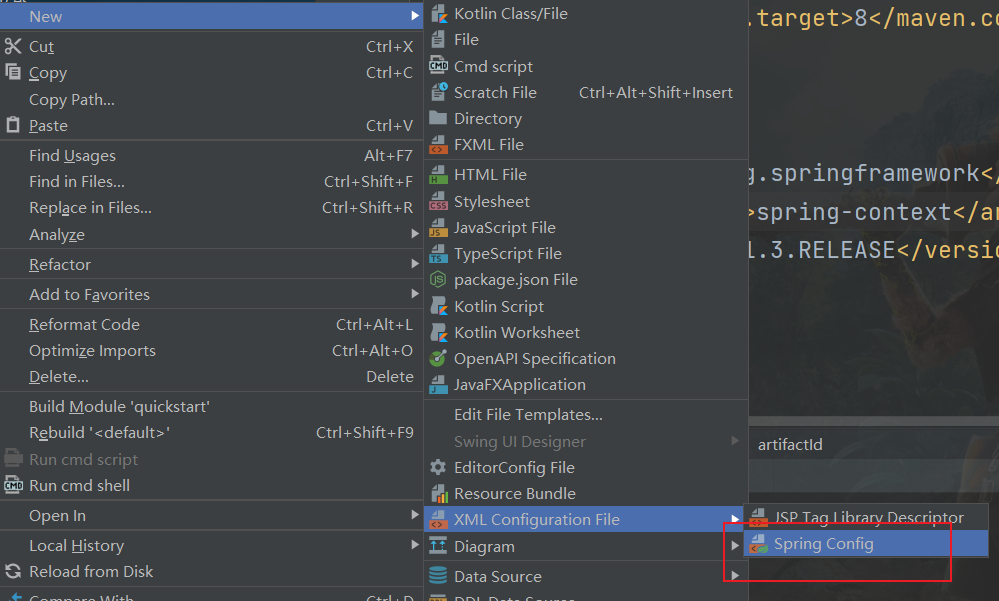
Initialize configuration:
<?xml version="1.0" encoding="UTF-8"?>
<beans xmlns="http://www.springframework.org/schema/beans"
       xmlns:xsi="http://www.w3.org/2001/XMLSchema-instance"
       xsi:schemaLocation="http://www.springframework.org/schema/beans http://www.springframework.org/schema/beans/spring-beans.xsd">

</beans>
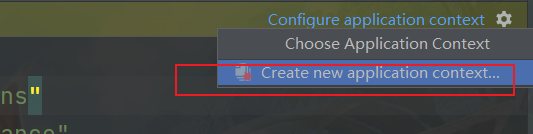
Configure the application context of idea and click ok directly
2.4 creating entity classes
Create an entity class named Person under src/main/java. You can customize the package structure (top.jtszt.bean in mine). You can get started quickly just to feel the effect of control inversion. Therefore, you don't need to define information in the class first
2.5 declaration bean
Add the declaration of the Person class in the Spring configuration file, and use the bean tag declaration in the beans tag body:
<!-- id Represents the bean Unique identification of class Is the full class name of the class to be declared -->
<beans...>
	<bean id="person" class="top.jtszt.bean.Person"></bean>
</beans>
2.6 create startup class
Create a startup class quickstartapplication. Com under the customization package java
public class QuickStartApplication {
    public static void main(String[] args) {
         ApplicationContext ioc =  new ClassPathXmlApplicationContext("ioc.xml");
        Person person = (Person) ioc.getBean("person");
        System.out.println(person);
    }
}
Here, the ClassPathXmlApplicationContext is used to load the configuration file. After loading, the ApplicationContext interface is used to receive it, and then the getBean method is called to pass in the id of the bean to be obtained, obtain the bean and print it
top.jtszt.bean.Person@523884b2
So far, we have completed the quick start of the Spring framework. We can find that we do not manually go to the new object, but declare the object in the configuration file, and then get the object through the factory
3. IoC part
3.1 IoC container
org. springframework. context. The ApplicationContext interface represents the Spring IoC container, which is responsible for instantiating, configuring and assembling beans. Through quick start, you can write the relevant declarations of classes in the configuration file (in addition, you can use annotation driven development, which will be described in detail below), and then load the resources into the IoC container for management through the container. Before reading the bean instance through the IoC container, you need to instantiate the IoC container itself. In web applications, configuration files (based on xml configuration) are usually loaded under classpath through ClassPathXmlApplicationContext to generate an IoC container:
ApplicationContext ioc = new ClassPathXmlApplicationContext("ioc.xml");
In fact, it can also be returned as BeanFactory, which is the basic implementation of IoC container. Its feature is to delay loading all beans; ApplicationContext is a sub interface of BeanFactory. It simplifies the integration with AOP, message mechanism, event mechanism, and extension to the Web environment, while maintaining compatibility with basic features. This method is recommended in the official Spring documentation.
You should use an ApplicationContext unless you have a good reason for not doing so.
In addition, you can also load XML configuration files from the file system or URL through FileSystemXmlApplicationContext; XmlWebApplicationContext and XmlPortletApplicationContext are used for Web and portal applications.
3.2 dependency lookup (based on xml)
Dependency lookup means that the controlled objects in the container find their dependent resources and collaboration objects through the API of the container. To find objects in this way, you need to call the relevant API. IOC used above GetBean ("person") is a dependency lookup.
1) Context based dependency lookup:
① Through the object id acquisition, the id of the object configured in the xml file is passed in, that is, the acquisition method that can be used quickly;
② To find by object type, it should be noted that if multiple beans of the same type are configured in the XML file, an exception will be thrown during acquisition, so beans of the same type must be unique in the container:
Person person = ioc.getBean(Person.class);
③ Find by using the combination of type and id parameters
Person person = ioc.getBean("person", Person.class);
④ Obtain the implementation class / subclass of the incoming interface / abstract class through the getBeansOfType method (assuming MyInterface is an interface)
Map<String, MyInterface> beans = ioc.getBeansOfType(MyInterface.class);
2) Find all bean s of IoC container
If you need to find all beans in the IoC container, you can also use the getBeanDefinitionNames method, which will obtain the IDs of all beans, and then you can find the corresponding beans according to the IDS
String[] beanNames = ioc.getBeanDefinitionNames();
3) Delay lookup
For some special scenarios, you need to rely on some specific beans in the container, but when they do not exist, you need to have a method to deal with the corresponding situation instead of throwing exceptions. Assuming that the Person class is not in the IoC container, if we directly getBean will report NoSuchBeanDefinitionException, what we need is to make it delay finding the bean. What should we do?
In ApplicationContext, there is a method called getBeanProvider, which passes in the class information of the bean and gets an objectprovider < > object. Exceptions will be thrown only when calling the getObject method of the object to try to get the bean object inside.
Further, if the bean doesn't exist, I don't want it to throw exceptions. What should I do?
There is also a method called getIfAvailable in ObjectProvider. When the bean exists, it will get the bean, and if it fails to get the bean, it will return null instead of exception.
3.3 dependency injection (based on xml)
Now we can get objects from the IoC container, but we can find that these objects have no specific attributes, and dependency injection is a process, that is, we don't need to transfer these attributes manually, but hand them to the IoC container for processing, so that the container can inject objects through reflection.
Transform the Person object:
public class Person {
	private String name;
	private Integer age;
	private String phone;
	private Car car;
	private List<Car> CarList;
	private Map<String, Object> testMap;

	public Person(String name, Integer age, String phone) {
		this.name = name;
		this.age = age;
		this.phone = phone;
	}

	public void setTestMap(Map<String, Object> testMap) {
        this.testMap = testMap;
    }
	public void setCar(Car car) {this.car = car;}
	public void setCarList(List<Car> carList) {CarList = carList;}
	public void setnameForPerson(String name) {this.name = name;}
	public void setAge(Integer age) {this.age = age;}
	public void setPhone(String phone) {this.phone = phone;}
    //Override toString method
}
There are two main forms of dependency injection: constructor based dependency injection and Setter based dependency injection.
1) Dependency injection based on Setter;
Configure in the xml file, use the property tag, the name attribute is the corresponding setXx method's Xx, not the attribute defined in the class, and the value is the attribute value:
<bean id="person1" class="top.jtszt.bean.Person">
    <!-- As you can see, it says here nameForPerson be not name -->
	<property name="nameForPerson" value="zhangsan"/>
	<property name="age" value="16"/>
	<property name="phone" value="135000"/>
</bean>
2) Constructor based dependency injection;
In the xml file, the constructor Arg tag is used for assignment. Name is the constructor parameter name and value is the value:
<bean id="person2" class="top.jtszt.bean.Person">
	<!-- Call the parameterized constructor to create an object and assign a value -->
	<constructor-arg name="name" value="lisi"/>
	<constructor-arg name="age" value="18"/>
	<constructor-arg name="phone" value="135111"/>
</bean>
The name attribute of constructor Arg can also be omitted here, but the value must be written in the constructor order
3) Other cases of assigning values to bean properties
① Assign null to the attribute;
<bean id="person3" class="top.jtszt.bean.Person">
	<property name="name">
		<null/>
	</property>
</bean>
② Assign a value to the attribute of the reference type;
Create a Car class:
public class Car {
    private String carName;
    private Integer price;

    public void setCarName(String carName) {this.carName = carName;}
    public void setPrice(Integer price) {this.price = price;}
    //Override toString
}
Method 1: use bean tag assignment
<bean id="person4" class="top.jtszt.bean.Person">
    <property name="car">
		<bean class="top.jtszt.bean.Car">
			<property name="carName" value="benz"/>
			<property name="price" value="8800"/>
		</bean>
	</property>
</bean>
Method 2: reference external bean
<bean id="car1" class="top.jtszt.bean.Car">
	<property name="carName" value="bmw"/>
	<property name="price" value="3380"/>
</bean>
<bean id="person4" class="top.jtszt.bean.Person">
    <property name="car" ref="car1"/>
</bean>
③ Assign a value to the collection type attribute;
1) Assign a value to the List property:
<bean id="person5" class="top.jtszt.bean.Person">
	<property name="carList">
        <!-- there list Label is equivalent to list = new ArrayList<>(); -->
        <list>
        <!-- Method 1: directly write internal bean -->
            <bean class="top.jtszt.bean.Car">
                <property name="carName" value="byd"/>
                <property name="price" value="6600"/>
            </bean>
        <!-- Method 2: reference external bean -->
            <ref bean="car1"/>
        <!-- list Also in value The label can be assigned a single value -->
        </list>
    </property>
</bean>
2) Assign a value to the map attribute:
<bean id="person6" class="top.jtszt.bean.Person">
	<property name="testMap">
		<!-- 1.map Label is equivalent to map = new LinkedHashMap<>(); -->
		<map>
			<!-- Method 1: in value Write value directly in -->
			<entry key="key01" value="zhangsan"/>
			<!-- Mode 2: value Is a reference bean Content of -->
			<entry key="key02" value-ref="car1"/>
			<!-- Mode 3: in entry Write directly inside the label bean As its value -->
			<entry key="key03">
				<bean class="top.jtszt.bean.Car">
					<property name="carName" value="honda"/>
					<property name="price" value="5200"/>
				</bean>
			</entry>
		</map>
	</property>
</bean>
3.4 annotation driven development
From spring framework 3 After 0, a large number of annotations were introduced, and the annotation driven method can be used to replace the original xml configuration, which is also a common configuration method later.
1) Configuration class
Annotation driven requires Configuration classes. A Configuration class can be understood as an xml. As long as a @ Configuration is marked on the class, this class is the Configuration class. In xml, we use Bean tags to declare beans. In annotation driven, we only need to mark @ Bean on the method to represent the declaration of beans.
@Configuration
public class ConfClass {
    //The default method name is the id of the bean. If @ Bean("xx") is used, it means that xx is the id of the bean
    //The return value type is the type of bean
    @Bean
    public Person person(){
        return new Person();
    }
}
This is equivalent to creating an xml file and registering the person class with id person in the IoC container.
2) Dependency lookup
After configuring the class, the dependent lookup needs to use the AnnotationConfigApplicationContext to initialize the loading container.
ApplicationContext context = new AnnotationConfigApplicationContext(ConfClass.class);
Person person = (Person)context.getBean("person");
System.out.println(person);
3) Dependency injection
Method 1: injection based on Setter method
You only need to use the set method in the method to assign the attribute and return the object after assigning the attribute.
@Bean
public Person person(){
    Person person = new Person();
    person.setName("zs");
    person.setAge(11);
    return person;
}
Method 2: constructor based injection
@Bean
public Person person(){
    return new Person("zs",11,"135111");
}
4) Component registration
When we need to register more and more beans, it is unrealistic to write many methods and annotate many Bean annotations. Therefore, Spring also provides some schema annotations, which can realize the rapid registration of components. The most basic is the @ Component annotation, which means that the annotated class will be registered in the IoC container as a Bean, that is, we can mark the annotation directly on the Person entity class, so we don't need to write Bean annotation manually for registration.
@Component
public class Person {
    private String name;
    ....
}
After this configuration, the Person class is registered in the IoC container by default. The id is a small hump of the class name. If you want to specify the id, you can use @ Component("xx") declaration.
5) Component scan
After declaring a component, you need to scan the component to make the IoC container aware of the existence of the component. We can directly configure one more @ ComponentScan("xx") annotation on the configuration class. xx is the package path and specifies the package and its sub packages to be scanned.
@Configuration
@ComponentScan("top.jtszt.bean")
public class ConfClass { }
You can also pass in the package path when creating the AnnotationConfigApplicationContext object, which can also be used for component scanning.
ApplicationContext context = new AnnotationConfigApplicationContext("top.jtszt.bean");
In addition to annotation driven component scanning, component scanning can also be performed based on xml configuration
<beans>
	<context:component-scan base-package="top.jtszt.bean"/>
</beans>
6) Several annotations for declaring bean s
@Component: a general annotation that can label any class as a Spring component.
@Repository: the corresponding persistence layer, namely Dao layer, is mainly used for database related operations.
@Service: corresponding to the service layer, which mainly involves some complex logic, and the Dao layer is required.
@Controller: corresponding to the Spring MVC control layer, the main user accepts the user request and calls the Service layer to return data.
7) Annotation and xml linkage
Open the annotation configuration in xml and declare the configuration class
<beans>
	<context:annotation-config/>
    <bean class="top.jtszt.annotation.ConfClass"/>
</beans>
Use the annotation @ ImportResource on the configuration class to import the xml file
@Configuration
@ImportResource("classpath:applicationcontext.xml")
public class ConfClass { }
3.5 other postures of dependency injection (based on annotation)
1) Annotated attribute injection
When property injection is performed on the scanned Component of @ Component, the @ Value("xx") annotation can be used to inject information on the corresponding property, and the entity class can be without Setter method.
@Component
public class Person {
    @Value("zs")
    private String name;
    @Value("12")
    private Integer age;
    @Value("132111")
    private String phone;
    //Override toString
}
2) Inject profile from external
It is also allowed to inject properties after reading information from an external configuration file in Spring. First, you need to annotate the class with @ PropertySource("xx"), where xx represents the location of the configuration file. Then use @ Value("${yy}") annotation on the attribute for injection, where yy represents the key corresponding to the value in the configuration file.
① Create a configuration file under the classpath my properties
person.name=ls
person.age=16
person.phone=135123
② Mark @ PropertySource("classpath:my.properties") on the entity class
③ Mark @ Value on the corresponding attribute to get the Value
@Component
@PropertySource("classpath:my.properties")
public class Person {
    @Value("${person.name}")
    private String name;
    @Value("${person.age}")
    private Integer age;
    @Value("${person.phone}")
    private String phone;
    //Override toString
}
3) SpEL implementation injection
Spiel, the Spring expression language, is derived from Spring 3 0 began to be supported. Spiel supports calling attribute values, attribute parameters, method calls, array storage, logical calculation and other functions. The syntax of spiel is uniformly expressed by #{xx}, and xx is an expression.
The most common is to use spiel to refer to bean properties or call methods.
Example: now there are two entity classes Bird and Dog. We can use spiel to inject the age attribute of Bird into the age attribute of Dog.
@Component
public class Bird {
    @Value("16")
    private String age;
    ...
}
@Component
public class Dog {
    @Value("#{bird.age}")
    private String age;
    ...
}
3.6 automatic injection
1)@Autowired
The @ Autowired annotation is directly marked on the attribute or Setter method in the bean. The IoC container will find the bean of the corresponding type from the container and assign it to the corresponding attribute according to the type corresponding to the attribute, so as to realize automatic injection.
If the corresponding type of bean cannot be found in the container, a NoSuchBeanDefinitionException exception will be thrown. You can also add required = false to the annotation, and null will be injected when the bean cannot be found.
Suppose there is a car class, and now the Person class has an attribute called car, which needs to be automatically injected:
@Component
public class Person {
    private String name;
    @Autowired
    private Car car;
    //Override toString
}
★ principle of Autowired injection:
First, you will get the type of the attribute and find it in the IoC container. If you find one, you will return; Throw an exception if it cannot be found (bean cannot be found); If more than one is found, it will find the corresponding id in the container according to the attribute id. if so, it will return and throw an exception if not (this type of bean is not unique).
2)@Qualifier
If there are multiple beans of the same type in the container (and the id does not match), the injection will fail. At this point, you can use the @ Qualifier annotation to explicitly specify which bean to inject.
@Autowired
@Qualifier("bmw")
private Car car;
3)@Primary
In addition to using @ Qualifier, @ Primary can also be marked on the injected Bean, and the default injected Bean can be specified.
@Configuration
@ComponentScan("top.jtszt.bean")
public class ConfClass {
    @Bean
    @Primary
    public Car bmw(){
        return new Car();
    }
}
4)@Resource
@The difference between @ WiFi and @ WiFi is that @ WiFi is injected directly from @ WiFi @ Resource according to the specification.
@Resource(name="benz")
private Car carCar;
5)@Inject
@Inject is from JSR330 specification. It needs to import javax. Exe before use Inject dependency. It is equivalent to @ Autowired in use, but because it is the specification of JSR, it is not limited by the Spring framework.
3.7 similarities and differences between di and DL
- Different action objectives
- The target of dependency injection is usually class members
- The target of dependent search can be in vivo or in vitro
- Different implementation methods
- Dependency injection is usually received passively by means of a context
- Dependency lookup usually uses context search actively
3.8 bean advanced
1) Scope of the bean
**singleton: * * a single instance bean has been created before the container is created, and there is only a single object in the container;
**prototype: * * multi instance beans can only be created when calling related methods to obtain beans, and one bean is created at a time;
Request: each HTTP request will generate a new bean, which is only valid in the current HTTP request;
Session: each HTTP request will generate a new bean, which is only valid in the current HTTP session;
Global session: the global session scope is meaningful only in portlet based web applications. Spring 5 has no more. Portlets are small Java Web plug-ins that can generate fragments of semantic code (such as HTML). They are based on portlet containers and can handle HTTP requests like servlets. However, unlike servlets, each portlet has a different session.
In the bean configuration, single instance / multi instance can be specified through the scope attribute.
<!--bean The scope of is single instance by default( singleton) -->
<bean id="car1" class="top.jtszt.bean.Car" scope="prototype"/>
2) Type of bean
① Ordinary bean
Beans like those created earlier are ordinary bean s
@Component
public class Person { ... }
② Factory bean
The so-called factory Bean is to use factory methods to create beans with the help of factorybeans when the creation of Bean objects is too complex or there are some special strategies. FactoryBean interface is a factory for creating objects. If a Bean implements the FactoryBean interface, it will no longer be an ordinary Bean and will not work in the actual business logic, but by the created objects.
The FactoryBean interface has three methods:
public interface FactoryBean<T> {
    // Returns the created object
    @Nullable
    T getObject() throws Exception;

    // Returns the type of the created object (that is, the generic type)
    @Nullable
    Class<?> getObjectType();

    // Whether the created object is a single instance Bean or a prototype Bean, the default is a single instance Bean
    default boolean isSingleton() {
        return true;
    }
}
★ several notes about FactoryBean:
- The bean s it creates are placed directly in the IoC container
- Its loading is accompanied by the initialization time of the IoC container, that is, it is created before the container is generated
- It produces beans by delaying production, which is created only when the method is called to get the bean
- The bean s produced by using it are single instance by default
★ difference between BeanFactory and FactoryBean:
BeanFactory: from the perspective of class inheritance structure, it is the top-level container implementation of Spring; From the perspective of class composition structure, it is the deepest container, and ApplicationContext combines BeanFactory at the bottom.
FactoryBean: a factory bean that creates objects. You can use it to directly create some objects with complex initialization processes.
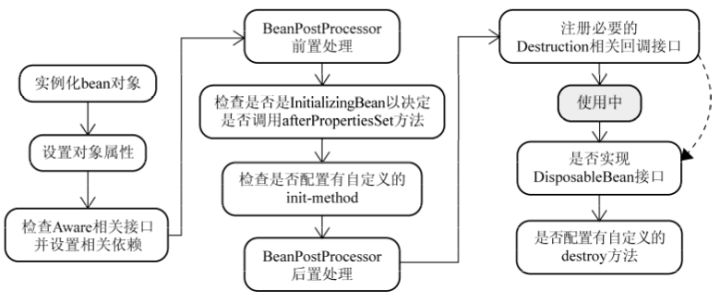
3) The lifecycle of a bean
-
The Bean container finds the definition of Spring Bean in the configuration file.
-
The Bean container uses the Java Reflection API to create an instance of a Bean.
-
If some attribute values are involved, use the set() method to set some attribute values.
-
If the Bean implements the BeanNameAware interface, call the setBeanName() method to pass in the name of the Bean.
-
If the Bean implements the BeanClassLoaderAware interface, call the setBeanClassLoader() method and pass in an instance of the ClassLoader object.
-
Similar to the above, if other * Aware interface, call the corresponding method.
-
If there is a BeanPostProcessor object related to the Spring container that loads the Bean, execute the postProcessBeforeInitialization() method
-
If the Bean implements the InitializingBean interface, execute the afterpropertieset () method.
-
If the definition of the Bean in the configuration file contains the init method attribute, execute the specified method.
-
If there is a BeanPostProcessor object related to the Spring container that loads the Bean, execute the postProcessAfterInitialization() method
-
When you want to destroy a Bean, if the Bean implements the DisposableBean interface, execute the destroy() method.
-
When you want to destroy a Bean, if the definition of the Bean in the configuration file contains the destroy method attribute, execute the specified method. quote
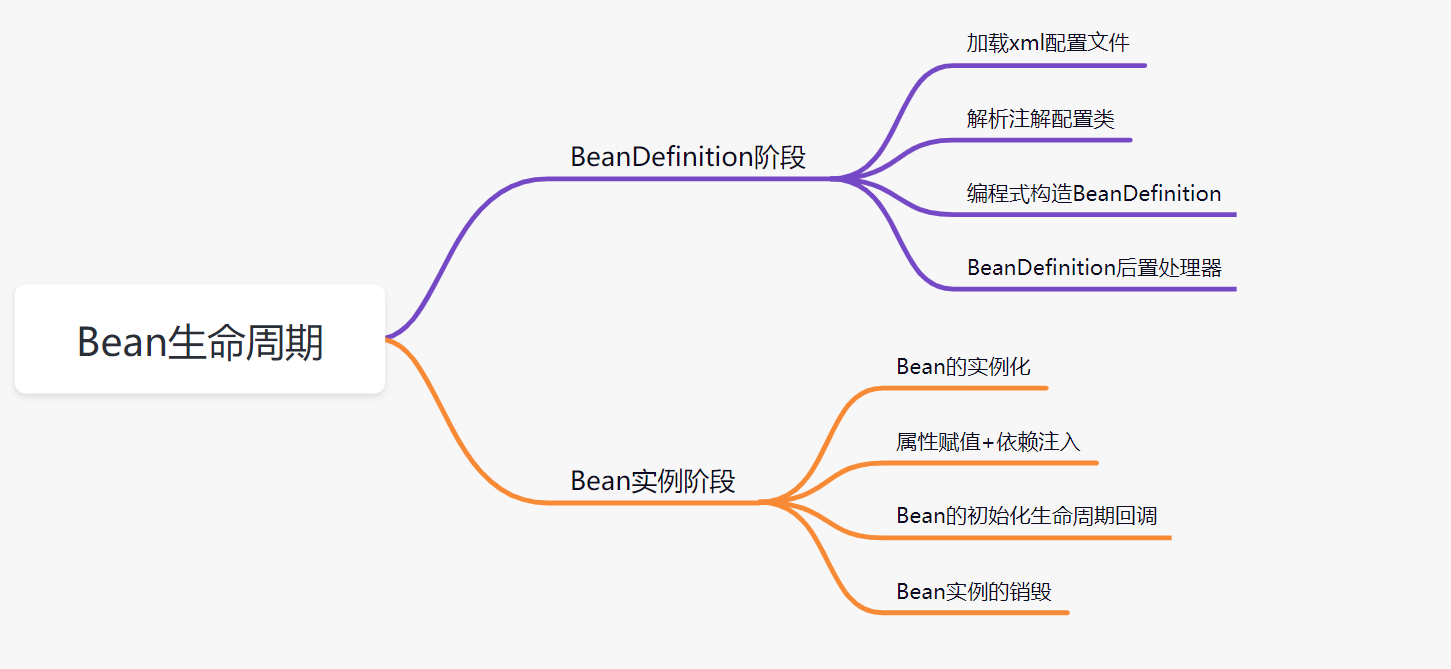
4) Instantiation method of bean
① The bean is instantiated directly after it is registered through the < bean > tag or @ bean, @ Component annotation
② Instantiate beans with factorybeans
③ Instantiate the bean using the static factory method factory method
④ Instantiate the bean using the factory method factory bean + factory method
5) Thread safety of single instance bean s
By default, the thread of a single instance bean is unsafe (as long as the member attributes may change). That is, if an object / basic type variable / static variable with data storage function is defined on the global level of a single instance bean, there will be a thread unsafe problem.
resolvent:
- By declaring the Scope = "prototype" of the bean, the bean is turned into a multi instance
- Defined using the local variable ThreadLocal
4. AOP part
4.1 AOP overview
In OOP development, some repeated operations can be separated into modules, which can reduce the amount of code, but it still can not fundamentally solve the redundancy of code. In this case, we can separate these repeated operations into sections and combine them into the original objects through dynamic agents at runtime, which is AOP, which is a supplement to OOP.
AOP is aspect oriented programming. In fact, it is to enhance some methods on demand. Some business methods unrelated to business logic (such as log printing, permission verification, data cache, etc.) are taken away as enhancers, and then enhanced by dynamic agents. From this, we can also realize that AOP can also realize decoupling, And AOP can realize component-based and pluggable function expansion.
The design principle of AOP is to enhance the crosscutting of the original business logic, and the bottom layer is the runtime dynamic agent mechanism.
Unlike OOP, which focuses on objects, the core of AOP is aspect.
4.2 terminology
① Target object: refers to the proxy object, that is, the object to be enhanced;
② Connection point: in Spring, connection point refers to all methods in the target object;
③ Pointcut: refers to the connection points that enhance the target object. There may be many connection points in the target object, but not all of them need to be enhanced. Therefore, the pointcut must be a connection point, but the connection point is not necessarily a pointcut;
④ Notification: Codes used to enhance objects (such as log printing, recording, etc.);
⑤ Proxy object: refers to the combination of target object and notification
⑥ Aspect: refers to the combination of pointcuts and notifications
4.3 notification type
**Pre notification Before: * * triggered Before the target method (pointcut method) is called;
**Post notification After: * * triggered After the target method (pointcut method) is called;
**Return notification afterreturning: * * triggered after the target method (pointcut method) returns successfully;
**Exception notification AfterThrowing: * * triggered after an exception occurs / is thrown by the target method (pointcut method);
**Surround notice: * * it can directly get the target object and the method to be executed, so it can cut in at any position of program execution.
try{
	//Before advice
    Object res = pjp.proceed();
    //Return notification
}catch(e){
    //Exception notification
}finally{
    //Post notification
}
4.4 pointcut expression
The AOP configuration in Spring is to find specific methods to cut in (enhance) according to the pointcut expression. Therefore, before implementing AOP, we need to understand various writing methods of pointcut expression.
1) Syntax of pointcut expression:
Execution (access qualifier method return value type method full class name (parameter list type) [throws] exception full class name)
2) Wildcard
If the package name is... It means all subordinate packages (recursion); if the parameter is... It means no parameter restriction; if the package name / method name is * it means all packages / methods, and the | & & operator is supported in the expression
For example:
①execution(public int top.jtszt.impl.MyCalculator.*(int,int))
②execution(int top.jtszt..*.*(..))
① Indicates that the entry is top jtszt. impl. All public methods with return values of int and two int parameters under the mycalculator class
② Indicates that the entry is top Jtszt all public methods with return value of int type under all classes in all subordinate sub packages
4.5 AOP implementation (based on xml)
Background: the target object is top jtszt. impl. Mycalculator, which is for top jtszt. inter. The implementation of calculator interface, including four connection points: add, sub, div and multi, and the aspect class is top jtszt. utils. Logutils, including five notification methods: logStart, logReturn, logException, logEnd and logAround. Now you need to use the aspect class to cut in the target object.
First, you need to import the dependencies required by AOP in maven, including spring AOP (dependent by spring context), aopalliance, aspectjweaver and cglib. Then declare the AOP configuration in the spring configuration file, where you need to import the AOP namespace.
① Inject IoC into facet classes: configure bean s for facet classes;
② Configure pointcut expression: next, configure aop to use the < aop: config > tag. In order to achieve the effect of reusing pointcut expressions, we can first use the < aop: pointcut > tag to declare pointcuts. Its expression attribute is the pointcut expression. Next, we can reuse this expression according to its id; (Note: the cut in class must be injected into the IoC container)
③ Define facet class: use the < AOP: aspect > tag to define. The ref attribute points to the facet class bean, and then define various notification methods in the tag body;
④ Define notification method: there are five tags that can define notification methods. In the tag body, the method attribute is the notification method name, and the pointcut ref attribute points to the pointcut expression defined above< AOP: before > represents advance notice< AOP: after returning > represents a return notification. You can use the returning attribute to define the variable name to receive the return value, which is passed in as a parameter in the cut in method< AOP: after throwing > represents exception notification. You can use the throwing attribute to define the variable name to receive exception information, which is passed in as a parameter in the cut in method< AOP: after > represents post notification< AOP: around > stands for surround notification.
<beans>
	<!-- First, you need to configure the facet class bean -->
     <bean id="logUtils2" class="top.jtszt.utils.LogUtils"/>
     <!-- In configuration file AOP -->
     <aop:config>
         <!-- Define pointcut expressions -->
         <aop:pointcut id="myPoint" expression="execution(public * top.jtszt.impl.MyCalculator.*(int,int))"/>
         <!-- Define a facet class -->
         <aop:aspect ref="logUtils2">
             <!--Define pre notification method-->
             <aop:before method="logStart" pointcut-ref="myPoint"/>
             <!--Define return notification method-->
             <aop:after-returning method="logReturn" pointcut-ref="myPoint" returning="result"/>
             <!--Define exception notification methods-->
             <aop:after-throwing method="logException" pointcut-ref="myPoint" throwing="exception"/>
             <!--Define post notification method-->
             <aop:after method="logEnd" pointcut-ref="myPoint"/>
             <!--Define surround notification method-->
             <aop:around method="logAround" pointcut-ref="myPoint" />
         </aop:aspect>
     </aop:config>
</beans>
4.6 AOP implementation (annotation based)
1) Inject IoC into facet classes: annotate facet classes with @ Component and @ Aspect annotations
2) Configure Pointcut expression: define an empty method in the facet class, and declare the Pointcut expression with @ Pointcut annotation, so as to reuse the expression below;
@Pointcut("execution(public int top.jtszt.impl.MyCalculator.*(int,int))")
public void pointcutExpression(){}
3) Define notification method:
① @ Before(): indicates that it is cut in before the method starts;
② @ AfterReturning(): indicates that the method is cut in after normal return, and then the parameter name receiving the return value can be declared;
③ @ AfterThrowing(): indicates that the method is cut in after throwing an exception, and then the parameter name of receiving the exception can be declared;
④ @ After(): indicates that the method is cut in at the end of the method (such as finally in try... catch);
⑤ @ Around(): indicates that this is a surround notification method. The surround method will be executed before the other four notification methods. The return value of this method represents the return value of the actual method.
@Before("pointcutExpression()")
public static void logStart(){}

@AfterReturning(value="pointcutExpression()",returning = "result")
public static void logReturn(Object result){}

@AfterThrowing(value="pointcutExpression()",throwing = "exception")
public static void logException(Exception exception){}

@After("pointcutExpression()")
public static void logEnd(){}
4) Open annotation AOP
If you use xml + annotation, you can configure < aop: AspectJ AutoProxy / > in xml to enable annotation aop.
If pure annotation is used, the @ EnableAspectJAutoProxy annotation can be added to the configuration class to enable annotation aop.
4.7 notification method parameters
Like using the native dynamic proxy, if you need to obtain the parameters and method names of the cut in method in the notification method, you need to pass in the JoinPoint type parameters. There are several common methods:
- Object JoinPoint.getTarget(): get the target object without proxy
- Object JoinPoint.getThis(): get proxy object
- Object[] JoinPoint.getArgs(): get the parameter list of the cut in method
- Signature JoinPoint.getSignature(): get method signature
- String Signature.getName(): get method name
- Method (MethodSignature)Signature.getMethod(): get method information
It should be noted that since the return value of the surround notification method represents the return value of the actual method, it is necessary to pass in a ProceedingJoinPoint type parameter. By calling the proceed() method, the return value of the actual method can be obtained. This statement is also equivalent to calling the invoke() method in the dynamic proxy.
4.8 execution sequence of multiple sections
If multiple facet classes cut into the same method, follow the rule from outside to inside (execute in the hexadecimal order of unicode encoding of the facet class name).
For example, the outer section class A is AspectOne, and the inner section class B is AspectTwo.
The execution sequence is: A pre notification method → B pre notification method → actual method → B return / exception notification method → B post notification method → A return / exception notification method → A post notification method
If you want to change the execution Order of the aspect, you can set the priority of the aspect class through the @ Order annotation and pass in an int type parameter. The smaller the value, the higher the priority value, and the default is the lowest priority.
In addition, the execution order of the notification methods of the same type in the same aspect is also in accordance with the unicode encoding order.
4.9 transaction control with AOP
Background information: bookstores carry out book sales activities, and members have balance information in the system. After users buy books, the system needs to reduce the library inventory and the user balance, which is a whole (a transaction). Now you need to use AOP for transaction control to ensure the consistency of the two operations.
Process: let Spring manage the database connection pool and JDBC template, DAO use the automatically assembled JDBC template to operate the database, and Service makes specific settlement methods; Then let Spring use AOP to control the transaction of this checkout method.
1) Environmental preparation
① Add maven dependencies, including MySQL connector Java, spring TX, c3p0, spring JDBC, ioc and aop related dependencies;
② Preparing database tables
User information table:
CREATE TABLE t_account(
	username VARCHAR(50) PRIMARY KEY,
	balance INT
)
Book information sheet:
CREATE TABLE t_book(
	isbn VARCHAR(50) PRIMARY KEY,
	book_name VARCHAR(50),
	price INT
)
Book inventory table:
CREATE TABLE t_book_stock(
	isbn VARCHAR(50),
	stock INT,
	CONSTRAINT fk_isbn FOREIGN KEY(isbn) REFERENCES t_book(isbn)
)
Operation database:
@Repository
public class BookDAO {
    @Autowired
    JdbcTemplate jdbcTemplate;

    //Method of reducing balance
    public void updateBalance(String userName, int price){
        String sql = "UPDATE t_account SET balance=balance-? WHERE username=?";
        jdbcTemplate.update(sql,price,userName);
    }

    // Method of obtaining book price
    public int getPrice(String isbn){
        String sql = "SELECT price FROM t_book WHERE isbn=?";
        return jdbcTemplate.queryForObject(sql, Integer.class, isbn);
    }

    // Method of reducing inventory
    public void updateStock(String isbn){
        String sql = "UPDATE t_book_stock SET stock=stock-1 WHERE isbn=?";
        jdbcTemplate.update(sql,isbn);
    }
}
Service method (for convenience of not writing interface):
@Service
public class BookService {

    @Autowired
    private BookDAO bookDAO;

    public void checkout(String username,String isbn){
        //Inventory reduction
        bookDAO.updateStock(isbn);
        //Less balance
        bookDAO.updateBalance(username, bookDAO.getPrice(isbn));
    }
}
There are package scanning and other operations in xml, which will not be posted here.
2) Configure declarative transactions (xml based)
The above Service method does not do transaction management. Once an exception occurs after the inventory reduction method is executed, the inventory will be successfully subtracted by 1, but the user balance is not deducted, which is obviously not feasible. Then we will manage the transaction. First, we will configure it based on xml, which depends on tx and aop namespaces.
First, you need to configure the data source, and since the JDBC template auto assembly is used above, you need to configure it here.
<beans>
    <!-- Configuration is written in db.properties in -->
	<context:property-placeholder location="db.properties"/>
    <!-- c3p0 Connection pool -->
    <bean id="ds" class="com.mchange.v2.c3p0.ComboPooledDataSource">
        <property name="user" value="${jdbc.user}"/>
        <property name="password" value="${jdbc.password}"/>
        <property name="jdbcUrl" value="${jdbc.jdbcUrl}"/>
        <property name="driverClass" value="${jdbc.driverClass}"/>
        <property name="maxPoolSize" value="${jdbc.maxPoolSize}"/>
        <property name="minPoolSize" value="${jdbc.minPoolSize}"/>
    </bean>
	<!-- to configure jdbcTemplate -->
    <bean id="jdbcTemplate" class="org.springframework.jdbc.core.JdbcTemplate">
        <property name="dataSource" ref="ds"/>
    </bean>
</beans>
Next, configure the transaction manager provided by Spring. When JDBC/MyBatis is used for persistence, you can use the data source transaction manager as the transaction manager.
<bean id="tm" class="org.springframework.jdbc.datasource.DataSourceTransactionManager">
	<property name="dataSource" ref="ds"/>
</bean>
Next, you need to tell Spring which methods are transaction methods. The advice tag under the tx namespace is used. The transaction manager points to the transaction manager. The attributes under the tag have only one tag method, and the name attribute is used to match the transaction methods (wildcards can be used). In addition, there are other attributes:
-
Timeout set timeout to automatically terminate the transaction and roll back;
-
Read only sets the transaction to read-only;
-
No rollback for specifies which exceptions are not rolled back. Pass in the full class name of the exception, which is empty by default;
-
Rollback for when the method triggers an exception, roll back and pass in the full class name of the exception; The default is to catch all runtime exceptions and errors;
-
Isolation modifies the isolation level of a transaction;
-
Propagation specifies the propagation behavior of the transaction;
These properties can also be configured in the @ Transactional annotation.
<tx:advice id="myAdvice" transaction-manager="tm">
    <!-- Indicates which methods are transaction methods-->
	<tx:attributes>
		<tx:method name="*"/>
		<tx:method name="checkout" timeout="-1" read-only="false"/>
		<tx:method name="get*" read-only="true"/>
	</tx:attributes>
</tx:advice>
The above only declares the transaction method, but in fact, you need to set the entry point to carry out transaction management. Only after successful entry can there be subsequent transaction management. That is, the transaction method must be the entry point, but the entry point is not necessarily the transaction method.
<aop:config>
	<aop:pointcut id="txPoint" expression="execution(* top.jtszt.*.*.*(..))"/>
    <!-- advice-ref: Configuration pointing to the transaction manager -->
	<aop:advisor advice-ref="myAdvice" pointcut-ref="txPoint"/>
</aop:config>
3) Configure declarative transactions (annotation based)
First, you need to add @ EnableTransactionManagement to the configuration class to start the transaction manager, or you can start the annotation based declarative transaction in the xml file.
@Configuration
@EnableTransactionManagement
@ComponentScan("top.jtszt")
public class ConfClass {}
<tx:annotation-driven transaction-manager="tm"/>
Then configure the data source and transaction manager in the configuration class
@Configuration
@EnableTransactionManagement
@ComponentScan("top.jtszt")
public class ConfClass {
    //read configuration file
    @Bean
    public Properties properties() throws IOException {
        Properties properties = new Properties();
        properties.load(new FileReader("db.properties"));
        return properties;
    }
	//Configure data sources
    @Bean
    public ComboPooledDataSource dataSource(Properties properties) throws PropertyVetoException {
        ComboPooledDataSource ds = new ComboPooledDataSource();
        ds.setUser(properties.getProperty("jdbc.user"));
        ds.setPassword(properties.getProperty("jdbc.password"));
        ds.setJdbcUrl(properties.getProperty("jdbc.jdbcUrl"));
        ds.setDriverClass(properties.getProperty("jdbc.driverClass"));
        return ds;
    }
	//Configure JDBC template
    @Bean
    public JdbcTemplate jdbcTemplate(DataSource dataSource){
        JdbcTemplate jdbcTemplate = new JdbcTemplate();
        jdbcTemplate.setDataSource(dataSource);
        return jdbcTemplate;
    }
	//Configure transaction manager
    @Bean
    public DataSourceTransactionManager dataSourceTransactionManager(DataSource dataSource){
        DataSourceTransactionManager tm = new DataSourceTransactionManager();
        tm.setDataSource(dataSource);
        return tm;
    }
}
Next, you need to tell Spring which methods are transaction methods, use @ Transactional, and it is best to set the rollbackFor attribute. This annotation has other attributes that can be set, similar to < TX: method >.
@Transactional(rollbackFor = {Exception.class})
public void checkout(String username,String isbn){...}
In addition, @ Transactional can also be set on a class, indicating that all methods are transaction methods.
4) Propagation behavior of transactions
As mentioned above, there is an attribute in the transaction method setting that can set the propagation behavior of transactions. What is the propagation behavior of transactions?
Transaction propagation behavior refers to how a transaction method runs when called by another transaction method. The propagation behaviors defined in Spring are:
- REQUIRED: if there is a current transaction, run it in it. Otherwise, open a new transaction and run it in its own transaction (the attributes of the transaction are inherited from the large transaction);
- REQUIRES_NEW: the current method must open a new transaction and run it in its own transaction. If a transaction is running, it will be suspended;
- SUPPORTS: if a transaction is running, the method runs in the transaction; otherwise, it can not run in the transaction;
- NOT_SUPPORTED: the current method should not run in a transaction. If there is a running transaction, suspend it;
- MANDATORY: the current method must run inside the transaction, or an exception will be thrown;
- NEVER: the current method should not run inside the transaction, or an exception will be thrown;
- NESTED: if a transaction is running, the current method should run in the NESTED transaction of the transaction. Otherwise, start a new transaction and run in its own transaction.
5) Transaction invalidation
Generally, the following scenarios occur when a transaction fails:
- In SSM development, Spring and Spring MVC are in charge of two containers. At this time, if Spring MVC scans @ Service, then @ controller injects methods without transactions, which will lead to transaction failure. Therefore, the configuration of declarative transactions must be loaded by the Spring container.
- If the @ Transactional annotation is marked on the interface, but the implementation class uses the Cglib proxy, the transaction will be invalidated. You mark the interface, but when Cglib proxy, you directly get the implementation class to build the proxy object, which bypasses the transaction management of the interface.
- The transaction catches the RuntimeException by default. If an Exception is thrown, it is not caught by default and the transaction is invalid. Therefore, it is generally explicitly declared to catch the Exception.
- If you try to catch exceptions in the Service method, the transaction interceptor will be presented with no exceptions, which will naturally lead to transaction failure.
- In the same class, if a method calls its own method and another method with transaction control, the direct call will also lead to transaction failure.
reference material:
- Spring Framework 5.1.3.RELEASE document
- Learn more about Spring nuggets from 0
- JavaGuide-Spring
- Thread safety of singleton Bean in Spring - CSDN
- The life cycle of Spring Bean - blog Garden
- Source code analysis of Spring IOC container_ Javadoop
- Spring5 system architecture - CSDN
- Lei Fengyang Spring, Spring MVC, MyBatis courses - bilibili li