IOC (Inversion of Control) is a concept and an idea. It refers to handing over the call right of the object directly controlled by the program code to the container, and realizing the assembly and management of the object through the container. Inversion of Control is the transfer of control over the object, from the program code itself to the external container. The creation of objects, attribute assignment and dependency management are realized through containers.
IOC is a concept and an idea, which is implemented in a variety of ways. At present, the more popular implementation method is dependency injection. Widely used.
Dependency: the classA class contains instances of classB, and the method of calling classB in classA completes the function, that is, classA relies on classB.
Dependency injection: DI(Dependency Injection). The program code does not do location query. These tasks are completed by the container itself.
Dependency injection DI refers to that if another object needs to be called for assistance during program operation, the callee does not need to be created in the code, but depends on the external container, which is created and passed to the program. Spring's dependency injection has almost no requirements for callers and callees, and fully supports the management of dependencies between objects.
The Spring framework uses dependency injection (DI) to implement IOC.
The spring container is a large factory responsible for creating and managing all Java objects, which are called beans. Spring container manages the dependencies between beans in the container. Spring uses "dependency injection" to manage the dependencies between beans. Use IoC to realize decoupling and between objects.
1.1 the first program of spring
1.1.1 create maven project

1.1.2 introduction of maven dependent POM xml
<dependencies>
    <!--unit testing -->
    <dependency>
      <groupId>junit</groupId>
      <artifactId>junit</artifactId>
      <version>4.11</version>
      <scope>test</scope>
    </dependency>
    <!--Spring rely on-->
    <dependency>
      <groupId>org.springframework</groupId>
      <artifactId>spring-context</artifactId>
      <version>5.2.5.RELEASE</version>
    </dependency>
  </dependencies>

  <!--plug-in unit-->
  <build>
    <plugins>
      <plugin>
        <artifactId>maven-compiler-plugin</artifactId>
        <version>3.1</version>
        <configuration>
          <source>1.8</source>
          <target>1.8</target>
        </configuration>
      </plugin>
    </plugins>
  </build>
1.1.3 define interface and entity classes
SomeService interface:
package com.suyv.spring.service;

public interface SomeService {
    void doSome();
}
Implementation class:
package com.suyv.spring.service.Impl;

import com.suyv.spring.service.SomeService;

public class SomeServiceImpl implements SomeService {

    public SomeServiceImpl() {
        super();
        System.out.println("SomeServiceImpl Nonparametric construction method");
    }

    @Override
    public void doSome() {
        System.out.println("====Business method doSome()===");
    }
}
1.1.4 create Spring configuration file
You need to add a constraint file in the spring configuration for normal use. The constraint file is an xsd extension.
<?xml version="1.0" encoding="UTF-8"?>
<beans xmlns="http://www.springframework.org/schema/beans"
       xmlns:xsi="http://www.w3.org/2001/XMLSchema-instance"
       xsi:schemaLocation="http://www.springframework.org/schema/beans
       http://www.springframework.org/schema/beans/spring-beans.xsd">
	<!--<bean />: Used to define an instance object. One instance corresponds to one bean Element.-->
	<!--id: The attribute is Bean Unique identification of the instance. The program passes id Property access Bean,Bean And Bean The dependency between is also through id Property.-->
	<!--class: Specify this Bean Note that this can only be a class, not an interface.-->
    <bean id="someService" class="com.suyv.spring.service.Impl.SomeServiceImpl"></bean>
</beans>
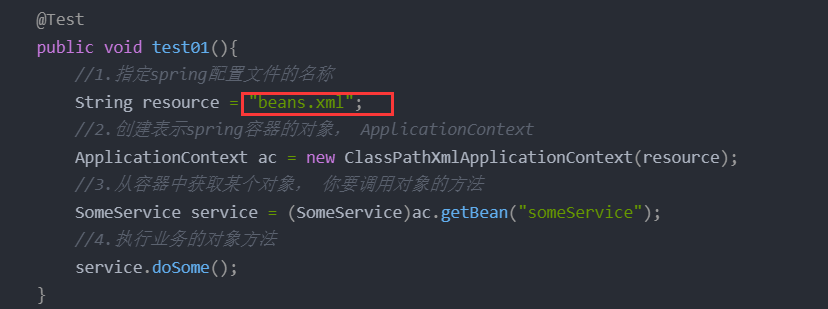
1.1.5 define test classes
	@Test
    public void test01(){
        //1. Specify the name of the spring configuration file
        String resource = "beans.xml";
        //2. Create an object representing the spring container, ApplicationContext
        ApplicationContext ac = new ClassPathXmlApplicationContext(resource);
        //3. Get an object from the container, and you want to call the method of the object
        SomeService service = (SomeService)ac.getBean("someService");
        //4. Object and method of executing business
        service.doSome();
    }
Execution results:

1.1.6 using spring to create non custom class objects
Add Java. Net to the spring configuration file util. Date definition:
<bean id="myDate" class="java.util.Date" />
In MyTest test class:
	@Test
    public void test02(){
        String config = "beans.xml";
        ApplicationContext ac = new ClassPathXmlApplicationContext(config);
        Date mydate = (Date) ac.getBean("mydate");
        System.out.println("Date" + mydate);
    }
Execution results:

1.1.7 container interface and implementation class
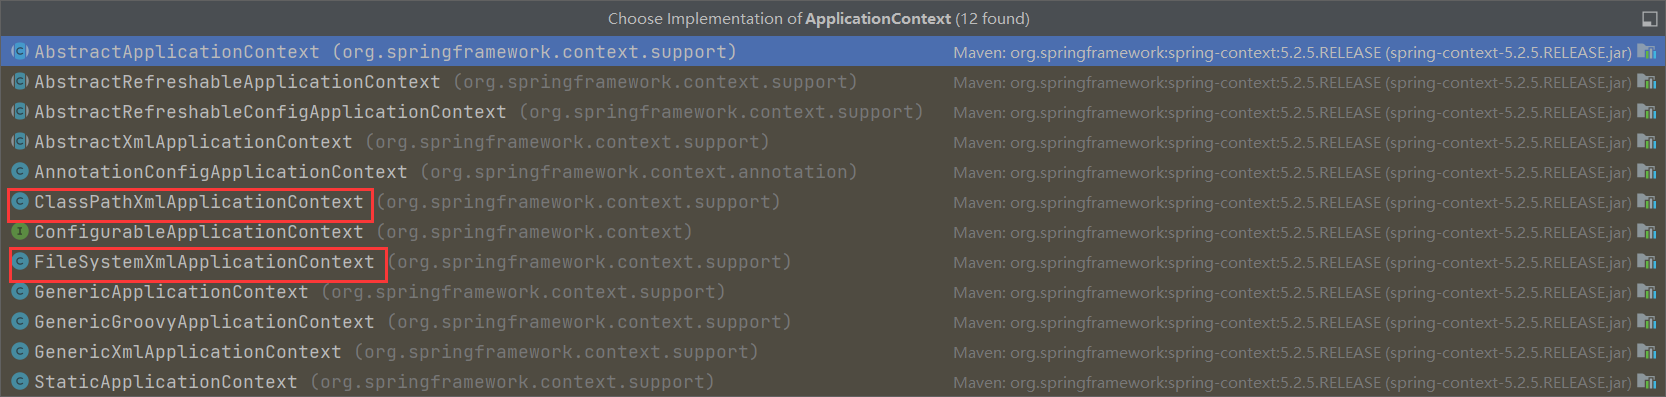
1) ApplicationContext interface
ApplicationContext is used to load the Spring configuration file and act as a "container" in the program. There are two implementation classes.
-
The configuration file is under the classpath
If the Spring configuration file is stored in the classpath of the project, the ClassPathXmlApplicationContext implementation class is used for loading.
-
Assembly timing of objects in the ApplicationContext container
The ApplicationContext container will assemble all the objects in the container at one time when the container object is initialized. If you want to use these objects in future code, you just need to get them directly from memory. High execution efficiency. But it takes up memory.
1.2 XML based DI
After a bean instance calls the parameterless constructor to create an object, it needs to initialize the properties of the bean object. Initialization is done automatically by the container, which is called injection.
According to different injection methods, there are two common types: set injection and structure injection.
1.2.1 injection classification
1) set injection
Set injection is also called set injection, which passes in the instance of the callee through the setter method. This injection method is simple and intuitive, so it is widely used in Spring dependency injection.
A. Simple type
Entity class:
package com.suyv.spring.ba01;

public class Student {
    private String name;
    private int age;

    public void setName(String name) {
        System.out.println("Student name:"+name);
        this.name = name;
    }

    public void setAge(int age) {
        System.out.println("Student age:"+age);
        this.age = age;
    }

    @Override
    public String toString() {
        return "Student{" +
                "name='" + name + '\'' +
                ", age=" + age +
                '}';
    }
}
Spring configuration file:
    <bean id="myStudent" class="com.suyv.spring.ba01.Student">
        <property name="name" value="Li Si"></property>
        <property name="age" value="20"></property>
    </bean>
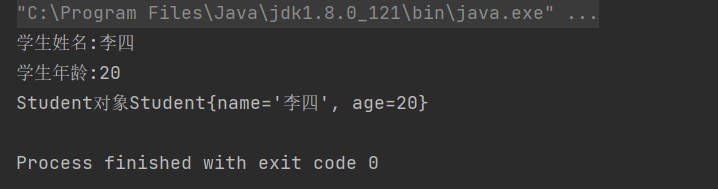
Test method:
	@Test
    public void test01(){
        //Specify the location and name of the spring configuration file
        String resource = "ba01/applicationContext.xml";
        ApplicationContext ac = new ClassPathXmlApplicationContext(resource);
        Student myStudent = (Student)ac.getBean("myStudent");
        System.out.println("Student object"+myStudent);
    }
Execution results:
B. Reference type
When a property value of a specified bean is an instance of another bean, the reference relationship between them is specified through Ref. The value of ref must be the id value of a bean.
Entity class:
package com.suyv.spring.ba02;

public class Student {
    private String name;
    private int age;
    private School school;

    public void setName(String name) {
        System.out.println("Student name:"+name);
        this.name = name;
    }

    public void setAge(int age) {
        System.out.println("Student age:"+age);
        this.age = age;
    }

    public void setSchool(School school) {
        System.out.println("Student school:"+school);
        this.school = school;
    }

    @Override
    public String toString() {
        return "Student{" +
                "name='" + name + '\'' +
                ", age=" + age +
                ", school=" + school +
                '}';
    }
}
package com.suyv.spring.ba02;

public class School {
    private String Name;
    private String Address;

    public void setName(String name) {
        Name = name;
    }

    public void setAddress(String address) {
        Address = address;
    }

    @Override
    public String toString() {
        return "School{" +
                "Name='" + Name + '\'' +
                ", Address='" + Address + '\'' +
                '}';
    }
}
Spring configuration file:
<bean id="myStudent" class="com.suyv.spring.ba02.Student">
        <property name="name" value="Li Si"></property>
        <property name="age" value="20"></property>
        <property name="school" ref="mySchool"></property>
    </bean>

    <bean id="mySchool" class="com.suyv.spring.ba02.School">
        <property name="name" value="Henan University of science and technology"></property>
        <property name="address" value="Luoyang City, Henan Province"></property>
    </bean>
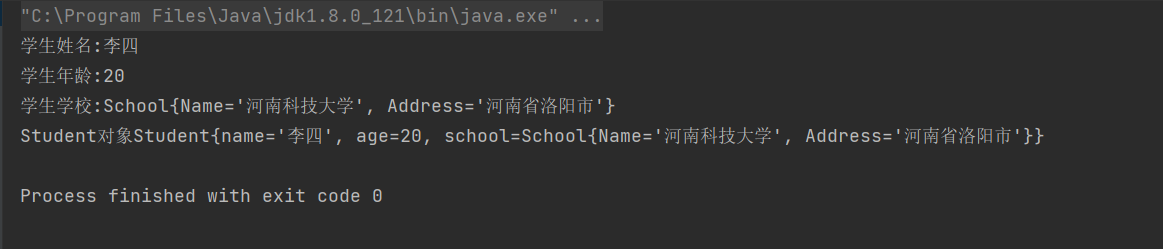
Test method:
	@Test
    public void test02(){
        //Specify the location and name of the spring configuration file
        String resource = "ba02/applicationContext.xml";
        ApplicationContext ac = new ClassPathXmlApplicationContext(resource);
        Student myStudent = (Student)ac.getBean("myStudent");
        System.out.println("Student object"+myStudent);
    }
Execution results:
2) Structural injection
Construction injection refers to completing the instantiation of the callee while constructing the caller instance. That is, use the constructor to set dependencies.
Entity class: Student class and School class
Spring configuration file:

A. Using the name attribute
Spring configuration file:
Test method:
@Test
    public void test031(){
        //Specify the location and name of the spring configuration file
        String resource = "ba03/applicationContext.xml";
        ApplicationContext ac = new ClassPathXmlApplicationContext(resource);
        Student myStudent = (Student)ac.getBean("myStudent01");
        System.out.println("Student object"+myStudent);
    }
Execution results:

B. Using the index attribute
Spring configuration file:

Test method:
@Test
    public void test032(){
        //Specify the location and name of the spring configuration file
        String resource = "ba03/applicationContext.xml";
        ApplicationContext ac = new ClassPathXmlApplicationContext(resource);
        Student myStudent = (Student)ac.getBean("myStudent02");
        System.out.println("Student object"+myStudent);
    }
Execution results:

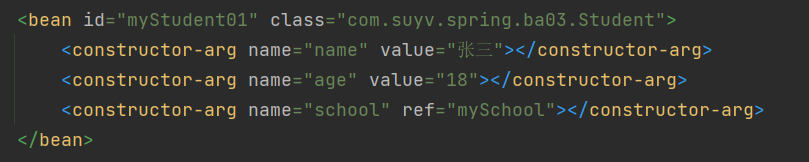
C. Use to omit the index attribute
Spring configuration file:

Test method:
@Test
    public void test033(){
        //Specify the location and name of the spring configuration file
        String resource = "ba03/applicationContext.xml";
        ApplicationContext ac = new ClassPathXmlApplicationContext(resource);
        Student myStudent = (Student)ac.getBean("myStudent03");
        System.out.println("Student object"+myStudent);
    }
Execution results:

1.2.2 automatic injection of reference type attribute
For the injection of reference type properties, you can also not display the injection in the configuration file. You can implicitly auto inject the reference type attribute by setting the autowire attribute value for the < bean / > tag (the default is not to automatically inject the reference type attribute). According to different automatic injection judgment criteria, it can be divided into two types:
byName: automatically inject by name
byType: automatically inject according to the type
1) byName mode automatic injection
When the id value of the caller bean in the configuration file is in line with the attribute name of the caller bean class in the code, the byName can be used to allow the container to automatically inject caller bean to the caller bean. The container is automatically injected by comparing the attribute name of the caller's bean class with the id of the callee's bean in the configuration file.
Entity class: Student class and School class
Spring configuration file:
	<bean id="myStudent" class="com.suyv.spring.ba04.Student" autowire="byName">
        <property name="name" value="Li Si"></property>
        <property name="age" value="20"></property>
    </bean>

    <bean id="school" class="com.suyv.spring.ba04.School">
        <property name="name" value="Henan University of science and technology"></property>
        <property name="address" value="Luoyang City, Henan Province"></property>
    </bean>
Test method:
@Test
    public void test04(){
        //Specify the location and name of the spring configuration file
        String resource = "ba04/applicationContext.xml";
        ApplicationContext ac = new ClassPathXmlApplicationContext(resource);
        Student myStudent = (Student)ac.getBean("myStudent");
        System.out.println("Student object"+myStudent);
    }
Execution results:

2) byType mode automatic injection
Automatic injection in byType mode requires that the class specified by the class attribute of the caller bean in the configuration file should be the same as the reference type attribute type of the bean class in the code. That is, it is either the same or has an is-a relationship (subclass or implementation class). However, there can only be one such homologous called bean. If there is more than one, the container does not know which one to match.
Entity class: Student class and School class
Spring configuration file:
	<bean id="myStudent" class="com.suyv.spring.ba05.Student" autowire="byType">
        <property name="name" value="Li Si"></property>
        <property name="age" value="20"></property>
    </bean>

    <bean id="mySchool" class="com.suyv.spring.ba05.School">
        <property name="name" value="Henan University of science and technology"></property>
        <property name="address" value="Luoyang City, Henan Province"></property>
    </bean>
Test method:
@Test
    public void test04(){
        //Specify the location and name of the spring configuration file
        String resource = "ba05/applicationContext.xml";
        ApplicationContext ac = new ClassPathXmlApplicationContext(resource);
        Student myStudent = (Student)ac.getBean("myStudent");
        System.out.println("Student object"+myStudent);
    }
Execution results:

1.2.3 specify multiple Spring configuration files for the application
In practical applications, with the increase of application scale, the number of beans in the system also increases greatly, resulting in a very large and bloated configuration file. In order to avoid this situation and improve the readability and maintainability of the configuration file, the Spring configuration file can be decomposed into multiple configuration files.
There is a master file in multiple configuration files, which introduces other sub files through < import / >. In Java code, you only need to initialize the container with the general configuration file.
Entity class: Student class and School class
Spring configuration file:
spring-school.xml file:
	<!--School All modules bean Your statement, School Configuration files for modules-->
    <!--statement School object-->
    <bean id="mySchool" class="com.suyv.spring.ba06.School">
        <property name="name" value="Aviation University"/>
        <property name="address" value="Haidian District " />
    </bean>
spring-student.xml file:
    <!--student All modules bean Statement of-->
    <bean id="myStudent" class="com.suyv.spring.ba06.Student"  autowire="byType">
        <property name="name" value="Zhang SA" />
        <property name="age" value="30" />
    </bean>
total.xml file:
Method 1:
	<!--Load file list-->
    <import resource="classpath:ba06/spring-school.xml" />
    <import resource="classpath:ba06/spring-student.xml" />
Method 2:
    <!--
       Wildcards can be used in configuration files that contain relationships(*: (represents any character)
       Note: the configuration file name of the master cannot be included in the range of wildcards (cannot be called spring-total.xml)
    -->
    <import resource="classpath:ba06/spring-*.xml" />
Test method:
@Test
    public void test01(){
      //Loading is the total file
       String config= "ba06/total.xml";
       ApplicationContext ac = new ClassPathXmlApplicationContext(config);
       //Get Student object from container
       Student myStudent =  (Student) ac.getBean("myStudent");
       System.out.println("student object="+myStudent);
   }
Execution results:

1.3 annotation based DI
For DI to use annotations, you no longer need to declare bean instances in the Spring configuration file. To use annotations in Spring, you need to make some changes based on the original Spring running environment.
The component scanner needs to be configured in the Spring configuration file to scan annotations in the specified basic package.
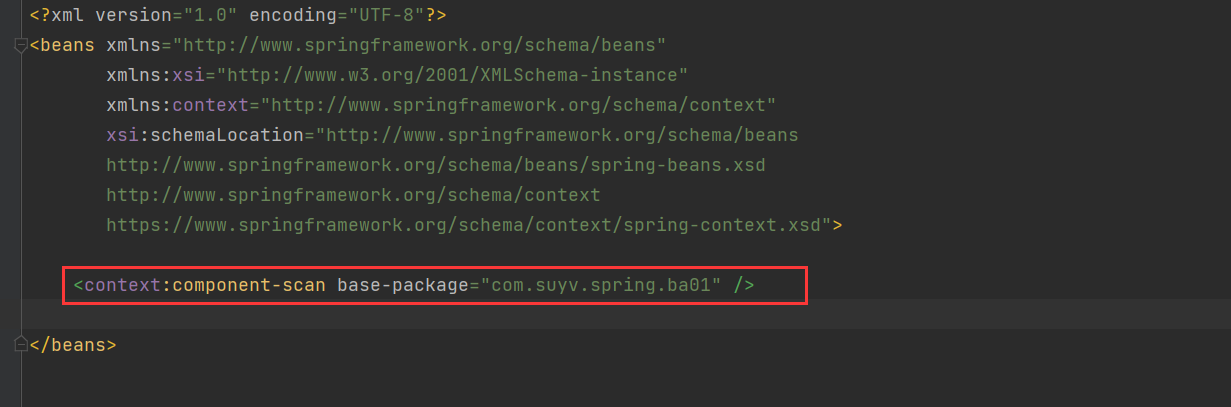
There are three ways to specify multiple packages:
	<!--The first way: use multiple component scanners to specify different packages-->
    <context:component-scan base-package="com.suyv.spring.ba01"/>
    <context:component-scan base-package="com.suyv.spring.ba02"/>

    <!--Second way: use separator(;or,)Separating multiple package names-->
    <context:component-scan base-package="com.suyv.spring.ba01;com.suyv.spring.ba02" />

    <!--The third way: specify the parent package-->
    <context:component-scan base-package="com.suyv.spring" />
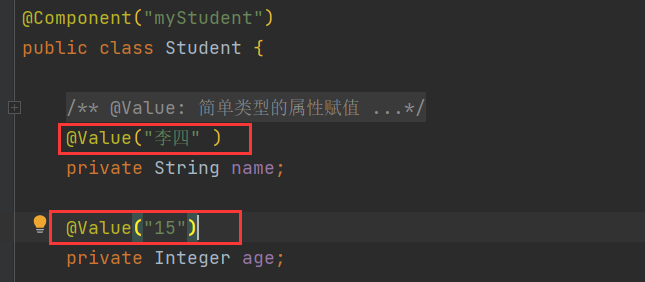
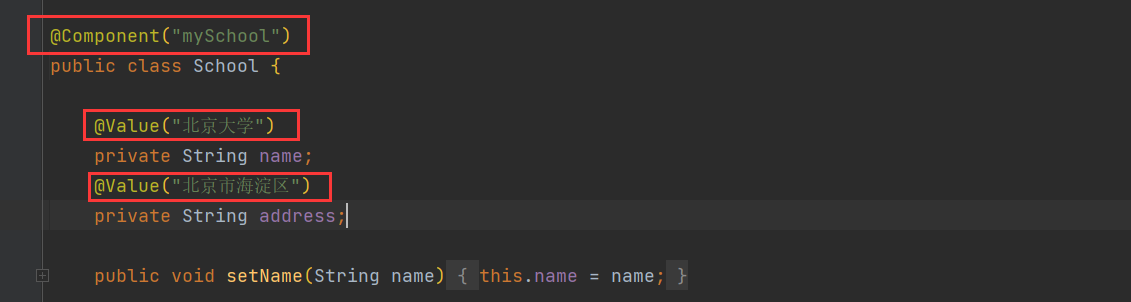
1.3.1 annotation @ Component for defining Bean
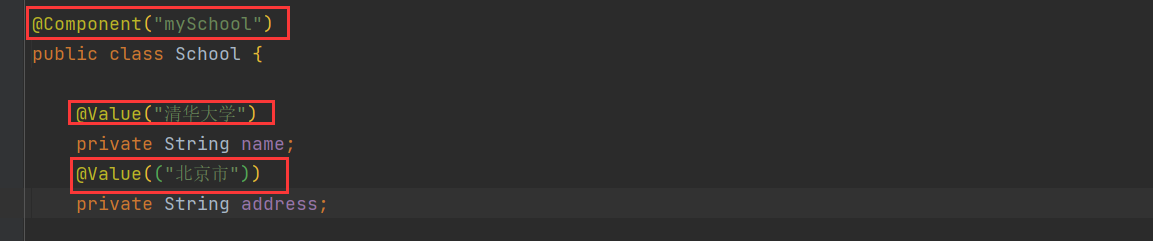
The @ Component annotation needs to be used on the class. The value attribute of the annotation is used to specify the id value of the bean.
Entity class:

spring configuration file:
<context:component-scan base-package="com.suyv.spring.ba01" />
Test code:
@Test
    public void test01(){
        String config = "applicationContext.xml";
        ApplicationContext ctx = new ClassPathXmlApplicationContext(config);
        //Get object from container
        Student student = (Student) ctx.getBean("student");
        System.out.println("student="+student);
    }
Execution results:

1.3.2 simple type attribute injection @ Value
Entity class:
spring configuration file:
<context:component-scan base-package="com.suyv.spring.ba02" />
Test method:
@Test
    public void test01(){
        String config="applicationContext.xml";
        ApplicationContext ctx = new ClassPathXmlApplicationContext(config);
        //Get object from container
        Student student = (Student) ctx.getBean("myStudent");
        System.out.println("student="+student);
    }
Execution results:

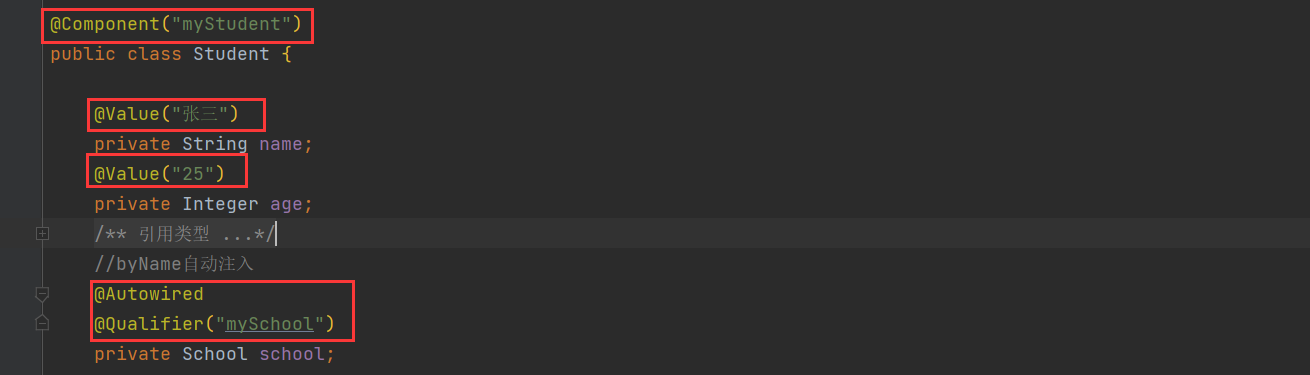
1.3.3 byType auto injection @ Autowired
Entity class:

spring configuration file:
<context:component-scan base-package="com.suyv.spring.ba03" />
Test method:
@Test
    public void test01(){
        String config="applicationContext.xml";
        ApplicationContext ctx = new ClassPathXmlApplicationContext(config);
        //Get object from container
        Student student = (Student) ctx.getBean("student");
        System.out.println("student="+student);
    }
Execution results:

1.3.4 byName auto inject @ Autowired and @ Qualifier
The annotation @ Autowired and @ Qualifier need to be used together on the reference attribute@ The value attribute of Qualifier is used to specify the id value of the Bean to match. Class does not need a set method, but can also be added to the set method.
Entity class:
spring configuration file:
<context:component-scan base-package="com.suyv.spring.ba04" />
Test method:
@Test
    public void test01(){
        String config="applicationContext.xml";
        ApplicationContext ctx = new ClassPathXmlApplicationContext(config);
        //Get object from container
        Student student = (Student) ctx.getBean("myStudent");
        System.out.println("student="+student);
    }
Execution results:

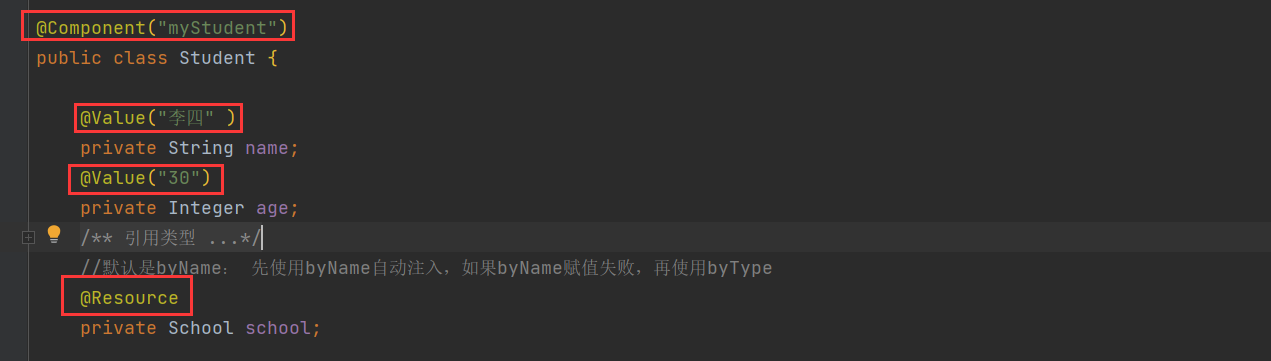
1.3.5 JDK annotation @ Resource automatic injection
Spring provides support for @ resource annotation in JDK@ Resource annotations can match beans by name or type. The default is injection by name. Using this annotation requires that the JDK must be version 6 or above@ Resource can be on property or set method.
Entity class:

spring configuration file:
<context:component-scan base-package="com.suyv.spring.ba06" />
Test method:
@Test
    public void test01(){
        String config="applicationContext.xml";
        ApplicationContext ctx = new ClassPathXmlApplicationContext(config);
        //Get object from container
        Student student = (Student) ctx.getBean("myStudent");
        System.out.println("student="+student);
    }
Execution results:

1.3.6 comparison between annotations and XML
The advantages of annotation are:
convenient
visual
Efficient (less code and less complex than writing configuration files).
Its disadvantages are also obvious: it is written into Java code in a hard coded way, and the modification needs to recompile the code.
The advantages of XML are:
Configuration and code are separate
Make changes in xml without compiling code. Just restart the server to load the new configuration.
The disadvantages of xml are: trouble in writing, low efficiency, and too complex for large projects.