Copy project
1. Retain the engineering infrastructure 2. Erase the original engineering trace
Steps:
1. Copy the created folder into a springboot_0x_xxxxxxx folder
2. Enter springboot_ 0x_ XXXXXXXX modify factid 6 in pom.xml file
3. Delete unnecessary files, leaving only src and pom.xml files
4. Then spring boot_ 0x_ XXXXXXXX can be used as a template
5. Spring boot_ 0x_ XXXXXXXX make a copy and change the artifact ID to the module name to be used
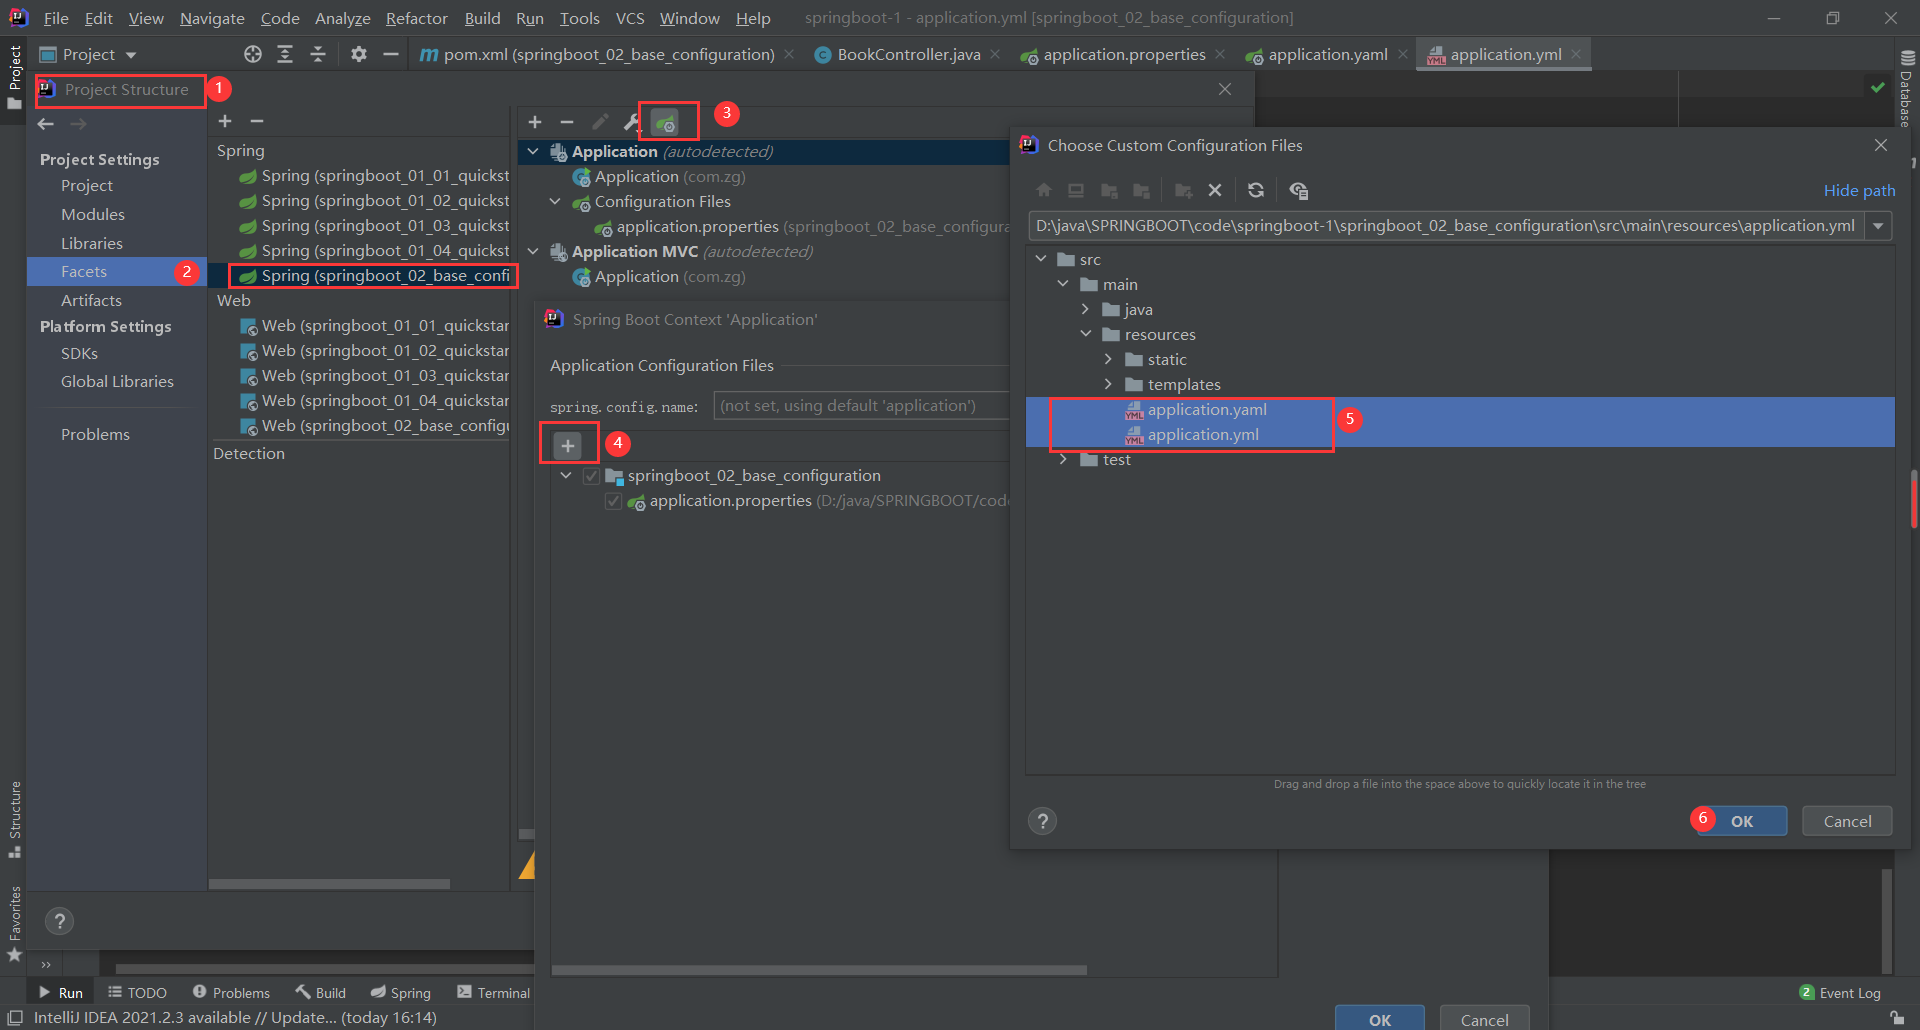
6. Enter IDEA, enter module management, and add
Question:
1. After copying the project, the items on the left can be clearly distinguished, but maven on the right will have two identical names

2. Solution, delete the following code
<name>springboot_01_02_quickstart</name>
<description>Demo project for Spring Boot</description>
In order to avoid this problem, you can go directly to springboot_ 0x_ Delete the above two lines of code in the XXXXXX template

Property configuration
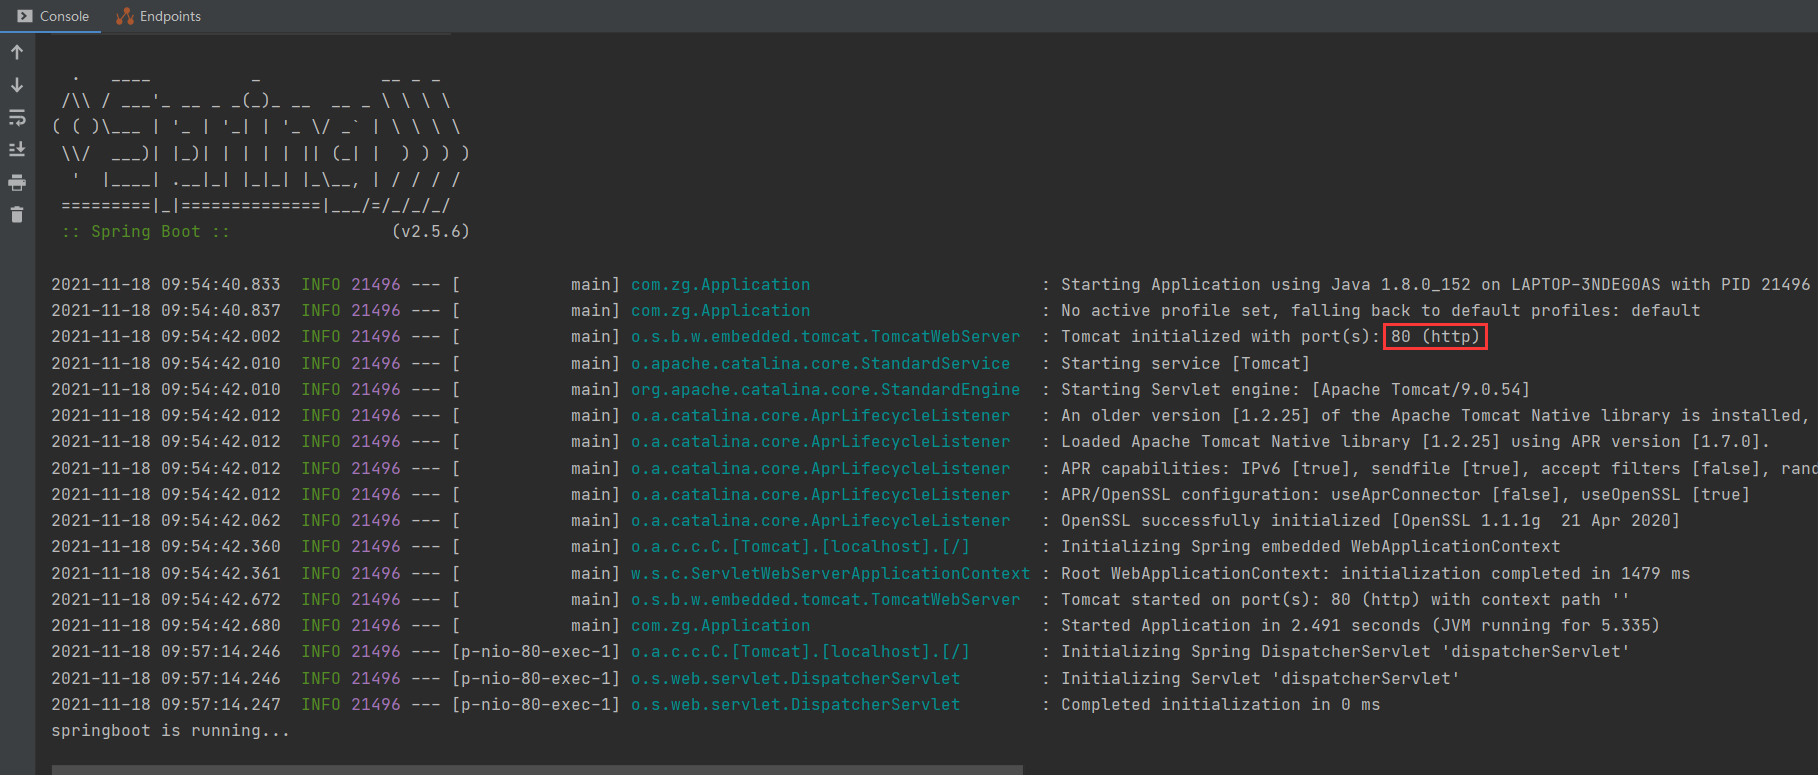
Modify server port
Change 8080 to 80, but now it is an embedded tomcat, so you need to modify it in application.properties under the resources folder. Because application.properties is empty at this time, you can directly write the key value pair to be changed. server.port=80, which is the port configuration of the server
Close port 80
C:\WINDOWS\system32>net stop http
HTTP Service Service stopped successfully.
C:\WINDOWS\system32>netstat -ano | findstr 0.0.0.0:80
C:\WINDOWS\system32>sc config http start=disabled
[SC] ChangeServiceConfig success
Basic configuration
In SpringBoot, all configuration files are written in application.properties, and there is no need to write too many files
# Port configuration of the server
server.port=80
# Modify banner
spring.main.banner-mode=off
# journal
logging.level.root=info
SpringBoot built-in property query, https://docs.spring.io/spring-boot/docs/current/reference/html/application-properties.html#application-properties.core.debug
After importing the corresponding starter in SpringBoot, provide the corresponding configuration properties
Profile type in 3
SpringBoot provides a variety of property configuration methods
1,application.properties
server.port=80
2,application.yml
server:
	port:81
3,application.yaml
server:
	port:82

The same configurations in different configuration files overwrite each other according to the loading priority, and all different configurations in different configuration files are retained
Load a configuration file whose configuration file is SpringBoot
yaml
yaml ---- a data serialization format
Advantages: easy to read, easy to interact with script language, data as the core, emphasizing data over format
yaml file extension
Advantages of yaml format

rule of grammar:
Case sensitive
The attribute hierarchy is described in multiple lines, and each line ends with a colon
Indent is used to indicate the hierarchical relationship, align to the left of the same level, and only spaces are allowed (Tab key is not allowed)
Add a space before the attribute value (colon + space is used to separate the attribute name from the attribute value)
#Indicates a comment
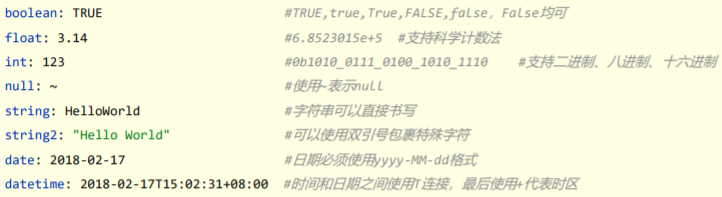
Literal value representation:
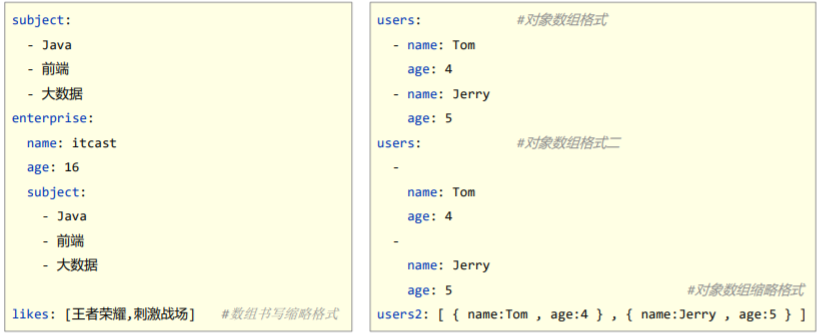
Array representation:
Use the minus sign below the writing position of the attribute name as the data start symbol, write one data in each line, and the minus sign is separated from the space between the data
Use @ Value to read single data. The reference method of property name is ${primary property name. Secondary property name...}
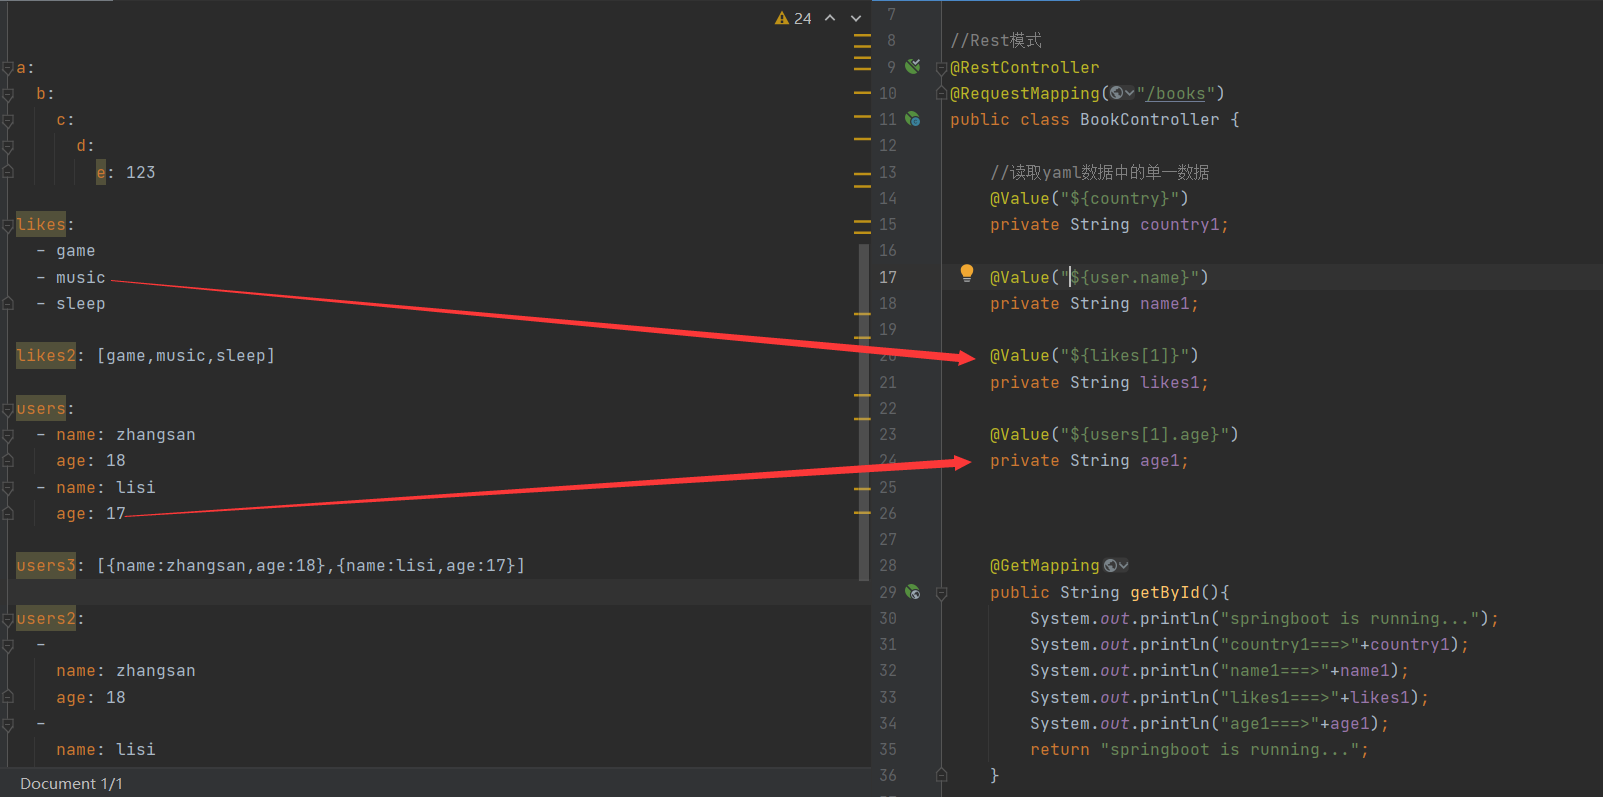
How to reference attributes by attribute name reference in yml file
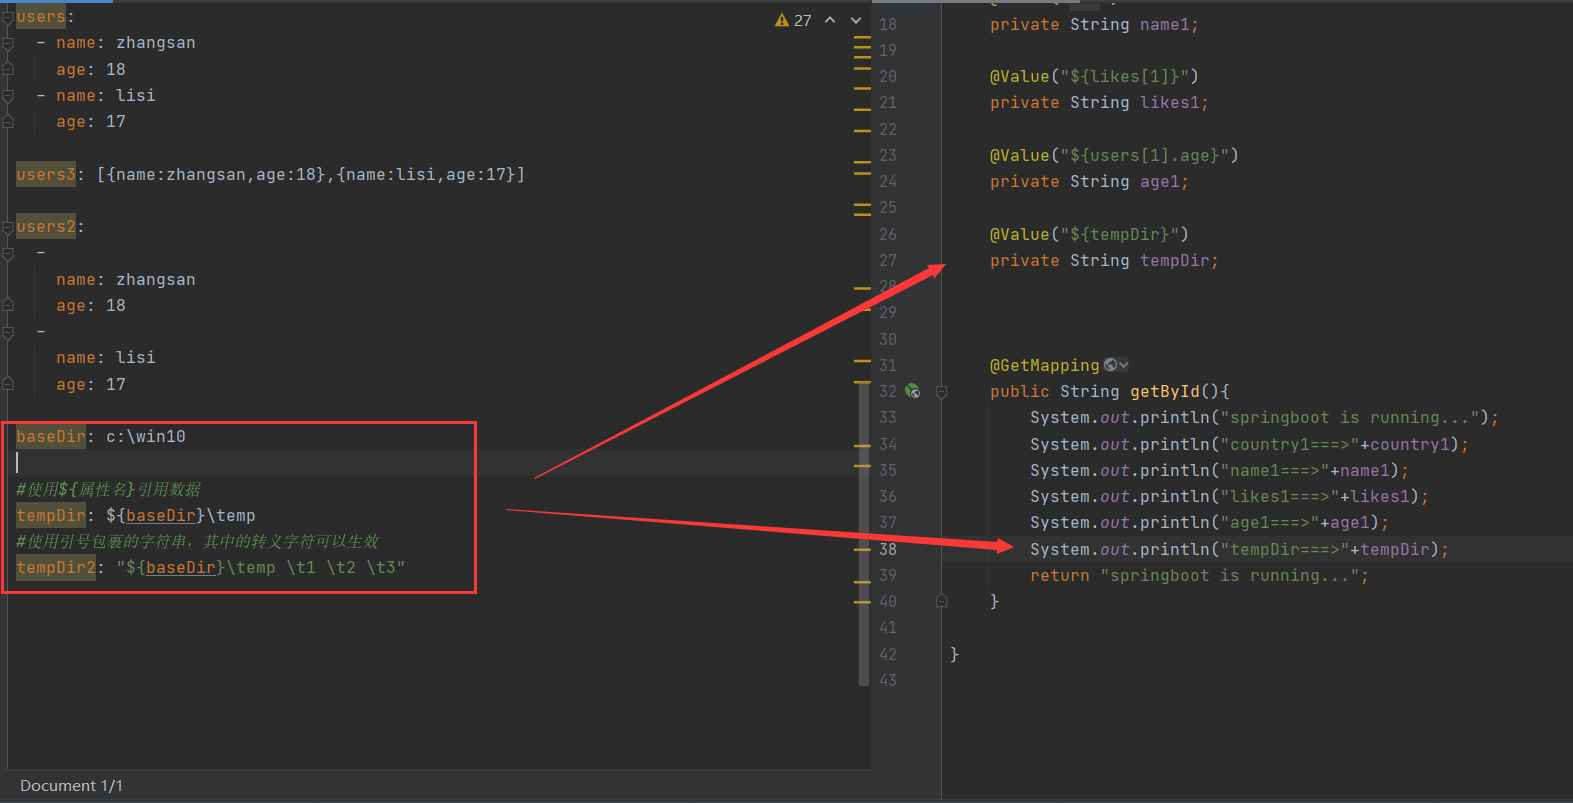
If a transition character appears in the attribute value, it needs to be wrapped in double quotes
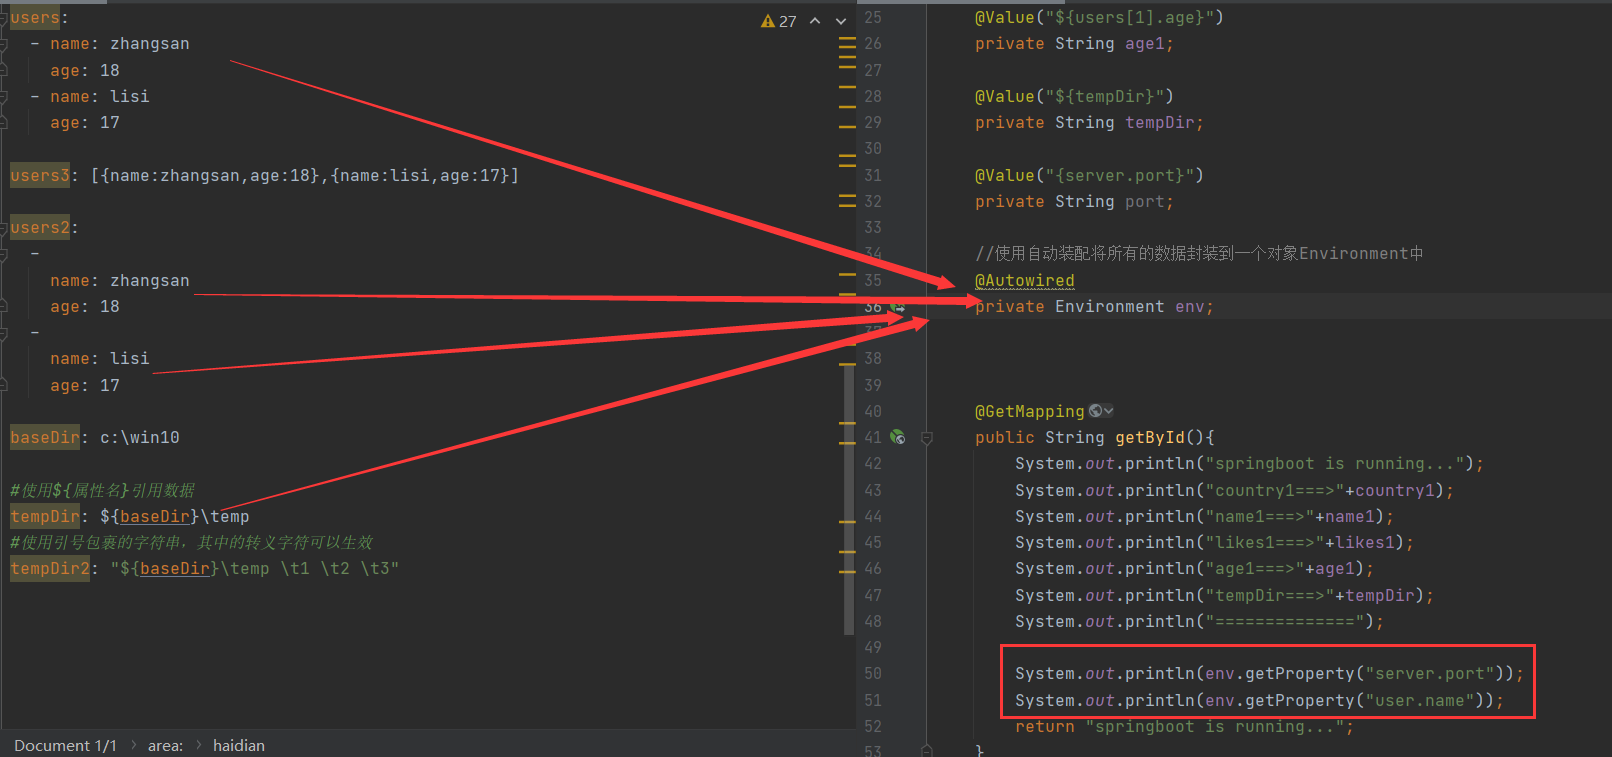
Read yml all attribute data environment
Read yml reference attribute data
1. You need to provide a model data first
# Create a class to encapsulate the following data
# Spring helps us to load data into objects. We must tell spring to load this set of information
# When using, you can get information directly from spring
datasource:
  driver: com.mysql.cj.jdbc.Driver
  url: jdbc:mysql://localhost:3306/db2?serverTimezone=UTC
  username: root
  password: root
2. Provides a class that encapsulates data
This class must define a part of the data. The @ ConfigurationProperties("datasource") specifies which part is encapsulated
package com.zg;

import org.springframework.boot.context.properties.ConfigurationProperties;
import org.springframework.stereotype.Component;

//1. Define the data in the data model encapsulation yml file
//2. It is defined as a Bean controlled by Spring
@Component
//3. Specifies the data to load
@ConfigurationProperties("datasource")
public class MyDataSource {
    private String driver;
    private String url;
    private String username;
    private String password;

    public String getDriver() {
        return driver;
    }

    public void setDriver(String driver) {
        this.driver = driver;
    }

    public String getUrl() {
        return url;
    }

    public void setUrl(String url) {
        this.url = url;
    }

    public String getUsername() {
        return username;
    }

    public void setUsername(String username) {
        this.username = username;
    }

    public String getPassword() {
        return password;
    }

    public void setPassword(String password) {
        this.password = password;
    }

    @Override
    public String toString() {
        return "MyDataSource{" +
                "driver='" + driver + '\'' +
                ", url='" + url + '\'' +
                ", username='" + username + '\'' +
                ", password='" + password + '\'' +
                '}';
    }
}
3. Get encapsulated data
package com.zg.controller;

import com.zg.MyDataSource;
import org.springframework.beans.factory.annotation.Autowired;
import org.springframework.beans.factory.annotation.Value;
import org.springframework.core.env.Environment;
import org.springframework.web.bind.annotation.GetMapping;
import org.springframework.web.bind.annotation.RequestMapping;
import org.springframework.web.bind.annotation.RestController;

//Rest mode
@RestController
@RequestMapping("/books")
public class BookController {

    @Autowired
    private MyDataSource myDataSource;
    @GetMapping
    public String getById(){
        System.out.println("springboot is running...");
        System.out.println(myDataSource);
        return "springboot is running...";
    }

}
Summary:
1. Use the @ ConfigurationProperties annotation to bind configuration information to the encapsulated class
2. The encapsulation class needs to be defined as a Spring managed bean, otherwise property injection cannot be performed