Summary:
During Android development, you have to write your own background interface test. Today, you use SpringBoot to create a web, upload and download files, and package Tomcat deployed to the server. SpringBoot is easier to use than spring MVC, SSH and other frameworks. Suitable for quickly building a simple background.
1. Create a web project
Before creating the first web project, you need to install Tomcat and Maven. Environment configuration is not discussed here.
1. For new project, select Spring Initializer and java 8 (consistent with the local java environment and deployment)
war is selected as the packaging method, or POM. Com can be selected after the project is built Configuration in XML


First check Web - > spring web for the first time. Because maven environment needs to download a lot of things, it will be slow.

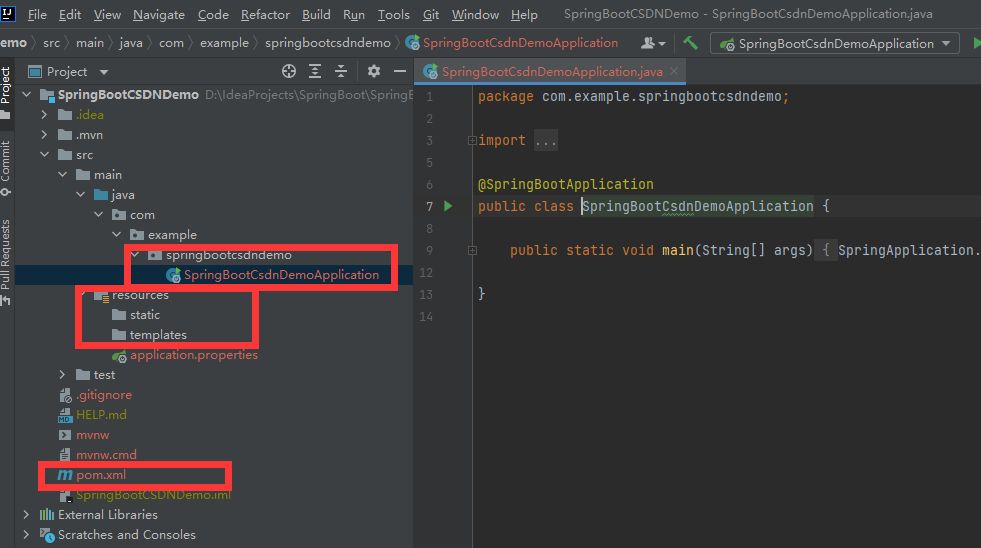
The project structure is as follows, which is the same as android studio
src side java file, and our controller is placed under it,
Our html files can be placed under the static folder of resources
pom.xml is similar to AS's build. XML Add dependencies and project global configuration to gradle file
2. Write relevant code
1. We need an html display interface
Create the file resources static. index. html
<!DOCTYPE html>
<html lang="en">
<head>
    <meta charset="UTF-8">
    <title>File upload</title>
</head>
<body>
<form action="file/upload" enctype="multipart/form-data" method="post">
    <input name="file" type="file"/>
    <input type="submit" value="upload"/>
</form>
<a href="file/download">File download</a>
<p/>
<a href="file/downloadZip">ZIP File download</a>
<br/>
</body>
</html>
Here is a brief description of this HTML file,
A form form and two hyperlinks. The file of file/download is consistent with the value of the comment @ RequestMapping("/file") of FileController below. Download and FileController The annotation @ GetMapping("/download") of download() is consistent.
Href = "file/download" do not write it as href = "/ file/download", otherwise 404 will be reported when deploying the project.
2. Write Controller to realize background function
Create the Controller folder and create the file FileController below. The API is provided by FileController
@RestController
@RequestMapping("/file")
@Slf4j
public class FileController {

    @Value("${filepath}")//Parse application Configuration in properties
    private String filepath;

    /**
     * Process file upload
     */
    @PostMapping(value = "/upload")
    public String upload(@RequestParam("file")MultipartFile file){
        File targetFile = new File(filepath);
        if (!targetFile.exists()) {
            targetFile.mkdirs();
        }
        try (FileOutputStream out = new FileOutputStream(filepath + file.getOriginalFilename());) {
            out.write(file.getBytes());
        } catch (Exception e) {
            e.printStackTrace();
            log.error("File upload failed!");
            return "uploading failure";
        }
        log.info("File uploaded successfully!");
        return "uploading success";
    }

    /**
     * Access method: http://localhost:8080/file/download
     * http://localhost:8080/file/download?filename=tmp.txt
     * When deploying to tomcat, the link is
     * http://localhost:8080/springbootweb01/file/download
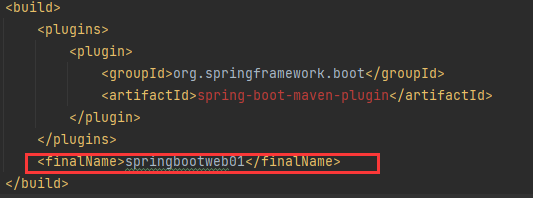
     * Where springbootweb01 is not the project name, but POM "finalName" for XML configuration "
     * @param response
     */
    @GetMapping("/download")
    public void download(HttpServletResponse response){

        String filename = null;
        String filePath = "D:/ideafile";//The path to the local storage file

        HttpServletRequest request =
                ((ServletRequestAttributes) RequestContextHolder.currentRequestAttributes()).getRequest();
        filename = request.getParameter("filename");//Gets the filename attribute in the request link

        if(filename == null || "".equals(filename)){
            filename = "tem.txt";//Return to default file
        }
        File file = new File(filePath + "/" + filename);
        if (file.exists()) {
            try (FileInputStream fis = new FileInputStream(file);
                 BufferedInputStream bis = new BufferedInputStream(fis)) {
                response.setContentType("application/octet-stream");
                response.setHeader("content-type", "application/octet-stream");
                response.setHeader("Content-Disposition", "attachment;fileName=" + URLEncoder.encode(filename, "utf8"));
                byte[] buffer = new byte[1024];
                //Output stream
                OutputStream os = response.getOutputStream();
                int i = bis.read(buffer);
                while (i != -1) {
                    os.write(buffer);
                    i = bis.read(buffer);
                }
            } catch (Exception e) {
                e.printStackTrace();
            }
        }
    }
<?xml version="1.0" encoding="UTF-8"?>
<project xmlns="http://maven.apache.org/POM/4.0.0" xmlns:xsi="http://www.w3.org/2001/XMLSchema-instance"
         xsi:schemaLocation="http://maven.apache.org/POM/4.0.0 https://maven.apache.org/xsd/maven-4.0.0.xsd">
    <modelVersion>4.0.0</modelVersion>
    <parent>
        <groupId>org.springframework.boot</groupId>
        <artifactId>spring-boot-starter-parent</artifactId>
        <version>2.5.3</version>
        <relativePath/> <!-- lookup parent from repository -->
    </parent>
    <groupId>com.wust.linliang</groupId>
    <artifactId>SpringBootWeb01</artifactId>
    <version>0.0.1-SNAPSHOT</version>
    <packaging>war</packaging>
    <name>SpringBootWeb01</name>
    <description>SpringBootWeb01</description>
    <properties>
        <project.build.sourceEncoding>UTF-8</project.build.sourceEncoding>
        <java.version>1.8</java.version>
        <maven.compiler.source>1.8</maven.compiler.source>
        <maven.compiler.target>1.8</maven.compiler.target>
    </properties>
    <dependencies>
        <dependency>
            <groupId>org.springframework.boot</groupId>
            <artifactId>spring-boot-starter-web</artifactId>
        </dependency>

        <dependency>
            <groupId>org.springframework.boot</groupId>
            <artifactId>spring-boot-starter-test</artifactId>
            <scope>test</scope>
        </dependency>

        <dependency>
            <groupId>org.projectlombok</groupId>
            <artifactId>lombok</artifactId>
        </dependency>

        <!-- https://mvnrepository.com/artifact/org.slf4j/slf4j-api -->
        <dependency>
            <groupId>org.slf4j</groupId>
            <artifactId>slf4j-api</artifactId>
            <version>1.7.32</version>
        </dependency>

        <!-- https://mvnrepository.com/artifact/ch.qos.logback/logback-classic -->
        <dependency>
            <groupId>ch.qos.logback</groupId>
            <artifactId>logback-classic</artifactId>
            <version>1.2.5</version>
        </dependency>

        <!-- https://mvnrepository.com/artifact/org.junit.jupiter/junit-jupiter-api -->
        <dependency>
            <groupId>org.junit.jupiter</groupId>
            <artifactId>junit-jupiter-api</artifactId>
            <version>5.7.1</version>
            <scope>test</scope>
        </dependency>

    </dependencies>

    <build>
        <plugins>
            <plugin>
                <groupId>org.springframework.boot</groupId>
                <artifactId>spring-boot-maven-plugin</artifactId>
            </plugin>
        </plugins>
        <finalName>springbootweb01</finalName>
    </build>

</project>
3. Deploy
1. It is different from testing in ide
Springbootweb01application. Needs to be modified Java and let it inherit SpringBootServletInitializer
public class SpringBootWeb01Application  extends SpringBootServletInitializer {
    @Override
    protected SpringApplicationBuilder configure(SpringApplicationBuilder application) {
        return application.sources(SpringBootWeb01Application.class);
    }
    public static void main(String[] args) {
        SpringApplication.run(SpringBootWeb01Application.class, args);
    }
}
2. Modify POM XML file
Add war

In POM Add springbootweb01 under the build of XML, which is the file name of the war we packaged

3. Package war and double-click the intall of maven

D:\IdeaProjects\SpringBoot\SpringBootWeb01\target\springbootweb01.war
The war is produced under the tartget of the project and placed under the webapp of tomcat. After it is put in, it will be automatically decompressed into a folder. Start tomcat and enter:
http://localhost:8080/springbootweb01/index.html

Git link: https://github.com/linliangliang/SpringBoot
Here is a simple way to view github code online. You only need to add 1s, so you don't need to read it after downloading.
:https://github1s.com/linliangliang/SpringBoot