1, Introduction to spring boot filter Foundation & actual combat
1.1 filter
What is a filter
It is implemented based on Servlet Technology. In short, the filter plays the role of filtering. It helps us filter some specified URLs and do some special processing in the development of web projects
What does the filter mainly achieve
1.Filter out unnecessary things, such as wrong requests.
2.You can also modify the request and the corresponding content.
3.It can also be used to filter unlisted users
 Copy code
Filter code implementation
There are three methods for filter, among which the init and destroy methods are generally not used, and the doFilter method is mainly used.
Filter implementation process
If the filter passes, execute filterchain. In dofilter doFilter(request,response); .
1.2. Create project
1.3. Filter quick start
How to use filters in springBoot?
There are two ways to implement custom Filter. The first is to use * * @ WebFilter * * annotation, and the second is to use FilterRegistrationBean (configuration class)
1.3.1 implementation of @ WebFilter
@WebFilter is used to declare a class as a filter. The annotation will be processed by the container during deployment. The container will deploy the corresponding class as a filter according to the specific attribute configuration.
| Attribute name | type | describe |
|---|---|---|
| filterName | String | Specify the name of the Filter |
| urlPatterns | String | Specify the URL intercepted by this Filter |
| value | String | Consistent with urlPatterns |
- Create a myfilter Implement Filter interface in Java
package com;
import org.springframework.stereotype.Component;
import javax.servlet.*;
import javax.servlet.annotation.WebFilter;
import javax.servlet.http.HttpServletRequest;
import java.io.IOException;

@WebFilter(urlPatterns = "/api/*",filterName = "myFilter")
@Order(1)//Specify the execution order of the filter. The higher the value, the later the execution
public class MyFilter implements Filter {
  @Override
public void init(FilterConfig filterConfig) throws ServletException {
    System.out.println("Initialize filter");
}
@Override
    public void doFilter(ServletRequest servletRequest, ServletResponse servletResponse,
FilterChain filterChain) throws IOException, ServletException {
        HttpServletRequest request= (HttpServletRequest) servletRequest;
        String uri=request.getRequestURI();
        String method=request.getMethod();
        System.out.println(uri+" "+method+"Ha ha, I'm in MyFilter Filter");
        filterChain.doFilter(servletRequest,servletResponse);

    }
}
Copy code- Add * * @ ServletComponentScan * * annotation on the startup class
- Create a FilterController interface
package com.controller;
import org.springframework.web.bind.annotation.GetMapping;
import org.springframework.web.bind.annotation.RestController;
@RestController
@RequestMapping("/api")
public class HelloController {

    @GetMapping("/user/filter")
    public String hello(){
        return "Ha ha, I passed the filter";
    }
}
Copy code- test
1.3.2 implementation of FilterRegistrationBean
- Create FilterCon "g"
package com.config;

import com.MyFilter;
import org.springframework.boot.web.servlet.FilterRegistrationBean;
import org.springframework.context.annotation.Bean;
import org.springframework.context.annotation.Configuration;

@Configuration
public class FilterConfig {
   @Bean
    public MyFilter myFilter(){
        return new MyFilter();
    }
    @Bean
    public FilterRegistrationBean getFilterRegistrationBean(MyFilter myFilter){
        FilterRegistrationBean filterRegistrationBean=new FilterRegistrationBean();
        /**
         * catalog filter
         */
        filterRegistrationBean.setFilter(MyFilter());
        /**
         * Intercept path
         */
        filterRegistrationBean.addUrlPatterns("/api/*");
        /**
         * Set intercept resource name
         */
        filterRegistrationBean.setName("myFilter");
        /**
         * Set the lower the access priority value, the higher the access priority value
         */
        filterRegistrationBean.setOrder(1);
        return filterRegistrationBean;
    }
}
Copy code- Remove the annotation from the MyFilter class
//@WebFilter(urlPatterns ={"/api/*"},filterName = "myFilter")
Copy code- Remove the annotation of the startup class
//@ServletComponentScan
 Copy code
- test
1.4. Filter and verify whether the user logs in
- Modify application Properties add the general configuration address of the development interface
#Configure open resources and release all requests with open at the address level
open.url=/**/open/**
Copy code
- Modify MyFilter
//@WebFilter(urlPatterns ={"/*"},filterName = "myFilter")
public class MyFilter implements Filter {
    @Value("${open.url}")//The path to get the open resources of the configuration class
    private String openUrl;
    @Override
    public void init(FilterConfig filterConfig) {
        System.out.println("initialization myFilter filter");
    }

    @Override
    public void doFilter(ServletRequest servletRequest, ServletResponse servletResponse,
FilterChain filterChain) throws IOException, ServletException {
        HttpServletRequest request = (HttpServletRequest) servletRequest;
        String requestUrl = request.getRequestURI();
        System.out.println("filter MyFilter Intercepted request for" + requestUrl);
        //First, check whether it is an open api
        //Yes, direct release. No, check the token again
        PathMatcher matcher = new AntPathMatcher();
        if(matcher.match(openUrl,requestUrl)){
            filterChain.doFilter(servletRequest,servletResponse);
        }else {
            String token=request.getHeader("token");
            if(StringUtils.isEmpty(token)){
                servletRequest.getRequestDispatcher("/api/open/unLogin").forward(servletRequest,
                        servletResponse);
            }else {
                filterChain.doFilter(servletRequest,servletResponse);
            }
        }

    }

}
Copy code- Write Controller
@GetMapping("/open/home/info")
    public Map<String,String> getHome(){
        Map<String,String> map=new HashMap<>();
        map.put("tourist","Welcome to the home page");
        return map;
    }

    @GetMapping("/open/unLogin")
    public String getUnauthorized(){
        return "Login failed, please login again";
    }
Copy code- test
2, Introduction to the basics of SpringBoot interceptor & actual combat
2.1 interceptor
What is the interceptor
In short, it is a valve that intercepts a method before it is accessed, and then adds some operations before or after it. Interceptor is an implementation strategy of AOP.
Function of interceptor
Intervene in a running process
Implementation of interceptor
The interceptor also has three main methods: the preHandle is called before the request. If the request needs to be intercepted, it returns false, otherwise it returns true; postHandle is called after the request and has no return value; After completion is called at the end of the request and has no return value.
2.2. Interceptor quick start
Overall steps
Create a class to implement the HandlerInterceptor interface, then create a configuration class to implement the WebMvcCon "guide interface, and override the addInterceptors method
- Create interceptor and implement HandlerInterceptor interface
package com.interceptor;

import org.springframework.beans.factory.annotation
import org.springframework.util.AntPathMatcher;
import org.springframework.util.PathMatcher;
import org.springframework.web.servlet.HandlerInterceptor
import org.springframework.web.servlet.ModelAndView

import javax.servlet.http.HttpServletRequest;
import javax.servlet.http.HttpServletResponse;
public class MyInterceptor implements HandlerInterceptor {
    @Value("${open.url}")
    private String openUrl;
    @Override
    public boolean preHandle(HttpServletRequest request, HttpServletResponse response, Object
handler) throws Exception {
        System.out.println("MyInterceptor....Call before request processing( Controller (before method call)");
        String requestUrl=request.getRequestURI();
        System.out.println("filter MyFilter Intercepted request for"+requestUrl);
        return true;

    }
     @Override
    public void postHandle(HttpServletRequest request, HttpServletResponse response, Object
handler, ModelAndView modelAndView) throws Exception {
        System.out.println("MyInterceptor...Called after the request is processed, but before the view is rendered( Controller Method call
 (rear)");
    }

    @Override
    public void afterCompletion(HttpServletRequest request, HttpServletResponse response, Object
handler, Exception ex) throws Exception {
        System.out.println("MyInterceptor....Called after the end of the entire request, that is DispatcherServlet Rendered right
 Should be executed after the view (mainly for resource cleanup)");
    }
}
Copy code- Modify application Add open resources to properties
#All requests with an open address level are released
open.url=/**/open/**
Copy code
- Create a Java implementation of WebMvcCon "guide" and override the addInterceptors method
package com.config;

import com.interceptor.MyInterceptor;
import org.springframework.beans.factory.annotation.Value;
import org.springframework.context.annotation.Bean;
import org.springframework.context.annotation.Configuration;
import org.springframework.web.servlet.config.annotation.InterceptorRegistry
import org.springframework.web.servlet.config.annotation.WebMvcConfigurer;
@Configuration
public class WebAppConfig implements WebMvcConfigurer {
    @Value("${open.url}")
    private String openUrl;
    @Bean
    public MyInterceptor getMyInterceptor(){
        return new MyInterceptor();
    }
    @Override
    public void addInterceptors(InterceptorRegistry registry) {
      registry.addInterceptor(getMyInterceptor()).addPathPatterns("/api/**").excludePathPatterns(openUrl);//Increase interception and non interception paths
    }
}
Copy code- Write Controller
package com.controller;

import org.springframework.web.bind.annotation.GetMapping;
import org.springframework.web.bind.annotation.RequestMapping;
import org.springframework.web.bind.annotation.RestController;

import java.util.HashMap;
import java.util.Map;
@RestController
@RequestMapping("/api")
public class InterceptorController {
       @GetMapping("/home/open/info")
    public String home(){
        return "Welcome to the home page";
    }

    @GetMapping("/user/interceptor")
    public String interceptor(){
        return "I was intercepted and passed the interceptor";
    }
}
Copy code- test
With open( http://localhost:8080/api/open/home/info) No interception
2.3. Intercept and verify whether the user logs in to the actual combat
- Write Controller
 @GetMapping("/user/filter")
    public String testFilter(){
        return "Has passed the interceptor";
    }
    @GetMapping("/open/unLogin")
    public String getUnauthorized(){
        return "Login failed, please login again";
    }
Copy code- Write interceptor verification logic
public class MyInterceptor implements HandlerInterceptor {
    @Value("${open.url}")
    private String openUrl;

    @Override
    public boolean preHandle(HttpServletRequest request, HttpServletResponse response, Object
handler) throws Exception {
        System.out.println("MyInterceptor....Call before request processing( Controller (before method call)");
        System.out.println("MyInterceptor Intercepted request for"+requestUrl);
         String requestUrl=request.getRequestURI();
        System.out.println(requestUrl+"cover MyInterceptor Intercepted");
        //Just judge whether to carry the voucher
        String token = request.getHeader("token");
        if(StringUtils.isEmpty(token)){
            request.getRequestDispatcher("/api/open/unLogin").forward(request,response);
            return false;
        }
        return true;

        }

    }
 @Override
    public void postHandle(HttpServletRequest request, HttpServletResponse response, Object
handler, ModelAndView modelAndView) throws Exception {
        System.out.println("MyInterceptor...Called after the request is processed, but before the view is rendered( Controller Method call
 (rear)");
    }

    @Override
    public void afterCompletion(HttpServletRequest request, HttpServletResponse response, Object
handler, Exception ex) throws Exception {
        System.out.println("MyInterceptor....Called after the end of the entire request, that is DispatcherServlet Rendered right
 Should be executed after the view (mainly for resource cleanup)");
    }
                           }
Copy code- test
3, Spring Boot static resource access
- Source code analysis
We open the ResourceProperties resource configuration class and find that the default static resource paths are as follows. As long as the static resources are placed in any of these directories, spring MVC will help us deal with them. We are used to putting static resources in the classpath:/static / directory
- classpath:/META-INF/resources/
- classpath:/resources/
- classpath:/static/
- classpath:/public
- test
Put the picture in the static directory and restart it
4, Spring Boot integration Jsp
One development scenario that I have to say about Java is Web development. One technology that cannot be bypassed when it comes to Web development is JSP, because there are still many companies on the market using SSM+JSP, and then want to upgrade Spring Boot. This course mainly talks about how to use JSP in SpringBoot project
- Create a new project and create webapp
- Introduce jsp related dependencies
<!--JSP Standard label Library-->
<dependency>
    <groupId>javax.servlet</groupId>
    <artifactId>jstl</artifactId>
</dependency>

<!--built-in tocat yes Jsp Supported dependencies for compilation Jsp-->
<dependency>
    <groupId>org.apache.tomcat.embed</groupId>
    <artifactId>tomcat-embed-jasper</artifactId>
</dependency>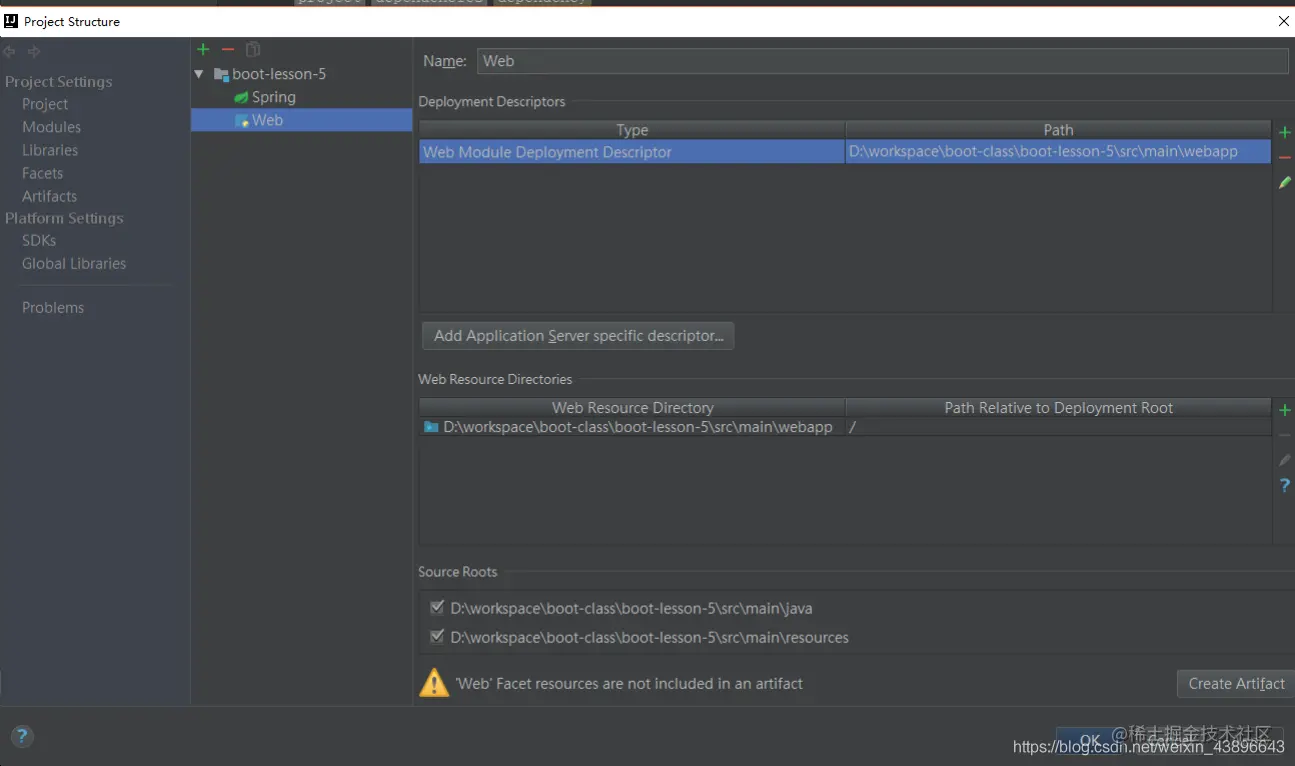
Copy code- web configuration
Edit project Structure
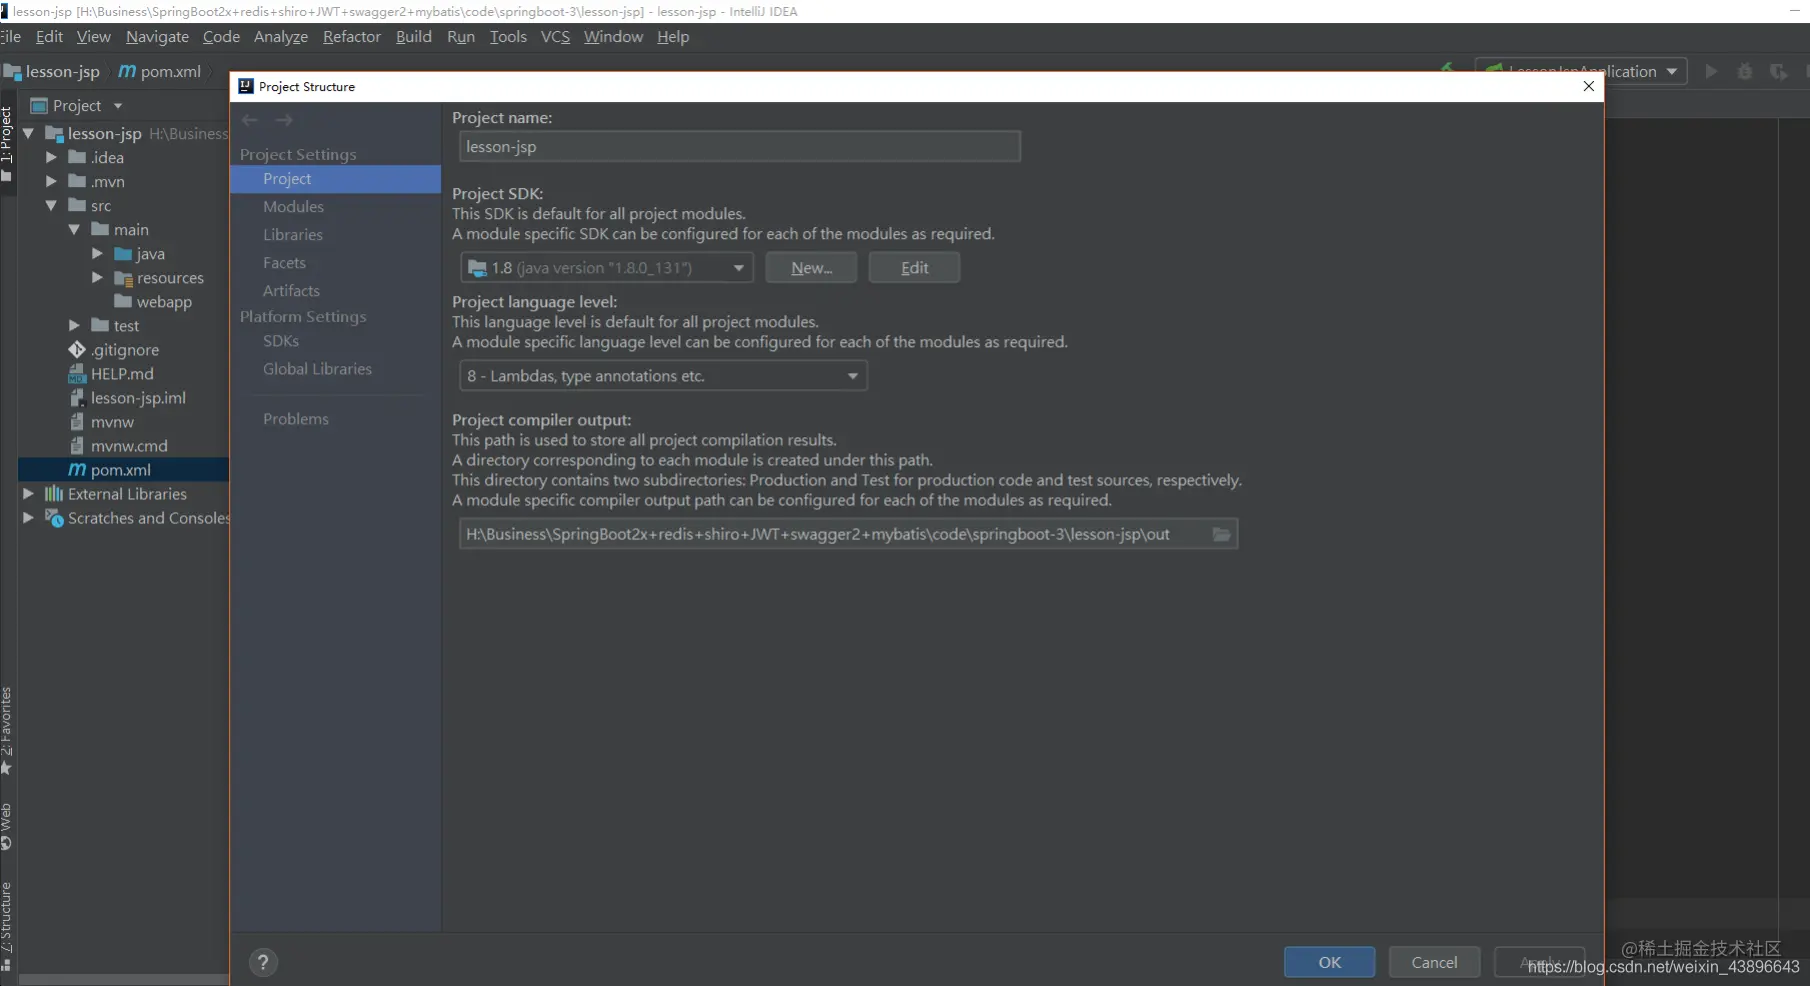
Configure root path
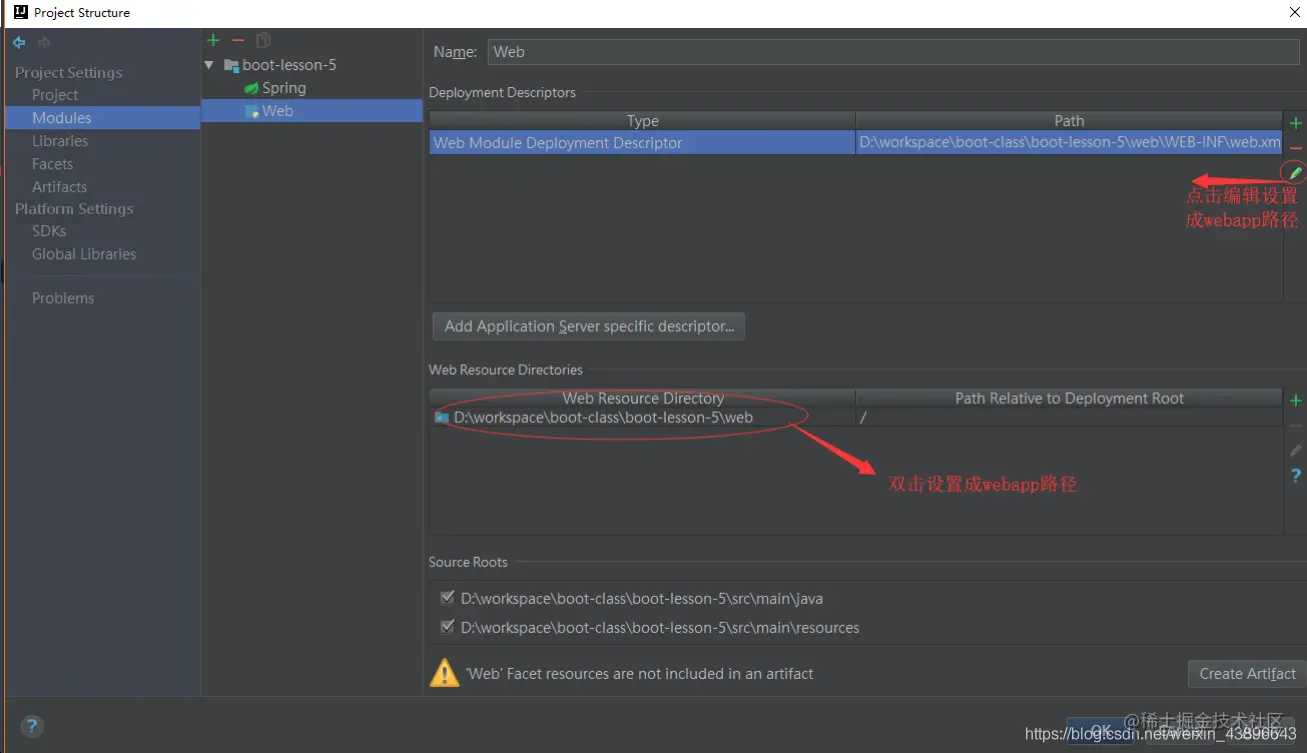
**Click apply**
- Spring Mvc view parser configuration
spring.mvc.view.prefix=/WEB-INF/jsp/
spring.mvc.view.suffix=.jsp
server.port=8080
 Copy code
- test
- epilogue
Therefore, when we upgrade an old project to a Spring Boot project in the future, we must first configure the following path of webapp, configure the web, and then configure some configurations required by ORM. Finally, remember to configure the view parser. After the required configuration is configured, you can copy the code directly into the new project.
5, Spring Boot integrates Thymeleaf
Thymeleaf is a template engine for rendering XML/XHTML/HTML5 content. Similar to jsp and FreeMaker, it can also be easily integrated with the Web framework as a template engine for Web applications. Compared with other template engines, the biggest feature of thymeleaf is that it can directly open and correctly display the template page in the browser without starting the whole Web application. Thymeleaf supports Spring Expression Language as a dialect, that is, spiel, which is an EL expression that can be used in Spring. It is different from the jsp we have used. Thymeleaf uses html tags to complete the incoming logic and data for rendering. It can be said that it is feasible to completely replace jsp with thymeleaf.
- Create a springboot project


- Thymeleaf configuration
#thymeleaf
# Prefix default read classpath:/templates/
#No configuration required
#spring.thymeleaf.prefix=classpath:/templates/
# suffix
spring.thymeleaf.suffix=.html
spring.thymeleaf.charset=UTF-8
spring.thymeleaf.servlet.content-type=text/html
 Copy code
- test
Create hello HTML, create a hello.html file under templates xmlns:th must be added to HTML=“ www.thymeleaf.org "Thymeleaf declaration space
<!DOCTYPE html>
<html lang="en" xmlns:th="http://www.thymeleaf.org">
<head>
    <meta charset="UTF-8">
    <title>Title</title>
</head>
<body>
<p th:text="'hello:'+${username}"></p>
</body>
</html>
Copy code
Create HelloController
package com.controller;

import org.springframework.stereotype.Controller;
import org.springframework.ui.Model;
import org.springframework.web.bind.annotation.GetMapping;
import org.springframework.web.bind.annotation.RequestMapping;
@Controller
public class HelloController {

    @GetMapping("/hello")
    public String hello(Model model){
        model.addAttribute("username","zhangsan");
        return "hello";
    }
}
Copy code- test
6, Spring Boot integrates Freemarker
- Create project

- Freemarker configuration
#freemarker
spring.freemarker.template-loader-path=classpath:/templates/
# suffix
spring.freemarker.suffix=.html
spring.freemarker.charset=UTF-8
spring.freemarker.content-type=text/html
 Copy code
- test
Create hello html
<!DOCTYPE html>
<html lang="en">
<head>
    <meta charset="UTF-8">
    <title>Title</title>
</head>
<body>
<h1>${username}</h1>Welcome Freemarker Template
</body>
</html>
Copy code
Create HelloController
package com.controller;

import org.springframework.stereotype.Controller;
import org.springframework.ui.Model;
import org.springframework.web.bind.annotation.GetMapping;
import org.springframework.web.bind.annotation.RequestMapping;
@Controller
public class HelloController {
    @GetMapping("/hello")
    public String hello(Model model){
        model.addAttribute("username","Zhang San");
        return "hello";
    }
}

Copy code- test
Browser input: http://localhost:8080/hello