Recently, I'm more and more motivated to learn. I just finished the RabbitMQ introduction and environment construction last night. Today, I began to update the actual combat article. I think of what my colleagues described to me: the donkeys in the production team are not as diligent as you. Ha ha, ha ha, that's really right!
To get back to business, this blog refers to the RabbitMQ course of muke.com, which is simplified and provides the simplest implementation of message queue without storage function. The course link is as follows. Interested partners can learn by themselves:
https://www.imooc.com/video/17845
Configure message queuing
Open and log in to the message queue management interface. First, configure exchange:

There are three parameters in the figure, namely, the name, type and persistence of exchange.
Then configure the queue:

Finally, configure the binding between exchange and queue:

After the basic configuration is completed, you can start writing code.
We know that in the message queue, the producer is the message provider and the consumer is the message consumer. Therefore, we need to create two projects: the producer project rabbitmq producer and the consumer project rabbitmq consumer.
Create producer project
The directory structure of the producer project rabbitmq producer is as follows:
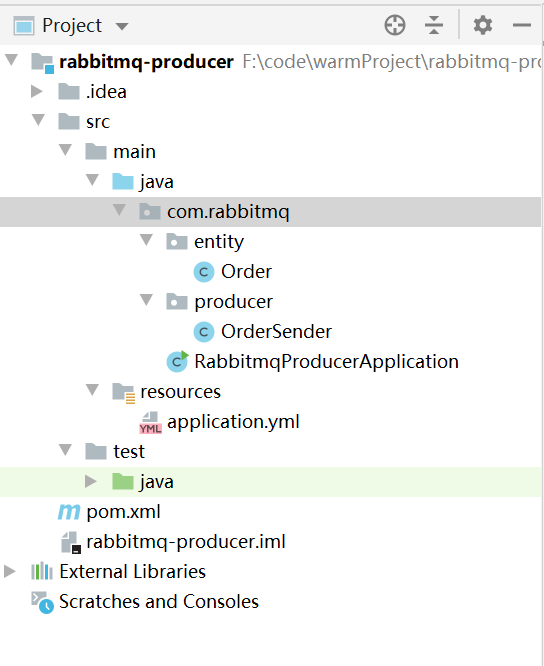
1. Create project structure
Create a new com.rabbitmq package in the java folder, and then create a sub package in the package:
Entity: used to store entity objects;
Producer: a service used to implement producer production messages;
2. Introduce dependency and configuration
Dependencies to add:
<?xml version="1.0" encoding="UTF-8"?>
<project xmlns="http://maven.apache.org/POM/4.0.0"
         xmlns:xsi="http://www.w3.org/2001/XMLSchema-instance"
         xsi:schemaLocation="http://maven.apache.org/POM/4.0.0 http://maven.apache.org/xsd/maven-4.0.0.xsd">
    <modelVersion>4.0.0</modelVersion>

    <groupId>org.example</groupId>
    <artifactId>rabbitmq-producer</artifactId>
    <version>1.0-SNAPSHOT</version>
    <parent>
        <groupId>org.springframework.boot</groupId>
        <artifactId>spring-boot-starter-parent</artifactId>
        <version>2.1.5.RELEASE</version>
        <relativePath/> <!-- lookup parent from repository -->
    </parent>
    <dependencies>
        <dependency>
            <groupId>org.springframework.boot</groupId>
            <artifactId>spring-boot-starter</artifactId>
        </dependency>
        <dependency>
            <groupId>org.springframework.boot</groupId>
            <artifactId>spring-boot-starter-amqp</artifactId>
        </dependency>
        <dependency>
            <groupId>org.springframework.boot</groupId>
            <artifactId>spring-boot-starter-web</artifactId>
        </dependency>

        <!--Tool class dependency package-->
        <dependency>
            <groupId>org.apache.commons</groupId>
            <artifactId>commons-lang3</artifactId>
            <version>3.8.1</version>
        </dependency>
        <dependency>
            <groupId>commons-io</groupId>
            <artifactId>commons-io</artifactId>
            <version>2.4</version>
        </dependency>
        <dependency>
            <groupId>com.alibaba</groupId>
            <artifactId>fastjson</artifactId>
            <version>1.2.49</version>
        </dependency>
        <dependency>
            <groupId>org.springframework.boot</groupId>
            <artifactId>spring-boot-starter-test</artifactId>
            <scope>test</scope>
        </dependency>
    </dependencies>

</project>
System configuration:
server:
  servlet:
    context-path: /
  port: 8605
spring:
  application:
    name: rabbitmq-producer
  rabbitmq:
    host: The server IP
    port: 5672
    username: admin
    password: admin
    virtual-host: /
    publisher-confirms: true #confirm mode
    publisher-returns: true #return mechanism
    template:
      mandatory: true #Configure secondary attributes in combination with return mechanism
    connection-timeout: 5000
3. Create entity class
Order.java
package com.rabbitmq.entity;

import java.io.Serializable;

// Order entity class
public class Order implements Serializable {
    // Order id
    private String id;
    // Order No
    private String code;
    // Unique id of the message sent
    private String messageId;

    public String getId() {
        return id;
    }

    public void setId(String id) {
        this.id = id;
    }

    public String getCode() {
        return code;
    }

    public void setCode(String code) {
        this.code = code;
    }

    public String getMessageId() {
        return messageId;
    }

    public void setMessageId(String messageId) {
        this.messageId = messageId;
    }
}
Since the messages in the message queue need to be transmitted in the network, this entity class must implement the serialization interface;
4. Create a production message service class
OrderSender.java
package com.rabbitmq.producer;

import com.rabbitmq.entity.Order;
import org.springframework.amqp.rabbit.connection.CorrelationData;
import org.springframework.amqp.rabbit.core.RabbitTemplate;
import org.springframework.beans.factory.annotation.Autowired;
import org.springframework.stereotype.Component;

@Component
public class OrderSender {

    @Autowired
    private RabbitTemplate rabbitTemplate;

    public void sendOrder(Order order) throws Exception{
        CorrelationData correlationData = new CorrelationData();
        correlationData.setId(order.getMessageId());
        rabbitTemplate.convertAndSend("order-exchange","order.abcd", order, correlationData);
    }
}
This class is very important. It automatically injects the template instance used to operate the message queue and calls its convertAndSend method to send messages.
The order exchange here is the exchange name we set in advance. order.abcd can match the Routing Key we set. You can write a test case to test the release of messages.
5. Test message release
Create a new sub package in the test package and add the development class ApplicationTest.java:

ApplicationTest.java
package com.rabbitmq;

import com.rabbitmq.entity.Order;
import com.rabbitmq.producer.OrderSender;
import org.junit.Test;
import org.junit.runner.RunWith;
import org.springframework.beans.factory.annotation.Autowired;
import org.springframework.boot.test.context.SpringBootTest;
import org.springframework.test.context.junit4.SpringRunner;

import java.util.UUID;

@RunWith(SpringRunner.class)
@SpringBootTest
public class ApplicationTest {
    @Autowired
    OrderSender orderSender;

    @Test
    public void test() throws Exception {
        Order order = new Order();
        order.setId("1");
        order.setCode("Order No. 001");
        order.setMessageId(System.currentTimeMillis() + "_" + UUID.randomUUID());
        orderSender.sendOrder(order);
    }

}
The code of the test class is very simple, that is, create an order and set the attribute, then call the message publishing method to store the message to the message queue.
After the test is passed, you can see that a non consumed message appears in the message queue on the management panel:

Now that there are messages in the message queue, let's develop consumer projects for consumption.
Create consumer item
The new consumer project rabbitmq consumer has the following structure:
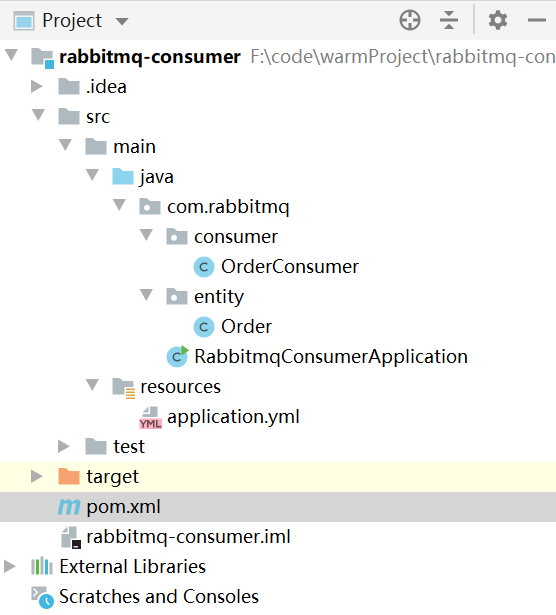
The entity class Order.java remains unchanged, but the configuration file needs to be modified.
1. Modify the configuration file
Compared with the producer project, pom.xml needs to modify the port number and add a configuration item:
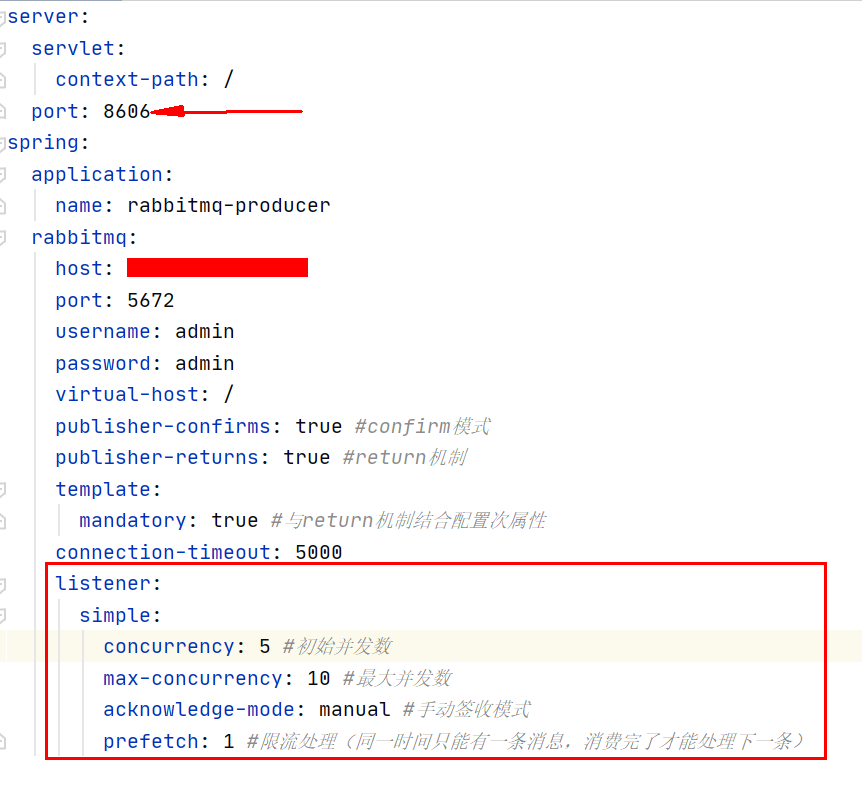
New configuration items are as follows:
	listener:
      simple:
        concurrency: 5 #Initial concurrency
        max-concurrency: 10 #Maximum concurrent number
        acknowledge-mode: manual #Manual sign in mode
        prefetch: 1 #Current limiting processing (only one message can be processed at a time, and the next message can only be processed after consumption)
2. Develop message consumption
OrderConsumer.java
package com.rabbitmq.consumer;

import com.rabbitmq.client.Channel;
import com.rabbitmq.entity.Order;
import org.springframework.amqp.rabbit.annotation.*;
import org.springframework.amqp.support.AmqpHeaders;
import org.springframework.messaging.handler.annotation.Headers;
import org.springframework.messaging.handler.annotation.Payload;
import org.springframework.stereotype.Component;
import java.io.IOException;
import java.util.Map;

@Component
public class OrderConsumer {

    @RabbitListener(
            bindings = @QueueBinding(
                    value = @Queue(value = "order-queue", durable = "true"),
                    exchange = @Exchange(name = "order-exchange", durable = "true", type = "topic"),
                    key = "order.#"
            )
    )
    @RabbitHandler
    public void onOrderMessage(@Payload Order order, @Headers Map<String, Object> headers, Channel channel) throws IOException {
        // Consumer operation
        System.out.println("-------------Receive the message and start consumption------------");
        System.out.println("Order No.:" + order.getCode());
        Long deliverTag = (Long) headers.get(AmqpHeaders.DELIVERY_TAG);
        // Since we have enabled manual confirmation, consumers must confirm here
        channel.basicAck(deliverTag,false);
    }
}
We previously configured the manual confirmation message in the configuration file, so we need to pass in a Channel type object for confirmation. We must note that this Channel is not in NIO, but in the com.rabbitmq.client package. Don't make a mistake.
After processing the normal business logic, manual confirmation is required:
channel.basicAck(deliverTag,false);
Another thing to note is that @ RabbitListener not only implements the binding of consumers with the corresponding message queue, exchange and routing keywords, but also has the function of creating by default. In other words, if we have not manually created exchange, queue and routing key on the console in advance, the code can be created for us automatically.
3. Run the program for message consumption
Run the consumer project and you can see the record of output message consumption:

Check the console interface and find that the messages in the message queue have been consumed:
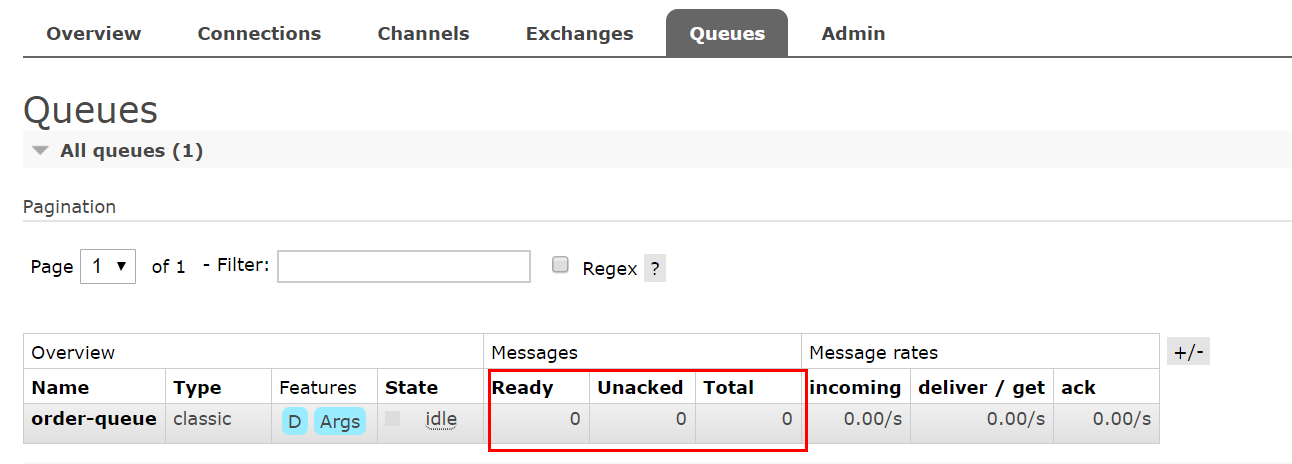
So far, the simplest message queue has been completed. However, in the actual production environment, such implementation is far from enough. We also need to consider the reliability of message delivery and consumption, and ensure the reliability of transmission process. Otherwise, the message will be sacrificed if it is lost. I can't write it today. Bye for the next blog!