1. SpringBoot
Javase:OOP
mysql: persistence
html+js+css+jquery + framework = view, unskilled framework, poor css
javaweb: a website that independently develops MVC three-tier architecture
ssm: framework, which simplifies our development process and makes the configuration more complicated
war: tomcat running
Spring re simplification: spring boot jar: embedded tomcat; Microservice architecture!
More and more services! springboot
1.1 review what Spring is
Spring is an open source framework. It is a lightweight Java development framework developed in 2003 by Rod Johnson
Spring is created to solve the complexity of enterprise application development and simplify development
1.2 how spring simplifies Java development
In order to reduce the complexity of Java development, Spring adopts the following four key strategies:
-
Lightweight and minimally intrusive programming based on POJO, everything is bean;
-
Loose coupling is realized through IOC, dependency injection (DI) and interface oriented;
-
Declarative programming based on AOP and conventions;
-
Reduce the style code through cut plane and template, RedisTemplate, xxtemplate;
1.3 what is SpringBoot
Students who have studied javaweb know that developing a web application requires a lot of steps from the initial contact with Servlet combined with Tomcat to run a Hello Wolrld program; Later, I used the framework Struts, and then spring MVC. Now, with spring boot, other web frameworks will appear in a year or two; Have you ever experienced the continuous evolution of the framework, and then develop your own projects, and all the technologies are constantly changing and transforming? Suggestions can be experienced again;
To get back to business, what is SpringBoot? It is a java web development framework, which is similar to spring MVC. Compared with the benefits of other Java Web frameworks, it is officially said to simplify development, and the Convention is greater than the configuration. you can "just run", which can quickly develop web applications and launch an http interface in a few lines of code.
The development of all technical frameworks seems to follow a main line law: a normative framework is derived from a complex application scenario. People only need to carry out various configurations without realizing it by themselves. At this time, the powerful configuration function becomes an advantage; After a certain degree of development, people have chosen some practical functions and design essence to reconstruct some lightweight frameworks based on actual production and application. Later, in order to improve the development efficiency, they disliked that the original configurations were too troublesome, so they began to advocate "agreement is greater than configuration", and then derived some one-stop solutions.
Yes, this is the process of Java enterprise application - > J2EE - > spring - > springboot.
With the continuous development of spring, more and more fields are involved. The project integration development needs to cooperate with a variety of files, which gradually becomes less easy to use and simple, contrary to the original concept, and even called configuration hell. Spring Boot is a development framework abstracted under such a background. The purpose is to make it easier for everyone to use spring and integrate various common middleware and open source software;
Spring Boot is developed based on spring. Spring Boot itself does not provide the core features and extension functions of the spring framework, but is only used to quickly and quickly develop a new generation of applications based on the spring framework. In other words, it is not a solution to replace spring, but a tool closely combined with the spring framework to improve the spring developer experience. Spring Boot takes the core idea that convention is greater than configuration. By default, it helps us make a lot of settings. Most Spring Boot applications only need a few spring configurations. At the same time, it integrates a large number of commonly used third-party library configurations (such as Redis, MongoDB, Jpa, RabbitMQ, Quartz, etc.), and these third-party libraries can be used out of the box with almost zero configuration in Spring Boot applications.
Simply put, spring boot is not a new framework. It configures the use of many frameworks by default. Just like maven integrates all jar packages, spring boot integrates all frameworks.
Spring Boot was born in a famous family. From the beginning, it stood at a relatively high starting point. After several years of development, the ecology is perfect enough. Spring Boot has become the hottest technology in the Java field.
Main advantages of Spring Boot:
-
Get started faster for all Spring developers
-
Out of the box, various default configurations are provided to simplify project configuration
-
Inline containers simplify Web projects
-
There are no requirements for redundant code generation and XML configuration
2. Hello World
2.1 preparation
We will learn how to quickly create a Spring Boot application and implement a simple Http request processing. Through this example, I have a preliminary understanding of Spring Boot and experience its features of simple structure and rapid development.
My environmental preparation:
-
java version "1.8.0_181"
-
Maven-3.6.1
-
SpringBoot 2.x latest edition
Development tools:
-
IDEA
2.2 description of creating basic project
Spring officially provides a very convenient tool for us to quickly build applications
Spring Initializr: https://start.spring.io/
Project creation method 1: use the Web page of Spring Initializr to create the project
1. Open https://start.spring.io/
2. Fill in project information
3. Click the "Generate Project" button to generate the project; download the project
4. Unzip the project package and import it as Maven project with IDEA. You can go to the next step until the project is imported.
5. If it is used for the first time, the speed may be slow, there are many packages, and you need to wait patiently for everything to be ready.
Project creation method 2: directly create a project using IDEA (this method is generally used)
1. Create a new project
2. Select spring initalizr, and you can see that the default is to go to the quick build tool on the official website
3. Fill in project information
4. Select the initialized component (just check Web for beginners)
5. Fill in the project path
6. Wait for the project to build successfully
Project structure analysis:
Through the above steps, the basic project is created. The following files will be generated automatically.
1. Main startup class of program
2. An application Properties configuration file
3. A test class
4. A POM xml
2.3 pom.xml analysis
Open POM XML, take a look at the dependencies of the Spring Boot project:
<!-- Parent dependency --> <parent> <groupId>org.springframework.boot</groupId> <artifactId>spring-boot-starter-parent</artifactId> <version>2.2.5.RELEASE</version> <relativePath/> </parent> <dependencies> <!-- web Scene launcher --> <dependency> <groupId>org.springframework.boot</groupId> <artifactId>spring-boot-starter-web</artifactId> </dependency> <!-- springboot unit testing --> <dependency> <groupId>org.springframework.boot</groupId> <artifactId>spring-boot-starter-test</artifactId> <scope>test</scope> <!-- Eliminate dependency --> <exclusions> <exclusion> <groupId>org.junit.vintage</groupId> <artifactId>junit-vintage-engine</artifactId> </exclusion> </exclusions> </dependency> </dependencies> <build> <plugins> <!-- Package plug-in --> <plugin> <groupId>org.springframework.boot</groupId> <artifactId>spring-boot-maven-plugin</artifactId> </plugin> </plugins> </build>
2.4 write an http interface
1. If you want to create a package of the same level under the main directory of the controller, you must not identify it under the same level
2. Create a new HelloController class in the package
package com.dary.helloworld.controller;
import org.springframework.web.bind.annotation.RequestMapping;
import org.springframework.web.bind.annotation.RestController;
//automatic assembly
@RestController
public class HelloController {
@RequestMapping("/hello")
public String hello(){
//Call the service and accept the front-end parameters!
return "Hello World";
}
}3. After writing, start the project from the main program, launch the request from the browser, and see the page return; The console outputs the port number accessed by Tomcat!
In a few simple steps, the development of a web interface is completed. SpringBoot is so simple. So we often use it to build our micro service projects!
2.5 type the project into a jar package and click maven's package
If you encounter the above errors, you can configure to skip the project and run test cases during packaging
<!--
    At work,In many cases, we don't want to execute test cases when packaging
    Maybe the test case is not finished,Or test examples will affect database data
    Skip test case execution
    -->
<plugin>
    <groupId>org.apache.maven.plugins</groupId>
    <artifactId>maven-surefire-plugin</artifactId>
    <configuration>
        <!--Skip project run test case-->
        <skipTests>true</skipTests>
    </configuration>
</plugin>
If the package is successful, a jar package will be generated in the target directory
3. Preliminary discussion on principle
How exactly does the hellospprinboot we wrote before run? Maven project, we usually start from POM XML file;
3.1 pom.xml
3.1.1 parent dependency
It mainly depends on a parent project, which mainly manages the resource filtering and plug-ins of the project!
 <parent>
        <groupId>org.springframework.boot</groupId>
        <artifactId>spring-boot-starter-parent</artifactId>
        <version>2.3.10.RELEASE</version>
        <relativePath/> <!-- lookup parent from repository -->
    </parent>
Click in and find another parent dependency
<parent>
    <groupId>org.springframework.boot</groupId>
    <artifactId>spring-boot-dependencies</artifactId>
    <version>2.3.10.RELEASE</version>
    <relativePath>../../spring-boot-dependencies</relativePath>
</parent>
This is the place to really manage all dependent versions in the SpringBoot application, the version control center of SpringBoot;
In the future, we will import dependency. By default, we don't need to write a version; However, if the imported package is not managed in the dependency, you need to manually configure the version;
3.1.2 spring boot starter
<dependency>
    <groupId>org.springframework.boot</groupId>
    <artifactId>spring-boot-starter-web</artifactId>
</dependency>
Springboot boot starter XXX: the scenario initiator of spring boot
Spring boot starter Web: it helps us import the components that the web module depends on for normal operation;
SpringBoot extracts all functional scenarios and makes them into starters. You only need to introduce these starters into the project, and all relevant dependencies will be imported. We can import the scenario starters with what functions we want to use; We can also customize the starter ourselves in the future;
3.2 main startup
After analyzing POM XML to see this startup class
3.2.1 default main startup class
//@Spring bootapplication to annotate a main program class
//It shows that this is a Spring Boot application
@SpringBootApplication
public class SpringbootApplication {
public static void main(String[] args) {
//I thought I started a method, but I didn't expect to start a service
SpringApplication.run(SpringbootApplication.class, args);
}
}But a simple startup class is not simple! Let's analyze what these annotations do
3.2.2 @SpringBootApplication
Function: mark a class to indicate that this class is the main configuration class of SpringBoot. SpringBoot should run the main method of this class to start the SpringBoot application;
Enter this annotation: you can see that there are many other annotations above!
@SpringBootConfiguration
@EnableAutoConfiguration
@ComponentScan(
    excludeFilters = {@Filter(
    type = FilterType.CUSTOM,
    classes = {TypeExcludeFilter.class}
), @Filter(
    type = FilterType.CUSTOM,
    classes = {AutoConfigurationExcludeFilter.class}
)}
)
public @interface SpringBootApplication {
    // ......
}
3.2.3 @ComponentScan
This annotation is very important in Spring. It corresponds to the elements in the XML configuration.
Function: automatically scan and load qualified components or beans, and load the bean definition into the IOC container
3.2.4 @SpringBootConfiguration
Function: the configuration class of SpringBoot is marked on a class to indicate that it is a SpringBoot configuration class;
Let's move on to this annotation
// Click in to get the following @ Component
@Configuration
public @interface SpringBootConfiguration {}
@Component
public @interface Configuration {}The @ Configuration here indicates that this is a Configuration class, which is the xml Configuration file corresponding to Spring;
The @ Component inside shows that the startup class itself is just a Component in Spring and is responsible for starting the application!
Let's go back to the spring boot application annotation and continue.
3.2.5 @EnableAutoConfiguration
@Enable autoconfiguration: enable autoconfiguration
Previously, we needed to configure things ourselves, but now SpringBoot can automatically configure them for us@ EnableAutoConfiguration tells SpringBoot to enable the auto configuration function, so that the auto configuration can take effect;
Click in the annotation to view it continuously:
@AutoConfigurationPackage: autoconfiguration package
@Import({Registrar.class})
public @interface AutoConfigurationPackage {
}
@Import: the Spring bottom annotation @ import imports a component into the container
Registrar.class function: scan the package of the main startup class and all components in all sub packages under the package to the Spring container;
This analysis is finished. Step back and continue to look
@Import({AutoConfigurationImportSelector.class}): import components to the container;
AutoConfigurationImportSelector: automatically configure the import selector, so which component selectors will it import? Let's click this class to see the source code:
1. There is one such method in this class
// Obtain candidate configurations
protected List<String> getCandidateConfigurations(AnnotationMetadata metadata, AnnotationAttributes attributes) {
    //The getSpringFactoriesLoaderFactoryClass () method here
    //The returned annotation class is the annotation class that we first saw to start the automatic import configuration file; EnableAutoConfiguration
    List<String> configurations = SpringFactoriesLoader.loadFactoryNames(this.getSpringFactoriesLoaderFactoryClass(), this.getBeanClassLoader());
    Assert.notEmpty(configurations, "No auto configuration classes found in META-INF/spring.factories. If you are using a custom packaging, make sure that file is correct.");
    return configurations;
}
2. This method also calls the static method of the springfactoryesloader class! We enter the loadFactoryNames() method of the springfactoryiesloader class
public static List<String> loadFactoryNames(Class<?> factoryClass, @Nullable ClassLoader classLoader) {
    String factoryClassName = factoryClass.getName();
    //Here it calls the loadSpringFactories method again
    return (List)loadSpringFactories(classLoader).getOrDefault(factoryClassName, Collections.emptyList());
}
3. Let's continue to click to view the loadSpringFactories method
private static Map<String, List<String>> loadSpringFactories(@Nullable ClassLoader classLoader) {
//After obtaining the classLoader, we can see that what we get here is the class itself marked with EnableAutoConfiguration
MultiValueMap<String, String> result = (MultiValueMap)cache.get(classLoader);
if (result != null) {
return result;
} else {
try {
//Go to get a resource "META-INF/spring.factories"
Enumeration<URL> urls = classLoader != null ? classLoader.getResources("META-INF/spring.factories") : ClassLoader.getSystemResources("META-INF/spring.factories");
LinkedMultiValueMap result = new LinkedMultiValueMap();
//Traverse the read resources and encapsulate them into a property
while(urls.hasMoreElements()) {
URL url = (URL)urls.nextElement();
UrlResource resource = new UrlResource(url);
Properties properties = PropertiesLoaderUtils.loadProperties(resource);
Iterator var6 = properties.entrySet().iterator();
while(var6.hasNext()) {
Entry<?, ?> entry = (Entry)var6.next();
String factoryClassName = ((String)entry.getKey()).trim();
String[] var9 = StringUtils.commaDelimitedListToStringArray((String)entry.getValue());
int var10 = var9.length;
for(int var11 = 0; var11 < var10; ++var11) {
String factoryName = var9[var11];
result.add(factoryClassName, factoryName.trim());
}
}
}
cache.put(classLoader, result);
return result;
} catch (IOException var13) {
throw new IllegalArgumentException("Unable to load factories from location [META-INF/spring.factories]", var13);
}
}
}4. Found a file that appears many times: spring Factories, search it globally
3.2.6 spring.factories
We open spring according to the source Factories, you can see many automatic configuration files; This is the root of automatic configuration!
WebMvcAutoConfiguration
Let's open any one of the automatic configuration classes above, such as webmvcoautoconfiguration
You can see that these are JavaConfig configuration classes one by one, and some beans are injected. You can find some classes you know and get familiar with them!
Therefore, the real implementation of automatic Configuration is to search all meta-inf / spring from the classpath Factories Configuration file, and the corresponding org. Org springframework. boot. autoconfigure. The Configuration items under the package are instantiated into the IOC container Configuration class in the form of JavaConfig marked with @ Configuration through reflection, and then these are summarized into an instance and loaded into the IOC container.
Conclusion:
-
SpringBoot starts from meta-inf / spring. In the classpath Get the value specified by EnableAutoConfiguration from factories
-
Import these values into the container as automatic configuration class, and the automatic configuration class will take effect to help us with automatic configuration;
-
The overall solution and automatic configuration of J2EE are in the jar package of springboot autoconfigure;
-
It will import many automatic configuration classes (xxxAutoConfiguration) into the container, that is, import all the components required for this scenario into the container and configure these components;
-
The automatic configuration class eliminates the need for us to manually write configuration injection function components;
Now you should have a general understanding of the operation principle of SpringBoot, and we will deepen it later!
3.3 SpringApplication
3.3.1 not simple method
At first, I thought I was running a main method, but I didn't expect to start a service;
@SpringBootApplication
public class SpringbootApplication {
    public static void main(String[] args) {
        SpringApplication.run(SpringbootApplication.class, args);
    }
}
SpringApplication.run analysis
The analysis of this method is mainly divided into two parts: one is the instantiation of spring application, and the other is the execution of run method;
3.3.2 SpringApplication
This class mainly does the following four things:
1. Infer whether the type of application is a normal project or a Web project
2. Find and load all available initializers and set them in the initializers property
3. Find all the application listeners and set them in the listeners property
4. Infer and set the definition class of the main method, and find the running main class
View constructor:
public SpringApplication(ResourceLoader resourceLoader, Class... primarySources) {
    // ......
    this.webApplicationType = WebApplicationType.deduceFromClasspath();
    this.setInitializers(this.getSpringFactoriesInstances();
    this.setListeners(this.getSpringFactoriesInstances(ApplicationListener.class));
    this.mainApplicationClass = this.deduceMainApplicationClass();
}
3.3.3 run method process analysis
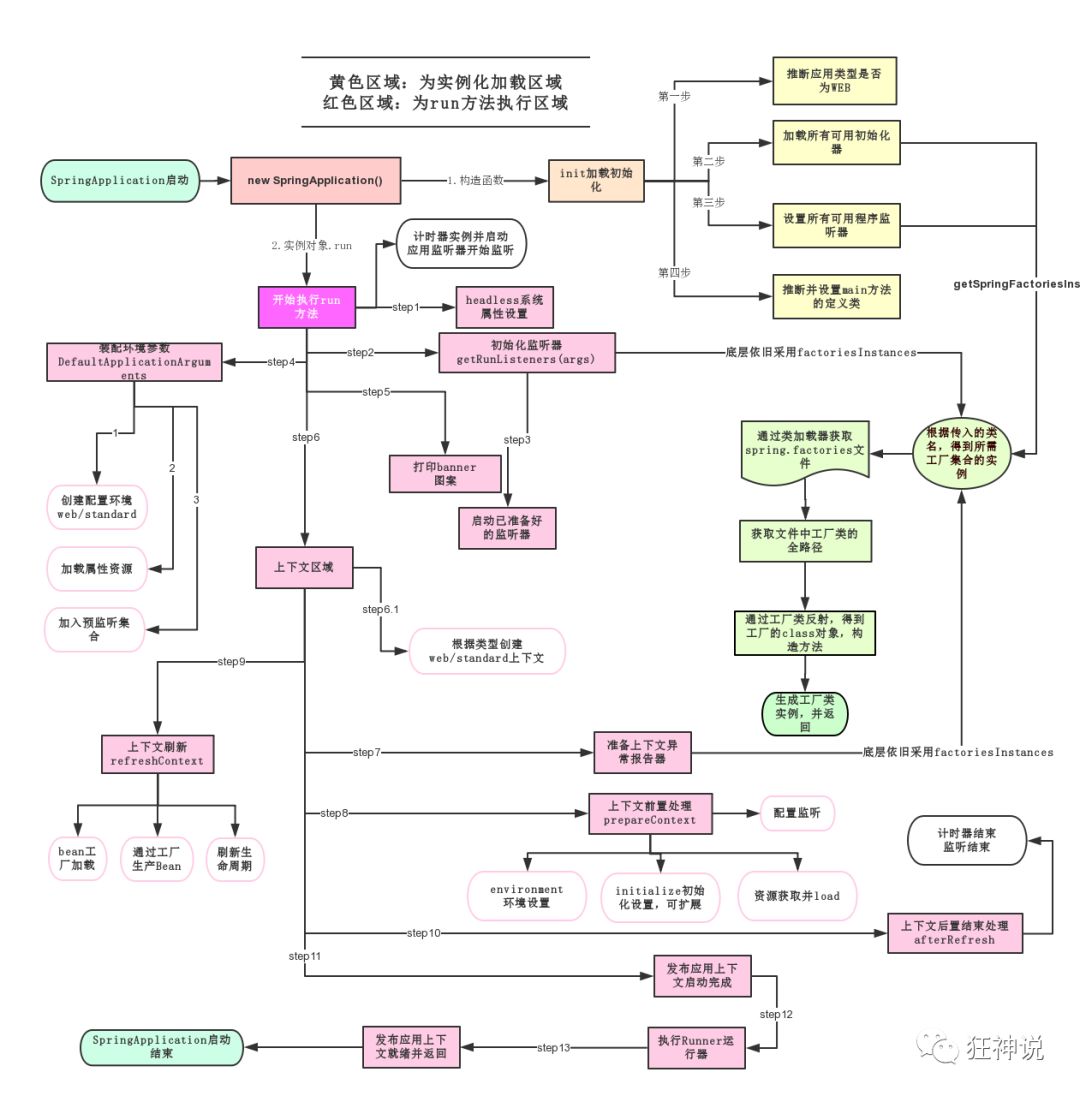
Follow the source code and this picture to explore!
4. yaml
configuration file
SpringBoot uses a global configuration file with a fixed name
-
application.properties
-
-
Syntax structure: key=value
-
-
application.yml
-
-
Syntax structure: key: space value
-
Function of configuration file: modify the default value of SpringBoot automatic configuration, because SpringBoot is automatically configured at the bottom;
For example, we can modify the default startup port number of Tomcat in the configuration file! Test it!
server.port=8088
4.1 yaml overview
YAML is a recursive abbreviation of "YAML Ain't a Markup Language". When developing this language, YAML actually means "Yet Another Markup Language"
This language is data centric, not markup language focused!
Most of the previous configuration files were configured using xml; For example, a simple port configuration, let's compare yaml and xml
Traditional xml configuration:
<server>
    <port>8088<port>
</server>
yaml configuration:
server:
  port: 8088
4.2 yaml basic grammar
Note: strict grammar requirements!
1. Spaces cannot be omitted
2. Indentation is used to control the hierarchical relationship. As long as a column of data aligned on the left is at the same level.
3. Attributes and values are case sensitive.
Literal: ordinary value [number, Boolean, string]
The literal quantity can be written directly after it. By default, the string does not need double quotation marks or single quotation marks;
k: v
be careful:
-
"" double quotation marks will not escape the special characters in the string, and the special characters will be used as the meaning they want to express;
For example: name: "kuang \n shen" output: kuang newline shen
-
'' single quotation mark, which will escape special characters, and the special characters will eventually be output as ordinary characters
For example: name: 'kuang \n shen' output: kuang \n shen
Object, Map (key value pair)
#Object, Map format
k:
    v1:
    v2:
Write the attribute and value relationship of the object in the next line, and pay attention to the indentation; For example:
student:
    name: qinjiang
    age: 3
Inline writing
student: {name: qinjiang,age: 3}Array (List, set)
Use the - value to represent an element in the array, for example:
pets:
 - cat
 - dog
 - pig
Inline writing
pets: [cat,dog,pig]
Modify the default port number of SpringBoot
Add the parameter of port number in the configuration file to switch ports;
server:
  port: 8088
Injection profile
yaml file is more powerful because it can directly inject matching values into our entity classes!
4.3 yaml injection profile
1. Create a new file application. In the resources directory of the springboot project yml
2. Write an entity class Dog;
package com.dary.s2config.pojo;
import lombok.AllArgsConstructor;
import lombok.NoArgsConstructor;
import org.springframework.stereotype.Component;
@Component
@AllArgsConstructor
@NoArgsConstructor
public class Dog {
private String name;
private Integer age;
}3. Think about how we used to inject attribute values into bean s@ Value, test the dogs:
@Component //Register bean
public class Dog {
    @Value("Ah Huang")
    private String name;
    @Value("18")
    private Integer age;
}
4. Inject and output the dog under the test class of SpringBoot;
@SpringBootTest
class DemoApplicationTests {
@Autowired //Inject the dog automatically
Dog dog;
@Test
public void contextLoads() {
System.out.println(dog); //Print and look at the dog object
}
}The result is output successfully and @ Value is injected successfully
5. We are writing a more complex entity class: the Person class
package com.dary.s2config.pojo;
import lombok.AllArgsConstructor;
import lombok.Data;
import lombok.NoArgsConstructor;
import org.springframework.stereotype.Component;
import java.util.Date;
import java.util.List;
import java.util.Map;
@Data
@Component
@AllArgsConstructor
@NoArgsConstructor
public class Person {
private String name;
private Integer age;
private Boolean happy;
private Date birth;
private Map<String,Object> maps;
private List<Object> lists;
private Dog dog;
}6. Let's use yaml configuration for injection. When you write, pay attention to the differences and advantages. Let's write a yaml configuration!
person:
  name: dary
  age: 21
  happy: true
  birth: 1998/02/02
  maps: {k1: v1,k2: v2}
  lists:
    - code
    - girl
    - music
  dog:
    name: zyz
    age: 1
7. We have written all the values of the person object just now. Now let's inject them into our class!
/*
@ConfigurationProperties effect:
Map the value of each attribute configured in the configuration file to this component;
Tell SpringBoot to bind all properties in this class to the relevant configuration in the configuration file
Parameter prefix = "person": match all attributes under person in the configuration file one by one
*/
package com.dary.s2config.pojo;
import lombok.AllArgsConstructor;
import lombok.Data;
import lombok.NoArgsConstructor;
import org.springframework.boot.context.properties.ConfigurationProperties;
import org.springframework.stereotype.Component;
import java.util.Date;
import java.util.List;
import java.util.Map;
@Data
@Component
@ConfigurationProperties(prefix = "person")
@AllArgsConstructor
@NoArgsConstructor
public class Person {
private String name;
private Integer age;
private Boolean happy;
private Date birth;
private Map<String,Object> maps;
private List<Object> lists;
private Dog dog;
}8. IDEA prompts that the annotation processor configured by springboot is not found. Let's look at the document. We can look at the document and find a dependency!


<!-- After importing the configuration file processor, the configuration file will be bound, and there will be a prompt that needs to be restarted -->
<dependency>
  <groupId>org.springframework.boot</groupId>
  <artifactId>spring-boot-configuration-processor</artifactId>
  <optional>true</optional>
</dependency>
9. After confirming that the above configurations are OK, let's test in the test class:
@SpringBootTest
class DemoApplicationTests {
@Autowired
Person person; //Inject person automatically
@Test
public void contextLoads() {
System.out.println(person); //Print person information
}
}Result: all values are injected successfully!
Person(name=dary,
        age=21,
        happy=true,
        birth=Mon Feb 02 00:00:00 CST 1998,
        maps={k1=v1, k2=v2},
        lists=[code, girl, music],
        dog=Dog(name=zyz, age=2))
yaml configuration injection into entity class is completely OK!
Classroom test:
1. If the key value of the configuration file is different from the value of the attribute, the result output is null and the injection fails
2. After configuring a person2, point @ ConfigurationProperties(prefix = "person2") to our person2;
4.4 loading the specified configuration file
@PropertySource: load the specified configuration file;
@configurationProperties: get the value from the global configuration file by default;
1. Let's create a new person in the resources directory Properties file
name=dary
2. Then specify in our code to load person Properties file
package com.dary.s2config.pojo;
import lombok.AllArgsConstructor;
import lombok.Data;
import lombok.NoArgsConstructor;
import org.springframework.context.annotation.PropertySource;
import org.springframework.stereotype.Component;
import java.util.Date;
import java.util.List;
import java.util.Map;
@Data
@Component
@AllArgsConstructor
@NoArgsConstructor
@PropertySource(value = "classpath:person.properties")
public class Person {
private String name;
private Integer age;
private Boolean happy;
private Date birth;
private Map<String,Object> maps;
private List<Object> lists;
private Dog dog;
}3. Output the test again: the specified configuration file is bound successfully!
4.6 placeholder for configuration file
The configuration file can also write placeholders to generate random numbers
person:
  name: dary${random.uuid}
  age: ${random.int}
  happy: true
  birth: 1998/02/02
  maps: {k1: v1,k2: v2}
  lists:
    - code
    - girl
    - music
  dog:
    name: ${person.hello:hello}_zyz
    age: 2
4.7 review properties configuration
The yaml methods we used above are the simplest and most commonly used in development; Also recommended by springboot! Let's talk about other implementation methods. The reason is the same; Write or write like that; In addition to yml, the configuration file also has the properties we used before. We didn't talk about it. Let's talk about it!
[note] when writing the properties configuration file in Chinese, there will be garbled codes. We need to set the encoding format to UTF-8 in IDEA;
Settings -- > configured in fileencodings;
Test steps:
1. Create a new entity class User
@Component //Register bean
public class User {
    private String name;
    private int age;
    private String sex;
}
2. Edit profile user properties
user1.name=dary
user1.age=18
user1.sex=male
3. We use @ Value on the User class to inject!
@Component //Register bean
@PropertySource(value = "classpath:user.properties")
public class User {
    //Use @ value directly
    @Value("${user.name}") //Take value from configuration file
    private String name;
    @Value("#{9*2}")  // #{SPEL} Spring expression
    private int age;
    @Value("male")  // Literal
    private String sex;
}
4. Springboot test
@SpringBootTest
class DemoApplicationTests {
@Autowired
User user;
@Test
public void contextLoads() {
System.out.println(user);
}
}Result normal output
4.8 comparison summary
@Value is not friendly to use! We need to assign a value to each attribute separately, which is troublesome; Let's look at a function comparison diagram

1. @ ConfigurationProperties only needs to be written once, and @ Value needs to be added to each field
2. Loose binding: what does that mean? For example, the last name written in my yml is the same as lastName, and the letters followed by - are capitalized by default. This is loose binding. You can test it
3. JSR303 data verification is that we can add a layer of filter verification in the field to ensure the legitimacy of the data
4. Complex type encapsulation. Objects can be encapsulated in yml, but value is not supported
Conclusion:
Values can be obtained by configuring yml and configuring properties. yml is highly recommended;
If we only need to obtain a value in the configuration file in a business, we can use @ value;
If we specially write a JavaBean to map one by one with the configuration file, we can directly @ configurationProperties. Don't hesitate!
5. JSR303 data verification and multi environment switching
5.1 let's see how to use it first
In Springboot, @ validated can be used to verify the data. If the data is abnormal, exceptions will be thrown uniformly to facilitate the unified processing of the exception center. Let's write a comment here so that our name can only support Email format;
import org.springframework.stereotype.Component;
import org.springframework.validation.annotation.Validated;
import java.util.Date;
import java.util.List;
import java.util.Map;
@Data
@Component
@ConfigurationProperties(prefix = "person")
@AllArgsConstructor
@NoArgsConstructor
@Validated
public class Person {
private String name;
private Integer age;
private Boolean happy;
private Date birth;
private Map<String,Object> maps;
private List<Object> lists;
private Dog dog;
}Running result: default message [not a legal email address];
Using data verification can ensure the correctness of data;
5.2 common parameters
@NotNull(message="Name cannot be empty") private String userName; @Max(value=120,message="The oldest can't check 120") private int age; @Email(message="Email format error") private String email; Empty check @Null Verify that the object is null @NotNull Verify that the object is not null, Cannot check string with length 0 @NotBlank Check whether the constraint string is Null And by Trim Is the length greater than 0,String only,And the spaces before and after will be removed. @NotEmpty Check whether the constraint element is NULL Or EMPTY. Booelan inspect @AssertTrue verification Boolean Whether the object is true @AssertFalse verification Boolean Whether the object is false Length check @Size(min=, max=) Validation object( Array,Collection,Map,String)Is the length within the given range @Length(min=, max=) string is between min and max included. Date check @Past verification Date and Calendar Is the object before the current time @Future verification Date and Calendar Is the object after the current time @Pattern verification String Whether the object conforms to the rules of regular expressions .......wait In addition, we can also customize some data verification rules
5.3 multi environment switching
profile is Spring's support for different configuration functions for different environments. You can quickly switch environments by activating different environment versions;
Multi profile
When we write the main configuration file, the file name can be application - {profile} Properties / YML, used to specify multiple environment versions;
For example:
application-test.properties represents the test environment configuration
application-dev.properties represents the configuration of the development environment
However, Springboot does not start these configuration files directly. It uses application. Com by default Properties master configuration file;
We need to select the environment to be activated through a configuration:
#For example, if the dev environment is specified in the configuration file, we can test by setting different port numbers;
#When we start SpringBoot, we can see that the configuration has been switched to dev;
spring.profiles.active=dev
5.4 multiple document blocks of yaml
It is the same as in the properties configuration file, but it is more convenient to use yml to implement it without creating multiple configuration files!
server: port: 8081 spring: profiles: active: dev --- server: port: 8082 spring: profiles: dev --- server: port: 8083 spring: profiles: test
Note: if both yml and properties are configured with ports and no other environment is activated, the properties configuration file will be used by default!
5.5 loading location of configuration file
There are many ways to load configuration files externally. We can select the most commonly used one and configure it in the developed resource file!
Official external configuration file description reference document
springboot startup will scan the application in the following location Properties or application YML file as the default configuration file of Spring boot:
Priority 1: under the project path config Folder profile
 Priority 2: configuration file under project path
 Priority 3: under resource path config Folder profile
 Priority 4: configuration file under resource path
The priority is from high to bottom, and the configuration of high priority will overwrite the configuration of low priority;
SpringBoot will load all the main configuration files from these four locations; Complementary configuration;
We set a project access path configuration in the lowest level configuration file to test the complementarity problem;
#Configure the access path of the project
server.servlet.context-path=/dary
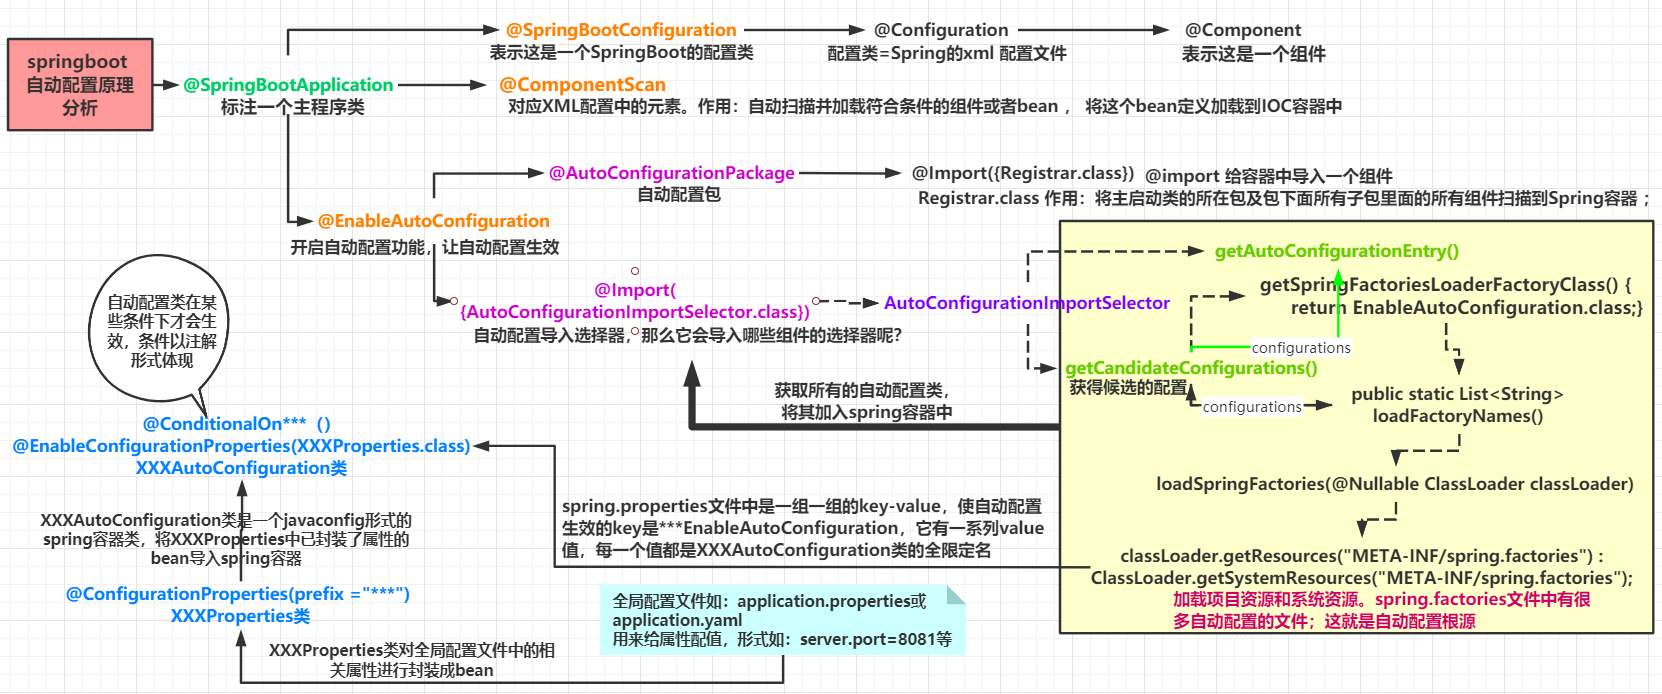
6. Automatic configuration principle
What can a configuration file write? How do you write it?
There are a lot of configurations in the official documentation of SpringBoot, which we can't remember all
6.1 analyze the principle of automatic configuration
We take Http encoding autoconfiguration (Http encoding autoconfiguration) as an example to explain the principle of autoconfiguration;
//Indicates that this is a configuration class. Like the previously written configuration file, you can also add components to the container;
@Configuration
//Start the ConfigurationProperties function of the specified class;
//Enter the HttpProperties view and bind the corresponding values in the configuration file with HttpProperties;
//And add HttpProperties to the ioc container
@EnableConfigurationProperties({HttpProperties.class})
//Spring underlying @ Conditional annotation
//According to different conditions, if the specified conditions are met, the configuration in the whole configuration class will take effect;
//The meaning here is to judge whether the current application is a web application. If so, the current configuration class will take effect
@ConditionalOnWebApplication(
type = Type.SERVLET
)
//Judge whether the current project has this class CharacterEncodingFilter; Filter for garbled code resolution in spring MVC;
@ConditionalOnClass({CharacterEncodingFilter.class})
//Determine whether there is a configuration in the configuration file: spring http. encoding. enabled;
//If it does not exist, the judgment is also valid
//Even if pring. Is not configured in our configuration file http. encoding. It is also effective by default;
@ConditionalOnProperty(
prefix = "spring.http.encoding",
value = {"enabled"},
matchIfMissing = true
)
public class HttpEncodingAutoConfiguration {
//He has mapped to the SpringBoot configuration file
private final Encoding properties;
//When there is only one constructor with parameters, the value of the parameter will be taken from the container
public HttpEncodingAutoConfiguration(HttpProperties properties) {
this.properties = properties.getEncoding();
}
//Add a component to the container. Some values of this component need to be obtained from properties
@Bean
@ConditionalOnMissingBean //Determine whether the container does not have this component?
public CharacterEncodingFilter characterEncodingFilter() {
CharacterEncodingFilter filter = new OrderedCharacterEncodingFilter();
filter.setEncoding(this.properties.getCharset().name());
filter.setForceRequestEncoding(this.properties.shouldForce(org.springframework.boot.autoconfigure.http.HttpProperties.Encoding.Type.REQUEST));
filter.setForceResponseEncoding(this.properties.shouldForce(org.springframework.boot.autoconfigure.http.HttpProperties.Encoding.Type.RESPONSE));
return filter;
}
//. . . . . . .
}One sentence summary: determine whether this configuration class is effective according to different current conditions!
-
Once this configuration class takes effect; This configuration class will add various components to the container;
-
The properties of these components are obtained from the corresponding properties classes, and each property in these classes is bound to the configuration file;
-
All properties that can be configured in the configuration file are encapsulated in the xxxproperties class;
-
The attribute class corresponding to a function can be referenced for what can be configured in the configuration file
//Get the specified value from the configuration file and bind it with the properties of the bean
@ConfigurationProperties(prefix = "spring.http")
public class HttpProperties {
    // .....
}
Let's try the prefix in the configuration file and see the tips!
This is the principle of automatic assembly!
6.2 essence
1. SpringBoot boot will load a large number of auto configuration classes
2. Let's see if the functions we need are in the auto configuration class written by SpringBoot by default;
3. Let's see which components are configured in this automatic configuration class; (as long as the component we want to use exists in it, we don't need to configure it manually)
4. When adding components to the automatic configuration class in the container, some properties will be obtained from the properties class. We only need to specify the values of these attributes in the configuration file;
Xxxautoconfiguration: automatic configuration class; Add components to container
Xxxproperties: encapsulates the related properties in the configuration file;
6.3 understanding: @ Conditional
After understanding the principle of automatic assembly, let's pay attention to a detail. The automatic configuration class must take effect under certain conditions;
@Conditional derived annotation (the native @ conditional function of Spring annotation version)
Function: only when the conditions specified by @ Conditional are satisfied can components be added to the container and all contents in the configuration configuration take effect;
So many automatic configuration classes can only take effect under certain conditions; So many classes have been loaded, but not all of them have taken effect.
How do we know which auto configuration classes work?
We can enable the debug=true attribute; To let the console print the automatic configuration report, so that we can easily know which automatic configuration classes are effective;
#Open the debugging class of springboot debug=true
Positive matches: (auto configuration class enabled: positive matches)
Negative matches: (automatic configuration class without startup and successful matching: negative matching)
Unconditional classes: (unconditional classes)
6.4 conclusion
-
SpringBoot starts from meta-inf / spring. In the classpath Get the value specified by EnableAutoConfiguration from factories
-
Import these values into the container as automatic configuration class, and the automatic configuration class will take effect to help us with automatic configuration;
-
The overall solution and automatic configuration of J2EE are in the jar package of springboot autoconfigure;
-
It will import many automatic configuration classes (xxxAutoConfiguration) into the container, that is, import all the components required for this scenario into the container and configure these components;
-
The automatic configuration class eliminates the need for us to manually write configuration injection function components;
-
When Spring Boot starts, meta-inf / Spring will be found through the @ EnableAutoConfiguration annotation All automatic configuration classes in the factories configuration file and load them. These automatic configuration classes are named at the end of AutoConfiguration. In fact, it is a Spring container configuration class in the form of JavaConfig. It can obtain the Properties configured in the global configuration file through the class named at the end of Properties, such as server Port, and the xxproperties class is bound with the corresponding Properties in the global configuration file through the @ ConfigurationProperties annotation.
7. SpringBoot Web development
Problems to be solved:
-
Import static resources
-
home page
-
jsp, template engine Thymeleaf
-
Assembly extension spring MVC
-
Add, delete, modify and check
-
Interceptor
-
internationalization!
7.1 static resources
protected void addResourceHandlers(ResourceHandlerRegistry registry) {
super.addResourceHandlers(registry);
if (!this.resourceProperties.isAddMappings()) {
logger.debug("Default resource handling disabled");
} else {
this.addResourceHandler(registry, "/webjars/**", "classpath:/META-INF/resources/webjars/");
this.addResourceHandler(registry, this.mvcProperties.getStaticPathPattern(), this.resourceProperties.getStaticLocations());
}
}
private void addResourceHandler(ResourceHandlerRegistry registry, String pattern, String... locations) {
if (!registry.hasMappingForPattern(pattern)) {
ResourceHandlerRegistration registration = registry.addResourceHandler(new String[]{pattern});
registration.addResourceLocations(locations);
registration.setCachePeriod(this.getSeconds(this.resourceProperties.getCache().getPeriod()));
registration.setCacheControl(this.resourceProperties.getCache().getCachecontrol().toHttpCacheControl());
this.customizeResourceHandlerRegistration(registration);
this.autoConfiguredResourceHandlers.add(pattern);
}
}
Summary:
-
In spring boot, we can handle static resources in the following ways
-
webjars localhost: 8088/webjars /
-
public,static,/**,resourse localhost: 8088/
-
-
Priority: resource > static (default) > public
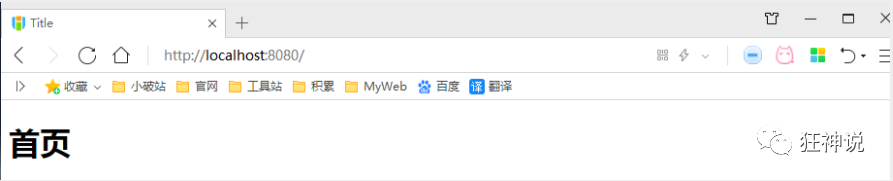
7.2 home page
After the static resource folder is finished, we continue to look down at the source code! You can see a map of the welcome page, which is our home page!
@Bean
public WelcomePageHandlerMapping welcomePageHandlerMapping(ApplicationContext applicationContext,
                                                           FormattingConversionService mvcConversionService,
                                                           ResourceUrlProvider mvcResourceUrlProvider) {
    WelcomePageHandlerMapping welcomePageHandlerMapping = new WelcomePageHandlerMapping(
        new TemplateAvailabilityProviders(applicationContext), applicationContext, getWelcomePage(), // Getwelcome page get welcome page
        this.mvcProperties.getStaticPathPattern());
    welcomePageHandlerMapping.setInterceptors(getInterceptors(mvcConversionService, mvcResourceUrlProvider));
    return welcomePageHandlerMapping;
}
Click in and continue to look
private Optional<Resource> getWelcomePage() {
    String[] locations = getResourceLocations(this.resourceProperties.getStaticLocations());
    // : is a new operator introduced in java8
    // When Class::function, function belongs to Class and should be a static method.
    // The fund of this::function belongs to this object.
    // In short, it is just a kind of grammatical sugar, which is a kind of abbreviation
    return Arrays.stream(locations).map(this::getIndexHtml).filter(this::isReadable).findFirst();
}
// The welcome page is an index under location Just HTML
private Resource getIndexHtml(String location) {
    return this.resourceLoader.getResource(location + "index.html");
}
Welcome page, all indexes under the static resource folder HTML page; Mapped by / * * map.
Like my visit http://localhost:8088/ , you will find index. In the static resource folder html
Create a new index HTML, in any of the above three directories; Then access the test http://localhost:8088/ Look at the results!
7.3 thymeleaf template engine
The page given to us by the front end is an html page. If we developed them before, we need to turn them into JSP pages. The advantage of JSP is that when we find out that some data is forwarded to the JSP page, we can easily realize the display and interaction of data with JSP.
jsp supports very powerful functions, including the ability to write Java code. However, in our current situation, the SpringBoot project is first in the form of jar, not war. Second, we still use embedded Tomcat. Therefore, it does not support jsp by default.
It doesn't support jsp. If we directly use pure static pages, it will bring us great trouble in development. What should we do?
SpringBoot recommends that you use the template engine:
In fact, we have heard a lot about template engines. In fact, jsp is a template engine and freemaker, which is widely used, including Thymeleaf recommended by SpringBoot. There are many template engines, but no matter how many template engines, their ideas are the same.

The function of the template engine is that we write a page template. For example, some values are dynamic. We write some expressions. Where do these values come from? We encapsulate some data in the background. Then give the template and the data to our template engine. The template engine will help you parse and fill the expression to the position we specify according to our data, and then finally generate a content we want to write to us. This is the idea of our template engine, whether jsp or other template engines. It's just that the syntax may be a little different between different template engines. I won't introduce others. I'll mainly introduce the Thymeleaf template engine recommended by SpringBoot. This template engine is a high-level language template engine, and its syntax is simpler. Moreover, the function is more powerful.
Let's take a look at this template engine. Since we want to look at this template engine. First, let's see how to use it in SpringBoot.
7.3.1 introduction of Thymeleaf
How to introduce it? For springboot, everything is a start. Let's introduce it into the project. Here are three websites:
Thafym official website: https://www.thymeleaf.org/
Thymeleaf's home page at Github: https://github.com/thymeleaf/thymeleaf
Spring official documentation: find our corresponding version
https://docs.spring.io/spring-boot/docs/2.2.5.RELEASE/reference/htmlsingle/#using-boot-starter
Find the corresponding pom dependency: you can click into the source code to see the original package!
<!--thymeleaf-->
<dependency>
            <groupId>org.thymeleaf</groupId>
            <artifactId>thymeleaf-spring5</artifactId>
</dependency>
<dependency>
            <groupId>org.thymeleaf.extras</groupId>
            <artifactId>thymeleaf-extras-java8time</artifactId>
</dependency>
Maven will automatically download the jar package. We can go and have a look at the downloaded things;
7.3.2 Thymeleaf analysis
Previously, we have introduced Thymeleaf. How can we use this?
First of all, we have to take a look at the automatic configuration rules of Thymeleaf according to the automatic configuration principle of SpringBoot. According to that rule, we use it.
Let's look for the automatic configuration class of Thymeleaf: ThymeleafProperties
@ConfigurationProperties(
    prefix = "spring.thymeleaf"
)
public class ThymeleafProperties {
    private static final Charset DEFAULT_ENCODING;
    public static final String DEFAULT_PREFIX = "classpath:/templates/";
    public static final String DEFAULT_SUFFIX = ".html";
    private boolean checkTemplate = true;
    private boolean checkTemplateLocation = true;
    private String prefix = "classpath:/templates/";
    private String suffix = ".html";
    private String mode = "HTML";
    private Charset encoding;
    private boolean cache;
    private Integer templateResolverOrder;
    private String[] viewNames;
    private String[] excludedViewNames;
    private boolean enableSpringElCompiler;
    private boolean renderHiddenMarkersBeforeCheckboxes;
    private boolean enabled;
    private final ThymeleafProperties.Servlet servlet;
    private final ThymeleafProperties.Reactive reactive;
}
We can see the default prefix and suffix in it!
We just need to put our html page under the templates under the classpath, and thymeleaf can help us render automatically.
There is no need to configure anything to use thymeleaf, just put it in the specified folder!
test
1. Write a TestController
package com.dary.sweb.controller;
import org.springframework.stereotype.Controller;
import org.springframework.web.bind.annotation.GetMapping;
//All pages under templates can only be jumped through the controller
//Template engine support is required! thymeleaf
@Controller
public class IndexController {
@GetMapping("/test")
public String test(){
return "test";
}
}2. Write a test page test Html is placed in the templates directory
<!DOCTYPE html> <html lang="en"> <head> <meta charset="UTF-8"> <title>Title</title> </head> <body> <h1>test</h1> </body> </html>
3. Start project request test
7.3.3 Thymeleaf grammar learning
To learn grammar, it is most accurate to refer to the official website documents. Let's find the corresponding version and have a look;
Thafym official website: https://www.thymeleaf.org/ , take a brief look at the official website! Let's download the official documents of Thymeleaf!
Let's do the simplest exercise: we need to find some data and display it on the page
1. Modify the test request and add data transmission;
@Controller
public class IndexController {
@GetMapping("/test")
public String test(Model model){
model.addAttribute("msg","hello,SpringBoot");
return "test";
}
}2. If we want to use thymeleaf, we need to import namespace constraints in html files to facilitate prompt.
We can check the namespace in #3 the official document and bring it here:
<!DOCTYPE html>
<html lang="en" xmlns:th="http://www.thymeleaf.org">
3. Let's write the front page
<!DOCTYPE html>
<html lang="en" xmlns:th="http://www.thymeleaf.org">
<head>
<meta charset="UTF-8">
<title>Title</title>
</head>
<body>
<div th:text="${msg}"></div>
</body>
</html>4. Start the test!
OK, the introduction is done. Let's seriously study the usage grammar of Thymeleaf!
1. We can use any th:attr to replace the value of the native attribute in Html!

2. What expressions can we write?
Simple expressions:(Expression syntax)
Variable Expressions: ${...}: Obtain variable value; OGNL;
1),Get the properties and call methods of the object
2),Use built-in basic objects:#18
#ctx : the context object.
#vars: the context variables.
#locale : the context locale.
#request : (only in Web Contexts) the HttpServletRequest object.
#response : (only in Web Contexts) the HttpServletResponse object.
#session : (only in Web Contexts) the HttpSession object.
#servletContext : (only in Web Contexts) the ServletContext object.
3),Some built-in tool objects:
#execInfo : information about the template being processed.
#uris : methods for escaping parts of URLs/URIs
#conversions : methods for executing the configured conversion service (if any).
#dates : methods for java.util.Date objects: formatting, component extraction, etc.
#calendars : analogous to #dates , but for java.util.Calendar objects.
#numbers : methods for formatting numeric objects.
#strings : methods for String objects: contains, startsWith, prepending/appending, etc.
#objects : methods for objects in general.
#bools : methods for boolean evaluation.
#arrays : methods for arrays.
#lists : methods for lists.
#sets : methods for sets.
#maps : methods for maps.
#aggregates : methods for creating aggregates on arrays or collections.
==================================================================================
Selection Variable Expressions: *{...}: Select expressions: and ${}It is the same in function;
Message Expressions: #{...}: Get international content
Link URL Expressions: @{...}: definition URL;
Fragment Expressions: ~{...}: Fragment reference expression
Literals((literal)
Text literals: 'one text' , 'Another one!' ,...
Number literals: 0 , 34 , 3.0 , 12.3 ,...
Boolean literals: true , false
Null literal: null
Literal tokens: one , sometext , main ,...
Text operations:((text operation)
String concatenation: +
Literal substitutions: |The name is ${name}|
Arithmetic operations:(Mathematical operation)
Binary operators: + , - , * , / , %
Minus sign (unary operator): -
Boolean operations:(Boolean operation)
Binary operators: and , or
Boolean negation (unary operator): ! , not
Comparisons and equality:(Comparison operation)
Comparators: > , < , >= , <= ( gt , lt , ge , le )
Equality operators: == , != ( eq , ne )
Conditional operators:Conditional operation (ternary operator)
If-then: (if) ? (then)
If-then-else: (if) ? (then) : (else)
Default: (value) ?: (defaultvalue)
Special tokens:
No-Operation: _Practice test:
1. We write a Controller and put some data
package com.dary.sweb.controller;

import org.springframework.stereotype.Controller;
import org.springframework.ui.Model;
import org.springframework.web.bind.annotation.GetMapping;

import java.util.Arrays;

//All pages under templates can only be jumped through the controller
//Template engine support is required! thymeleaf
@Controller
public class IndexController {

    @GetMapping("/test")
    public String test(Model model){
        model.addAttribute("msg","<h1>hello,SpringBoot");

        model.addAttribute("users", Arrays.asList("dary","dxy"));
        return "test";
    }
}
2. Test page fetching data
<!DOCTYPE html>
<html lang="en" xmlns:th="http://www.thymeleaf.org">
<head>
    <meta charset="UTF-8">
    <title>Title</title>
</head>
<body>

<div th:text="${msg}"></div>
<div th:utext="${msg}"></div>

<hr>

<h3 th:each="user:${users}" th:text="${user}"></h3>

</body>
</html>
7.4 MVC configuration principle
7.4.1 official website reading
Before writing the project, we also need to know what configuration SpringBoot has made for our spring MVC, including how to extend and customize it.
Only when we understand all these, can we use them more easily in the future. Way 1: source code analysis, way 2: official documents!
Spring MVC Auto-configuration
// Spring Boot provides automatic configuration for Spring MVC, which works well with most applications.
Spring Boot provides auto-configuration for Spring MVC that works well with most applications.
// Auto configuration adds the following functions on the basis of Spring default settings:
The auto-configuration adds the following features on top of Spring's defaults:
// Include view parser
Inclusion of ContentNegotiatingViewResolver and BeanNameViewResolver beans.
// Support the path of static resource folder and webjars
Support for serving static resources, including support for WebJars
// Automatically registered Converter:
// Converter, which is the thing that our web page submits data to the background and automatically encapsulates it into an object, such as automatically converting the "1" string into int type
// Formatter: [formatter, for example, the page gives us a 2019-8-10, which will automatically format it as a Date object]
Automatic registration of Converter, GenericConverter, and Formatter beans.
// HttpMessageConverters
// Spring MVC is used to convert Http requests and responses. For example, if we want to convert a User object into a JSON string, you can see the official website document explanation;
Support for HttpMessageConverters (covered later in this document).
// To define error code generation rules
Automatic registration of MessageCodesResolver (covered later in this document).
// Homepage customization
Static index.html support.
// icons customizing
Custom Favicon support (covered later in this document).
// Initialize the data binder: help us bind the request data to the JavaBean!
Automatic use of a ConfigurableWebBindingInitializer bean (covered later in this document).

/*
If you want to keep the Spring Boot MVC feature and want to add other MVC configurations (interceptors, formatters, view controllers, and other features), you can add your own
 The @ configuration class of is webmvcconfigurer, but @ EnableWebMvc is not added. If you want to provide
RequestMappingHandlerMapping,RequestMappingHandlerAdapter Or ExceptionHandlerExceptionResolver
 Instance, you can declare a webmvcreationadapter instance to provide such components.
*/
If you want to keep Spring Boot MVC features and you want to add additional MVC configuration
(interceptors, formatters, view controllers, and other features), you can add your own
@Configuration class of type WebMvcConfigurer but without @EnableWebMvc. If you wish to provide
custom instances of RequestMappingHandlerMapping, RequestMappingHandlerAdapter, or
ExceptionHandlerExceptionResolver, you can declare a WebMvcRegistrationsAdapter instance to provide such components.

// If you want to fully control Spring MVC, you can add your own @ Configuration and annotate it with @ EnableWebMvc.
If you want to take complete control of Spring MVC, you can add your own @Configuration annotated with @EnableWebMvc.
Let's compare it carefully and see how it is implemented. It tells us that SpringBoot has automatically configured SpringMVC for us, and then what things have been automatically configured?
7.4.2 content negotiation view resolver
ViewResolver is automatically configured, which is the view parser of spring MVC we learned before;
That is, the View object is obtained according to the return value of the method, and then the View object determines how to render (forward, redirect).
Let's take a look at the source code here: we find webmvcoautoconfiguration, and then search for content negotiatingviewresolver. Find the following method!
@Bean
@ConditionalOnBean(ViewResolver.class)
@ConditionalOnMissingBean(name = "viewResolver", value = ContentNegotiatingViewResolver.class)
public ContentNegotiatingViewResolver viewResolver(BeanFactory beanFactory) {
    ContentNegotiatingViewResolver resolver = new ContentNegotiatingViewResolver();
    resolver.setContentNegotiationManager(beanFactory.getBean(ContentNegotiationManager.class));
    // Content negotiatingviewresolver uses all other view parsers to locate views, so it should have a higher priority
    resolver.setOrder(Ordered.HIGHEST_PRECEDENCE);
    return resolver;
}
We can click into this category to see! Find the code of the corresponding parsing view;
@Nullable // Note: @ Nullable means that the parameter can be null
public View resolveViewName(String viewName, Locale locale) throws Exception {
    RequestAttributes attrs = RequestContextHolder.getRequestAttributes();
    Assert.state(attrs instanceof ServletRequestAttributes, "No current ServletRequestAttributes");
    List<MediaType> requestedMediaTypes = this.getMediaTypes(((ServletRequestAttributes)attrs).getRequest());
    if (requestedMediaTypes != null) {
        // Get candidate view objects
        List<View> candidateViews = this.getCandidateViews(viewName, locale, requestedMediaTypes);
        // Select the most appropriate view object, and then return this object
        View bestView = this.getBestView(candidateViews, requestedMediaTypes, attrs);
        if (bestView != null) {
            return bestView;
        }
    }
    // .....
}
Let's continue to click in and see how he gets the candidate view?
In getCandidateViews, you can see that he brings all the view parsers, performs a while loop, and parses them one by one!
Iterator var5 = this.viewResolvers.iterator();
Therefore, it is concluded that the view resolver of content negotiation is used to combine all view resolvers
Let's study his combinatorial logic and see that there is an attribute viewResolvers to see where it is assigned!
protected void initServletContext(ServletContext servletContext) {
    // Here, it gets all the view parsers in the container from the beanFactory tool
    // ViewRescolver.class combines all view parsers
    Collection<ViewResolver> matchingBeans = BeanFactoryUtils.beansOfTypeIncludingAncestors(this.obtainApplicationContext(), ViewResolver.class).values();
    ViewResolver viewResolver;
    if (this.viewResolvers == null) {
        this.viewResolvers = new ArrayList(matchingBeans.size());
    }
    // ...............
}
Since it is looking for a view parser in the container, can we guess that we can implement a view parser?
We can add a view parser to the container by ourselves; This class will help us automatically combine it; Let's do it
1. Try to write one of our programs in the main view;
@Bean //Put into bean
public ViewResolver myViewResolver(){
    return new MyViewResolver();
}

//When we write a static internal class, the view parser needs to implement the ViewResolver interface
private static class MyViewResolver implements ViewResolver{
    @Override
    public View resolveViewName(String s, Locale locale) throws Exception {
        return null;
    }
}
2. What do you think about whether the view parser we wrote by ourselves works?
We add a breakpoint to the doDispatch method in the dispatcher servlet for debugging, because all requests will go to this method

3. We start our project, and then visit a random page to see the Debug information;
Find this

Find the view parser, and we can see that our own definition is here;
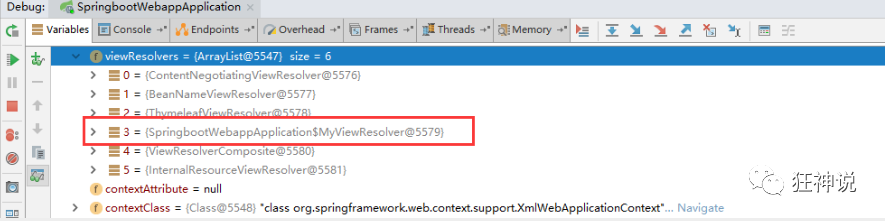
Therefore, if we want to use our own customized things, we just need to add this component to the container! SpringBoot will do the rest for us!
7.4.3 converter and formatter
Format converter found:
@Bean
@Override
public FormattingConversionService mvcConversionService() {
    // Get the formatting rules in the configuration file
    WebConversionService conversionService =
        new WebConversionService(this.mvcProperties.getDateFormat());
    addFormatters(conversionService);
    return conversionService;
}
Click to:
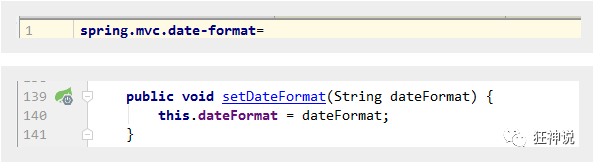
public String getDateFormat() {
    return this.dateFormat;
}

/**
* Date format to use. For instance, `dd/MM/yyyy`. default
 */
private String dateFormat;
You can see that in our Properties file, we can automatically configure it!
If you configure your own formatting method, it will be registered in the Bean and take effect. We can configure the date formatting rules in the configuration file:
The rest will not give examples one by one. You can go down and study more!
7.4.4 modify the default configuration of SpringBoot
The principle of so many automatic configuration is the same. Through the analysis of the principle of automatic configuration of WebMVC, we should learn a learning method and draw a conclusion through source code exploration; This conclusion must belong to itself and be all-round.
The bottom layer of SpringBoot uses a lot of these design details, so you need to read the source code if you have nothing to do! come to conclusion;
When SpringBoot automatically configures many components, first check whether there are user configured components in the container (if the user configures @ bean s), if so, use user configured components, and if not, use automatically configured components;
If there are multiple components, such as our view parser, you can combine the user configured with your own default!
The official documents of the extension using spring MVC are as follows:
If you want to keep Spring Boot MVC features and you want to add additional MVC configuration (interceptors, formatters, view controllers, and other features), you can add your own @Configuration class of type WebMvcConfigurer but without @EnableWebMvc. If you wish to provide custom instances of RequestMappingHandlerMapping, RequestMappingHandlerAdapter, or ExceptionHandlerExceptionResolver, you can declare a WebMvcRegistrationsAdapter instance to provide such components.
What we need to do is to write a @ Configuration annotation class, and the type should be WebMvcConfigurer, and the @ EnableWebMvc annotation cannot be marked; Let's write one by ourselves; We create a new package called config and write a class MyMvcConfig;
//The expected type is WebMvcConfigurer, so we implement its interface
//You can use custom classes to extend the functionality of MVC
@Configuration
public class MyMvcConfig implements WebMvcConfigurer {

    @Override
    public void addViewControllers(ViewControllerRegistry registry) {
        // When the browser sends / test, it will jump to the test page;
        registry.addViewController("/test").setViewName("test");
    }
}
Let's visit the browser:

It did jump over! Therefore, we want to extend spring MVC, and the official recommends that we use it in this way, so that we can not only keep all the automatic configurations of SpringBoot, but also use our extended configurations!
We can analyze the principle:
1. Webmvcoautoconfiguration is the automatic configuration class of spring MVC, which has a class webmvcoautoconfigurationadapter
2. There is an annotation on this class, which will be imported during other automatic configuration: @ Import(EnableWebMvcConfiguration.class)
3. Let's click EnableWebMvcConfiguration to see that it inherits a parent class: delegatingwebmvccconfiguration
There is such a piece of code in this parent class:
public class DelegatingWebMvcConfiguration extends WebMvcConfigurationSupport {
    private final WebMvcConfigurerComposite configurers = new WebMvcConfigurerComposite();

  // Get all webmvcconfigurers from the container
    @Autowired(required = false)
    public void setConfigurers(List<WebMvcConfigurer> configurers) {
        if (!CollectionUtils.isEmpty(configurers)) {
            this.configurers.addWebMvcConfigurers(configurers);
        }
    }
}
4. We can find a viewController we just set in this class as a reference and find that it calls a
protected void addViewControllers(ViewControllerRegistry registry) {
    this.configurers.addViewControllers(registry);
}
5. Let's go in and have a look
public void addViewControllers(ViewControllerRegistry registry) {
    Iterator var2 = this.delegates.iterator();

    while(var2.hasNext()) {
        // Call all WebMvcConfigurer related configurations together! Including those configured by ourselves and those configured by Spring
        WebMvcConfigurer delegate = (WebMvcConfigurer)var2.next();
        delegate.addViewControllers(registry);
    }

}
Therefore, it is concluded that all WebMvcConfiguration will be used, not only Spring's own configuration class, but also our own configuration class will be called;
7.4.5 take over spring MVC
Official documents:
If you want to take complete control of Spring MVCyou can add your own @Configuration annotated with @EnableWebMvc.
Full takeover: spring boot does not need the automatic configuration of spring MVC. We configure everything ourselves!
Just add a @ EnableWebMvc in our configuration class.
Let's see that if we take over spring MVC in full, the static resource mapping configured by SpringBoot will be invalid. We can test it;
Before adding any comments, visit the home page:
Annotate the configuration class: @ EnableWebMvc
We found that all spring MVC auto configuration failed! Return to the original appearance;
Of course, it is not recommended to use spring MVC in our development
Thinking? Why is the automatic configuration invalid after adding an annotation! Let's look at the source code:
1. It is found here that it imports a class. We can continue to look at it
@Import({DelegatingWebMvcConfiguration.class})
public @interface EnableWebMvc {
}
2. It inherits a parent class WebMvcConfigurationSupport
public class DelegatingWebMvcConfiguration extends WebMvcConfigurationSupport {
  // ......
}
3. Let's review the Webmvc autoconfiguration class
@Configuration(proxyBeanMethods = false)
@ConditionalOnWebApplication(type = Type.SERVLET)
@ConditionalOnClass({ Servlet.class, DispatcherServlet.class, WebMvcConfigurer.class })
// This annotation means that this auto configuration class will take effect only when there is no such component in the container
@ConditionalOnMissingBean(WebMvcConfigurationSupport.class)
@AutoConfigureOrder(Ordered.HIGHEST_PRECEDENCE + 10)
@AutoConfigureAfter({ DispatcherServletAutoConfiguration.class, TaskExecutionAutoConfiguration.class,
    ValidationAutoConfiguration.class })
public class WebMvcAutoConfiguration {

}
To sum up: @ EnableWebMvc has imported the WebMvcConfigurationSupport component;
The imported WebMvcConfigurationSupport is only the most basic function of spring MVC!
There will be many extension configurations in SpringBoot. As long as we see this, we should pay more attention~
8. Employee management system
See the employee management system documents for details
9. Integrate JDBC
Introduction to spring data
For the data access layer, whether SQL (relational database) or NoSQL (non relational database), the bottom layer of Spring Boot adopts the way of Spring Data for unified processing.
The bottom layer of Spring Boot uses the way of Spring Data to uniformly process various databases. Spring Data is also a well-known project in spring as well as Spring Boot, Spring Cloud and so on.
Spin data official website: https://spring.io/projects/spring-data
For database related initiators, please refer to the official documents:
https://docs.spring.io/spring-boot/docs/2.2.5.RELEASE/reference/htmlsingle/#using-boot-starter
Integrate JDBC
9.1 create test item test data source
1. I'll create a new project test: springboot data JDBC; Corresponding modules are introduced! Basic module
2. After the project was completed, we found that the following initiators were automatically imported for us:
<dependency>
    <groupId>org.springframework.boot</groupId>
    <artifactId>spring-boot-starter-jdbc</artifactId>
</dependency>
<dependency>
    <groupId>mysql</groupId>
    <artifactId>mysql-connector-java</artifactId>
    <scope>runtime</scope>
</dependency>
3. Compile yaml configuration file and connect to database;
spring:
  datasource:
    username: root
    password: 123456
    #? serverTimezone=UTC resolves the error in the time zone
    url: jdbc:mysql://localhost:3306/springboot?serverTimezone=UTC&useUnicode=true&characterEncoding=utf-8
    driver-class-name: com.mysql.cj.jdbc.Driver
4. After configuring these things, we can use them directly, because SpringBoot has automatically configured them for us by default; Go to the test class and test it
@SpringBootTest
class SpringbootDataJdbcApplicationTests {

    //DI injection data source
    @Autowired
    DataSource dataSource;

    @Test
    public void contextLoads() throws SQLException {
        //Take a look at the default data source
        System.out.println(dataSource.getClass());
        //Get connection
        Connection connection =   dataSource.getConnection();
        System.out.println(connection);
        //Close connection
        connection.close();
    }
}
Result: we can see that the default data source configured for us is: class com zaxxer. hikari. Hikaridatasource, we didn't configure it manually
We can automatically search all data sources in the global datasourceconfiguration:
@Import(
    {Hikari.class, Tomcat.class, Dbcp2.class, Generic.class, DataSourceJmxConfiguration.class}
)
protected static class PooledDataSourceConfiguration {
    protected PooledDataSourceConfiguration() {
    }
}-
The classes imported here are under the DataSourceConfiguration configuration class. It can be seen that the HikariDataSource data source is used by default in Spring Boot 2.2.5, while the org.org data source is used by default in previous versions, such as Spring Boot 1.5 apache. tomcat. jdbc. pool. Datasource as the data source;
-
HikariDataSource is known as the fastest data source of Java WEB, which is better than traditional connection pools such as C3P0, DBCP and Tomcat jdbc;
You can use spring datasource. Type specifies the custom data source type, and the value is the fully qualified name of the connection pool implementation to be used.
-
We will not introduce the data source. With database connection, it is obvious that CRUD can operate the database. But we need to know an object JdbcTemplate first
9.2 JDBCTemplate
1. With the data source (com.zaxxer.hikari.HikariDataSource), you can get the database connection (java.sql.Connection). With the connection, you can use the native JDBC statement to operate the database;
2. Even without using a third-party database operation framework, such as MyBatis, Spring itself makes a lightweight encapsulation of the native JDBC, that is, JdbcTemplate.
3. All CRUD methods for database operations are in the JdbcTemplate.
4. Spring Boot not only provides the default data source, but also the configured JdbcTemplate is placed in the container by default. Programmers only need to inject it themselves
5. The automatic configuration of JdbcTemplate depends on org springframework. boot. autoconfigure. JdbcTemplateConfiguration class under JDBC package
JdbcTemplate mainly provides the following methods:
-
Execute method: it can be used to execute any SQL statement, generally used to execute DDL statements;
-
Update method and batchUpdate method: update method is used to execute new, modify, delete and other statements; The batchUpdate method is used to execute batch related statements;
-
Query method and queryForXXX method: used to execute query related statements;
-
call method: used to execute stored procedures, functions and related statements.
9.3 testing
Write a Controller, inject JDBC template, and write test methods for access testing;
package com.dary.controller;

import org.springframework.beans.factory.annotation.Autowired;
import org.springframework.jdbc.core.JdbcTemplate;
import org.springframework.web.bind.annotation.GetMapping;
import org.springframework.web.bind.annotation.PathVariable;
import org.springframework.web.bind.annotation.RequestMapping;
import org.springframework.web.bind.annotation.RestController;

import java.util.Date;
import java.util.List;
import java.util.Map;

@RestController
@RequestMapping("/jdbc")
public class JdbcController {

    /**
     * Spring Boot The data source is provided by default, and org.org is provided by default springframework. jdbc. core. JdbcTemplate
     * JdbcTemplate Data sources will be injected into the database to simplify JDBC operations
     * Some common database connection errors can be avoided, and you don't have to close your own database
     */
    @Autowired
    JdbcTemplate jdbcTemplate;

    //Query all data in the employee table
    //One Map in the List corresponds to one row of data in the database
    //The key in the Map corresponds to the field name of the database, and the value corresponds to the field value of the database
    @GetMapping("/userList")
    public List<Map<String, Object>> userList(){
        String sql = "select * from user";
        List<Map<String, Object>> list_maps = jdbcTemplate.queryForList(sql);
        return list_maps;
    }

    //Add a new user
    @GetMapping("/add")
    public String addUser(){
        //Insert statement, pay attention to time
        String sql = "insert into mybatis.user(id,name,pwd) values (7,'Yan Jun','123321')";
        jdbcTemplate.update(sql);
        //query
        return "update-ok";
    }

    //Modify user information
    @GetMapping("/update/{id}")
    public String updateUser(@PathVariable("id") int id){
        //Insert statement
        String sql = "update mybatis.user set name=?,pwd=? where id="+id;
        //data
        Object[] objects = new Object[2];
        objects[0] = "dxy";
        objects[1] = "zzzzzz";
        jdbcTemplate.update(sql,objects);
        //query
        return "updateOk";
    }

    //delete user
    @GetMapping("/delete/{id}")
    public String delUser(@PathVariable("id") int id){
        //Insert statement
        String sql = "delete from mybatis.user where id=?";
        jdbcTemplate.update(sql,id);
        //query
        return "deleteOk";
    }

}
Test request, the result is normal;
10. Integrate Druid
10.1 Druid introduction
A large part of Java programs need to operate the database. In order to improve the performance, they have to use the database connection pool when operating the database.
Druid is a database connection pool implementation on Alibaba's open source platform. It combines the advantages of C3P0, DBCP and other DB pools, and adds log monitoring.
Druid can well monitor the connection of DB pool and the execution of SQL. It is naturally a DB connection pool for monitoring.
Druid has deployed more than 600 applications in Alibaba, which has been severely tested by large-scale deployment in the production environment for more than a year.
Hikari data source is used by default above Spring Boot 2.0. It can be said that Hikari and Driud are the best data sources on the current Java Web. Let's focus on how Spring Boot integrates Druid data source and how to realize database monitoring.
Github address: https://github.com/alibaba/druid/
com. alibaba. druid. pool. The basic configuration parameters of druiddatasource are as follows:
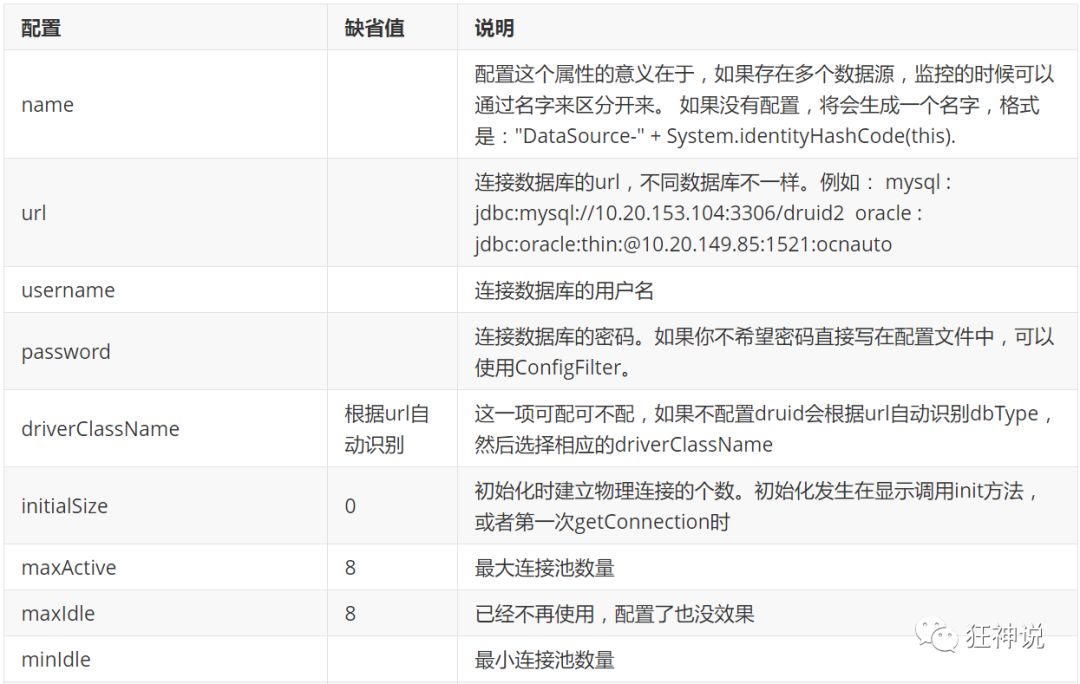


10.2 configuring data sources
1. Add Druid data source dependency on.
<!-- https://mvnrepository.com/artifact/com.alibaba/druid -->
<dependency>
    <groupId>com.alibaba</groupId>
    <artifactId>druid</artifactId>
    <version>1.2.4</version>
</dependency>
2. Switching data sources; As mentioned before, com.com is used by default for Spring Boot 2.0 and above zaxxer. hikari. Hikaridatasource data source, but it can be accessed through spring datasource. Type specifies the data source.
spring:
  datasource:
    username: root
    password: 19980228
    url: jdbc:mysql://@localhost:3306/mybatis?useUnicode=true&characterEncoding=UTF-8&useJDBCCompliantTimezoneShift=true&useLegacyDatetimeCode=false&serverTimezone=UTC
    driver-class-name: com.mysql.cj.jdbc.Driver
    type: com.alibaba.druid.pool.DruidDataSource
3. After data source switching, inject DataSource into the test class, obtain it, and output it to see whether the switching is successful;
4. Switching succeeded! Now that the switch is successful, you can set the initialization size, maximum number of connections, waiting time, minimum number of connections and other settings of the data source connection; You can view the source code
spring: datasource: username: root password: 19980228 url: jdbc:mysql://@localhost:3306/mybatis?useUnicode=true&characterEncoding=UTF-8&useJDBCCompliantTimezoneShift=true&useLegacyDatetimeCode=false&serverTimezone=UTC driver-class-name: com.mysql.cj.jdbc.Driver type: com.alibaba.druid.pool.DruidDataSource #Spring Boot does not inject these attribute values by default and needs to bind by itself #druid data source proprietary configuration initialSize: 5 minIdle: 5 maxActive: 20 maxWait: 60000 timeBetweenEvictionRunsMillis: 60000 minEvictableIdleTimeMillis: 300000 validationQuery: SELECT 1 FROM DUAL testWhileIdle: true testOnBorrow: false testOnReturn: false poolPreparedStatements: true #Configure filters for monitoring statistics interception, stat: monitoring statistics, log4j: logging, wall: defensive sql injection #If allowed, an error will be reported in Java lang.ClassNotFoundException: org. apache. log4j. Priority #Then import log4j dependency. Maven address: https://mvnrepository.com/artifact/log4j/log4j filters: stat,wall,log4j maxPoolPreparedStatementPerConnectionSize: 20 useGlobalDataSourceStat: true connectionProperties: druid.stat.mergeSql=true;druid.stat.slowSqlMillis=500 server: port: 8081
5. Dependency of import Log4j
<!-- https://mvnrepository.com/artifact/log4j/log4j -->
<dependency>
    <groupId>log4j</groupId>
    <artifactId>log4j</artifactId>
    <version>1.2.17</version>
</dependency>
6. Now programmers need to bind the parameters in the global configuration file for DruidDataSource and add them to the container instead of using the automatic generation of Spring Boot; We need to add the DruidDataSource component to the container and bind the attribute;
package com.dary.config;

import com.alibaba.druid.pool.DruidDataSource;
import org.springframework.boot.context.properties.ConfigurationProperties;
import org.springframework.context.annotation.Bean;
import org.springframework.context.annotation.Configuration;

import javax.sql.DataSource;

@Configuration
public class DruidConfig {

    /*
       Add the customized Druid data source to the container and no longer let Spring Boot create it automatically
       Bind the Druid data source attribute in the global configuration file to com alibaba. druid. pool. Druiddatasource to make them effective
       @ConfigurationProperties(prefix = "spring.datasource"): The function is to add the global configuration file
       The prefix is spring The value of the property injected into. Com.datasource alibaba. druid. pool. Druiddatasource is in a parameter with the same name
     */
    @ConfigurationProperties(prefix = "spring.datasource")
    @Bean
    public DataSource druidDataSource() {
        return new DruidDataSource();
    }

}
7. Test in the test class; See if it succeeds!
@SpringBootTest
class SpringbootDataJdbcApplicationTests {

    //DI injection data source
    @Autowired
    DataSource dataSource;

    @Test
    public void contextLoads() throws SQLException {
        //Take a look at the default data source
        System.out.println(dataSource.getClass());
        //Get connection
        Connection connection =   dataSource.getConnection();
        System.out.println(connection);

        DruidDataSource druidDataSource = (DruidDataSource) dataSource;
        System.out.println("druidDataSource Maximum connections to data source:" + druidDataSource.getMaxActive());
        System.out.println("druidDataSource Number of data source initialization connections:" + druidDataSource.getInitialSize());

        //Close connection
        connection.close();
    }
}
Output result: it can be seen that the configuration parameters have taken effect!
10.3 configure Druid data source monitoring
Druid data source has the function of monitoring and provides a web interface for users to view. Similarly, when installing a router, people also provide a default web page.
Therefore, the first step is to set Druid's background management page, such as login account, password, etc; Configure background management;
package com.dary.controller;

import org.springframework.beans.factory.annotation.Autowired;
import org.springframework.jdbc.core.JdbcTemplate;
import org.springframework.web.bind.annotation.GetMapping;
import org.springframework.web.bind.annotation.PathVariable;
import org.springframework.web.bind.annotation.RequestMapping;
import org.springframework.web.bind.annotation.RestController;

import java.util.List;
import java.util.Map;

@RestController
@RequestMapping("/jdbc")
public class JdbcController {

    /**
     * Spring Boot The data source is provided by default, and org.org is provided by default springframework. jdbc. core. JdbcTemplate
     * JdbcTemplate Data sources will be injected into the database to simplify JDBC operations
     * It can also avoid some common errors, and you don't have to close the database connection yourself
     */
    @Autowired
    JdbcTemplate jdbcTemplate;

    //Query all data in the employee table
    //One Map in the List corresponds to one row of data in the database
    //The key in the Map corresponds to the field name of the database, and the value corresponds to the field value of the database
    @GetMapping("/userList")
    public List<Map<String, Object>> userList(){
        String sql = "select * from user";
        List<Map<String, Object>> list_maps = jdbcTemplate.queryForList(sql);
        return list_maps;
    }

    //Add a new user
    @GetMapping("/add")
    public String addUser(){
        //Insert statement, pay attention to time
        String sql = "insert into mybatis.user(id,name,pwd) values (7,'Yan Jun','123321')";
        jdbcTemplate.update(sql);
        //query
        return "update-ok";
    }

    //Modify user information
    @GetMapping("/update/{id}")
    public String updateUser(@PathVariable("id") int id){
        //Insert statement
        String sql = "update mybatis.user set name=?,pwd=? where id="+id;
        //data
        Object[] objects = new Object[2];
        objects[0] = "dxy";
        objects[1] = "zzzzzz";
        jdbcTemplate.update(sql,objects);
        //query
        return "updateOk";
    }

    //delete user
    @GetMapping("/delete/{id}")
    public String delUser(@PathVariable("id") int id){
        //Insert statement
        String sql = "delete from mybatis.user where id=?";
        jdbcTemplate.update(sql,id);
        //query
        return "deleteOk";
    }

}
After configuration, we can choose to access: http://localhost:8081/druid/login.html
Configure Druid web monitoring filter
//Configure the filter for web monitoring of Druid monitoring
//WebStatFilter: used to configure management association monitoring statistics between Web and Druid data sources
@Bean
public FilterRegistrationBean webStatFilter() {
    FilterRegistrationBean bean = new FilterRegistrationBean();
    bean.setFilter(new WebStatFilter());

    //exclusions: sets which requests are filtered and excluded so that statistics are not performed
    Map<String, String> initParams = new HashMap<>();
    initParams.put("exclusions", "*.js,*.css,/druid/*,/jdbc/*");
    bean.setInitParameters(initParams);

    //"/ *" means to filter all requests
    bean.setUrlPatterns(Arrays.asList("/*"));
    return bean;
}
At ordinary times, it can be configured according to the needs during work, which is mainly used for monitoring!
11. Integrate MyBatis
Official documents: http://mybatis.org/spring-boot-starter/mybatis-spring-boot-autoconfigure/
Maven warehouse address: https://mvnrepository.com/artifact/org.mybatis.spring.boot/mybatis-spring-boot-starter/2.1.1
Integration test
1. Dependencies required to import MyBatis
<!-- https://mvnrepository.com/artifact/org.mybatis.spring.boot/mybatis-spring-boot-starter -->
<dependency>
    <groupId>org.mybatis.spring.boot</groupId>
    <artifactId>mybatis-spring-boot-starter</artifactId>
    <version>2.1.3</version>
</dependency>
2. Configuration database connection information (unchanged)
spring:
  datasource:
    username: root
    password: 19980228
    url: jdbc:mysql://@localhost:3306/mybatis?useUnicode=true&characterEncoding=UTF-8&useJDBCCompliantTimezoneShift=true&useLegacyDatetimeCode=false&serverTimezone=UTC
    driver-class-name: com.mysql.cj.jdbc.Driver
    type: com.alibaba.druid.pool.DruidDataSource

    #Spring Boot does not inject these attribute values by default and needs to bind by itself
    #druid data source proprietary configuration
    initialSize: 5
    minIdle: 5
    maxActive: 20
    maxWait: 60000
    timeBetweenEvictionRunsMillis: 60000
    minEvictableIdleTimeMillis: 300000
    validationQuery: SELECT 1 FROM DUAL
    testWhileIdle: true
    testOnBorrow: false
    testOnReturn: false
    poolPreparedStatements: true

    #Configure filters for monitoring statistics interception, stat: monitoring statistics, log4j: logging, wall: defensive sql injection
    #If allowed, an error will be reported in Java lang.ClassNotFoundException: org. apache. log4j. Priority
    #Then import log4j dependency. Maven address: https://mvnrepository.com/artifact/log4j/log4j
    filters: stat,wall,log4j
    maxPoolPreparedStatementPerConnectionSize: 20
    useGlobalDataSourceStat: true
    connectionProperties: druid.stat.mergeSql=true;druid.stat.slowSqlMillis=500

server:
  port: 8081
3. Test whether the database connection is successful!
4. Create an entity class and import Lombok!
User.java
package com.dary.pojo;

import lombok.AllArgsConstructor;
import lombok.Data;
import lombok.NoArgsConstructor;

@Data
@NoArgsConstructor
@AllArgsConstructor
public class User {

    private int id;
    private String name;
    private String pwd;

}
5. Create Mapper directory and corresponding Mapper interface
UserMapper.java
package com.dary.mapper;
import com.dary.pojo.User;
import org.apache.ibatis.annotations.Mapper;
import org.springframework.stereotype.Repository;
import java.util.List;
//@Mapper: indicates that this class is a mapper of MyBatis
@Mapper
@Repository
public interface UserMapper {
// Get all department information
List<User> getUserList();
// Get department by id
User getUserList(int id);
int addUser(User user);
int updateUser(User user);
int deleteUser(int id);
}6. Corresponding Mapper mapping file
UserMapper.xml
<?xml version="1.0" encoding="UTF-8" ?>
<!DOCTYPE mapper
PUBLIC "-//mybatis.org//DTD Mapper 3.0//EN"
"http://mybatis.org/dtd/mybatis-3-mapper.dtd">
<mapper namespace="com.dary.mapper.UserMapper">
<select id="queryUserList" resultType="User">
select * from user;
</select>
<select id="queryUserById" resultType="User">
select * from user where id = #{id};
</select>
<insert id="addUser" parameterType="User">
insert into user (id,name,pwd) values (#{id},#{name},#{pwd})
</insert>
<update id="updateUser" parameterType="User">
update user set name = #{name},pwd=#{pwd} where id = #{id}
</update>
<delete id="deleteUser" parameterType="int">
delete from user where id = #{id}
</delete>
</mapper>7. maven configuration resource filtering problem
<resources>
    <resource>
        <directory>src/main/java</directory>
        <includes>
            <include>**/*.xml</include>
        </includes>
        <filtering>true</filtering>
    </resource>
</resources>
8. Write the UserController of the Department for testing!
package com.dary.controller;
import com.dary.mapper.UserMapper;
import com.dary.pojo.User;
import org.springframework.beans.factory.annotation.Autowired;
import org.springframework.web.bind.annotation.GetMapping;
import org.springframework.web.bind.annotation.RestController;
import java.util.List;
@RestController
public class UserController {
@Autowired
private UserMapper userMapper;
// Query all departments
@GetMapping("/queryUserList")
public List<User> queryUserList(){
List<User> userList = userMapper.queryUserList();
return userList;
}
//Add a user
@GetMapping("/add")
public String addUser(){
userMapper.addUser(new User(7,"Yan Jun","123321"));
return "ok";
}
//Modify a user
@GetMapping("/update")
public String updateUser(){
userMapper.updateUser(new User(5,"dary","121212"));
return "ok";
}
//Delete a user
@GetMapping("/delete")
public String deleteUser(){
userMapper.deleteUser(5);
return "ok";
}
}Start project access for testing!