What is SpringBoot
It is a micro service scaffold, which can quickly build a micro service.
Viewpoint: agreement is greater than configuration!!!
SpringBoot is currently the mainstream.
Create a SpringBoot microservice project
Spring officially provides a very convenient tool for us to quickly build applications
Spring Initializr: https://start.spring.io/
Project creation method 1: use the Web page of Spring Initializr to create the project
1. Open https://start.spring.io/
2. Fill in project information
3. Click the "Generate Project" button to generate the project; download the project
4. Unzip the project package and import it as Maven project with IDEA. Go to the next step until the project is imported.
5. If it is used for the first time, the speed may be slow, there are many packages, and you need to wait patiently for everything to be ready.
Project creation method 2: directly create a project using IDEA
1. Create a new project
2. Select spring initalizr, and you can see that the default is to implement it in the quick build tool on the official website
3. Fill in project information
4. Select the initialized component (just check Web for beginners)
5. Fill in the project path
6. Wait for the project to build successfully
Project structure analysis:
After completing the creation of the basic project through the above steps, the following files will be automatically generated.
1. Main startup class of the program
2. An application.properties configuration file
3. A test class
4. A pom.xml
pom.xml analysis
Open pom.xml to see the dependencies of the Spring Boot project:
<!-- Parent dependency -->
<parent>
    <groupId>org.springframework.boot</groupId>
    <artifactId>spring-boot-starter-parent</artifactId>
    <version>2.2.5.RELEASE</version>
    <relativePath/>
</parent>

<dependencies>
    <!-- web Scene launcher -->
    <dependency>
        <groupId>org.springframework.boot</groupId>
        <artifactId>spring-boot-starter-web</artifactId>
    </dependency>
    <!-- springboot unit testing  -->
    <dependency>
        <groupId>org.springframework.boot</groupId>
        <artifactId>spring-boot-starter-test</artifactId>
        <scope>test</scope>
        <!-- Eliminate dependency -->
        <exclusions>
            <exclusion>
                <groupId>org.junit.vintage</groupId>
                <artifactId>junit-vintage-engine</artifactId>
            </exclusion>
        </exclusions>
    </dependency>
</dependencies>

<build>
    <plugins>
        <!-- Package plug-ins -->
        <plugin>
            <groupId>org.springframework.boot</groupId>
            <artifactId>spring-boot-maven-plugin</artifactId>
        </plugin>
    </plugins>
</build>
Write an http interface
1. Create a new controller package in the same level directory of the main program. It must be in the same level directory, otherwise it will not be recognized
2. Create a new HelloController class in the package
@RestController
public class HelloController {

    @RequestMapping("/hello")
    public String hello() {
        return "Hello World";
    }

}
3. After writing, start the project from the main program, the browser initiates a request, and look at the page to return; the console outputs the port number accessed by Tomcat!
If you encounter the above errors, you can configure to skip the project and run test cases during packaging
<plugin>
    <groupId>org.apache.maven.plugins</groupId>
    <artifactId>maven-surefire-plugin</artifactId>
    <configuration>
        <!--Skip project run test case-->
        <skipTests>true</skipTests>
    </configuration>
</plugin>
If the package is successful, a jar package will be generated in the target directory
Change start flag:
How to change the letters formed by the characters displayed at startup? SpringBoot? That is, banner pattern;
Just one step: create a new banner.txt in the resources directory under the project.
Patterns can be to: https://www.bootschool.net/ascii This website is generated, and then copied to the file!
SpringBoot startup principle
We can find that the SpringBoot project depends on this parent project package
<parent>
    <groupId>org.springframework.boot</groupId>
    <artifactId>spring-boot-starter-parent</artifactId>
    <version>2.2.5.RELEASE</version>
    <relativePath/> <!-- lookup parent from repository -->
</parent>
After clicking open, it is found that there is a parent dependency
<parent>
    <groupId>org.springframework.boot</groupId>
    <artifactId>spring-boot-dependencies</artifactId>
    <version>2.2.5.RELEASE</version>
    <relativePath>../../spring-boot-dependencies</relativePath>
</parent>
This is our dependency configuration center.
Springboot boot starter XXX: the scenario initiator of spring boot
Spring boot starter Web: it helps us import the components that the web module depends on for normal operation
Therefore, SpringBoot extracts all functional scenarios and makes them into starters. Just introduce these starters into the project, and all relevant dependencies will be imported. We can import what scenario starters we want to use. We can also customize starters ourselves in the future
Main startup class:
//@Spring bootapplication to annotate a main program class
//This is a Spring Boot application
@SpringBootApplication
public class SpringbootApplication {

   public static void main(String[] args) {
     //I thought I started a method, but I didn't expect to start a service
      SpringApplication.run(SpringbootApplication.class, args);
   }

}
Focus on the annotation of spring boot application. We can click this annotation and find that there are many other annotations on this annotation.
@SpringBootConfiguration
@EnableAutoConfiguration
@ComponentScan(
    excludeFilters = {@Filter(
    type = FilterType.CUSTOM,
    classes = {TypeExcludeFilter.class}
), @Filter(
    type = FilterType.CUSTOM,
    classes = {AutoConfigurationExcludeFilter.class}
)}
)
public @interface SpringBootApplication {
    // ......
}
Part I: @ ComponentScan
This annotation is important in Spring and corresponds to the elements in the XML configuration.
Function: automatically scan and load qualified components or beans, and load the bean definition into the IOC container
@SpringBootConfiguration
Function: the configuration class of SpringBoot is marked on a class to indicate that it is a SpringBoot configuration class;
Let's move on to this annotation
//Click in to get the following @ Component
@Configuration
public @interface SpringBootConfiguration {}
@Component
public @interface Configuration {}
The @ Configuration here indicates that this is a Configuration class, which is the xml Configuration file corresponding to Spring;
The @ Component inside shows that the startup class itself is just a Component in Spring and is responsible for starting the application!
Let's go back to the spring boot application annotation and continue.
Part II: @ EnableAutoConfiguration
@EnableAutoConfiguration: enables the auto configuration function
Previously, we needed to configure things ourselves, but now SpringBoot can automatically configure them for us; @ EnableAutoConfiguration tells SpringBoot to turn on the automatic configuration function, so that the automatic configuration can take effect.
Click in the annotation to continue viewing:
@AutoConfigurationPackage: autoconfiguration package
@Import({Registrar.class})
public @interface AutoConfigurationPackage {
}
@Import: the Spring underlying annotation @ import imports a component into the container
Function of Registrar.class: scan the package of the main startup class and all components in all sub packages under the package to the Spring container
This analysis is finished. Step back and continue to look
@Import({AutoConfigurationImportSelector.class}): import components to the container;
AutoConfigurationImportSelector: automatically configure the import selector. What component selectors will it import? Let's click this class to see the source code:
1. There is one such method in this class
//Obtain candidate configurations
protected List<String> getCandidateConfigurations(AnnotationMetadata metadata, AnnotationAttributes attributes) {
    //The getSpringFactoriesLoaderFactoryClass () method here
    //The annotation class that we first saw to start automatic import configuration file is returned; EnableAutoConfiguration
    List<String> configurations = SpringFactoriesLoader.loadFactoryNames(this.getSpringFactoriesLoaderFactoryClass(), this.getBeanClassLoader());
    Assert.notEmpty(configurations, "No auto configuration classes found in META-INF/spring.factories. If you are using a custom packaging, make sure that file is correct.");
    return configurations;
}
2. This method calls the static method of springfactoryesloader class again! Let's enter the loadFactoryNames() method of springfactoryesloader class
public static List<String> loadFactoryNames(Class<?> factoryClass, @Nullable ClassLoader classLoader) {
    String factoryClassName = factoryClass.getName();
    //Here it calls the loadSpringFactories method again
    return (List)loadSpringFactories(classLoader).getOrDefault(factoryClassName, Collections.emptyList());
}
3. Let's continue to click to view the loadSpringFactories method
private static Map<String, List<String>> loadSpringFactories(@Nullable ClassLoader classLoader) {
    //After obtaining the classLoader, we can see that what we get here is the class itself marked with EnableAutoConfiguration
    MultiValueMap<String, String> result = (MultiValueMap)cache.get(classLoader);
    if (result != null) {
        return result;
    } else {
        try {
            //Go to get a resource "META-INF/spring.factories"
            Enumeration<URL> urls = classLoader != null ? classLoader.getResources("META-INF/spring.factories") : ClassLoader.getSystemResources("META-INF/spring.factories");
            LinkedMultiValueMap result = new LinkedMultiValueMap();

            //Traverse the read resources and encapsulate them into a property
            while(urls.hasMoreElements()) {
                URL url = (URL)urls.nextElement();
                UrlResource resource = new UrlResource(url);
                Properties properties = PropertiesLoaderUtils.loadProperties(resource);
                Iterator var6 = properties.entrySet().iterator();

                while(var6.hasNext()) {
                    Entry<?, ?> entry = (Entry)var6.next();
                    String factoryClassName = ((String)entry.getKey()).trim();
                    String[] var9 = StringUtils.commaDelimitedListToStringArray((String)entry.getValue());
                    int var10 = var9.length;

                    for(int var11 = 0; var11 < var10; ++var11) {
                        String factoryName = var9[var11];
                        result.add(factoryClassName, factoryName.trim());
                    }
                }
            }

            cache.put(classLoader, result);
            return result;
        } catch (IOException var13) {
            throw new IllegalArgumentException("Unable to load factories from location [META-INF/spring.factories]", var13);
        }
    }
}
4. Find a file that appears many times: spring.factories. Search it globally
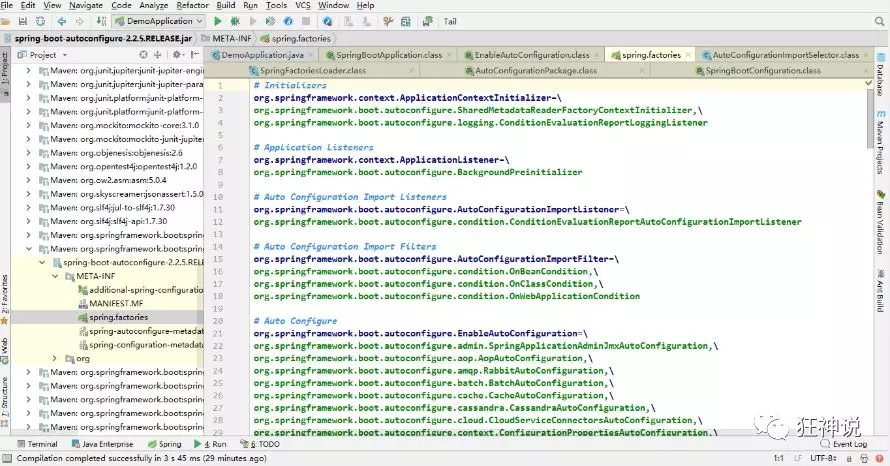
At this point, we have found the root of automatic configuration. There are many automatic configuration files.
Part III: spring.factories
Click webmvcoautoconfiguration
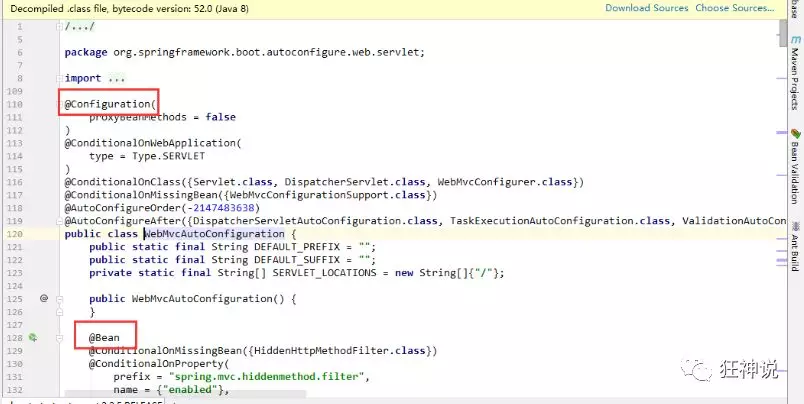
You can see that these are JavaConfig configuration classes one by one, injecting some beans.
Therefore, the real implementation of automatic Configuration is to search all META-INF/spring.factories Configuration files from the classpath, and instantiate the Configuration items under the corresponding org.springframework.boot.autoconfigure. Package into IOC container Configuration classes in the form of JavaConfig marked with @ Configuration through reflection, and then summarize them into an instance and load them into the IOC container In the filter.
Conclusion:
1. When springboot starts, obtain the value specified by EnableAutoConfiguration from META-INF/spring.factories under the classpath
2. Import these values into the container as an automatic configuration class, and the automatic configuration class will take effect to help us with automatic configuration;
3. The whole J2EE solution and automatic configuration are in the jar package of springboot autoconfigure;
4. It will import many automatic configuration classes (xxxAutoConfiguration) into the container, that is, import all components required for this scenario into the container and configure these components;
5. The automatic configuration class eliminates the need to manually write configuration injection function components;
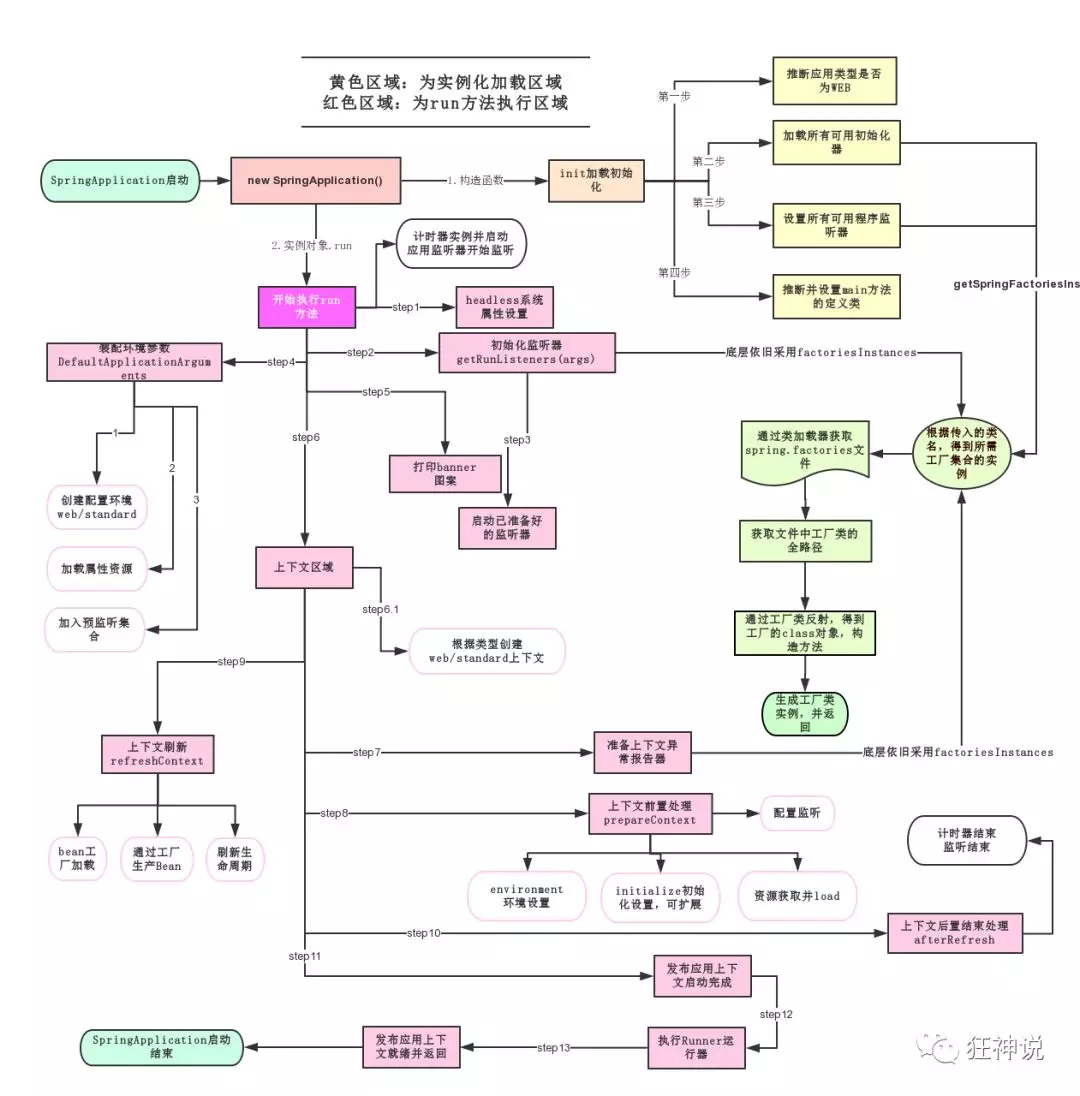
How spring application starts
SpringApplication.run analysis
The analysis of this method is mainly divided into two parts: one is the instantiation of spring application, and the other is the execution of run method;
Part I:
1. Infer whether the type of application is a normal project or a Web project
2. Find and load all available initializers and set them in the initializers property
3. Find all application listeners and set them to the listeners property
4. Infer and set the definition class of the main method, and find the main class to run
The code is very clear
public SpringApplication(ResourceLoader resourceLoader, Class... primarySources) {
    // ......
    this.webApplicationType = WebApplicationType.deduceFromClasspath();
    this.setInitializers(this.getSpringFactoriesInstances();
    this.setListeners(this.getSpringFactoriesInstances(ApplicationListener.class));
    this.mainApplicationClass = this.deduceMainApplicationClass();
}
Part II: run method process analysis
YML configuration
SpringBoot uses a global configuration file with a fixed name
application.properties
Syntax structure: key=value
application.yml
Syntax structure: key: space value
Function of configuration file: modify the default value of SpringBoot automatic configuration, because SpringBoot is automatically configured at the bottom;
yaml basic syntax
Note: strict grammar requirements!
1. Spaces cannot be omitted
2. Indentation is used to control the hierarchical relationship. As long as a column of data aligned on the left is at the same level.
3. Attributes and values are case sensitive.
Literal: normal value [number, Boolean, string]
The literal quantity can be written directly after the string. By default, double quotation marks or single quotation marks are not added to the string;
k: v
be careful:
"" double quotation marks will not escape the special characters in the string, and the special characters will be used as the meaning they want to express;
For example: name: "kuang \n shen" output: kuang newline shen
'' single quotation mark will escape special characters, and the special characters will eventually be output as ordinary characters
For example: name: 'kuang \n shen' output: kuang \n shen
Object, Map (key value pair)
#Object, Map format
k:
    v1:
    v2:
Write the attribute and value relationship of the object in the next line, and pay attention to the indentation; For example:
student:
    name: qinjiang
    age: 3
Inline writing
student: {name: qinjiang,age: 3}
Array (List, set)
Use the - value to represent an element in the array, for example:
pets:
 - cat
 - dog
 - pig
Inline writing
pets: [cat,dog,pig]
Modify the default port number:
server:
  port: 8082
Example: injection profile
yaml file is more powerful because it can directly inject matching values into our entity classes!
yaml injection profile
1. Create a new file application.yml in the resources directory of the springboot project
2. Write an entity class Dog;
package com.kuang.springboot.pojo;

@Component  //Register bean s into the container
public class Dog {
    private String name;
    private Integer age;

    //Parameterless construction, get, set method, toString() method
}
3. Think about how we used to inject attribute values into bean s@ Value, test the dogs:
@Component //Register bean
public class Dog {
    @Value("Ah Huang")
    private String name;
    @Value("18")
    private Integer age;
}
4. Inject and output the dog under the test class of SpringBoot;
@SpringBootTest
class DemoApplicationTests {

    @Autowired //Inject the dog automatically
    Dog dog;

    @Test
    public void contextLoads() {
        System.out.println(dog); //Print and look at the dog object
    }

}
The result is successfully output and @ Value is successfully injected. This is our original method, right.

5. We are writing a more complex entity class: the Person class
@Component //Register bean s into the container
public class Person {
    private String name;
    private Integer age;
    private Boolean happy;
    private Date birth;
    private Map<String,Object> maps;
    private List<Object> lists;
    private Dog dog;

    //Parameterless construction, get, set method, toString() method
}
6. Let's use yaml configuration for injection. When you write, pay attention to the differences and advantages. We write a yaml configuration!
person:
  name: qinjiang
  age: 3
  happy: false
  birth: 2000/01/01
  maps: {k1: v1,k2: v2}
  lists:
   - code
   - girl
   - music
  dog:
    name: Wangcai
    age: 1
7. We have written all the values of the person object just now. Now let's inject them into our class!
/*
@ConfigurationProperties effect:
Map the value of each attribute configured in the configuration file to this component;
Tell SpringBoot to bind all properties in this class to the relevant configuration in the configuration file
 Parameter prefix = "person": match all attributes under person in the configuration file one by one
*/
@Component //Register bean
@ConfigurationProperties(prefix = "person")
public class Person {
    private String name;
    private Integer age;
    private Boolean happy;
    private Date birth;
    private Map<String,Object> maps;
    private List<Object> lists;
    private Dog dog;
}
8. IDEA prompts that the springboot configuration annotation processor is not found. Let's look at the document. We can look at the document and find a dependency!

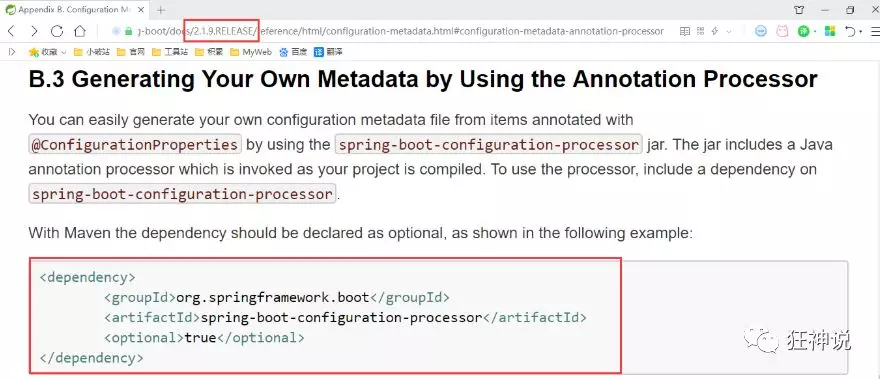
<dependency>
  <groupId>org.springframework.boot</groupId>
  <artifactId>spring-boot-configuration-processor</artifactId>
  <optional>true</optional>
</dependency>
9. After confirming that the above configurations are OK, let's test in the test class:
@SpringBootTest
class DemoApplicationTests {

    @Autowired
    Person person; //Inject person automatically

    @Test
    public void contextLoads() {
        System.out.println(person); //Print person information
    }

}
Result: all values are injected successfully!

yaml configuration injection into the entity class is completely OK!
Test:
1. If the key value of the configuration file is different from the value of the attribute, the result output is null and the injection fails
2. After configuring a person2, point @ ConfigurationProperties(prefix = "person2") to our person2;
Loads the specified configuration file
@PropertySource: load the specified configuration file;
@configurationProperties: get the value from the global configuration file by default;
1. Let's create a new person.properties file in the resources directory
name=kuangshen
2. Then specify in our code to load the person.properties file
@PropertySource(value = "classpath:person.properties")
@Component //Register bean
public class Person {

    @Value("${name}")
    private String name;

    ......
}
3. Output the test again: the specified configuration file is bound successfully!

Profile placeholder
Configuration files can also write placeholders to generate random numbers
person:
    name: qinjiang${random.uuid} # Random uuid
    age: ${random.int}  # Random int
    happy: false
    birth: 2000/01/01
    maps: {k1: v1,k2: v2}
    lists:
      - code
      - girl
      - music
    dog:
      name: ${person.hello:other}_Wangcai
      age: 1
Review the properties configuration
The yaml methods we used above are the simplest and most commonly used in development; It is also recommended by springboot! Let's talk about other implementation methods. The reason is the same; Write or write like that; In addition to yml, the configuration file also has the properties we used before. We didn't talk about it. Let's talk about it!
[note] when writing the properties configuration file in Chinese, there will be garbled codes. We need to set the encoding format to UTF-8 in the IDEA;
settings - > configured in fileencodings;

Test steps:
1. Create a new entity class User
@Component //Register bean
public class User {
    private String name;
    private int age;
    private String sex;
}
2. Edit the configuration file user.properties
user1.name=kuangshen
user1.age=18
user1.sex=male
3. We use @ Value on the User class for injection!
@Component //Register bean
@PropertySource(value = "classpath:user.properties")
public class User {
    //Use @ value directly
    @Value("${user.name}") //Take value from configuration file
    private String name;
    @Value("#{9*2}")  // #{SPEL} Spring expression
    private int age;
    @Value("male")  // Literal
    private String sex;
}
4. Springboot test
@SpringBootTest
class DemoApplicationTests {

    @Autowired
    User user;

    @Test
    public void contextLoads() {
        System.out.println(user);
    }

}
Result normal output:

contrast:
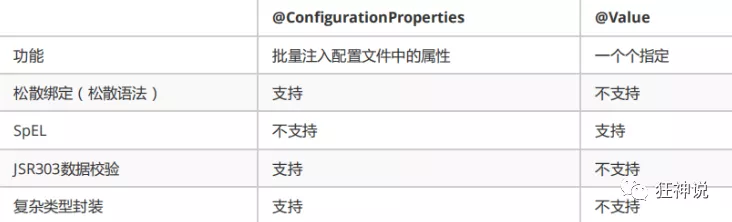
JSR303
In Springboot, @ validated can be used to verify the data. If the data is abnormal, exceptions will be thrown uniformly to facilitate the unified processing of the exception center. Let's write a comment here so that our name can only support Email format;
@Component //Register bean
@ConfigurationProperties(prefix = "person")
@Validated  //data verification
public class Person {

    @Email(message="Mailbox format error") //name must be in mailbox format
    private String name;
}
Running result: default message [not a legal email address];

Using data verification can ensure the correctness of data;
Common parameters
@NotNull(message="Name cannot be empty")
private String userName;
@Max(value=120,message="The oldest can't check 120")
private int age;
@Email(message="Mailbox format error")
private String email;
Empty check
@Null       Verify that the object is null
@NotNull    Verify that the object is not null, Cannot check string with length 0
@NotBlank   Check whether the constraint string is Null And by Trim Is the length greater than 0,String only,And the front and back spaces will be removed.
@NotEmpty   Check whether the constraint element is NULL Or EMPTY.
Booelan check
@AssertTrue     verification Boolean Whether the object is true
@AssertFalse    verification Boolean Whether the object is false
Length check
@Size(min=, max=) Validation object( Array,Collection,Map,String)Is the length within the given range
@Length(min=, max=) string is between min and max included.
Date check
@Past       verification Date and Calendar Is the object before the current time
@Future     verification Date and Calendar Is the object after the current time
@Pattern    verification String Whether the object conforms to the rules of regular expressions
In addition, we can also customize some data verification rules
Multi environment switching
profile is Spring's support for different configuration functions for different environments. You can quickly switch environments by activating different environment versions;
Multi profile
When we write the main configuration file, the file name can be application-{profile}.properties/yml, which is used to specify multiple environment versions;
For example:
application-test.properties represents the test environment configuration
application-dev.properties represents the development environment configuration
However, Springboot does not directly start these configuration files. It uses the application.properties main configuration file by default;
We need to select the environment to be activated through a configuration:
#For example, if the dev environment is specified in the configuration file, we can test by setting different port numbers;
#When we start SpringBoot, we can see that the configuration has been switched to dev;
spring.profiles.active=dev
Multiple document blocks in yaml
It is the same as in the properties configuration file, but it is more convenient to use yml to implement it without creating multiple configuration files!
server:
  port: 8081
#Select the environment block to activate
spring:
  profiles:
    active: prod

---
server:
  port: 8083
spring:
  profiles: dev #Name of the configuration environment


---

server:
  port: 8084
spring:
  profiles: prod  #Name of the configuration environment
Note: if both yml and properties are configured with ports and no other environment is activated, the properties configuration file will be used by default!
Configuration file loading location
There are many ways to load configuration files externally. We can select the most commonly used one and configure it in the developed resource file!
Official external configuration file description reference document
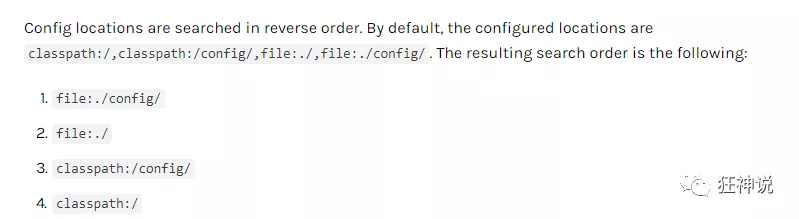
springboot startup will scan the application.properties or application.yml file in the following location as the default configuration file of Spring boot:
Priority 1: config folder configuration file under project path
Priority 2: configuration file under project path
Priority 3: config folder configuration file under resource path
Priority 4: configuration file under resource path
The priority is from high to bottom, and the configuration of high priority will overwrite the configuration of low priority;
SpringBoot will load the main configuration file from these four locations; complementary configuration;
We set up a project access path configuration in the lowest level configuration file to test the complementarity problem;
#Configure the access path of the project
server.servlet.context-path=/kuang
Development, operation and Maintenance Tips
Load the configuration file at the specified location
We can also change the default configuration file location through spring.config.location
After the project is packaged, we can use the form of command line parameters to specify the new location of the configuration file when starting the project. In this case, there are usually many operations in the later stage. For the same configuration, the externally specified configuration file has the highest priority
java -jar spring-boot-config.jar --spring.config.location=F:/application.properties
To be continued