1. What is mybatis plus?
(1) MyBatis plus (MP for short) is an enhancement tool for MyBatis. On the basis of MyBatis, it only makes enhancements and does not change. It is born to simplify development and improve efficiency. We can understand that it has encapsulated some CRUD methods. We don't need to write xml anymore. Just call these methods directly, similar to JPA.
- Official website address: https://mp.baomidou.com/
- GitHub home page: https://github.com/baomidou/mybatis-plus
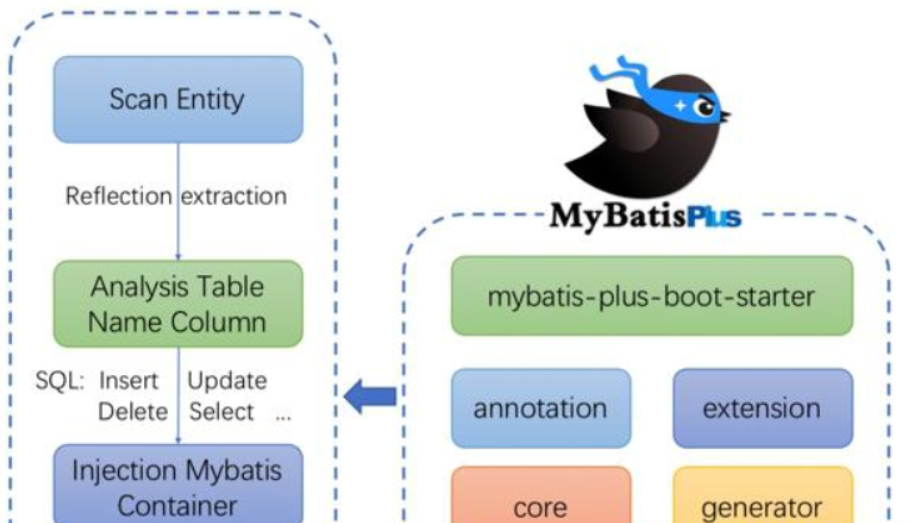
(2) Mybatis plus framework structure is as follows
2. Functional features of mybatis plus
- No invasion: it is only enhanced without change, and its introduction will not affect the existing project, which is as smooth as silk
- Low loss: the basic CURD will be injected automatically upon startup, with basically no loss of performance and direct object-oriented operation
- Powerful crud operation: built in general Mapper and general Service, most CRUD operations of a single table can be realized only through a small number of configurations, and there is a powerful condition constructor to meet various use requirements
- Support Lambda formal call: it is convenient to write various query conditions through Lambda expression, and there is no need to worry about wrong fields
- Support automatic generation of primary key: support up to 4 primary key strategies (including distributed unique ID generator - Sequence), which can be configured freely to perfectly solve the primary key problem
- Support ActiveRecord mode: support ActiveRecord formal calls. Entity classes only need to inherit Model classes to perform powerful CRUD operations
- Support custom global general operations: support global general method injection (Write once, use anywhere)
- Built in code generator: code or Maven plug-in can be used to quickly generate Mapper, Model, Service and Controller layer code, support template engine, and more custom configurations for you to use
- Built in paging plug-in: Based on MyBatis physical paging, developers do not need to care about specific operations. After configuring the plug-in, writing paging is equivalent to ordinary List query
- The paging plug-in supports multiple databases: MySQL, MariaDB, Oracle, DB2, H2, HSQL, SQLite, Postgre, SQLServer and other databases
- Built in performance analysis plug-in: it can output Sql statements and their execution time. It is recommended to enable this function during development and testing to quickly find out slow queries
- Built in global interception plug-in: it provides intelligent analysis and blocking of full table delete and update operations, and can also customize interception rules to prevent misoperation
3. Support database
- mysql , mariadb , oracle , db2 , h2 , hsql , sqlite , postgresql , sqlserver
- Dameng database, Xugu database, NPC Jincang database
4. Installation configuration
(1) First edit the pom.xml file of the project and add the following dependencies:
mybatis-plus-boot-starter: MyBatis-Plus rely on
mysql-connector-java: MySQL Database driven
druid: Druid It is a database connection pool called monitoring developed by Alibaba, and it is also the best database connection pool at present.
lombok: Tool plug-ins that provide many practical annotations
<!-- MyBatis-Plus rely on -->
<dependency>
    <groupId>com.baomidou</groupId>
    <artifactId>mybatis-plus-boot-starter</artifactId>
    <version>3.3.1</version>
</dependency>

<!-- Database driven dependency -->
<dependency>
    <groupId>mysql</groupId>
    <artifactId>mysql-connector-java</artifactId>
</dependency>

<!-- Database connection pool -->
<dependency>
    <groupId>com.alibaba</groupId>
    <artifactId>druid</artifactId>
    <version>1.1.9</version>
</dependency>

<!-- Lombok -->
<dependency>
    <groupId>org.projectlombok</groupId>
    <artifactId>lombok</artifactId>
    <optional>true</optional>
</dependency>
(2) Next, configure the database connection information in application.properties:
spring.datasource.type=com.alibaba.druid.pool.DruidDataSource
spring.datasource.url=jdbc:mysql://localhost:3306/hangge
spring.datasource.username=root
spring.datasource.password=hangge1234
(3) Finally, add the @ MapperScan annotation to the Spring Boot startup class to scan the Mapper folder:
To indicate that a class is Mapper There are two ways:
One way is in concrete Mapper Add on @Mapper Annotation indicating that the interface is a MyBatis Medium Mapper. This way is needed in every Mapper Add notes on the.
A simpler way (that is, the way used in this example) is to add to the configuration class @MapperScan("com.example.demo.mapper") Annotation indicating scanning com.example.demo.mapper All interfaces under the package are used as Mapper. This eliminates the need to configure on each interface @Mapper Annotated.
@SpringBootApplication
@MapperScan("com.example.demo.mapper")
public class DemoApplication {
    public static void main(String[] args) {
        SpringApplication.run(DemoApplication.class, args);
    }
}
1. Create entity class
(1) Suppose our database table structure is as follows:
(2) Create the corresponding User entity class:
@Data
public class User {
    //Specifies that the primary key uses the database ID auto increment policy
    @TableId(type = IdType.AUTO)
    private Integer id;
    private String userName;
    private String passWord;
}
2. Create database access layer
We write a Mapper class (UserMapper). We only need to inherit the BaseMapper interface without writing any methods or xml files.
public interface UserMapper extends BaseMapper<User> {
}
3. Start the test
(1) In the Controller, we call UserMapper to add, delete, modify and query data.
@RestController
public class HelloController {

    @Autowired
    UserMapper userMapper;

    @RequestMapping("/test")
    public void test(){
        // New data
        User user1 = new User();
        user1.setUserName("hangge");
        user1.setPassWord("123456");
        int i1 = userMapper.insert(user1);
        System.out.println("Insert a piece of data>>>" + i1);

        // Modify data
        User user2 = new User();
        user2.setId(1);
        user2.setPassWord("888888");
        int i2 = userMapper.updateById(user2);
        System.out.println("Update a piece of data>>>" + i2);

        // Delete data
        int i3 = userMapper.deleteById(12);
        System.out.println("Delete a piece of data>>>" + i3);

        // Query a single piece of data
        User user4 = userMapper.selectById(1);
        System.out.println("Query 1 piece of data>>>" + user4.toString());

        // Query multiple data
        List<User> users = userMapper.selectList(null);
        System.out.println("Query multiple data>>>" + users);

        return;
    }
}
(2) Access in browser http://localhost:8080/test Address, you can see the log printed by the console as follows. You can find that we have realized the CRUD function of the User table through several simple steps:
2, Set the table name and field name corresponding to the model
1. Set the associated table name
(1) By default, if the database table is named with a standard underscore and can correspond to the class name of the upper entity class, we do not need to manually match it. For example, if there is a user_info table, the following entity class will be automatically matched:
@Data
public class UserInfo {
    private Integer id;
    private String userName;
    private String passWord;
}
(2) If all tables in the database have a table name prefix, for example, we want the t_user_info table to still correspond to the UserInfo entity class, you can add the following global configuration setting table name prefix:
mybatis-plus.global-config.db-config.table-prefix=t_
(3) If all table names are not named with underscores (but can correspond to class names), for example, if you want the userinfo table to correspond to the userinfo entity class, you can add the following global configuration to indicate that the database table does not use underscores
mybatis-plus.global-config.db-config.table-underline=false
(4) In addition to the above two global configuration methods, we can also use the @ TableName table name annotation to specify the table name corresponding to the current entity class. For example, the table name corresponding to the following UserInfo entity class is user:
@Data
@TableName(value = "user")
public class UserInfo {
    private Integer id;
    private String userName;
    private String passWord;
}
2. Set the associated field name
(1) Like the table name, if the field names in the database table are named with standard underscores and can correspond to the member names of the upper entity class (hump naming), we don't need to match them manually. For example, the fields in the following user_info table will automatically correspond to each member attribute of the UserInfo entity class one by one:
@Data
public class UserInfo {
    private Integer id;
    private String userName;
    private String passWord;
}
(2) If the field names in the database table are not named with underscores (but can correspond to the member names of entity classes), the following global configuration can be added to indicate that the field names in the database table are not named with underscores:
mybatis-plus.configuration.map-underscore-to-camel-case=false
(3) In addition to the global configuration method, we can also use @ TableId annotation (marked on the primary key) and @ TableField annotation (marked on other member properties) to specify the corresponding field name:
@Data
public class UserInfo {
    @TableId(value = "uuid")
    private Integer id;
    @TableField(value = "uname")
    private String userName;
    @TableField(value = "pword")
    private String passWord;
}
3, Primary key policy
We can set the growth strategy of the primary key id through the type attribute of the @ TableId annotation. There are the following primary key strategies, which can be freely configured according to the situation.
1,ASSIGN_ID (snowflake algorithm)
If the type value is not set, idtype is used by default ASSIGN_ ID policy (since 3.3.0). This policy will automatically generate primary key ID using snowflake algorithm. The primary key type is Long or String (corresponding to MySQL table fields BIGINT and VARCHAR respectively)
Tip: this policy uses interfaces IdentifierGenerator Method of nextId(The default implementation class is DefaultIdentifierGenerator Snowflake algorithm), the following is an introduction to snowflake algorithm:
Snowflake algorithm( SnowFlake)yes Twitter Open source distributed id Generation algorithm. Its core idea is to use a 64 bit of long The number of type is globally unique id. It is widely used in distributed systems ID Time stamp is introduced, which basically keeps self increasing.
@Data
public class UserInfo {
    //Specifies that the primary key generation policy uses the snowflake algorithm (the default policy)
    @TableId(type = IdType.ASSIGN_ID)
    private Long id;
    private String userName;
    private String passWord;
}
2,ASSIGN_UUID (UUID without dash)
If idtype ASSIGN_ UUID policy, the UUID without middle dash will be automatically generated as the primary key. The primary key type is String, and the corresponding MySQL table field is VARCHAR(32)
Tip: this policy uses the method nextUUID of the interface IdentifierGenerator
@Data
public class UserInfo {
    //Specifies that the primary key generation policy is UUID without dashes
    @TableId(type = IdType.ASSIGN_UUID)
    private String id;
    private String userName;
    private String passWord;
}
3. AUTO (database ID increases automatically)
For databases like MySQL that support automatic primary key increment, we can use idtype Auto strategy.
@Data
public class UserInfo {
    //Specifies that the primary key uses the database ID auto increment policy
    @TableId(type = IdType.AUTO)
    private Integer id;
    private String userName;
    private String passWord;
}
4. INPUT (set the primary key value before insert ing)
(1) For sequential databases, such as Oracle and SQL server, when you need to create a self incrementing field, you need to use sequence.
Tips:
stay Oracle 11g To set the auto increment field, you need to create a sequence first( SQUENCE)Create another trigger( TRIGGER).
stay Oracle 12c In, you only need to use IDENTITY Property is OK, and MySQL Just as simple.
(2) Mybatis plus has defined the common database primary key sequence. First, we only need to define @ Bean in @ Configuration class:
Mybatis-Plus The following database primary key sequence is built in (if the built-in support does not meet your needs, it can be implemented) IKeyGenerator Interface for extension):
DB2KeyGenerator
H2KeyGenerator
KingbaseKeyGenerator
OracleKeyGenerator
PostgreKeyGenerator
@Bean
public OracleKeyGenerator oracleKeyGenerator(){
    return new OracleKeyGenerator();
}
(3) Then, configure the primary key Sequence for the entity class, and specify the primary key policy as IdType.INPUT:
Tip: the parent class can define @ KeySequence, and the child class can use it. In this way, several tables can share a Sequence
@TableName("TEST_SEQUSER")
@KeySequence("SEQ_TEST")//Class annotation
public class TestSequser{
  @TableId(value = "ID", type = IdType.INPUT)
  private Long id;

}
(4) If the primary key is of String type, you can also use:
How to use Sequence As the primary key, but the entity primary key type is String That is, the primary key of the table is varchar2,But you need to start from sequence Medium value
 Entity definition @KeySequence annotation clazz Specify type String.class
 Entity defines the type of primary key String
 be careful: oracle of sequence Returned is Long Type, if the primary key type is Integer,May cause ClassCastException
@KeySequence(value = "SEQ_ORACLE_STRING_KEY", clazz = String.class)
public class YourEntity{

    @TableId(value = "ID_STR", type = IdType.INPUT)
    private String idStr;
    ...
}
5. NONE
If idtype None policy indicates that the primary key type is not set (in the annotation, it is equal to follow the global, and the global value is equal to INPUT)
Attachment: global policy configuration
Suppose we want to use the AUTO policy by default (the database ID increases automatically), then we can add the following configuration in application.properties to modify it:
1 .mybatis-plus.global-config.db-config.id-type=auto
Mybatis plus has a built-in general Mapper. We only need to inherit BaseMapper. Most CRUD operations of a single table can be realized through a small number of configurations. At the same time, it has a powerful condition constructor to meet various use needs.
4, Mapper's CRUD interface 1: basic query
1. Preparation
(1) Suppose we have the following user information table user_info:
(2) First, create the corresponding entity class UserInfo
@Data
public class UserInfo {
    private Integer id;
    private String userName;
    private String passWord;
    private Integer age;
}
(3) Then you just need to create the UserInfoMapper interface and inherit the BaseMapper interface to use various CRUD methods.
public interface UserInfoMapper extends BaseMapper<UserInfo> {
}
2. selectById (query a record by id)
@RestController
public class HelloController {

    @Autowired
    UserInfoMapper userInfoMapper;

    @RequestMapping("/test")
    public void test(){
        // Query data by id
        UserInfo user = userInfoMapper.selectById(2);
        System.out.println(user);
    }
}
3. selectOne (use the query constructor to query a record):
Note: if there are multiple records that meet the incoming conditions in the database, this method cannot be used and an error will be reported.
(1) Before querying, we need to create a corresponding QueryWrapper to construct the where condition by writing the corresponding attributes in the table:
// Query criteria: the name contains' ha 'and the age is less than 40
QueryWrapper<UserInfo> queryWrapper = new QueryWrapper<>();
queryWrapper.like("user_name","ha").lt("age",40);
// Start query
UserInfo user = userInfoMapper.selectOne(queryWrapper);
System.out.println(user);
(2) In addition to using the QueryWrapper, we can also do the same thing with the lambda condition constructor.
Tip: the advantage of lambda conditional constructor is that it calls the method in the entity class. If the method name is written incorrectly, it will directly report an error and correct it in advance. Unlike QueryWrapper, which constructs the where condition by writing the corresponding attributes in the table, it is prone to spelling errors and can't be found until run time.
// Query criteria: the name contains' ha 'and the age is less than 40
LambdaQueryWrapper<UserInfo> queryWrapper = new LambdaQueryWrapper<>();
queryWrapper.like(UserInfo::getUserName,"ha").lt(UserInfo::getAge,40);
// Start query
UserInfo user = userInfoMapper.selectOne(queryWrapper);
System.out.println(user);
- Mybatis plus provides four ways to create lambda conditional constructors. The first three are as follows:
LambdaQueryWrapper<UserInfo> lqw1 = new QueryWrapper<UserInfo>().lambda();
LambdaQueryWrapper<UserInfo> lqw2= new LambdaQueryWrapper<>();
LambdaQueryWrapper<UserInfo> lqw3 = Wrappers.lambdaQuery();
- Whether the previous lambda constructor or queryWrapper, it is troublesome to pass the object to the mapper's selectOne method after writing the conditional construction statement. MyBatisPlus provides the fourth functional programming method, which does not need to be passed every time.
UserInfo userInfo = new LambdaQueryChainWrapper<>(userInfoMapper)
        .like(UserInfo::getUserName,"ha")
        .lt(UserInfo::getAge,40)
        .one();
(3) We can also directly pass the object to QueryWrapper in the form of construction parameters. MyBatisPlus will automatically build the SQL statement of the corresponding query according to the attributes in the entity object:
// Query criteria: the name is' hangge 'and the age is 22
UserInfo userInfo = new UserInfo();
userInfo.setUserName("hangge");
userInfo.setAge(22);
QueryWrapper<UserInfo> queryWrapper = new QueryWrapper<>(userInfo);
// Start query
UserInfo user = userInfoMapper.selectOne(queryWrapper);
System.out.println(user);
If we want to perform fuzzy query through some attributes in the object, we can annotate the corresponding attributes in the entity class corresponding to the database table. For example, we want to query users vaguely by name:
@Data
public class UserInfo {
    private Integer id;
    @TableField(condition = SqlCondition.LIKE)
    private String userName;
    private String passWord;
    private Integer age;
}
- Next, we query the users whose names contain ha. We can find that the generated sql statement does use like for fuzzy query:
// Query criteria: the name contains' ha '
UserInfo userInfo = new UserInfo();
userInfo.setUserName("ha");
QueryWrapper<UserInfo> queryWrapper = new QueryWrapper<>(userInfo);
// Start query
UserInfo user = userInfoMapper.selectOne(queryWrapper);
4. selectBatchIds (batch query by ID and return a List)
List<Integer> ids = new ArrayList<>();
ids.add(1);
ids.add(2);
ids.add(3);
List<UserInfo> users = userInfoMapper.selectBatchIds(ids);
System.out.println(users);
5. selectByMap (a List is returned by querying the conditions encapsulated in the Map)
be careful: map Write the column name in the data table, not the attribute name of the entity class. For example, the attribute name is userName,The fields in the data table are user_name,What should be written here is user_name.
Map<String,Object> columnMap = new HashMap<>();
columnMap.put("user_name", "hangge");
columnMap.put("age", 22);
List<UserInfo> users = userInfoMapper.selectByMap(columnMap);
System.out.println(users);
6. selectList (use the query constructor to return a List):
Note: the use of selectList is similar to that of selectOne, except that when there are multiple records in the database that meet the incoming conditions, using selectOne will report an error. In this case, select list is used.
(1) Before querying, we need to create a corresponding QueryWrapper and construct the where condition by writing the corresponding attributes in the table:
// Query criteria: the name contains' ha 'and the age is less than 40
QueryWrapper<UserInfo> queryWrapper = new QueryWrapper<>();
queryWrapper.like("user_name","ha").lt("age",40);
// Start query
List<UserInfo> users = userInfoMapper.selectList(queryWrapper);
System.out.println(user);
(2) In addition to using the QueryWrapper, we can also do the same thing with the lambda condition constructor.
Tips: lambda The advantage of conditional constructor is that it calls the method in the entity class. If the method name is written incorrectly, it will directly report an error, so as to correct the error in advance. No QueryWrapper It is constructed by writing the corresponding attributes in the table where Condition, prone to spelling errors, which will not be found until run time.
// Query criteria: the name contains' ha 'and the age is less than 40
LambdaQueryWrapper<UserInfo> queryWrapper = new LambdaQueryWrapper<>();
queryWrapper.like(UserInfo::getUserName,"ha").lt(UserInfo::getAge,40);
// Start query
List<UserInfo> users = userInfoMapper.selectList(queryWrapper);
System.out.println(users);
-
Mybatis plus provides four ways to create lambda conditional constructors. The first three are as follows:
LambdaQueryWrapper<UserInfo> lqw1 = new QueryWrapper<UserInfo>().lambda();
LambdaQueryWrapper<UserInfo> lqw2= new LambdaQueryWrapper<>();
LambdaQueryWrapper<UserInfo> lqw3 = Wrappers.lambdaQuery();
-
Whether the previous lambda constructor or queryWrapper, it is troublesome to pass the object to the mapper's selectList method after writing the conditional construction statement. MyBatisPlus provides the fourth functional programming method, which does not need to be passed every time.
List<UserInfo> userInfos = new LambdaQueryChainWrapper<>(userInfoMapper)
        .like(UserInfo::getUserName,"ha")
        .lt(UserInfo::getAge,40)
        .list();
(3) We can also directly pass the object to QueryWrapper in the form of construction parameters. MyBatisPlus will automatically build the SQL statement of the corresponding query according to the attributes in the entity object:
// Query criteria: the name is' hangge 'and the age is 22
UserInfo userInfo = new UserInfo();
userInfo.setUserName("hangge");
userInfo.setAge(22);
QueryWrapper<UserInfo> queryWrapper = new QueryWrapper<>(userInfo);
// Start query
List<UserInfo> users = userInfoMapper.selectList(queryWrapper);
System.out.println(users);
If we want to perform fuzzy query through some attributes in the object, we can annotate the corresponding attributes in the entity class corresponding to the database table. For example, we want to query users vaguely by name:
@Data
public class UserInfo {
    private Integer id;
    @TableField(condition = SqlCondition.LIKE)
    private String userName;
    private String passWord;
    private Integer age;
}
- Next, we query the users whose names contain ha. We can find that the generated sql statement does use like for fuzzy query:
// Query criteria: name contains' ha '
UserInfo userInfo = new UserInfo();
userInfo.setUserName("ha");
QueryWrapper<UserInfo> queryWrapper = new QueryWrapper<>(userInfo);
// Start query
List<UserInfo> users = userInfoMapper.selectList(queryWrapper);
7. selectMaps (use the query constructor to return a List):
The usage of selectMaps is very similar to the above selectList. Both of them pass in a query constructor to query, and then return a List. The difference is that the List returned by selectMaps contains maps:
Note: the key in the Map is the table field name, not the attribute name of the corresponding entity class.
UserInfo userInfo = new UserInfo();
userInfo.setUserName("ha");
QueryWrapper<UserInfo> queryWrapper = new QueryWrapper<>(userInfo);
// Start query
List<Map<String, Object>> users = userInfoMapper.selectMaps(queryWrapper);
System.out.println(users);
8. selectObjs (use the query constructor to return a List):
The usage of selectObjs is very similar to the previous selectList. It passes in a query constructor to query, and then returns a List. The difference is that in the List returned by selectObjs, only the first field value is returned:
UserInfo userInfo = new UserInfo();
userInfo.setAge(22);
QueryWrapper<UserInfo> queryWrapper = new QueryWrapper<>(userInfo);
// Start query
List<Object> users = userInfoMapper.selectObjs(queryWrapper);
System.out.println(users);
9. selectCount (query the total number of records using the query constructor):
The usage of selectCount is very similar to that of the previous selectList. Both of them pass in a query constructor for query. The difference is that selectCount returns an Integer value (the number of qualified records):
UserInfo userInfo = new UserInfo();
userInfo.setAge(22);
QueryWrapper<UserInfo> queryWrapper = new QueryWrapper<>(userInfo);
// Start query
Integer count = userInfoMapper.selectCount(queryWrapper);
System.out.println(count);
Attachment: add your own database operation
If we feel that the CRUD interface provided by default cannot meet the requirements, we can add our own SQL statements. Specifically, there are the following two schemes.
1. Annotation method (Mapper.java)
We can directly use @ Select to set the corresponding sql statement on the custom method:
public interface UserInfoMapper extends BaseMapper<UserInfo> {
    @Select("select * from user_info WHERE age > #{age}")
    List<UserInfo> getAll(Integer age);
}
2. XML format (Mapper.xml)
(1) First, add a custom sql statement in mapper.xml:
<?xml version="1.0" encoding="UTF-8" ?>
<!DOCTYPE mapper PUBLIC "-//mybatis.org//DTD Mapper 3.0//EN"
        "http://mybatis.org/dtd/mybatis-3-mapper.dtd">
<mapper namespace="com.example.demo.mapper.UserInfoMapper">
    <select id="getAll" resultType="com.example.demo.model.UserInfo">
        SELECT * FROM user_info WHERE age > #{age}
    </select>
</mapper>
(2) Then add the corresponding interface method in mapper.java:
public interface UserInfoMapper extends BaseMapper<UserInfo> {
    List<UserInfo> getAll(Integer age);
}