6. Spring Boot Security Framework
6.1 Understanding Spring Security
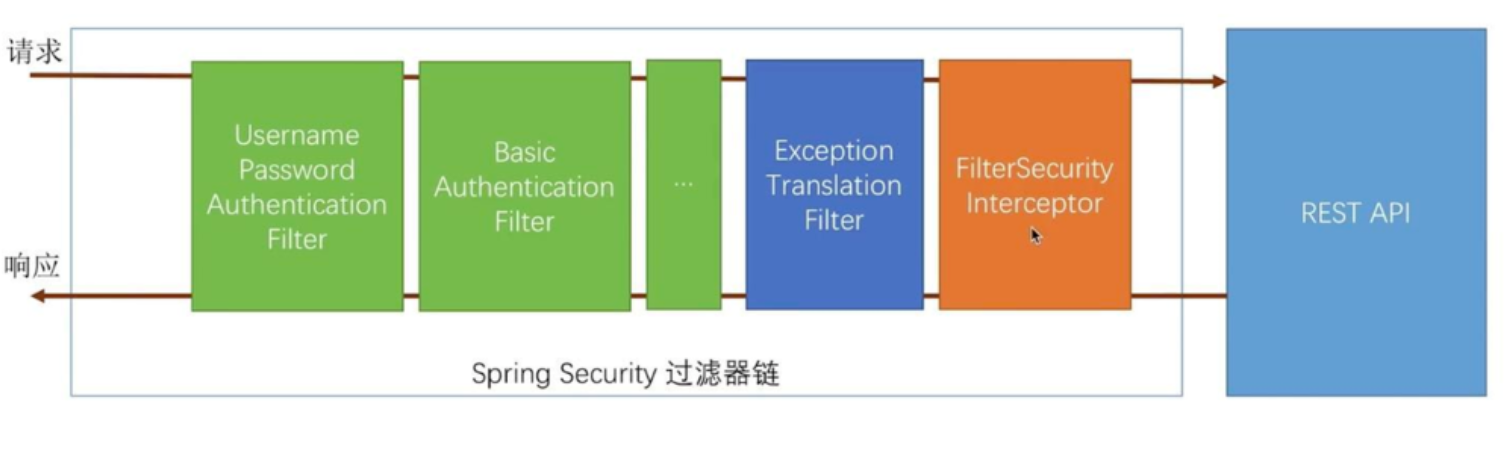
Spring Security is dedicated to providing Authentication and Authorization management for Java applications.
Certification: This is mainly to solve the problem of who I am by providing evidence to prove that you are the person you say.
Authorization: This is mainly to solve the problem of what I can do.
It is a powerful, highly customized authentication and access control framework. At its core is a set of filter chains that are automatically configured when a project is started. At its core, Basic Authentication Filter is used to authenticate users. In Spring Security, a filter handles one type of authentication, as follows:
(Source: https://www.jianshu.com/p/ef1e218f014a)
6.1.1 Getting Started Projects
-
Create Project
Create a Web project for Spring Boot and add Spring Security dependencies:
<dependency> <groupId>org.springframework.boot</groupId> <artifactId>spring-boot-starter-security</artifactId> </dependency> -
Controller
New HelloController class, add/hello interface:
@RestController public class HelloController { @RequestMapping("/hello") public String home() { return "Hello ,spring security!"; } } -
test
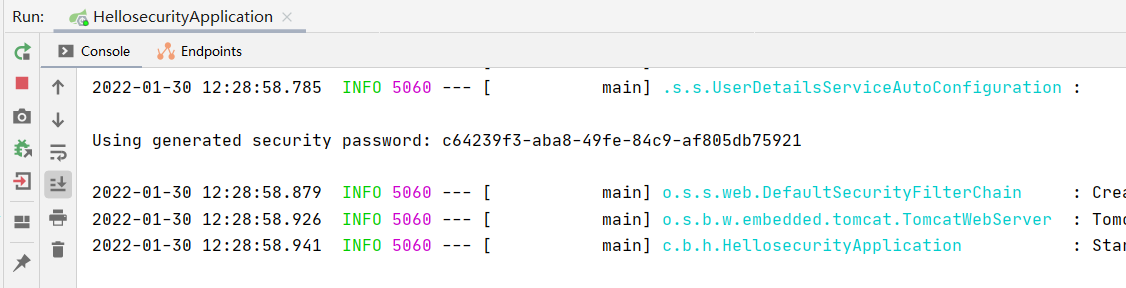
Start the project and access it in the browser http://localhost:8080/login The interface automatically jumps to the login page provided by Spring Security, as follows:

Explain that Spring Security is working, it will protect the resources in the project. The Spring Security default user name is user, and the default password is generated when Spring Security starts, as you can see in the startup log. You can successfully access the interface by filling in the user name and password.

-
Custom User Name and Password
You can also set your own user name and password in application. Add the following configuration to yml:
spring:
  security:
    user:
      name: admin
      password: 123456
Restart the project to access the protected/hello interface. Automatically jumped to the default login page, entered the user name and password and successfully jumped to / hello.
6.1.2 Role Access Control
Usually, we need to implement the function that "specific resources can only be accessed by specific roles". Suppose our system has two roles:
- ADMIN: All resources are accessible.
- USER: Only specific resources can be accessed.
Now add'/user/**'interface to the system to represent user information resources (accessible by USER); Add the'/admin/**'interface to represent the administrator's resources (USER is not accessible), code as follows:
@RestController
public class UserController {
    @RequestMapping("/user/hello")
    public String hello() {
        return "user,Hello !";
    }
}

@RestController
public class AdminController {
    @RequestMapping("/admin/hello")
    public String hello() {
        return "admin,Hello !";
    }
}
In practical development, users and roles are stored in the database. For demonstration purposes, this example creates two users and roles that are stored in memory. You can customize classes and integrate the WebSecurityConfigurerAdapter to further configure Spring Security:
@Configuration
public class SecurityConfig extends WebSecurityConfigurerAdapter {
    /*Do not encrypt passwords*/
    @Bean
    PasswordEncoder passwordEncoder(){
        return NoOpPasswordEncoder.getInstance();
    }
    @Override
    protected void configure(AuthenticationManagerBuilder auth) throws Exception {
        auth.inMemoryAuthentication()
                /*Administrator users have ADMIN and USER roles*/
                .withUser("admin").password("admin").roles("ADMIN", "USER")
                .and()
                /*Ordinary user*/
                .withUser("shenziyi").password("shenziyi").roles("USER");
    }
    @Override
    protected void configure(HttpSecurity http) throws Exception {
        http
                .authorizeRequests()
                /*URLs accessed by ordinary users*/
                .antMatchers("/user/**").hasRole("USER")
                /*URLs accessed by administrator users*/
                .antMatchers("/admin/**").hasRole("ADMIN")
                .anyRequest().authenticated() //Other multiple paths must be authenticated
                .and()
                .formLogin()
                .loginProcessingUrl("/login")
                .permitAll()  //Access to the'/login'interface does not require authentication to prevent redirection loops
                .and()
                .csrf().disable(); //Close csrf
    }
}
Based on the configuration above, we know that users using "shenziyi" have access to the "/user/**" interface and that all interfaces can be accessed by using admin login.
6.2 Database-based authentication
In the previous case, the user name and password of the user login system are defined in memory. In the actual development, the basic information and role of the user are authenticated and authorized by querying the database.
6.2.1 Spring Security based on database authentication
-
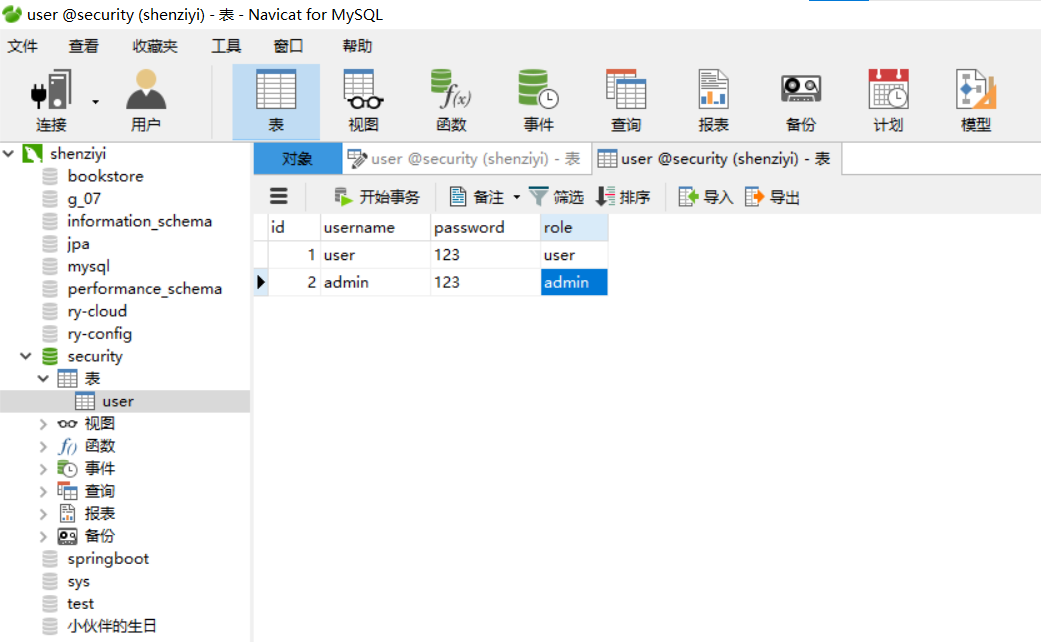
Create Table
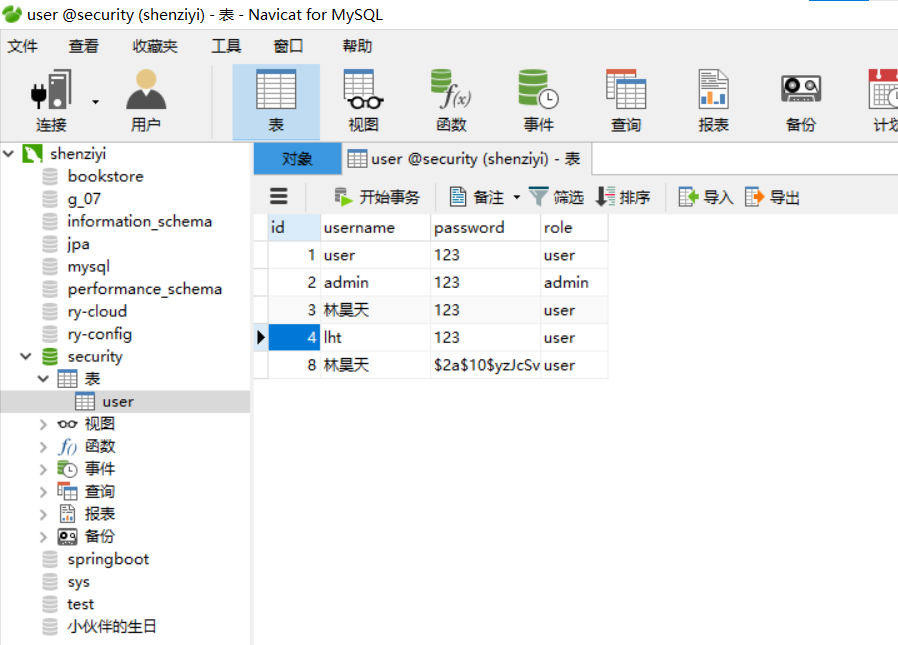
Create a user table in the MySQL database with the id as the primary key and add two users (user and admin).
-
Create Project
Create a Spring Boot module project and select related dependencies:
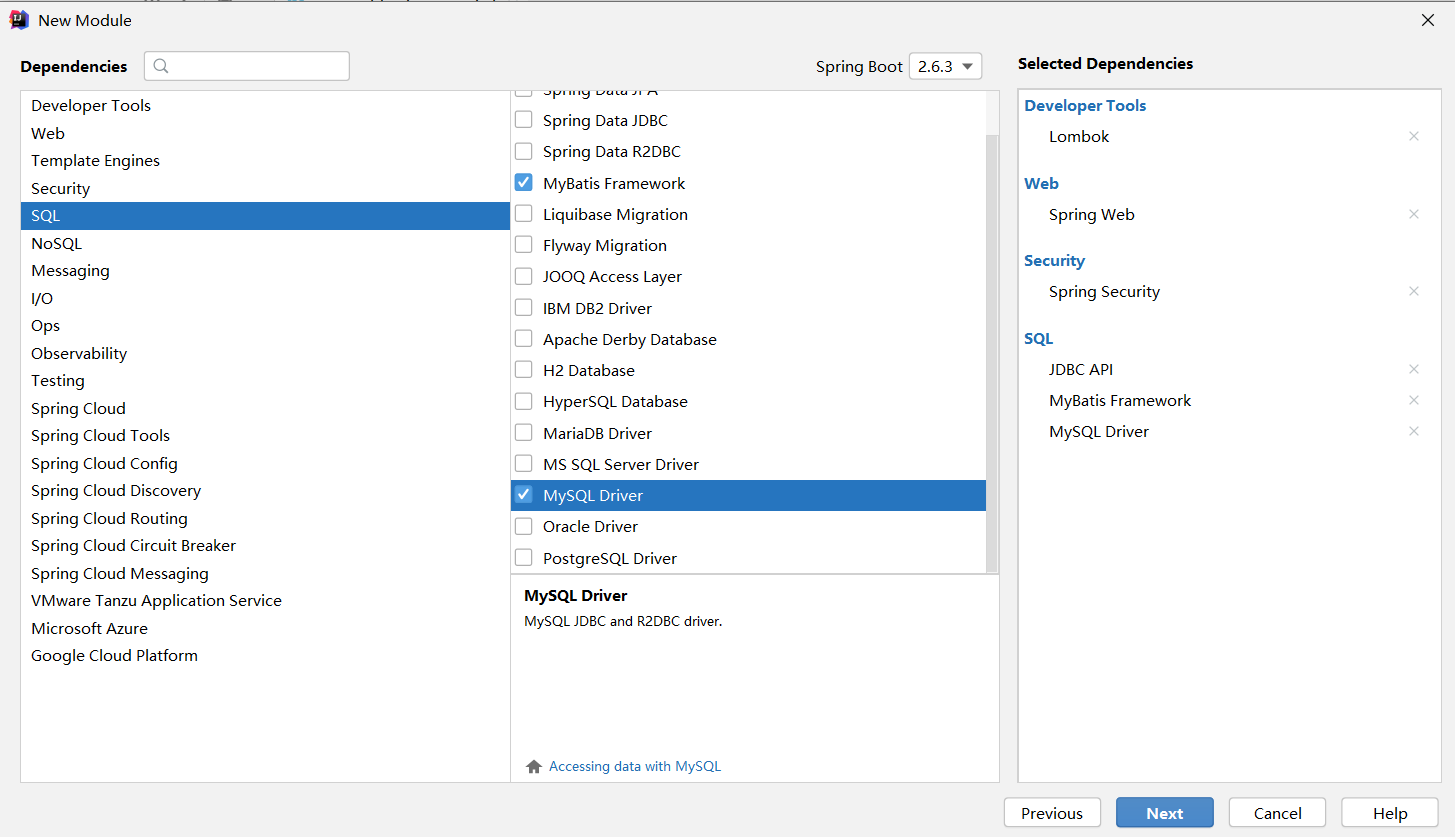
The main purpose of Lombok is to eliminate boilerplate code from actual development by annotations, such as getter, setter methods, override toString, equals methods, etc. These codes have little technical content but are often written and can be replaced with annotations such as @Data, @Setter, @Getter.
-
configuration file
In application. MySQL connection configuration and MyBatis configuration are set in YML with the following code:
spring: datasource: url: jdbc:mysql://localhost:3306/security?serverTimezone=GMT%2B8&characterEncoding=utf-8 username: root password: admin123 driver-class-name: com.mysql.jdbc.Driver logging: level: com.example.bdatabaserole.mapper: debug -
Create Entity Class
Create an entity class corresponding to the user table and implement UserDetails:
package com.shenziyi.spring_security.entity;

import lombok.Data;
import org.springframework.security.core.GrantedAuthority;
import org.springframework.security.core.authority.SimpleGrantedAuthority;
import org.springframework.security.core.userdetails.UserDetails;

import java.io.Serializable;
import java.util.ArrayList;
import java.util.Collection;
import java.util.List;


@Data   //lombok comment omits get/set and other methods
public class UserInfo implements Serializable,UserDetails {
    private int id;

    private String username;
    private String password;
    private String role;

    public UserInfo(String username,String password,String role){
        this.username=username;
        this.password=password;
        this.role=role;
    }

    /**
     * Indicates whether the user's account has expired. Expired accounts cannot be verified.
     * Returns true if the user's account is valid (that is, it has not expired), or false if it is not valid
     */
    @Override
    public boolean isAccountNonExpired() {
        return true;
    }

    /**
     * Indicates whether the user is locked or unlocked. The locked user could not be authenticated.
     * Returns true if the user is not locked, false otherwise
     */
    @Override
    public boolean isAccountNonLocked() {
        return true;
    }

    /**
     * Indicates whether the user's credentials (passwords) have expired. Expired credentials prevent authentication
     * Returns true if the user's credentials are valid (that is, they have not expired)
     * Returns false if it is not valid (i.e. expired)
     */
    @Override
    public boolean isCredentialsNonExpired() {
        return true;
    }


    /**
     * Indicates whether the user is enabled or disabled. Cannot authenticate disabled users
     * Returns true if the user is enabled, false otherwise
     */
    @Override
    public boolean isEnabled() {
        return true;
    }

    @Override
    public Collection<? extends GrantedAuthority>getAuthorities(){
        Collection<GrantedAuthority>authorities=new ArrayList<>();
        authorities.add(new SimpleGrantedAuthority("ROLE_"+this.role));
        return authorities;
    }

}
The UserDetails interface is the core interface for providing user information. This interface only implements storing user information. Subsequently, the user information provided by the interface will be encapsulated in the Authentication of the authentication object. UserDetails provides seven methods by default:
Method Name Effect getAuthorities() User's role set, ROLE_needs to be added by default prefix getPassword() Get the current user object password getUsername() Get the current user object user name isAccountNonExpired() Is Account Expired isAccountNonLocked() Is Account Locked isCredentialsNonExpired() Does the voucher expire isEnabled() Is User Available -
Create Mapper interface and Service layer
Create a UserMapper interface that replaces XML with annotations for simple SQL statements, then create a UserInfoService business layer class:
<?xml version="1.0" encoding="UTF-8" ?>
<!DOCTYPE mapper
        PUBLIC "-//mybatis.org//DTD Mapper 3.0//EN"
        "http://mybatis.org/dtd/mybatis-3-mapper.dtd">
<!--Namespace must be and UserMapper Same class name-->
<mapper namespace="com.shenziyi.spring_security.mapper.UserMapper">
    <select id="getUserByUsername" resultType="com.shenziyi.spring_security.entity.UserInfo">
        select * from user where username = #{username};
  </select>
    <select id="getRolesById" resultType="com.shenziyi.spring_security.entity.Role">
        select * from role where id in(select rid from user_role where uid=#{uid});
  </select>
</mapper>
package com.shenziyi.spring_security.mapper; import com.shenziyi.spring_security.entity.Role; import com.shenziyi.spring_security.entity.UserInfo; import org.apache.ibatis.annotations.Insert; import org.apache.ibatis.annotations.Mapper; import org.apache.ibatis.annotations.Select; import org.springframework.stereotype.Repository; import java.util.List; @Mapper @Repository public interface UserMapper { @Select("select * from user where username = #{username}") UserInfo getUserByUsername(String username); } -
Create Controller
Next, create the UserController
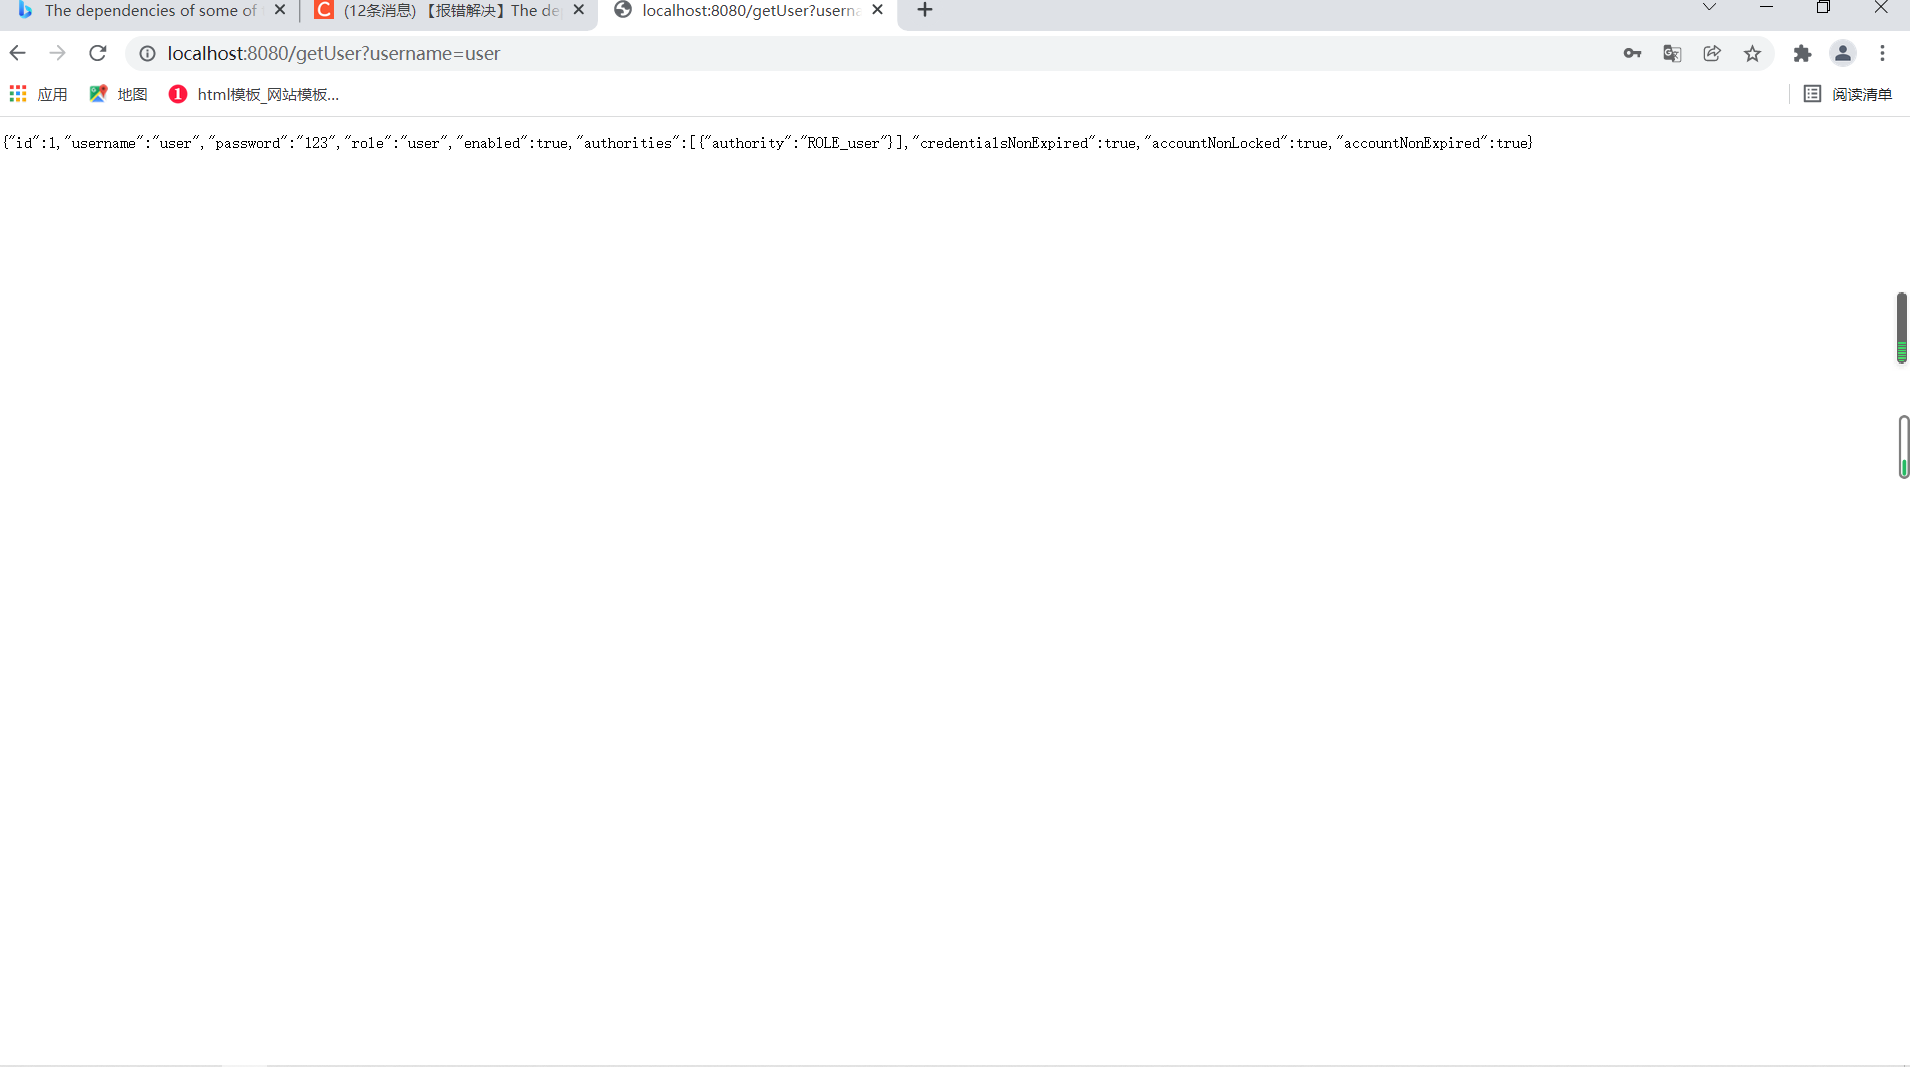
package com.shenziyi.spring_security.controller; import com.shenziyi.spring_security.entity.UserInfo; import com.shenziyi.spring_security.service.UserInfoService; import org.springframework.beans.factory.annotation.Autowired; import org.springframework.security.access.prepost.PreAuthorize; import org.springframework.stereotype.Controller; import org.springframework.web.bind.annotation.*; @RestController public class UserController { @Autowired private UserInfoService userInfoService; @GetMapping("/getUser") public UserInfo getUser(@RequestParam String username){ return userInfoService.getUserInfo(username); } } -
identity authentication
User information needs to be read from the database for authentication, a new class needs to be created to implement the UserDetailService interface, and the loadUserByUsername method is overridden. The parameter of this method is the user name at the time of login. The user name is used to find the user in the database. If it does not exist, an exception that does not exist is thrown. If the user is found, the user and role information are returned. LoadUserByUsername will be called automatically when the user logs in:
package com.shenziyi.spring_security.service;


import com.shenziyi.spring_security.entity.UserInfo;
import org.springframework.beans.factory.annotation.Autowired;
import org.springframework.context.annotation.Lazy;
import org.springframework.security.core.GrantedAuthority;
import org.springframework.security.core.authority.SimpleGrantedAuthority;
import org.springframework.security.core.userdetails.User;
import org.springframework.security.core.userdetails.UserDetails;
import org.springframework.security.core.userdetails.UserDetailsService;
import org.springframework.security.core.userdetails.UsernameNotFoundException;
import org.springframework.security.crypto.password.PasswordEncoder;
import org.springframework.stereotype.Component;

import java.util.ArrayList;
import java.util.List;


@Component
public class CustomUserDetailsService implements UserDetailsService {
    @Autowired
    private UserInfoService userInfoService;


    /**
     * Need to create a new configuration class to register a specified encrypted Bean, or register the specified in the next Security configuration class
     */
    @Autowired
    @Lazy
    private PasswordEncoder passwordEncoder;

    @Override
    public UserDetails loadUserByUsername(String username) throws UsernameNotFoundException {
        // Getting user information from the database by user name
        UserInfo userInfo = userInfoService.getUserInfo(username);
        if (userInfo == null) {
            throw new UsernameNotFoundException("user does not exist");
        }
        String role=userInfo.getRole();
        List<GrantedAuthority>authorities=new ArrayList<>();
        authorities.add(new SimpleGrantedAuthority("ROLE_"+role));
        return new User(
                userInfo.getUsername(),
                passwordEncoder.encode(userInfo.getPassword()),
                authorities
        );
    }
}
(There is a minor problem here, because two classes refer to each other, causing Spring to initialize beans without knowing which one to initialize first. This creates a circular dependency, so choose either one to use the @lazy annotation to delay the loading of one of the dependent beans, thereby resolving the problem that Spring does not know which to initialize first when initializing beans.)
-
Configuration of Spring Security
Create a WebSecurityConfig that inherits the WebSecurityConfigurerAdapter and overrides the configure(auth) method:
package com.shenziyi.spring_security.config; import com.shenziyi.spring_security.service.CustomUserDetailsService; import org.springframework.beans.factory.annotation.Autowired; import org.springframework.context.annotation.Bean; import org.springframework.security.config.annotation.authentication.builders.AuthenticationManagerBuilder; import org.springframework.security.config.annotation.web.configuration.EnableWebSecurity; import org.springframework.security.config.annotation.web.configuration.WebSecurityConfigurerAdapter; import org.springframework.security.crypto.bcrypt.BCryptPasswordEncoder; import org.springframework.security.crypto.password.PasswordEncoder; @EnableWebSecurity //Is the comment used by Spring Security to enable Web security public class WebSecurityConfig extends WebSecurityConfigurerAdapter { @Autowired private CustomUserDetailsService userDatailService; /** * Specify encryption */ @Bean public PasswordEncoder passwordEncoder(){ // Encrypt password using BCrypt return new BCryptPasswordEncoder(); } @Override protected void configure(AuthenticationManagerBuilder auth) throws Exception { auth // Authentication of users read from the database .userDetailsService(userDatailService) .passwordEncoder(passwordEncoder()); } } -
test
Start the project after the configuration is completed, enter the user name and password in the database on the login page, and access the interface after successful login:
6.2.2 Role Access Control
Once the above settings are complete, you can log in using the user name and password in the database and get the user's role. Next, you restrict the user's request access through the user's role.
-
Open Access
In 6.1, role access control is URL-based, and we have the flexibility to configure method security through annotations. Add @EnableGlobalMethodSecurity annotation to WebSecurityConfig to open method access:
@EnableWebSecurity //Is the comment used by Spring Security to enable Web security
@EnableGlobalMethodSecurity(prePostEnabled = true)//Turn on method-level security validation
public class WebSecurityConfig extends WebSecurityConfigurerAdapter{
    //...
}
Code explanation: prePostEnabled = true unlocks the @PreAuthorize and @PostAuthorize annotations, @PreAuthorize annotations validate before method execution, and @PostAuthorize annotations validate after method execution.
-
Add Access Interface at Control Layer
Add access to methods in the UserController class:
package com.shenziyi.spring_security.controller;


import com.shenziyi.spring_security.entity.UserInfo;
import com.shenziyi.spring_security.service.UserInfoService;
import org.springframework.beans.factory.annotation.Autowired;
import org.springframework.security.access.prepost.PreAuthorize;
import org.springframework.stereotype.Controller;
import org.springframework.web.bind.annotation.*;


@RestController
public class UserController {
    @Autowired
    private UserInfoService userInfoService;

    @GetMapping("/getUser")
    public UserInfo getUser(@RequestParam String username){
        return userInfoService.getUserInfo(username);
    }

    @PreAuthorize("hasAnyRole('user')") //Only the user role can access this method
    @GetMapping("/user")
    public String user(){
        return "hello,user";
    }

    @PreAuthorize("hasAnyRole('admin')") //Only admin roles can access this method
    @GetMapping("/admin")
    public String admin(){
        return "hello,admin";
    }
}
Code explanation: @PreAuthorize('hasAnyRole('user')) comment indicates that a user role is required to access this method.
-
test
Restart the program so that users of the role user can log in and access localhost:8080/user, but not localhost:8080/admin. If you log in using a user with the role admin, you can access all of them.
6.2.3 Password Encryption Save
The user passwords above are manually added to the database, so they are displayed in clear text in the database. In practice, the user passwords need to be encrypted and saved. The following simulates the registered user and encrypts the saved password.
-
Modify Mapper interface
Add an insert user to the UserMapper interface:
@Mapper @Repository public interface UserMapper { @Select("select * from user where username = #{username}") UserInfo getUserByUsername(String username); @Insert("insert into user(username,password,role) value(#{username},#{password},#{role})") int insertUserInfo(UserInfo userInfo); } -
Modify Service Class
Add an insert method to the UserInfoService class and make the password encrypted:
@Service public class UserInfoService { @Autowired private UserMapper userMapper; public UserInfo getUserInfo(String username){ return userMapper.getUserByUsername(username); } @Autowired private PasswordEncoder passwordEncoder; public int insertUser(UserInfo userInfo){ /*Encrypt Password*/ userInfo.setPassword(passwordEncoder.encode(userInfo.getPassword())); return userMapper.insertUserInfo(userInfo); } } -
Modify Controller
Add the Insert User Interface to the UserController class:
@PostMapping("addUser") public int addUser(@RequestBody UserInfo userInfo){ return userInfoService.insertUser(userInfo); } -
test
Configuration is complete, services are started, and POST requests are sent using Postman to add users as follows:

After clicking the Send button, the diagram shows that the addition failed, and the status code of the response shows 401 Unauthorized, indicating that there is no permission to log in, but the registered user does not need to log in, so the registered user needs to be granted permission.Modify the WebSecurityConfig configuration class to override the configure method:
@Override protected void configure(HttpSecurity http)throws Exception{ http .authorizeRequests() //Allow POST requests/addUser s without authentication .antMatchers(HttpMethod.POST,"/addUser").permitAll() .anyRequest().authenticated() //All requests need validation .and() .formLogin() //Use the default login page .and() .csrf().disable(); } -
Restart Project
Access the addUser interface again and see that Postman sent the request successfully:

Viewing the database data, the added user password is encrypted:
-
Log on with an encrypted password
Logging in with an encrypted password requires modifying the CustomUserDetailsService class. If you need to encrypt the plaintext password from the database before, you do not need to encrypt it again. The code is as follows:
public UserDetails loadUserByUsername(String username) throws UsernameNotFoundException {
        // Getting user information from the database by user name
        UserInfo userInfo = userInfoService.getUserInfo(username);
        if (userInfo == null) {
            throw new UsernameNotFoundException("user does not exist");
        }
        String role=userInfo.getRole();
        List<GrantedAuthority>authorities=new ArrayList<>();
        authorities.add(new SimpleGrantedAuthority("ROLE_"+role));
        return new User(
                userInfo.getUsername(),
                //The database password is encrypted without further encryption
                userInfo.getPassword(),
                authorities
        );
    }
Access in browser http://localhost:8080/user , enter shenziyi login.
6.2.4 Many-to-Many user roles
Authentication data is one role for many users. In the actual project, it is mostly many-to-many. We develop and explain on the basis of this project. This section describes data authentication and authorization for many-to-many relationships of user roles.
-
Create table structure
There are three tables, user table, role table and user role Association table. (ROLE_prefix role name)
-
Create Entity Class
Modify the UserInfo entity class based on the table structure to create a Role class:
	@Override
    public Collection<? extends GrantedAuthority> getAuthorities() {
        Collection<GrantedAuthority> authorities = new ArrayList<>();
        for (Role role : roleList) {
            //The database role table field is ROLE_ Beginning, so there's no need to add ROLE_here
            authorities.add(new SimpleGrantedAuthority(role.getName()));
        }
        return authorities;
    }

    /**
     * Indicates whether the user's account has expired. Expired accounts cannot be verified.
     * Returns true if the user's account is valid (that is, it has not expired), or false if it is not valid
     */
    @Override
    public boolean isAccountNonExpired() {
        return true;
    }

    /**
     * Indicates whether the user is locked or unlocked. The locked user could not be authenticated.
     * Returns true if the user is not locked, false otherwise
     */
    @Override
    public boolean isAccountNonLocked() {
        return true;
    }

    /**
     * Indicates whether the user's credentials (passwords) have expired. Expired credentials prevent authentication
     * Returns true if the user's credentials are valid (that is, they have not expired)
     * Returns false if it is not valid (i.e. expired)
     */
    @Override
    public boolean isCredentialsNonExpired() {
        return true;
    }


    /**
     * Indicates whether the user is enabled or disabled. Cannot authenticate disabled users
     * Returns true if the user is enabled, false otherwise
     */
    @Override
    public boolean isEnabled() {
        return true;
    }
}
@Data public class Role { private int id; private String name; private String nameZh; } -
Create UserMapper and UserMapper.xml
Modify the abstract method in the UserMapper interface with the following code:
@Mapper
@Repository
public interface UserMapper {
//    @Select("select * from user where username = #{username}")
    UserInfo getUserByUsername(String username);
    List<Role> getRolesById(int id);


    // Add User
    @Insert("insert into user(username, password) value(#{username}, #{password})")
    int insertUserInfo(UserInfo userInfo);
}
Next, create a UserMapper under classpath:mappers. The XML Mapping file, which is recommended in XML when the SQL statement is more complex, has the following code:
<?xml version="1.0" encoding="UTF-8" ?>
<!DOCTYPE mapper
        PUBLIC "-//mybatis.org//DTD Mapper 3.0//EN"
        "http://mybatis.org/dtd/mybatis-3-mapper.dtd">
<!--Namespace must be and UserMapper Same class name-->
<mapper namespace="com.shenziyi.mapper.UserMapper">
    <select id="getUserByUsername" resultType="com.shenziyi.entity.UserInfo">
        select * from user where username = #{username};
  </select>
    <select id="getRolesById" resultType="com.shenziyi.entity.Role">
        select * from role where id in(select rid from user_role where uid=#{uid});
  </select>
</mapper>
And in application. Configure in yml:
mybatis: mapper-locations: classpath:mappers/*.xml type-aliases-package: com.shenziyi.mapper -
Modify CustomUserDetailsService class
Modify the loadUserByUsername method in the CustomUserDetailsService class:
@Component public class CustomUserDetailsService implements UserDetailsService { @Autowired private UserInfoService userInfoService; @Autowired private UserMapper userMapper; /** * Need to create a new configuration class to register a specified encrypted Bean, or register the specified in the next Security configuration class */ @Autowired private PasswordEncoder passwordEncoder; @Override public UserDetails loadUserByUsername(String username) throws UsernameNotFoundException { // Getting user information from the database by user name UserInfo userInfo = userInfoService.getUserInfo(username); if (userInfo == null) { throw new UsernameNotFoundException("user does not exist"); } userInfo.setRoleList(userMapper.getRolesById(userInfo.getId())); return userInfo; } } -
controller Layer
Add the following methods to the UserController class:
@RestController public class UserController { @Autowired private UserInfoService userInfoService; //Add to @PostMapping("/addUser") public int addUser(@RequestBody UserInfo userInfo){ return userInfoService.insertUser(userInfo); } @GetMapping("/getUser") public UserInfo getUser(@RequestParam String username){ return userInfoService.getUserInfo(username); } @PreAuthorize("hasAnyRole('user')") // This method can only be accessed by the user role @GetMapping("/user") public String user(){ return "hello,user"; } @PreAuthorize("hasAnyRole('dba','admin')") // The dba\admin role can access this method @GetMapping("/db") public String dba(){ return "hello,dba,admin"; } @PreAuthorize("hasAnyRole('admin')") // Only admin roles can access this method @GetMapping("/admin") public String admin(){ return "hello,admin"; } } -
After the configuration is complete, start the project to test the interface in the controller.
6.2.5 Role Inheritance
Role inheritance is actually a very common inheritance, because most companies may adopt pyramid-shaped governance and bosses may have some or all of the rights of their subordinates. This reality, reflected in our code, is role inheritance.
The Spring Security provides developers with a relevant role inheritance solution by providing a RoleHierarchy in the configuration class with the following code:
@Bean
RoleHierarchy roleHierarchy(){
    RoleHierarchyImpl roleHierarchy=new RoleHierarchyImpl();
    String hierarchy="ROLE_dba>ROLE_admin \n ROLE_admin>ROLE_user";//dba, admin, user are all roles in the user table
    roleHierarchy.setHierarchy(hierarchy);
    return roleHierarchy;
}
An example of the RoleHierarchy interface is provided, using strings to describe the inheritance relationship between roles. ROLE_dba has ROLE_ All permissions for admin, ROLE_admin has ROLE_ All permissions for user. When this Bean is provided, all future ROLE_ Resource that the user role can access, ROLE_dba and ROLE_admin is accessible with ROLE_ Resource accessible to admin role, ROLE_dba is also accessible.