preface
Personally, I think the configuration of mainstream Spring Boot and Spring MVC is cumbersome. Only some older projects are used, or government agencies will use it. However, Spring Boot convention is greater than configuration. Now microservice technology is common, and the use of Spring Cloud is based on Spring Boot.
Why use JWT Token instead of Session?
When the user logs in successfully for the first time, the Session will be passed in to the server and a SessionId will be returned to the client. The client will save the SessionId in the Cookie. The user requests the server again with the SessionId, and the server will look for the Session with the SessionId. The Session is stored in memory. If the service volume is large, it will occupy a lot of memory, and the expansibility of the Session is not strong.
The Token is like an ID card. After the user successfully logs in to the server for the first time, a unique Token string will be returned. The client will save it to the cache and request to carry the Token again. The server will parse the Token to obtain the user information and query it in the database. SSO single sign on in the same domain or across domains is basically realized through Token, which has strong expansibility. As just said, the Token must check the database every time it is parsed. If the service volume is particularly large and concurrent, the database will be accessed frequently, which is easy to cause database connection interruption or waiting state. At this time, we only need to store the Token in redis. Each request will only judge whether this Token exists in redis. Redis is single threaded, which can effectively control concurrency, and the processing level of redis is millisecond. Let's get to the point.
1, Use IDEA to build Spring Boot project and integrate Spring Data JPA
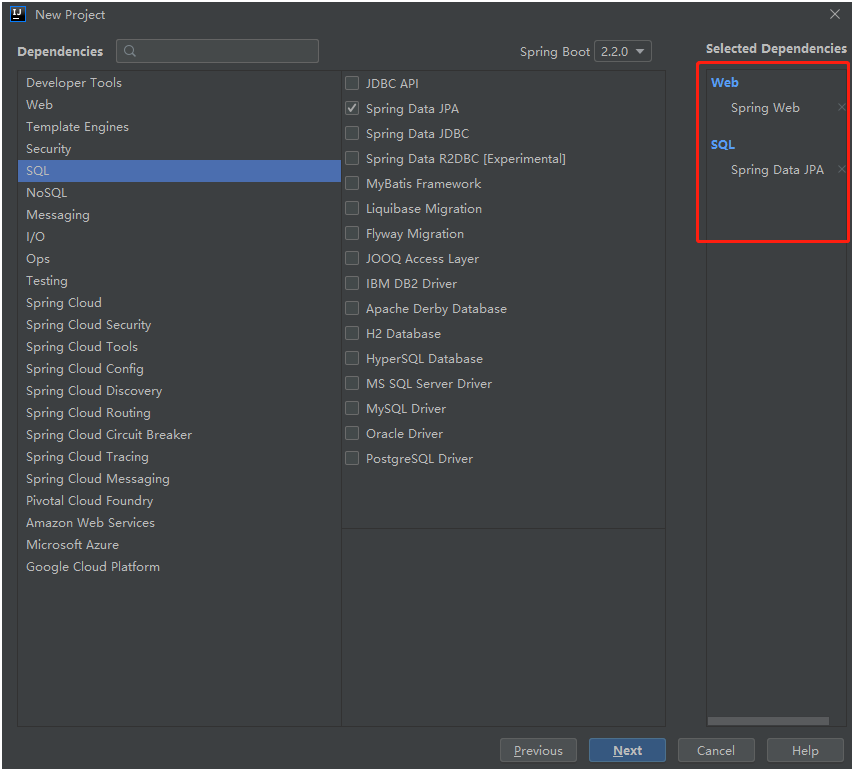
1. New project
Note here that Spring Web and Spring Data JPA must be checked for a new project. If it is done in an existing project, you can add dependencies.
        <dependency>
            <groupId>org.springframework.boot</groupId>
            <artifactId>spring-boot-starter-web</artifactId>
        </dependency>
        <!--Spring Data JPA rely on-->
        <dependency>
            <groupId>org.springframework.boot</groupId>
            <artifactId>spring-boot-starter-data-jpa</artifactId>
        </dependency>
2. Introduce MySQL dependency
        <!--Mysql rely on-->
        <dependency>
            <groupId>mysql</groupId>
            <artifactId>mysql-connector-java</artifactId>
            <version>5.1.42</version>
        </dependency>
        <dependency>
            <groupId>com.alibaba</groupId>
            <artifactId>druid</artifactId>
            <version>1.1.10</version>
        </dependency>
        <!--JSON tool-->
        <dependency>
            <groupId>com.alibaba</groupId>
            <artifactId>fastjson</artifactId>
            <version>1.2.47</version>
        </dependency>
Our information is added to the database, so here we add the dependency between MySQL and Alibaba Druid connection pool. JSON tool will be used below, and we add it in advance.
3. application.properties configuration
#Port number
server.port=8011
#mysql driver
spring.datasource.driver-class-name=com.mysql.jdbc.Driver
#mysql address
spring.datasource.url=jdbc:mysql://localhost:3306/test?useUnicode=true&characterEncoding=utf8
#mysql user name
spring.datasource.username=root
#mysql password
spring.datasource.password=123456
#JPA connection to mysql
spring.jpa.database=mysql
#Run display sql
spring.jpa.show-sql=true
spring.jpa.database represents the database type to which JPA will connect
2, Describes using Spring Data JPA
JPA is the abbreviation of Java Persistence API and its Chinese name is java persistence layer API. It is the mapping relationship between JDK 5.0 annotation or XML description object relational table, and persistes the entity object at run time to the database. Sun introduced the new JPA ORM specification for two reasons: first, simplify the existing Java EE and Java SE application development; Second, sun hopes to integrate ORM technology to realize the unification of the world.
1. Create a new table user
CREATE TABLE `user` (
  `id` int NOT NULL AUTO_INCREMENT,-- Primary key ID
  `username` varchar(100) DEFAULT NULL,-- user name
  `password` varchar(100) DEFAULT NULL,-- password
  `realname` varchar(100) DEFAULT NULL,-- Real name
  `create_time` datetime NOT NULL,-- Creation time
  PRIMARY KEY (`id`)
) ENGINE=InnoDB AUTO_INCREMENT=2 DEFAULT CHARSET=utf8
2. Create a new UserEntity
/**
  * user
  * @date 2019/10/24 11:35
  */
@Entity
@Table(name = "user", schema = "test", catalog = "")
public class UserEntity {

    private int id;
    private String username;
    private String password;
    private String realname;
    private Date createTime;

    @Id
    @Column(name = "id")
    public int getId() {
        return id;
    }

    public void setId(int id) {
        this.id = id;
    }

    @Basic
    @Column(name = "username")
    public String getUsername() {
        return username;
    }

    public void setUsername(String username) {
        this.username = username;
    }

    @Basic
    @Column(name = "password")
    public String getPassword() {
        return password;
    }

    public void setPassword(String password) {
        this.password = password;
    }

    @Basic
    @Column(name = "realname")
    public String getRealname() {
        return realname;
    }

    public void setRealname(String realname) {
        this.realname = realname;
    }

    @Basic
    @Column(name = "create_time")
    public Date getCreateTime() {
        return createTime;
    }

    public void setCreateTime(Date date) {
        this.createTime = date;
    }

    @Override
    public boolean equals(Object o) {
        if (this == o) return true;
        if (o == null || getClass() != o.getClass()) return false;
        UserEntity that = (UserEntity) o;
        return id == that.id &&
                Objects.equals(username, that.username) &&
                Objects.equals(password, that.password) &&
                Objects.equals(realname, that.realname) &&
                Objects.equals(createTime, that.createTime);
    }

    @Override
    public int hashCode() {
        return Objects.hash(id, username, password, realname, createTime);
    }
}- @Entity: represents an entity that needs to be automatically scanned by Spring.
- @Table(name = "user", schema = "test", catalog = ""): name corresponds to the name of the table in the database and the schema of the schema table. We can fill in the database name. The directory of the catalog table is not filled in by default. Generally, we can directly use @ Table(name = "user").
- @Column: corresponds to the field name in the database.
- @ID: indicates the primary key ID.
There is a method to automatically generate JPAEntity on the Internet. We Baidu ourselves.
3. Create a new UserRepository interface and inherit the JpaRepository
public interface UserRepository extends JpaRepository<UserEntity, Integer> {
}
- UserEntity: corresponding entity. If you have other entities, fill in your corresponding entity, or fill in Map.
- Integer: database primary key type.


JpaRepository inherits the interfaces PagingAndSortingRepository and QueryByExampleExecutor, while PagingAndSortingRepository inherits CrudRepository, so the JpaRepository interface has basic addition, deletion, modification, query and paging at the same time. Therefore, we only need to inherit the JpaRepository.
4. Create a new UserController (we don't write the Service layer here for convenience) and inject the UserRepository
The detailed code is as follows:
@RestController
@RequestMapping("/api/system")
public class UserController {

    @Autowired
    private UserRepository userRepository;
}
@RestController is equivalent to the combination of @ Controller and @ ResponseBody. It cannot return pages, and the view parser cannot parse JSP and HTML pages.
@RequestMapping maps the request path.
@Usage rules of Autowired:
- There are candidate beans of this type in the container
- The container can contain multiple candidate beans of this type
- Spring 3. Before x, there could only be one Bean in the spring container, and multiple beans reported an exception, BeanCreationException
- Spring 3. After X, there can be multiple beans. When using @ Autowired, the variable name must be the same as one of the multiple beans of this type (that is, @ Autowired private student; in the above, student is the id of one of the multiple beans)
- If Rule 4 is violated, a BeanCreationException will be thrown
https://cloud.tencent.com/developer/article/1479065
5. Create a new return tool class ResultUtils
/**
  * Define return tool class
  * @date 2019/10/24 11:58
  */
public class ResultUtils {

    /**
    * Successful return
    * @param data
    * @param msg
    * @return
    */
    public static Object success(Object data,String msg){
        Result result = new Result();
        result.setState(true);
        result.setData(data);
        result.setMsg(msg);
        return result;
    }

    public static Object success(String msg){
        Result result = new Result();
        result.setState(true);
        result.setMsg(msg);
        return result;
    }

    public static Object success(Object data){
        Result result = new Result();
        result.setState(true);
        result.setData(data);
        return result;
    }

    public static Object success(){
        Result result = new Result();
        result.setState(true);
        return result;
    }

    /**
    * Error return
    * @return
    */
    public static Object error(){
        Result result = new Result();
        result.setState(false);
        return result;
    }

    public static Object error(String msg){
        Result result = new Result();
        result.setState(false);
        result.setMsg(msg);
        return result;
    }
}
public static class Result{
        private boolean state;//Return status
        private Object data;//Return data
        private String msg;//Return information
        public boolean isState() {
            return state;
        }

        public void setState(boolean state) {
            this.state = state;
        }

        public Object getData() {
            return data;
        }

        public void setData(Object data) {
            this.data = data;
        }

        public String getMsg() {
            return msg;
        }

        public void setMsg(String msg) {
            this.msg = msg;
        }
}
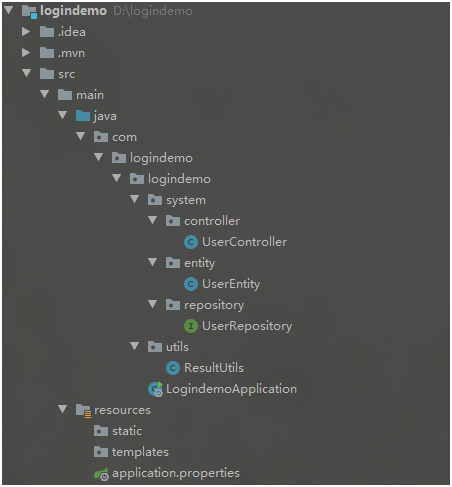
This is my complete directory structure:
6. Add the annotation @ EntityScan("com.logindemo.logindemo.system.entity") in the startup class LogindemoApplication
@Entity scan scans the entities under the specified package when Spring starts. According to my experience, if it is not added, it may return the injection exception. If there are many services, the packages are separated and can be used* Instead.
For example, @ EntityScan("com.logindemo.logindemo. *") is used to scan all entities under logindemo if we have more than system and many other directories.
7. Write a new user method in UserController. The saveUser code is as follows:
    /**
     * New user
     * @return
     */
    @RequestMapping("/saveUser")
    public Object saveUser(){
        UserEntity userEntity = new UserEntity();
        //user name
        userEntity.setUsername("admin");
        //Password note: use Spring Boot's own encryption to encrypt the password
        userEntity.setPassword( DigestUtils.md5DigestAsHex("123456".getBytes()));
        //Real name
        userEntity.setRealname("administrators");
        //Creation time
        userEntity.setCreateTime(new Date());
        //To add a new user, call the Spring Data JPA's own method to add a new user
        UserEntity save = userRepository.save(userEntity);
        //If it is not equal to null, return the tool class we just defined
        if (save!=null){
            return ResultUtils.success("Operation succeeded");
        }
        return ResultUtils.error("operation failed");
    }
Request using browser http://localhost:8011/api/system/saveUser , the browser response returns the message:

Here is a simple demonstration, which will explain the user-defined query when used later.
3, Integrated JWT
1. Introduce JWT dependency
        <dependency>
            <groupId>io.jsonwebtoken</groupId>
            <artifactId>jjwt</artifactId>
            <version>0.9.0</version>
        </dependency>
https://baijiahao.baidu.com/s?id=1608021814182894637&wfr=spider&for=pc
2. What is a Token
Token means "token". It is a string generated by the server as an identification of the client's request.
Composition of simple Token; uid (user's unique identity), time (timestamp of current time), sign (signature).
3. Write a Token generation tool class and create a new JwtUtils tool class, as follows:
package com.logindemo.logindemo.utils;

import com.logindemo.logindemo.system.entity.UserEntity;
import io.jsonwebtoken.Jwts;
import io.jsonwebtoken.SignatureAlgorithm;

import java.util.Date;
/**
 * jwt Tool class
 * @date 2019/10/24 9:38
 */
public class JwtUtils {
    public static final String SUBJECT="test";//Signature publisher
    public static final String APPSECRET="logindemo";//autograph

    /**
     * Generate token
     * @param userEntity
     * @return
     */
    public static String genJsonWebToken(UserEntity userEntity){
        String token="";
        if (userEntity!=null){
            token=Jwts.builder().setSubject(SUBJECT)//publisher
                    .claim("username",userEntity.getUsername())
                    .claim("realName",userEntity.getRealname())
                    .setIssuedAt(new Date())//Issue date
                    .signWith(SignatureAlgorithm.HS256,APPSECRET).compact();//autograph
        } else {
            token="";
        }
        return token;
    }
}
Later, we will use Redis to verify the Token instead of JWT's own verification method.
4. Test to generate Token
public static void main(String[] args) {
    UserEntity userEntity = new UserEntity();
    userEntity.setUsername("admin");
    userEntity.setRealname("administrators");
    System.out.println(genJsonWebToken(userEntity));
    //Input content: eyjhbgcioijiuzi1nij9 eyJzdWIiOiJ0ZXN0IiwidXNlcm5hbWUiOiJhZG1pbiIsInJlYWxOYW1lIjoi566h55CG5ZGYIiwiaWF0IjoxNTcxODkyNDU0fQ. S7pMyYZ_ D_ MSa-JcSKNRTc08bbAsEc8y7vSwgMktp2s
}
Token:
eyJhbGciOiJIUzI1NiJ9.eyJzdWIiOiJ0ZXN0IiwidXNlcm5hbWUiOiJhZG1pbiIsInJlYWxOYW1lIjoi566h55CG5ZGYIiwiaWF0IjoxNTcxODkyNDU0fQ.S7pMyYZ_D_MSa-JcSKNRTc08bbAsEc8y7vSwgMktp2s
The above is the Token we generated.
A Token is a string of strings generated by the server as a Token requested by the client. After the first login, the server generates a Token and returns the Token to the client. Later, the client only needs to bring the Token to request data without bringing the user name and password again.
4, Integrate Redis (Redis service needs to be built by yourself)
Redis installation reference under Windows:
https://www.cnblogs.com/W-Yentl/p/7831671.html
Redis installation under Linux reference:
https://www.cnblogs.com/zuidongfeng/p/8032505.html
1. Introduce Redis dependency
        <dependency>
            <groupId>org.springframework.boot</groupId>
            <artifactId>spring-boot-starter-data-redis</artifactId>
        </dependency>
2. application. Redis properties configuration
#Redis
#Redis address
spring.redis.host=39.96.167.196
#Redis port
spring.redis.port=6379
#Redis password (can not be written if it is not set)
spring.redis.password=******
#Redis timeout
spring.redis.timeout=10000
#Redis database index (0 by default)
spring.redis.database=0
3. Write Redis tool class
package com.logindemo.logindemo.utils;

import org.springframework.beans.factory.annotation.Autowired;
import org.springframework.data.redis.core.StringRedisTemplate;
import org.springframework.stereotype.Component;
import javax.annotation.PostConstruct;
import java.util.concurrent.TimeUnit;

/**
 * Redis Tool class
 * @date 2019/10/24 12:58
 */
@Component
public class RedisUtils {

    @Autowired
    public StringRedisTemplate redisTemplate;

    public static RedisUtils redisUtils;

    /**
     * This method is loaded only once when Spring starts
     */
    @PostConstruct
    public void init(){
        redisUtils=this;
        redisUtils.redisTemplate=this.redisTemplate;
    }

    /**
     *redis Save data and set cache time
     * @param key key
     * @param value value
     * @param time second
     */
    public void set(String key,String value,long time){
        redisUtils.redisTemplate.opsForValue().set(key, value, time, TimeUnit.SECONDS);
    }


    /**
     * redis Store data
     * @param key key
     * @param value value
     */
    public void set(String key,String value){
        redisUtils.redisTemplate.opsForValue().set(key, value);
    }

    /**
     * Get expiration time according to key
     * @param key
     * @return
     */
    public Long getExpire(String key){
        return redisUtils.redisTemplate.getExpire(key,TimeUnit.SECONDS);
    }

    /**
     * Determine whether the key exists
     * @param key
     * @return
     */
    public Boolean hasKey(String key){
        return redisUtils.redisTemplate.hasKey(key);
    }

    /**
     * Set the expiration time according to the key
     * @param key key
     * @param time second
     * @return
     */
    public Boolean expire(String key,long time){
        return redisUtils.redisTemplate.expire(key,time , TimeUnit.SECONDS);
    }
}
5, Write login interface in UserController
1. Inject RedisUtils into UserController
    @Autowired
    private RedisUtils redisUtils;
Here, we can directly use @ Autowired auto injection.
2. UserRepository method
    /**
     * Query whether the user exists according to the user name
     * @param username
     * @return
     */
    int countByUsername(String username);

    /**
     * Query password according to user name
     * @param username
     * @return
     */
    @Query(value = "select * from user where username=?1",nativeQuery = true)
    UserEntity getPassword(String username);
Introduction to custom writing:
- The countByUsername method is a dynamic SQL query of Spring Data JPA.
- count stands for quantity. ByUsername is queried according to user name. Note that the initial letter of the condition must be capitalized. The overall meaning is to query quantity according to user name.
- countByUsername is the same as select count (1) from user where username='admin '.
Example: query the number of users according to user name and password
int countByUsernameAndPassword(String username,String password);
-m if there are still conditions, you can continue to splice And. If the relationship of "Or" is used, the initial letter of Or must also be capitalized
- If you need to query, the user needs to use find, which is similar to count. You only need to replace count with find
Description of @ Query annotation:
@Query(value = "select * from user where username=?1",nativeQuery = true)
UserEntity getPassword(String username);
- nativeQuery = true ` indicates that the native SQL query is used
- ? 1 ¢ represents the first parameter. If there is a password besides username, the writing method is as follows:
@Query(value = "select * from user where username=?1 and password=?2",nativeQuery = true)
UserEntity getPassword(String username,String password);
Write @ Param as follows:
@Query(value = "select * from user where username=:username and password=:password",nativeQuery = true)

UserEntity getPassword(@Param("username") String username,@Param("password") String password);
The above two writing methods depend on your personal preferences.
For naming rules of Spring Data JPA methods, please refer to:
https://blog.csdn.net/qq8057656qq/article/details/86744132
3. Login interface code
    /**
     * Login interface
     * @param request
     * @return
     */
    @PostMapping("/login")
    public Object login(@RequestBody String request){
        JSONObject jsonObject = JSON.parseObject(request);//Convert to JSON object
        if (jsonObject.get("username")==null&&"".equals(jsonObject.get("username").toString())){
            return ResultUtils.error("User name cannot be empty");
        }
        if (jsonObject.get("password")==null&&"".equals(jsonObject.get("password").toString())){
            return ResultUtils.error("User name cannot be empty");
        }
        String username = jsonObject.get("username").toString();
        String password = jsonObject.get("password").toString();
        if (userRepository.countByUsername(username)>0){//Determine whether the user exists
            UserEntity userEntity = userRepository.getPassword(username);//Password in database
            if (DigestUtils.md5DigestAsHex(password.getBytes()).equals(userEntity.getPassword())){//Verify that the passwords are consistent
                String token = JwtUtils.genJsonWebToken(userEntity);//Get Token
                redisUtils.set(token,userEntity.getRealname(),60);//After successful login, put the token into Redis Key to save the token, and value to save the user's real name
                //After successful login, return the token and real name
                Map<String,Object> map = new HashMap<>();
                map.put("realname",userEntity.getRealname());
                map.put("token",token);
                return ResultUtils.success(map,"Login succeeded");//Login succeeded
            }
            return ResultUtils.error("Password error, please re-enter");
        } else {
            return ResultUtils.error("user name does not exist");
        }

    }
Because we use the @ PostMapping annotation, we can't use the browser to request directly in the later test (the browser request uses the GET request).
If you don't understand the @ RequestBody annotation, you can refer to it
https://www.jianshu.com/p/c1b8315c5a03
There are many tools for converting JSON strings to JSON objects. Here we use Alibaba's.
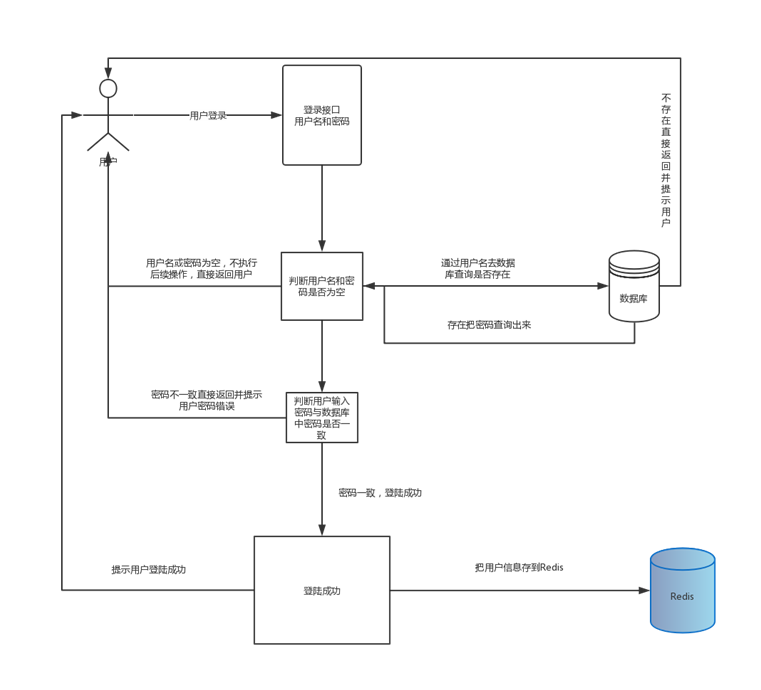
General process:
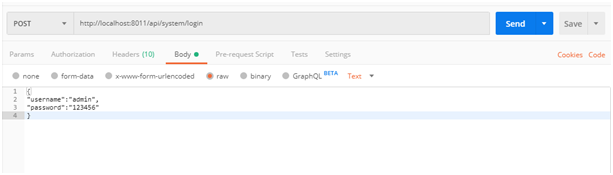
4. Use Postman to request the address
http://localhost:8011/api/system/login
Request JSON:
{
"username":"admin",
"password":"123456"
}
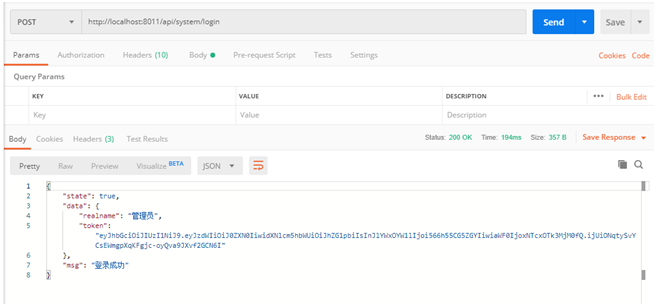
Return data:
{
"state": true,
"data": "login succeeded",
"msg": "Administrator"
}
6, Writing Spring Boot interceptors
1. Create a new package config and a new class WebSecurityConfig to inherit WebMvcConfigurationSupport
2. Add @ Configuration annotation to websecurityconfig
@The Configuration annotation on the class is equivalent to taking the class as the XML Configuration file of Spring. Its function is to configure the Spring container (application context).
3. Implement addInterceptors method and configure user-defined interception
    /**
     * Configure custom interceptors
     * @param registry
     */
    public void  addInterceptors(InterceptorRegistry registry){
        InterceptorRegistration addInterceptor = registry.addInterceptor(getSecurityInterceptor());
        List<String> list = new ArrayList<>();
        list.add("/api/system/saveUser");//Release new user interface address
        list.add("/api/system/login");//Release login interface address
        addInterceptor.excludePathPatterns(list);
        addInterceptor.addPathPatterns("/**");//Block all requests
    }
4. Create a new internal class SecurityInterceptor in WebSecurityConfig, inherit the HandlerInterceptorAdapter, and implement the preHandle method
- preHandle call time: the Controller method returns true and false before processing. If false is returned, the execution will be interrupted, otherwise the execution will continue. In addition to preHandle, there are postHandle and afterCompletion methods. postHandle is called after the Controller method is processed and before rendering the view.
- afterCompletion is invoked after rendering the view.
Here we only implement the preHandle method.
5. Inject SecurityInterceptor into WebSecurityConfig and add annotation @ Bean to the method
Note: @ Bean should be used with @ Configuration (you don't need to add @ Configuration when using the startup class).
6. Inject RedisUtils tool class into WebSecurityConfig class and improve preHandle method
The overall code is as follows:
package com.logindemo.logindemo.config;

import com.logindemo.logindemo.utils.RedisUtils;
import org.springframework.beans.factory.annotation.Autowired;
import org.springframework.context.annotation.Bean;
import org.springframework.context.annotation.Configuration;
import org.springframework.web.servlet.config.annotation.InterceptorRegistration;
import org.springframework.web.servlet.config.annotation.InterceptorRegistry;
import org.springframework.web.servlet.config.annotation.WebMvcConfigurationSupport;
import org.springframework.web.servlet.handler.HandlerInterceptorAdapter;
import javax.servlet.ServletOutputStream;
import javax.servlet.http.HttpServletRequest;
import javax.servlet.http.HttpServletResponse;
import java.io.IOException;
import java.io.OutputStreamWriter;
import java.util.ArrayList;
import java.util.List;

/**
 * Login interception configuration
 */
@Configuration
public class WebSecurityConfig extends WebMvcConfigurationSupport {

    @Autowired
    private RedisUtils redisUtils;

    /**
     * Inject Bean to let Spring scan SecurityInterceptor
     * Otherwise, the filter will not work
     * @return
     */
    @Bean
    public SecurityInterceptor getSecurityInterceptor(){
        return new SecurityInterceptor();
    }

    /**
     * Configure custom interceptors
     * @param registry
     */
    public void  addInterceptors(InterceptorRegistry registry){
        InterceptorRegistration addInterceptor = registry.addInterceptor(getSecurityInterceptor());
        List<String> list = new ArrayList<>();
        list.add("/api/system/saveUser");//Release new user interface address
        list.add("/api/system/login");//Release login interface address
        addInterceptor.excludePathPatterns(list);
        addInterceptor.addPathPatterns("/**");//Block all requests
    }

    private class SecurityInterceptor extends HandlerInterceptorAdapter {

        /**
         * Called before the business processor processes the request

         */
        @Override
        public boolean preHandle(HttpServletRequest request, HttpServletResponse response, Object handler) throws IOException {
            ServletOutputStream out = response.getOutputStream();//Create an output stream
            OutputStreamWriter ow=new OutputStreamWriter(out,"utf-8");//Set the coding format to prevent Chinese characters from being garbled
            String token = request.getHeader("token");//Get Token
            if(token!=null){//Judge whether the Token is empty
                if (redisUtils.hasKey(token)){//Judge whether the Token exists
                    redisUtils.expire(token,60); //If the Token exists, re assign the expiration time and release it
                    return true;
                }
                ow.write("token Error, please login again");//Information to return
                ow.flush();//Flush out the flow and send all buffered data to the destination
                ow.close();//Close flow
                return false;//intercept
            }
            ow.write("token Null, please login again");//Information to return
            ow.flush();//Flush out the flow and send all buffered data to the destination
            ow.close();//Close flow
            return false;//intercept
        }
    }
}
When sending a request, the user will first enter the addInterceptors method. If there is a path to be intercepted, the user will enter the preHandle method. Pass request. In the preHandle method Getheader ("Token") gets the Token (the Token will be put into the request header during the test). If there is no direct release in addInterceptors, the request path will not enter the preHandle method.
Here, we can echo the error message to the user through the output stream.
7. To facilitate viewing the effect, add the findAll method in UserController to return all users
    /**
     * Get all users
     * @return
     */
    @RequestMapping("/findAll")
    public Object findAll(){
        List<UserEntity> all = userRepository.findAll();
        for (UserEntity temp:all) {
            temp.setPassword(null);//Filter passwords
        }
        return all;
    }
Here, we cycle all user passwords to empty. No matter what business it is, as long as the information echoed to the user, the password is generally not displayed
7, Use Postman test
1. First, we directly access the findAll method
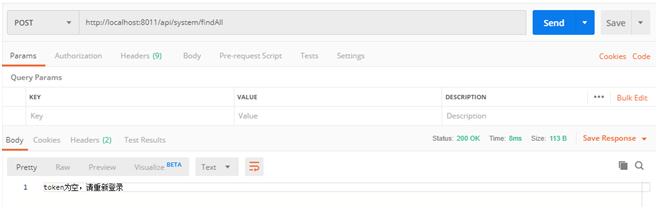
Prompt Token is empty, please login again.
2. Call the login interface to log in
3. Fill the returned Token into the Headers of findAll address
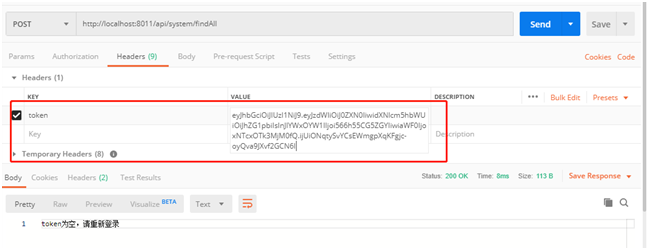
4. Re request findAll method

We can see that our request has been successful!