JSR303 data verification
Let's see how to use it first
In Springboot, @ validated can be used to verify the data. If the data is abnormal, exceptions will be thrown uniformly to facilitate the unified processing of the exception center. Let's write a comment here so that our name can only support Email format;
@Component //Register bean
@ConfigurationProperties(prefix = "person")
@Validated  //data verification
public class Person {


    @Email(message="Email format error") //name must be in mailbox format
    private String name;
}
Running result: default message [not a legal email address];

Using data verification can ensure the correctness of data;
Common parameters
@NotNull(message="Name cannot be empty")
private String userName;
@Max(value=120,message="The oldest can't check 120")
private int age;
@Email(message="Email format error")
private String email;


Empty check
@Null       Verify that the object is null
@NotNull    Verify that the object is not null, Cannot check string with length 0
@NotBlank   Check whether the constraint string is Null And by Trim Is the length greater than 0,String only,And the spaces before and after will be removed.
@NotEmpty   Check whether the constraint element is NULL Or EMPTY.

Booelan inspect
@AssertTrue     verification Boolean Whether the object is true
@AssertFalse    verification Boolean Whether the object is false

Length check
@Size(min=, max=) Validation object( Array,Collection,Map,String)Is the length within the given range
@Length(min=, max=) string is between min and max included.


Date check
@Past       verification Date and Calendar Is the object before the current time
@Future     verification Date and Calendar Is the object after the current time
@Pattern    verification String Whether the object conforms to the rules of regular expressions


.......wait
 In addition, we can also customize some data verification rules
Multi environment switching
profile is Spring's support for different configuration functions for different environments. You can quickly switch environments by activating different environment versions;
Multi profile
When we write the main configuration file, the file name can be application - {profile} Properties / YML, used to specify multiple environment versions;
For example:
application-test.properties represents the test environment configuration
application-dev.properties represents the configuration of the development environment
However, Springboot does not start these configuration files directly. It uses application. Com by default Properties master configuration file;
We need to select the environment to be activated through a configuration:
#For example, if the dev environment is specified in the configuration file, we can test by setting different port numbers;
#When we start SpringBoot, we can see that the configuration has been switched to dev;
spring.profiles.active=dev
Multiple document blocks in yaml
It is the same as in the properties configuration file, but it is more convenient to use yml to implement it without creating multiple configuration files!
server:
  port: 8081
#Select the environment block to activate
spring:
  profiles:
    active: prod


---
server:
  port: 8083
spring:
  profiles: dev #Name of the configuration environment


---


server:
  port: 8084
spring:
  profiles: prod  #Name of the configuration environment
Note: if both yml and properties are configured with ports and no other environment is activated, the properties configuration file will be used by default!
Configuration file loading location
There are many ways to load configuration files externally. We can select the most commonly used one and configure it in the developed resource file!
Official external configuration file description reference document
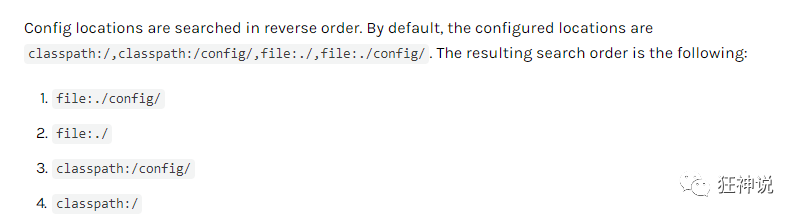
springboot startup will scan the application in the following location Properties or application YML file as the default configuration file of Spring boot:
Priority 1: under the project path config Folder profile
 Priority 2: configuration file under project path
 Priority 3: under resource path config Folder profile
 Priority 4: configuration file under resource path
The priority is from high to bottom, and the configuration of high priority will overwrite the configuration of low priority;
SpringBoot will load all the main configuration files from these four locations; Complementary configuration;
We set a project access path configuration in the lowest level configuration file to test the complementarity problem;
#Configure the access path of the project
server.servlet.context-path=/kuang
Development, operation and Maintenance Tips
Load the configuration file at the specified location
We can also use spring config. Location to change the default configuration file location
After the project is packaged, we can use the form of command line parameters to specify the new location of the configuration file when starting the project; In this case, there are usually many operations in the later stage. For the same configuration, the externally specified configuration file has the highest priority
java -jar spring-boot-config.jar --spring.config.location=F:/application.properties
Original link: https://blog.csdn.net/qq_33369905/article/details/106647295